Ausmo Posted January 18, 2011 Share Posted January 18, 2011 I have taken the plunge and placed an order for the RV-12 kit. :big_grin: The AUS $ looks pretty good just now so I have committed to the empennage/tailcone, wing, fuselage and finishing kit components. Let me tell you the hand shook a bit when I hit the send button with the credit card details for that lot! All done now though and I am eagerly and impatiently awaiting the eagle's landing. I thought I should use the waiting time to get a bit organised in the workshop. I would be particularly interested in hearing from all you experienced RV builders out there what particular tools/tool kits you acquired and where you sourced these. Also your experience with these -any tips and pointers would be much appreciated. Cheers Erik Link to comment Share on other sites More sharing options...
rgmwa Posted January 18, 2011 Share Posted January 18, 2011 Hi Erik, I've just finished the empenage kit and am a bit over 200 hours into the build. Wings and fuse kits are sitting on the shed floor, and the finishing kit should be here soon (also taking advantage of the strong Aussie dollar). I assume you know about the RV-12 forum on the VAF website, which is a great place for all kinds of help and information. http://www.vansairforce.com/community/forumdisplay.php?f=73 I got my tools from Isham (http://www.planetools.com), who are one of the recommended toolkit suppliers on Van's website. Avery and Cleaveland are the other two main ones. The tool kits have pretty much everything you need, except a compressor for the pneumatic riveter (essential). I got my riveter with the kit, but you could just as easily get a good one from some place like Repco or Supercheap Autos. I'd also suggest you order a Scotchbrite wheel with the tool kit. I've got mine mounted on a handy little Ryobi grinder and belt sander - $150 from Bunnings. The sanding belt is very useful, although a lot of preparation is done with hand files and scotchbrite pads. You'll probably find 80% of your time is spent preparing parts (depending on how much you decide to prime), and the other 20% putting them together. There's a lot of repetitive work in building a plane, but it's good to see it all come together into recognisable aircraft parts. You will also need a hand drill, cordless or otherwise. I use a normal 10mm Makita as it's smaller and lighter than most cordless types (and there's no battery to go flat). Also essential is a drill press - doesn't have to be a big one. Same goes for a bandsaw - not essential but very handy. A good 4 or 6 inch vice is another must have. You can never have too much bench and storage space. I have two worktables on lockable casters, plus some fixed benches. My main one has a hollow core door as a benchtop - nice and flat. Make sure it overhangs the frame by 50mm or so, because you'll sometimes want to clamp things in place. You will also need good lighting. I've got half a dozen fluros hanging above the main work area. Another tool I'd suggest getting is the Cleaveland edge breaking tool, which you will need for the tailcone. There's plenty of information about it on the VAF site. Lastly, a 10x/20x magnification jeweller's loupe (plenty on eBay) is good for checking your work close up - like countersunk holes, deburred edges etc. I bought one thinking I might use it once or twice, but it's been used a lot. Here's a picture of my setup (if it uploads). [ATTACH]12918.vB[/ATTACH] Hope that helps. I'm sure others will add their comments. rgmwa Link to comment Share on other sites More sharing options...
crashley Posted January 18, 2011 Share Posted January 18, 2011 rv12 hi congratulations on your project I have finished my 12 and it is geat if you need any info give me a call ashley Link to comment Share on other sites More sharing options...
denmit Posted January 18, 2011 Share Posted January 18, 2011 Great decision Ausmo - this is an extremely well engineered kit. RGMWA has covered off what tools you'll need - the only suggestion I'd make is to ensure the rivet squeezer supplied in any tool kit is manageable. There are a lot of squeezed rivets in a 12, and some squeezers are just to big and heavy to manoeuvre around the tighter spots. I bought a Cleaveland Mainsqueeze with a 3" yoke, which I love - the quality of my riveting became spot-on, meaning I wasn't drilling out rivets which set poorly with the cumbersome ATS squeezer. Cleaveland Tools do an RV-12 tool kit, see their website: http://www.cleavelandtoolstore.com. You can download their cattledog, or just look up what you need. The Cleaveland edge forming tool is the best bit of kit out there for putting the little bend in skin edges to make sure they sit flat. For fine work I just bought a pair of 1X magnifying glasses from the local service station for $5 - works for me - but good lighting is still a must-have. I also use 1" and 3" Scotchbrite wheels in a high speed electric drill for deburring long cumbersome items like spars - great for lightening holes too, so I would recommend them strongly. Note also that a 120 degree countersink cutter is necessary for some C/S pulled rivets. I also got three countersink cages and have set them for the correct depth for each rivet type (3/16, 1/8 and CS-4). That way I don't have to reset the depth of cut on the cage and do test countersinks every time a rivet size changes. One problem I can foresee for you will be the sheer volume of components you will have to store and - most importantly - readily retrieve. Vans only allows you 30 days to inventory the kits, afetr which they will not replace anything missing or damaged. I've had bits missing (mostly hardware) from both my kits, so an inventory is a must, meaning you will have to unpack everything to check that it is all there. Once it is all unpacked you will need to put it all somewhere that is safe from damage (particularly skins) but that you can instantly retrieve. I wrote down on the packing list where I stored stuff so that, if I couldn't put my hands on it straight away (frustrating when you're in full-on build mode), I could just look up the packing list for the location. Have fun with it Ausmo, and don't hesitate to put your hand up on this forum or Vans Airforce for assistance. As Crashley says above and RGMWA demonstrates, we are all more than happy to help. Denmit VS, rudder, HS complete, tailcone underway. Link to comment Share on other sites More sharing options...
Ausmo Posted January 19, 2011 Author Share Posted January 19, 2011 Thanks guys for your prompt and very helpful advice - which of course I will take! I had not thought of the task of inventory and storage of all the kit components. Indeed I imagine that will take some thought and planning! I have already found the Vans Airforce forums and looked at a number of builder's logs and blogs. These all seem to be an incredibly helpful source of advice. I apprerciate your kind offer of help and will no doubt be calling on that. Vans have advised they will be shipping in about 8 weeks. I heard a word that there might be a builder in Murray Bridge in SA, does anyone have any knowledge of such a person? Cheers Erik Link to comment Share on other sites More sharing options...
rgmwa Posted January 19, 2011 Share Posted January 19, 2011 I heard a word that there might be a builder in Murray Bridge in SA, does anyone have any knowledge of such a person?Cheers Erik Current list of RV-12 builders, compiled by Marcus last week (with a couple of my additions): Jim Tatlock - Geelong Rod Clark - Byron Bay Brian Howard - Gold Coast Alan Saunders - Gisborne Tony Earle - Port Maquarie (Flying) Marcus Bootle - Riddells Creek Ashley Hiscock - Hazlewood North (Flying) Stephen Vandervelden - Cranborne North Robert Melis - Perth Roger Russell - Sydney Dennis Mitchell - Queanbeyan Dave Hastwell - Adelaide (kit ordered) "Dunx" - Ravensthorpe WA (kit ordered) "Ausmo" - Barossa Valley SA (kit ordered) There may be others who aren't on the list, and I believe there are three under construction in NZ. Link to comment Share on other sites More sharing options...
Gnarly Gnu Posted January 24, 2011 Share Posted January 24, 2011 Congrats Erik, hope your build goes smoothly. Not to go OT but I find for large overseas purchases transferring money is vastly cheaper through organisations like Currencyonline or Ozforex.... cheaper than a bank transfer and lots cheaper than many credit cards who like to take a nice % off the top. There again the A$ is quite nice right now as you say, that tends to compensate somewhat. I have no connection to these financial companies but I am going through a similar purchasing process at the moment. Link to comment Share on other sites More sharing options...
denmit Posted January 24, 2011 Share Posted January 24, 2011 Spot on Gnarly, I've used Ozforex (a Macquarie Bank subsidiary) exclusively for kits and other lumpy overseas purchases and saved a modest but nevertheless welcome sum. They are good to deal with too. Cheers, Denmit Link to comment Share on other sites More sharing options...
Ausmo Posted January 25, 2011 Author Share Posted January 25, 2011 Thanks for the great advice guys - unfortunately a tad late in this instance. I will certainly take advantage when it comes time to purchase the balance of the kit. Cheers Erik Link to comment Share on other sites More sharing options...
rgmwa Posted January 25, 2011 Share Posted January 25, 2011 My experience too. I fell into the credit card trap first time around, but have used bank transfers since. rgmwa Link to comment Share on other sites More sharing options...
Gnarly Gnu Posted January 26, 2011 Share Posted January 26, 2011 Just checked with my bank (Westpac) current AU - US exchange rate is 0.97 plus a $20 fee while Currencyonline is 0.987 at the moment with no fee on larger amounts. Nice cash saving when you need to pay for an engine or something big, I found COL the cheapest (that I would trust anyway). Link to comment Share on other sites More sharing options...
Yenn Posted January 29, 2011 Share Posted January 29, 2011 All good info here and about all I can add is that the storage you need for all the kit pieces will also need extra for all the finished pieces, which are waiting for final assembly. At the momebnt I have one wing, the horiz stabiliser, rudder an aileron and a couple of flaps hanging from the rafters in my sheds. I used the packing cases as workbenches. One tip is make an inventory of whatever is left in any packing case, also if you can't find any piece when you do the inventory, lift out all the cardboard etc. I was missing the 2 horiz. stab stiffeners, about 1.5m long and 50mm thick. They were under what I thought was the bottom layer of cardboard. You will probably be horrified by the amount of butchers paper you have when it is all unloaded. I shall have to have a look at what the RV12 is, I am building a 4. Best of luck and enjoy the build. Link to comment Share on other sites More sharing options...
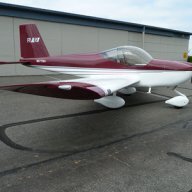
rgmwa Posted January 29, 2011 Share Posted January 29, 2011 I shall have to have a look at what the RV12 is, I am building a 4. Best of luck and enjoy the build. Here you go Yenn. This is an RV-12. It's not as fast as your -4, and it isn't aerobatic either, but it goes well and looks pretty good too. (Click on the image to enlarge it). rgmwa [ATTACH]12987.vB[/ATTACH] Link to comment Share on other sites More sharing options...
Recommended Posts
Create an account or sign in to comment
You need to be a member in order to leave a comment
Create an account
Sign up for a new account in our community. It's easy!
Register a new accountSign in
Already have an account? Sign in here.
Sign In Now