kgwilson Posted March 31, 2012 Author Share Posted March 31, 2012 There was a very long thread dedicated to this incident. See http://www.recreationalflying.com/threads/old-bar-ferris-wheel-incident.28587/page-29#post-194612 I do not intend to add anything more. 1 Link to comment Share on other sites More sharing options...
Bernie Knight Posted April 1, 2012 Share Posted April 1, 2012 Kevin, Alan - thanks will make sure I catch up with them. No doubt they will be busy and I will head up to their base to possibly take a better look. I have seen figures of 130 cruise. I have also seen some discussion here on the Forum where owners had made some real improvements to the cruising speed. I will have a look for this again - no doubt Gary and his Morgan owners will be up on this.. Link to comment Share on other sites More sharing options...
bacon Posted May 21, 2012 Share Posted May 21, 2012 Hi Kevin Hows the build coming along? You have done a great job so far in not very long, I've got the start of my kit waiting at home for me (0nce I get home from work). Only three more days and I will be able to start the build . Cheers Jamie Link to comment Share on other sites More sharing options...
damkia Posted May 21, 2012 Share Posted May 21, 2012 I have done a bit this month and now have the fuselage 90% complete with only 90% to go. The quote of all quotes Link to comment Share on other sites More sharing options...
kgwilson Posted May 21, 2012 Author Share Posted May 21, 2012 Hi Jamie, Garry & Kristine flew up to Grafton the other day for a cup of coffee & he mentioned to me that you were about to start your build. I don't seem to have made a lot of progress since the end of March but my log shows 33.5 hours work. Total hours to date is 289. I bonded the trailing edges of the rudder & elevators so put a bead of lightweight filler on them & sanded it back so the trailing edges are seamless. I also cleaned up the elevator tips & filled & sanded to remove any trace of the mould seam & did the same for the inboard ribs so it all looks like 1 piece. Filled other gaps like the fin to turtledeck & turtledeck to rear bulkhead. All the hand sanding seemed to take forever but it looks good. I also went down to the local surfboard factory & they gave me some polyurethane foam offcuts to make the fin & rudder tips. I shaped the foam and glued it on with polyester resin & then covered it with some glass cloth & polyester, added some filler & sanded it all back. I have recently installed the axles on the undercarriage & set up the disc callipers cutting out the shape in the leg ends. I reckon it's pretty important to get the axle camber & toe in spot on for nice straight taxiing with the castoring nosewheel so without any fancy tools I put the undercarriage leg on & levelled the fuselage both horizontally & longitudinally. I marked the centreline on each side of the U/C leg where the axles will be bolted in & with a vertical level, marked the centreline spot on the floor & put a straight edge across. I did the same each side of the firewall. Each side was not perfect but I made sure I got them both 90 deg to the A/C centreline. I was then able to set the camber 17mm down & toe in 3.2mm forward with my level clamped to a block of wood & marking & measuring the distances. I am just going to install the forward hatch door & then move the fuselage outside and under a weatherproof lean to at the side of the house so I can build the wings. I am going down to Taree for a day to run through all this with Garry before I start & am thinking of installing wing tanks to give me 170 litres total capacity. I'll post some progress photos tomorrow. Cheers Kevin 1 Link to comment Share on other sites More sharing options...
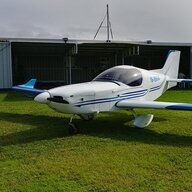
kgwilson Posted May 22, 2012 Author Share Posted May 22, 2012 Some progress photos 1 Link to comment Share on other sites More sharing options...
Virago Posted May 22, 2012 Share Posted May 22, 2012 Hi Kevin, Great pics! You're making real good progress and I can see you're going to end up with a superb aircraft! Neat work buddy! Now, if I could just get my act into gear and upload some photos... John. Link to comment Share on other sites More sharing options...
gareth lacey Posted May 22, 2012 Share Posted May 22, 2012 Hi Kevin looking good great work cheers gareth Link to comment Share on other sites More sharing options...
conran Posted September 21, 2012 Share Posted September 21, 2012 Some progress photos [ATTACH]17599[/ATTACH][ATTACH]17600[/ATTACH][ATTACH]17601[/ATTACH][ATTACH]17602[/ATTACH] Have you manage to get the brakes to work in this position? Link to comment Share on other sites More sharing options...
kgwilson Posted September 25, 2012 Author Share Posted September 25, 2012 I haven't done the final installation but I have followed the Matco manual & installed the floating callipers at the rear of the undercarriage leg. They can go in front but putting them on the back gives easy access to the bleed nipple. I have put the wheels on & the callipers float freely so I can't see any reason why they would not work. Link to comment Share on other sites More sharing options...
conran Posted September 26, 2012 Share Posted September 26, 2012 Thanks I have trouble getting them to work at all on one side and poor on the other. Garry thinks its the pedal angle. But I'm not sure, I thinks it's at the callipers. I need to go over them. Did you change the rudder pedals? Link to comment Share on other sites More sharing options...
kgwilson Posted September 26, 2012 Author Share Posted September 26, 2012 I haven't done the hydraulics yet but I have set the rudder pedals so they are vertical when the rudder is straight & there is no pressure on the master cylinders. It is essential to get the pedal geometry right. To get the required 450 psi to achieve the rated torque of the brake pad on the disc you need a minimum of 2.5 to 1 mechanical advantage. This is explained in the Matco Technical Service Bulletin. If you have Matco WE51L brakes I have a pdf file of the TSB I can send you. Most manuals etc are available on the Matco website anyway. Also make sure that the callipers are floating freely. If the torque on the axle bolts which hold the brake plate on is different for each bolt, the moveable brake shoe socket head cap screws can jam in the brake plate bushing. This might mean it is hard to apply the brake & when it is applied it won't release. Kevin Link to comment Share on other sites More sharing options...
conran Posted September 26, 2012 Share Posted September 26, 2012 Thanks Kevin it does sound like the callipers are not floating as you say. I'll look into that next cheers Did you set the rudder pedals and master cylinders to the ply floor? Link to comment Share on other sites More sharing options...
kgwilson Posted September 27, 2012 Author Share Posted September 27, 2012 Thanks Kevin it does sound like the callipers are not floating as you say. I'll look into that next cheersDid you set the rudder pedals and master cylinders to the ply floor? Yes I did. I took some photos of Garry's installations & did pretty much the same. Link to comment Share on other sites More sharing options...
Garry Morgan Posted September 27, 2012 Share Posted September 27, 2012 Hi Josh, I tried to ring you about your problem today,is the peddle sponge or does it go hard when pressure is applied? when bleding from the bottom to the top, you need to tap the peddle to get the air out of the cylinder, we worked on a break for 6 weeks to get it right because of air in the cyl. Link to comment Share on other sites More sharing options...
conran Posted September 27, 2012 Share Posted September 27, 2012 No mate, it's not spongy, same as it was when you used it. It must be at the calipers. I'll look at it when I get it going again Link to comment Share on other sites More sharing options...
kgwilson Posted September 28, 2012 Author Share Posted September 28, 2012 I have just realised I have not posted anything on my build progress since May. After getting the brakes and axles done & cutting a hole for the forward hatch I made a frame from some 1.6mm angle & cut out the door from some spare 025 thou sheet & used a bit of lightweight continuous hinge & riveted the assembly to the frame. I will use some camlock screws to hold it shut. The next thing was to make to wing spars. This required tapering the upper and lower aluminium angles & cutting & fitting the spar webbing, doubler plates, mounting plates & spacers. There was lots of sanding down to 600g to make sure there were no scratches across the spar angles & then etch priming everything before assembly. All solid 5/32 rivets are used for the spar & I didn't have an air hammer or a 5/32 rivet snap fitting. While pondering the option of manually riveting hundreds of rivets I was in Aldi one day & they had an air hammer there for $11.99. It looked as good as any other I'd seen & a snap fitting from Aircraft Spruce was pretty cheap so that was it. I checked out some youtube videos of solid riveting & set some practice rivets up & it was easy. I found that good strong pressure on the riveter & dolly are essential but now understand why solid rivets are much stronger than welds. I had to get the fuselage back out from around the side of the house & cut the main spar & drag spar holes before fitting the spars to set the dihedral. As I am building everything in half a double garage the only flattish area to set it up was the footpath in front of my house. This required levelling everything with a string line & level a making some wood supports for the tips of the spars. Then it was just a matter of clamping the spars in place & riveting the spar location angles to the steel central frame. When I had that right I clecoed the root ribs in place & checked the drag spar location & was very happy that without any adjustment at all I had the drag spar locations for each wing less than 1mm different & the trailing edges of the root ribs were exactly lined up with the bottom of the fuselage as they should be. Next will be the rest of the ribs, installation of the drag spar & setting the washout before installing the D box leading edge sheet. [/ATTACH] Link to comment Share on other sites More sharing options...
kgwilson Posted October 13, 2012 Author Share Posted October 13, 2012 Well I have the left hand wing ready for the D-box skin. After fitting all the ribs, drilling holes for the drag spar, fitting that & clamping everything down I then levelled the leading edge with a water level & set the washout at the tip. Once that was all clamped up it was just a simple matter of glassing the drag spar to the ribs. Then I bent up & bolted the drag strut in place with the steel sleeve inserted. I always knew it but once done the strength of this wing is quite apparent & I am a long way from completion. The washout still needs to be re-done when the wing is fully skinned as there are all sorts of other goodies to be installed before then. Link to comment Share on other sites More sharing options...
kgwilson Posted December 7, 2012 Author Share Posted December 7, 2012 The D-box is now riveted in place on both wings using csk rivets which required dimpling all holes in the sheet & countersinking all the holes in the main spar. I am now installing the 2 wing tanks. I will install outboard quick release fuel connectors at the root rib & run the fuel line through a L/R/Off selector to an electric transfer pump to pump fuel into the main tank. Total fuel capacity is around 170 litres. Some progress pics of the wing including setting the washout, rivet detail & about to pull the D-box skin on. Link to comment Share on other sites More sharing options...
Virago Posted December 7, 2012 Share Posted December 7, 2012 Hi Kevin, I never cease to admire your workmanship. Your setting a high standard to which I am trying real hard to attain. John. Link to comment Share on other sites More sharing options...
kgwilson Posted December 8, 2012 Author Share Posted December 8, 2012 Hi Kevin, I never cease to admire your workmanship. Your setting a high standard to which I am trying real hard to attain.John. Hi John, How is your build progressing? I will be taking mine up to the aerodrome after New Year to fit the wings, ailerons & flaps, engine & everything else. I've managed to buy in to a hangar quite cheaply, well its more like a garage with wing extensions but it keeps the weather & prying eyes off everything. Kevin Link to comment Share on other sites More sharing options...
Virago Posted December 8, 2012 Share Posted December 8, 2012 Hi Kevin, I am still working on the fuselage. It is at a stage where I could skin the sides (the bottom skin is on) but I am presently fitting wiring looms and other fiddly bits while I have easy access. I have also done the mounting brackets for autopilot pitch and roll servos. I have done the instrument panel layout and have cut all the required holes. When I work out how to post images on this site I'll do so. Keep up the good work mate! John. Link to comment Share on other sites More sharing options...
kgwilson Posted December 9, 2012 Author Share Posted December 9, 2012 When I work out how to post images on this site I'll do so. John. Hi John, It is very simple. Just click on the "Upload a File" button when you are creating a post. It is next to the "Post Reply" button on the bottom left of the frame when creating a post. This then brings up one of the folders on your PC in a pop up window. You can then click on the down arrow and go to the folder your photos are in & then just click on the photo & it will import it into the post. The new software automatically reduces the file size if it is a large file so you don't have to edit it like before. The first thing is probably to figure out where your photo files are. I know that a lot of people just use a photo application & don't have any idea where the directories (folders) are located. If you can work that out then it will all fall in to place. A folder called "My Pictures" under "Documents" or "My Documents" is usually a good place to start. If all else fails find a kid & ask him to show you. Most of them know how to do everything on a PC these days. Link to comment Share on other sites More sharing options...
kgwilson Posted January 24, 2013 Author Share Posted January 24, 2013 Well I have finally finished both wings ready for fitting. Getting the fuel tanks in was a mission & then getting cables etc around them was interesting but it all worked out well in the end. I made up some templates to make sure I got the angle for the flap & aileron brackets right. The plan calls for the rear skins to be installed as 2 pieces but Garry said some builders had successfully installed them as a 1 piece. I cut the right top one out as one piece and laid it on the wing & it looked fine & seemed to sit perfectly on the ribs. I then proceeded to bend the tabs 90 deg at the front to provide rigidity along the rivet line to the D-box with cutouts for ribs & drag strut & reduced to 10mm over the top of the tank. Trial fitted & full of confidence I started riveting it on. I finished & decided to admire my handywork only to be horrified that one panel over the fuel tank had gone concave. How could I have been so stupid? Did I have enough material to fix it? I gave up, had a beer & tried to figure out how to fix it. Well it had to come off, I found that there was plenty of spare sheet. The problem was a combination of the twist in the wing due to the 18mm of washout set at the tip & the fact that when I'd glassed the centre rib I'd cut the hole in for the fuel tank, somehow the rib was now 3mm lower in the centre than the ribs on either side. Fixed that easily & re-did it all again, this time clecoing it first. Turned the wing over & glassed the ply doublers for the Flap/aileron brackets & then installed the wing walk after setting a bend in the ply to conform to the curve of the wing top surface. The bottom was easier as it was almost flat with only holes having to be cut for cable exits & tabs being trimmed. Excluding the fuel tank the right wing took 42 hours, the left took 36, the difference being no stuff ups on the left and experience. Next step, wing fitting, ailerons & flaps. I am now shifting everything into the hanger so my wife will finally get the garage space back for her car. Wing progress Pics attached 1 1 1 Link to comment Share on other sites More sharing options...
keith.b Posted February 16, 2013 Share Posted February 16, 2013 Any further update? Regards Keith Link to comment Share on other sites More sharing options...
Recommended Posts
Create an account or sign in to comment
You need to be a member in order to leave a comment
Create an account
Sign up for a new account in our community. It's easy!
Register a new accountSign in
Already have an account? Sign in here.
Sign In Now