Ron Hoey
-
Posts
54 -
Joined
-
Last visited
Content Type
Profiles
Forums
Gallery
Downloads
Blogs
Events
Store
Aircraft
Resources
Tutorials
Articles
Classifieds
Movies
Books
Community Map
Quizzes
Everything posted by Ron Hoey
-
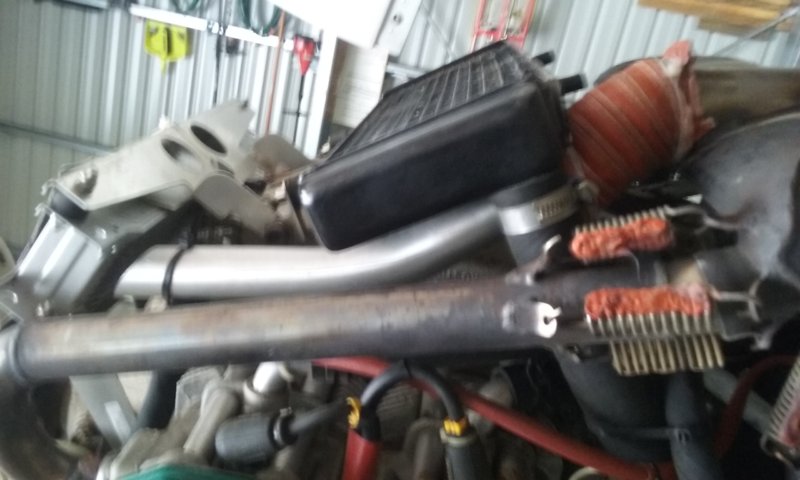
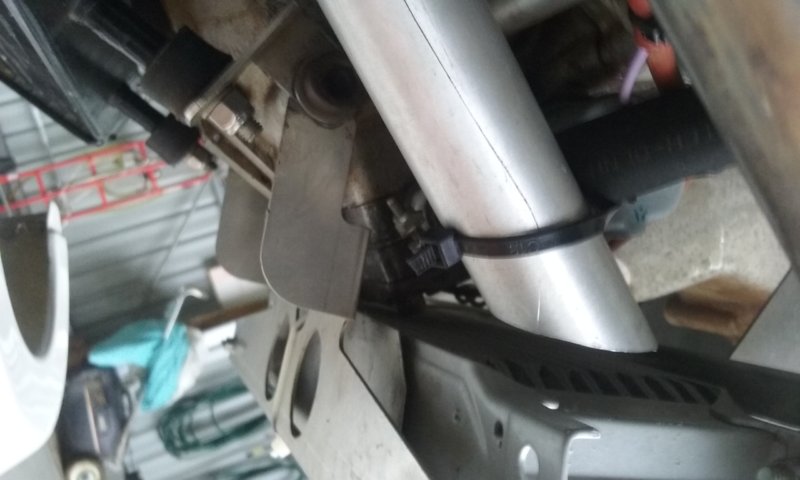
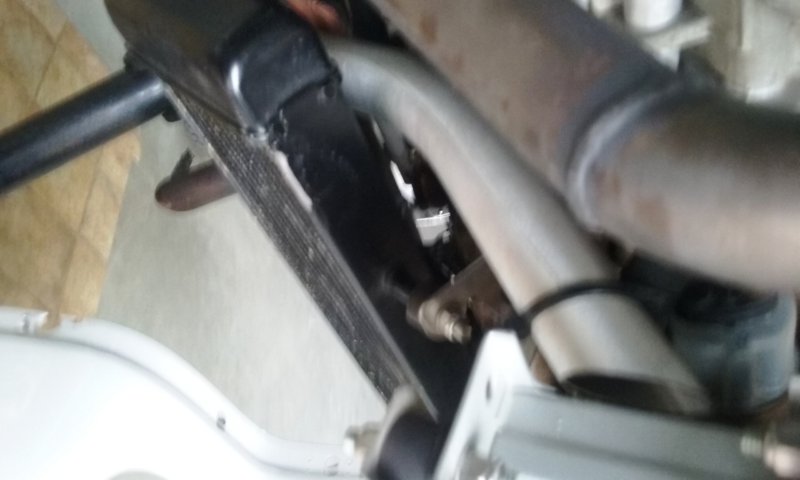
Hi All, My LAME suggested the best place to pick up warm air is behind the Oil Cooler. The air is fresh, as it comes straight through the radiator, and there is no need to cut into the cowling (and re-join it when replacing the cowling). I got lucky when I found a discarded vacuum cleaner hose with a curved aluminium fitting on the suction hose. Just the right diameter and with the perfect bend. (See Photos). I cut the end to sit behind the Oil Cooler, but far enough away from it to prevent vibration rubbing it against the radiator and damaging it. A bit of Scat hose on the other end allowed for a bend to the installed tube under the muffler. To top it off I put a 12 volt computer fan on the footwell outlet to assist the airflow. My kit didn't include a de-mister. Hoping this is of assistance. Blue Skies, Ron. Sorry about the photos being upside down. How do you prevent/fix this?

-
Hi all, I have a new nose wheel yoke for a standard Savannah tyre for sale. (I fitted Tundra Tyres). Reasonable offer and postage. 0439 854 266 (Sorry about the image, no matter what I did it came out sideways!!!???)
-
Hi Lyndon, I completed my VG XL in 2010, and during construction I read a few blogs warning against putting the through-wing breathers between tanks, as a tank movement can block the breather and stop fuel flow from that tank. Consequently I put breathers in the fuel caps (copied from a Gazelle) and they work perfectly. This was also suggested by another follower, I see. I am in Adelaide and would be glad to be of any assistance. PM me and set up comms. Ron
-
Yes, this is similar to the modified replacement I got from Reg. I'll see if I can re-post the photos as I think it is important for us to keep an eye on it. Hopefully the strengthener will prevent a re-occurrence, but will keep an eye on mine. Yes, that's
-
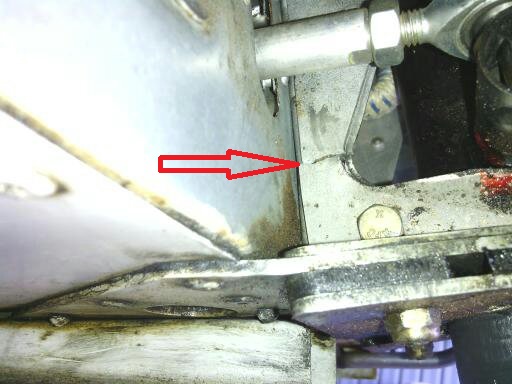
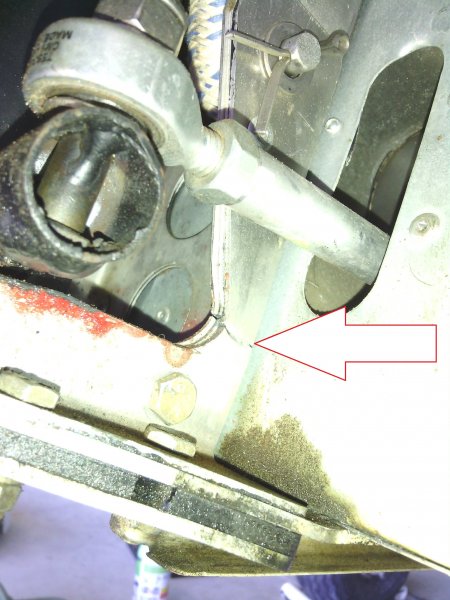
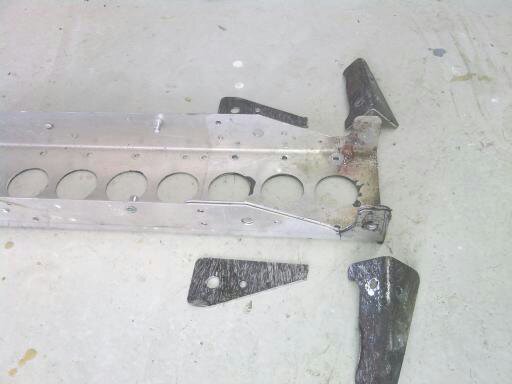
Hi all, Recently, when doing an inspection of my VG XL, I discovered cracks in the bracket which supports the steering wheel channel on the nose leg. The cracks were on both sides of the assembly and you will see from the photos, penetrated all three layers. No need to tell you the consequences of a nose wheel failure. Fortunately I was able to get a steering wheel channel, reinforcement, and new nose leg support from AeroKits. The ring mount allowed us (just) enough room to change it over without removing the engine. The replacement is a modification to strengthen the area and hopefully eliminate a repeat of the issue, so it is obviously a problem which has raised its head before. Consequently, I think we would all be wise to include this item in regular inspections. Regards to all, Ron. Attached Files: a" style="margin: 0px; padding: 10px 10px 0px; overflow: hidden; zoom: 1; border-radius: 5px; background: url("styles/default/xenforo/gradients/category-23px-light.png") 50% 0% repeat-x rgb(238, 241, 244);"> Left side view. note cracks in all 3 components. File size: 58.9 KB Views: 0 The assembly after removal. File size: 26 KB Views: 0
-
Thanks all, there were some good ideas for me to follow up. The problem is, I am one of the few pilots whose wife loves to fly. As we approach our 70th birthdays, my dear First Officer is subject to the heat/cool problems associated women of that vintage. So the clothing ideas and moving to Queensland won't necessarily work. The rest I will give a try and post back my results. Thanks again and Blue Skies to you all. Ron.
-
Hi all, Have any of you made any improvements to the cabin heater in your Savvy? Any advice would be appreciated. Blue Skies, Ron.
-
I ran the checks I mentioned in an earlier post and it was the sender unit. I replaced it and ran a test and it works OK. I believe it is a common problem. If any of you have the air lock problem, it is easily solved by adding a breather to the top of the collector tank and running a tube up to the fuel return line to the RH tank using a kit supplied by an agent. (I was fortunate enough to have received this advice before I built). Blue skies, Ron.
-
Hi Peter, I had a similar situation with my Savannah. It could be one of 2 things as far as I know. Firstly it could be a faulty sender as you suggested or secondly it could be the wire coming back to the sender earthing out (this is how the light is activated, by the negative side of the circuit being connected to earth through the closing switch on the sender unit. To find out which problem is yours, disconnect the spade connection on one of the wires coming off the sender unit (there is only one with a connection). With the master switch on, if the light stays on, it is an earthing problem, if it goes out it is the sender unit. Hope this helps. Ron.
-
Sounds like a great idea to me. Depending on work schedules of course, but please get it started and make it an annual event. And keep me informed, I'm keen. Ron.
-
Hi all, I am fitting an extra (necessary) instrument to my panel and, as there is no other space available, I have elected to take the slip ball out of the 2.25 inch hole and insert the new instrument there-in. This leaves me with a problem, as I consider the slip ball as a necessary instrument. I have heard of a small stick-on or screw-on slip ball but have not been able to source one on the net. Can anybody lead me in the right direction? Many thanks, Blue skies, Ron.
-
Thanks Terry, I have been laboring under a misapprehension. My apologies to all. Ron.
-
Did you only weigh the carpet you are going to use?
-
Mark, Re the battery, the manual is quite specific in regard to the placement of the battery in the XLVG. It must be in the back. Some of the earlier/other models were different as is evidenced by the alternative battery location inside their front left fuselage. The XL is a different aircraft; longer and with a different engine mount etc, etc. Mate, every XL built so far has been spot on with the battery in the back. Ron.
-
There isn't much choice really. If you want to spend a lot of time cutting and drilling then the 701 is for you, but if you want a kit that has everything laser cut and which fits together like a glove, then the Savannah is the way to go. The instruction manual is still a pest, but there are so many resources available on the net together with the great group which frequent this site and finally, your supplier/agent if you chose carefully, to guide you through any difficulties. I can put you on to a great agent in Oz who was always available and very helpful. The Savannah is the way to go. Ron
-
Yes, I had some parts the same as yours. I don't think there is anything to be concerned about as all the gurus tell us that the aluminium used is of the highest grade and won't give us any problems. Re the carpet, remember that you won't be using all that you have in the bag as much of it is scrap. I carpeted mine and the W&B figures told me to put more weight in! But of course each AC is different. Regards, Ron.
-
Hi Mark, You are right, those parts fit on the front fuse forward of the cabin each side. Still a little concerned that you are not checking all parts the same way you did the tail feathers. You will save time later, even if there is nothing missing, you will have a good knowledge of the bits when the time comes to stitch them together. Regards, Ron.
-
Hi Mark, Great start to your blog. Just a work of warning, make sure you do a complete inventory before you get stuck into the build. This was good advice I got from others. If there is something missing it may take a while to replace it, so go through the lot and discover the problems early. (My kit had several bits wrong or missing including 2 right #1 wing ribs and no left#1 rib). It isn't wasted time as it gives you a good insight into each section, like a reconnaissance so to speak. Isn't it great, getting those first few parts built? Blue skies, Ron.
-
Hi Mark, Yes, you made a great choice with the XL. I completed mine in February and couldn't be happier. Any probs, just post your query, the guys on this forum are great and will always help out, as they did for me. Blue skies, Ron Savannah 19-7109.
-
Hi Mark, Re the box, I used it supported on a trolley with HD castor wheels, so I could move it around. Regarding the flat surface, the Savannah kit is made so well you could assemble it on the back lawn and it will be square. For instance, you put the wing ribs, spars etc together and they are all over the place. Put on the first part of the skin and it acts as a template, as the holes are all super-accurately pre-drilled. Wallah! it is all straight! The "almost-arrived & just-has-to-clear-customs" period is the hardest part of the waiting period. All the best, Ron.
-
Hi Mark, Congratulations on a great choice. I completed my XL in February and have over 50 hours on it including trips to NatFly and Broken Hill. It is a pleasure to fly. You will get many conflicting pieces of advice, weigh them up and make the decision that best suits your situation. Have fun and don't hesitate to ask - the only silly question is the one you don't ask!! Blue skies, Ron.
-
Elevator trim Hi Peter, I had a look at mine and it is marginally thicker than the elevator. If you are comparing the holed surfaces which face each other, the one on the trim is considerably wider but it is on an angle when fitted, therefore reducing the thickness of the finished product. Hope this helps, Ron.