Kyle Communications Posted November 26, 2015 Share Posted November 26, 2015 Are you feeling guilty Steve....the comment was for Guy....he has a solar panel for a sex machine like me hahahahha Link to comment Share on other sites More sharing options...
Kyle Communications Posted November 26, 2015 Share Posted November 26, 2015 Bald as a badger 1 Link to comment Share on other sites More sharing options...
Guy s Posted November 26, 2015 Author Share Posted November 26, 2015 Are you feeling guilty Steve....the comment was for Guy....he has a solar panel for a sex machine like me hahahahha Yep 'm in the bald as a badger category, so we're like awesome sex machine right.COOL But a the end of the day I gotta find a way to protect the baldy. Am also thinking about a blind set-up as well tornado. Thanks Skee, there a shop in town that sells 3M products so will have a look. Link to comment Share on other sites More sharing options...
Guy s Posted December 26, 2015 Author Share Posted December 26, 2015 Tail feathers are on 2 Link to comment Share on other sites More sharing options...
rankamateur Posted December 27, 2015 Share Posted December 27, 2015 Put your black tail skid on or if it tips up when you crawl inside it will bend your rudder. Seen it happen on a maroon one, very nasty on a brand new plane. Link to comment Share on other sites More sharing options...
Guy s Posted December 27, 2015 Author Share Posted December 27, 2015 Put your black tail skid on or if it tips up when you crawl inside it will bend your rudder. Seen it happen on a maroon one, very nasty on a brand new plane. Already on Steve and don't plan on crawling inside. Well I hope not or is that wishful thinking ? 1 Link to comment Share on other sites More sharing options...
bobcharl Posted December 27, 2015 Share Posted December 27, 2015 Hi Guy s, I'm a bit late in responding to your query re roof tinting ; sorry. My experience is same as some other posts, had mine tinted about 2 years ago against advice that it may bubble, and to this point still perfect. I felt at the time that more would be needed so I fitted a blind as in the pics. It is a common household roller blind ( called a "Holland Blind" in some stores) cut to size and shape and fitted as shown. The plastic insert across the front edge I replaced with folded aluminium to give it some rigidity. Can be opened and closed in flight and very effectively breaks the radiant heat. But then I'm not bald! Regards, Bob 1 2 Link to comment Share on other sites More sharing options...
Guy s Posted December 28, 2015 Author Share Posted December 28, 2015 Thanks for the info Bob, I did get roof tinted which apparently cuts out 95% of the UV The newer Savannah's come out with a formed metal sheet that goes on the inside under the roof which will shield the sun rays to a certain extend. Link to comment Share on other sites More sharing options...
Skee Posted December 28, 2015 Share Posted December 28, 2015 Thanks for the info Bob, I did get roof tinted which apparently cuts out 95% of the UVThe newer Savannah's come out with a formed metal sheet that goes on the inside under the roof which will shield the sun rays to a certain extend. That's the shelf for the parachute bridles. 1 Link to comment Share on other sites More sharing options...
Guy s Posted December 28, 2015 Author Share Posted December 28, 2015 That's the shelf for the parachute bridles. I wondered what it's purpose was. I've install mine and guessing that's still ok. Link to comment Share on other sites More sharing options...
Guy s Posted December 29, 2015 Author Share Posted December 29, 2015 Just wondering on Savannah builders whether they put the Cowl on in the inside front fuselage or on the outside. Started he process of fitting the cowl on the outside only to find it tight against the muffler and also touching the water radiator which will require modifying and fiber-glassing of the cowl. Fitting the cowl on the inside will not require any extra work so wondering if it's worth the effort ? as trying to stretch fiberglass is not easy. 1 Link to comment Share on other sites More sharing options...
rick morawski Posted December 29, 2015 Share Posted December 29, 2015 Hi Guy I find fitting the cowl one of the most frustrating jobs in the build, sometimes they go easy, most times not! I have fitted them both inside and out but last few have settled on putting it inside. Problems to look out for when fitting it inside are - Naca scoop on top cowl fouls with top of left carb, need too leave adequate clearance at rear of spinner for withdrawal of cowl. Advantages are neat and tidy tight fit at rear of cowl, disadvantage of fiddly removal so as not to scratch the spinner. You seem to have found the problems of fitting outside, though I have found that interference at the water radiator mostly can be fixed with tighter fitment if pipes and large HD zip ties to hold up the rear end. Advantages are easy removal for engine servicing, disadvantage is the often loose look of the fitment. Choices, choices 1 Link to comment Share on other sites More sharing options...
Guy s Posted December 30, 2015 Author Share Posted December 30, 2015 Thanks Rick, Have the Cowl fitted on the outside and can see what needs to be done to make it fit properly, will try it on the inside and go from there. Getting pretty excited at seeing it take shape and getting closer to the finishing stage. I wish I had more time to really get into it and get it finish so I can go flying Link to comment Share on other sites More sharing options...
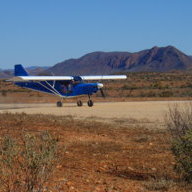
Guy s Posted February 17, 2016 Author Share Posted February 17, 2016 A quick update, The Sav has left home as I was running out of things I could do till the wings were fitted or maybe I wasn't looking hard enough, anyway into the Hanger we went. Wings are now on and a surprising easy task to fit them. Wiring all done and next on the list is to sort out the fuel lines but on saying that I keep finding lots of small jobs to finish and some turning into bigger jobs. What was it again that someone said, when you think your nearly finish you have 90% to go and I can understand that now but am starting to see the light at the end of the tunnel I think 1 Link to comment Share on other sites More sharing options...
eightyknots Posted February 23, 2016 Share Posted February 23, 2016 A quick update, The Sav has left home as I was running out of things I could do till the wings were fitted or maybe I wasn't looking hard enough, anyway into the Hanger we went. Wings are now on and a surprising easy task to fit them.Wiring all done and next on the list is to sort out the fuel lines but on saying that I keep finding lots of small jobs to finish and some turning into bigger jobs. What was it again that someone said, when you think your nearly finish you have 90% to go and I can understand that now but am starting to see the light at the end of the tunnel I think Did you consider Mark Kyle's fuel set up? Link to comment Share on other sites More sharing options...
Guy s Posted February 23, 2016 Author Share Posted February 23, 2016 I got these manifold taps off Reg Brost and think it's will be a similar set-up but with one tap being on either side and not together. Link to comment Share on other sites More sharing options...
rankamateur Posted February 24, 2016 Share Posted February 24, 2016 I got these manifold taps off Reg Brost and think it's will be a similar set-up but with one tap being on either side and not together.[ATTACH=full]41641[/ATTACH] Did you get the labels as well? I put my labels on then handled them with Loctite on my fingers so now have to get another set of labels because the printing lifted straight off. Take care. Link to comment Share on other sites More sharing options...
Guy s Posted February 24, 2016 Author Share Posted February 24, 2016 Yes I have the labels Steve but haven't install the taps yet. Will make sure my hands are clean when I got to that task. Link to comment Share on other sites More sharing options...
rankamateur Posted February 24, 2016 Share Posted February 24, 2016 Yes I have the labels Steve but haven't install the taps yet. Will make sure my hands are clean when I got to that task. Put them on last thing. I put mine on so I wouldn't lose them but then decided to install elbows on the inlets so I could mount the tap higher so it was easier to reach with my gammy shoulder, and dodge that angle stringer on the side sheet that usually gets in the way. Had to soften the Loctite with my soldering iron to get them apart. So the labels probably got a bit of heat too but the fresh Loctite is what really did the damage. I had to drill out the elbows to the same bore as the inlet barbs too, otherwise there was a considerable restriction to the flow. 1 Link to comment Share on other sites More sharing options...
Guy s Posted March 22, 2016 Author Share Posted March 22, 2016 With a few wet days hindering work I was able to make time for the Sav again and Dash installed with all the wiring and fuel lines completed. YAHOO Link to comment Share on other sites More sharing options...
rankamateur Posted March 22, 2016 Share Posted March 22, 2016 Guy, What did you mount your press-to-talk button in? I made a pair of nylon plugs in the lathe but the guru said they are too flat and the button will be too deep in the grip to reach so just before I cut the top off the grip.... Well I will consider other options. Link to comment Share on other sites More sharing options...
Guy s Posted March 22, 2016 Author Share Posted March 22, 2016 Think I might have gone along the same lines as you Steve, but me cutting the top of one of the grips and making a real balls up of it. Ringing the Guru for a new grip only to be told no such thing is carry in stock so mmm Anyway found a simple solution involving a long rubber Grommet which are supply in the kit but not intended for this task. The press to talk button can be fitted quite easy and then inserted into the grip, rubber mounted in a sense. Will try and post photo's tomorrow. Link to comment Share on other sites More sharing options...
rick morawski Posted March 22, 2016 Share Posted March 22, 2016 Guy, What did you mount your press-to-talk button in? I made a pair of nylon plugs in the lathe but the guru said they are too flat and the button will be too deep in the grip to reach so just before I cut the top off the grip....Well I will consider other options. That's what I do, cut the top off the grip and sand it smooth, put on in the stick upsidedown (best side up), get a correct size plastic pipe stopper with push button fitted and put in open end of stick. Works well. Will post a photo if you want. Link to comment Share on other sites More sharing options...
rankamateur Posted March 22, 2016 Share Posted March 22, 2016 Reg told me to get some more nylon and lathe up a couple more with a step in the top to take the PTT, but the button hole in the grip is not in the centre of the tube so it will be a bit more complex, job for the 4 jaw chuck I guess. Link to comment Share on other sites More sharing options...
rick morawski Posted March 22, 2016 Share Posted March 22, 2016 With a few wet days hindering work I was able to make time for the Sav again and Dash installed with all the wiring and fuel lines completed. YAHOO Nice looking dash Guy, tell us about those electronic instruments, what are they? Link to comment Share on other sites More sharing options...
Recommended Posts
Create an account or sign in to comment
You need to be a member in order to leave a comment
Create an account
Sign up for a new account in our community. It's easy!
Register a new accountSign in
Already have an account? Sign in here.
Sign In Now