facthunter Posted January 20, 2021 Share Posted January 20, 2021 Don't weigh it down with lots of paint When Dope was used, just adding tinter/pigment in the last coat was sufficient. Thick paint makes fabric crack also. Nev 1 Link to comment Share on other sites More sharing options...
Don J Posted January 20, 2021 Share Posted January 20, 2021 facthunter. Great advise. I'm using Poly Fiber covering system so the pink color of the VS is the first coat of Poly brush. Link to comment Share on other sites More sharing options...
Don J Posted January 26, 2021 Share Posted January 26, 2021 A bit done today. A couple shots of elevator getting covered. 42 stitches on elevator and 23 on rudder at 2-1/2" spacing. 4 Link to comment Share on other sites More sharing options...
Don J Posted January 27, 2021 Share Posted January 27, 2021 I have a question for the Forum. My Horz stab is covered with 1 mm ply and also covered with fabric on the ply. In the prints I see no mention of rib stitching fabric anywhere to the 9 ribs inside the H stab. The 1 mm ply is very thin and very simple to get stitches through it and the fabric. My question is do builders of the T-mono add stitches with 2.5"-3" spacing in this area beings it's in the prop blast at all times ? or is the weight gain of pinked tape and reinforcing tape along with stitch itself add up to much?? I cut two starter pieces of ply today for the Horz stab to start with bottom Link to comment Share on other sites More sharing options...
Don J Posted February 10, 2021 Share Posted February 10, 2021 Got the Horz Stab covered with ply and added access holes at all hinges and mount brackets. these will be covered with fabric and with hopes to never have to use them but there if needed. I installed TEE nuts to mount hinges and brackets but also backed them with nylon lock nuts so an opening was needed to fit wrench in if repairs where ever required. The picture of all the stuff piled on the table is actually a creative way I weighed down the ply on HZ for gluing (If there is a will there is a way) Got the tabs welded to header tank also. Yep still having fun but that leading edge was a trick on the hz very hard to NOT get waves at seams as seen by sanding 1 Link to comment Share on other sites More sharing options...
Kim Posted September 15, 2021 Share Posted September 15, 2021 Don What wood have you used for the fuselage? Looks quite dark in the photos. Link to comment Share on other sites More sharing options...
Don J Posted September 16, 2021 Share Posted September 16, 2021 14 hours ago, Kim said: Don What wood have you used for the fuselage? Looks quite dark in the photos. Spruce was used then painted with a dark wood sealer Link to comment Share on other sites More sharing options...
Don J Posted September 16, 2021 Share Posted September 16, 2021 Just a fast update to let you all know the build is still moving along. I'm in the stage of adding plywood to the outside of the fuselage and doing wind screen and cockpit interior. got header fuel tank in place and working on a 7 gallon belly tank to extend range. Poly fiber system for covering has worked well on the control surfaces. hope you all are doing well and safe. Don 4 Link to comment Share on other sites More sharing options...
Don J Posted October 8, 2021 Share Posted October 8, 2021 (edited) This is the horz. stab with ply on and covered with fabric. Poly brush is next step for it. in past photos you can see how the tip leading edge was hollow and after foam and two layers of fabric the lines filled in good. glue lines are approximately where the ribs are. Glad no rib stitching needed for this part. Edited October 8, 2021 by Don J 4 Link to comment Share on other sites More sharing options...
Don J Posted October 21, 2021 Share Posted October 21, 2021 Don't know if I ever got this picture out there? Shows rudder pulley's and some other details Got to get all that right before ply and covering and hope it's right. Root spars and ply are in my line of fire.☺️ 1 Link to comment Share on other sites More sharing options...
Don J Posted October 31, 2021 Share Posted October 31, 2021 i just remembered the more Ply you get on the fuselage the harder it is to reach all them little things you worked on earlier. Was able to hide all those knots and is going good. I hope your all well and building your craft. Link to comment Share on other sites More sharing options...
rgmwa Posted November 1, 2021 Share Posted November 1, 2021 Looking good, DJ. I see North Dakota has moved to Afghanistan? 1 Link to comment Share on other sites More sharing options...
Don J Posted November 5, 2021 Share Posted November 5, 2021 (edited) Hello from North Dakota every one. I got the controls covered and stitched with out a single knot showing and I'm here to tell my story. I did a typical square knot with a half hitch on both sides of the knot then passed my empty needle back through the hole and threaded one side of the thread beside the knot into the needle and was able to pull the knot through the hole and hide the knot. This was a time consuming process but I was able to test each knot for holding strength. Beings the aircraft is Experimental I used outdoor 3M brand double adhesive tape used for window heat shrink film to reinforce the fabric at stitch location. You do have to remove the paper covering once tape is in location but a needle did good in that mission. I only reinforced the fabric in the area of the stitch to save on weight. I'm very happy with the finished product of the control surfaces. So glad winter is here for me because of the more time dedicated to my build. Now to get the pinking tape over the stitches and get them sprayed with Poly Fiber products Edited November 5, 2021 by Don J 7 Link to comment Share on other sites More sharing options...
Don J Posted November 20, 2021 Share Posted November 20, 2021 I got a photo of the pinking tape done on the rudder. A note to all builders I started all my pinking tape at the trailing edge and worked my way forward and this kept the airflow over the control surfaces much like shingles on a roof protecting from rain. In my opinion the weakest area is the pinking tape at the trailing edge and probably the greatest chance for slipstream to lift Pinking tape. 3 1 Link to comment Share on other sites More sharing options...
facthunter Posted November 21, 2021 Share Posted November 21, 2021 Good theory. I wonder where separation starts. Are you going to gap seal the rudder? It's not that large. Nev 1 Link to comment Share on other sites More sharing options...
Don J Posted November 21, 2021 Share Posted November 21, 2021 Facthunter: I would say the separation would appear at the leading edge of the p-tape on the trailing edge due to prop blast and rocks from the prop. I will address gap seal if needed once ground and flight testing is under way. I did get the Elevator p-taped and went with 1-1/2 inch tape for more coverage on the stitches. Link to comment Share on other sites More sharing options...
Don J Posted January 11, 2022 Share Posted January 11, 2022 Got all the parts hanging and moving smoothly and dealing with cables. Soon will be able to cover fuselage with plywood but don't want to speak too soon because it seams like something always comes up to put the brakes on the next step. 4 Link to comment Share on other sites More sharing options...
Don J Posted January 12, 2022 Share Posted January 12, 2022 I want to share with you all my elevator cable routing and the use of stock KR-2 fittings and pulleys. the pictures show the control stick in place but not locked down tight for ease of work and one is of the duel pulleys at the rear spar and the final picture is of the duel pulley behind the rear spar behind seat bulkhead. In order to get full deflection of right aileron with out cable rub I needed to take the top cable and move it to the right side of stick center and the bottom cable to the left side of stick center (approx 3/8 inch). This is needed because the cables cross over from the stick to the first set of pulleys. A builder must try to keep cable off set degree to and from the pulleys at the very minimum lets say 5 degree max. In this set up the only deflection is from stick to first pulleys and with cables mounted to the stick on center you will have cable rub as soon as right aileron command is given with out the off set of mounting points.I did move one turnbuckle from stick and put it on top of the Horz stabilizer were the cable hooks to the elevator control horn beings the fin is removable. My thought is ease of inspection and less chance of interference of cable movement in rough air or rough ground use. All inspection and maintenance of pulleys and turnbuckles are very easy to reach and service. The routing pulley for elevator just in front of the vertical stabilizer will have its own inspection panel or ring installed once fuselage is covered in plywood. Build is going great and I'm having a good time with it and elevator cable runs smooth and with no binding felt. Don J 1 Link to comment Share on other sites More sharing options...
Don J Posted March 6, 2022 Share Posted March 6, 2022 I decided to make the cable routing of my rudder cables a bit different then the prints called for. I made 12- 1/8 "ply mounting brackets to glue to the up rights to hold 1/4" copper tubing in seat area and a 2" piece about half way to the tail . the tubing has a 3/16" ID hole and cables slides smoothly inside and all pieces are accessible by inspection plates or removing the sling seat. The reason my wood is dark in most areas Is because I seal the wood with a light coat of walnut colored stain for I can sand in areas that need something glued to it and see when I'm back to natural wood color then when finished I clear coat everything with polyurethane. Build is moving along slow but steady and still having fun. 4 Link to comment Share on other sites More sharing options...
Marty_d Posted March 7, 2022 Share Posted March 7, 2022 You're doing a great job, Don, I always enjoy seeing your progress. 1 Link to comment Share on other sites More sharing options...
Don J Posted March 7, 2022 Share Posted March 7, 2022 Thank you Marty_d I appreciate your support it really makes sharing my build with others enjoyable. Link to comment Share on other sites More sharing options...
Don J Posted March 13, 2022 Share Posted March 13, 2022 I finished the cable guides for my rudder as discussed in prior post and added a couple of pictures. I must say it was well worth the effort because cables run very smooth and their protected well in cockpit area. To save weight I could remove some of the tubing between mounting plates but then I have twice the possibility of cable wear on the tubing and more area to keep and eye on. Added 2 screws on each ply mounting plate for backup strength tho not needed it makes me feel better. 4 Link to comment Share on other sites More sharing options...
Don J Posted March 29, 2022 Share Posted March 29, 2022 (edited) Well my friends I nearly have all the interior work done on the plane as far as cables and other hard to reach areas. Pictures are of the fuselage ply being fitted and made ready for gluing. I had a nice piece of 5/32 inch ply to reach from FW to seat back with a 30degree tapper cut. from that point aft I will go 2 mm for 4 ft. then finish off with 1.5 mm ply at tail area. Turtle deck will be covered with 2 mm but with a removable panel over the last 2 turtle deck bulkheads for access to hardware for elevator cables. I estimate a weight gain of 2 pounds with the ply sizes being used but will have a much greater strength with the 5/32 ply in forward area and much less ripple in the ply. Build is going well and I enjoy everyday spending time on it. Root spars will be shortened 10 inches on each side and will leave approx. 10" wing walk for entry of cockpit and main gear will be mounted in wing root. Edited March 29, 2022 by Don J 7 Link to comment Share on other sites More sharing options...
Don J Posted August 2, 2022 Share Posted August 2, 2022 Just a fast hello and to let you all know the build is progressing very well. I've been working on wing spars along with many other areas and trying to go to an air show to see builds when I can. When I built this Trike with 1600 VW engine I did some Bob Hoovers build mods mainly in oil passage to test performance and temperature change. As I build the 1835 VW engine for the plane the work I did on the Trike engine Has given me much confidence on the aircraft power plant.Keeping the plane light and strong is still number one goal for me but too soon for a empty weight yet but I will guess around 460 - 490 pound ready to fly. I hope every one is well and getting some stick and rudder time. Don J 4 Link to comment Share on other sites More sharing options...
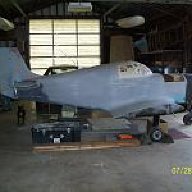
Don J Posted August 2, 2022 Share Posted August 2, 2022 Forgot to mention I did get the tail group in Poly Brush tho the picture is bad. 2 Link to comment Share on other sites More sharing options...
Recommended Posts
Create an account or sign in to comment
You need to be a member in order to leave a comment
Create an account
Sign up for a new account in our community. It's easy!
Register a new accountSign in
Already have an account? Sign in here.
Sign In Now