Mike Walling Posted December 12, 2022 Share Posted December 12, 2022 To Don J -what's the latest on this project Jon - has it flown yet? Thanks Mike w Link to comment Share on other sites More sharing options...
Teggles Posted February 12, 2023 Share Posted February 12, 2023 Maybe a stupid question but, do you know how many hours you have put into this project so far? Link to comment Share on other sites More sharing options...
Don J Posted April 1, 2023 Share Posted April 1, 2023 Hi guys I have been without a good computer for a while but finally upgraded my equipment so soon I will get some new pictures posted. I would like to share the news that trying to glue on a full piece of ply on side of fuselage from fire wall to seat back was not doable for me. I ended up mounting 6 separate ply panels to each side of fuselage to hold good shape and have the strength I felt needed for the plane. I did increase ply thickness from fire wall to seat back from 2 mm to 5 mm then reduced thickness as I moved towards the tail. Like I say as soon as I figure out my new computer and how to enclose pictures, I will post some photos. Sad to say the bird isn't flying yet but I will say I'm still enjoying the build very much and it is very hard for me to keep a true accurate account of total time on build. Hope to see and hear from you all soon. Don 4 Link to comment Share on other sites More sharing options...
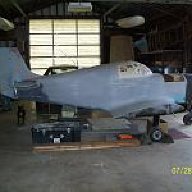
Don J Posted April 1, 2023 Share Posted April 1, 2023 (edited) Testing photo. Here is some pictures of fuselage work just before root ply rib being worked on and cable routing being cut out. There is a total of 14 separate ply panels 7 down each side once total fuselage is sheeted. As the thickness of the ply digresses filler base strip must be glued on to area were ply panel gets glued down to assure fuselage side has the same plain and no noticeable steps are seen. the final ply at trailing end will have inspection doors installed. Edited April 1, 2023 by Don J 2 Link to comment Share on other sites More sharing options...
Don J Posted April 2, 2023 Share Posted April 2, 2023 I want to point out a couple of steps and items I believe will help others on their build. As you can see from pictures of last post that the fuselage ply at the base of the spars is missing, and this could be avoided by not trying to cut openings before gluing the ply down. Better to pilot drill four small holes from inside of cockpit spar opening then connecting the lines and cut out with Dremel tool and block sand until satisfied with opening fit of spar. As you can see in the picture the fairing needed between the root rib and fuselage side which will cover the area of spar base missing ply, but I will have an extra amount of unwanted glue and weight that could have been avoided. The pile of hardware and parts is a photo of the many things you will have to install and then remove usually many times before your mission is complete. 1 Link to comment Share on other sites More sharing options...
Don J Posted April 14, 2023 Share Posted April 14, 2023 Just started on this step of the build and need to do a test block of balsa to see how the Aeropoxy glue is going to sand. T-88 epoxy is a bear to shape when connecting balsa together. 1 Link to comment Share on other sites More sharing options...
Don J Posted April 14, 2023 Share Posted April 14, 2023 If anyone has a set of landing gear for a Taylor-monoplane and would like to sell please give me a message. Thanks Don Link to comment Share on other sites More sharing options...
Recommended Posts
Create an account or sign in to comment
You need to be a member in order to leave a comment
Create an account
Sign up for a new account in our community. It's easy!
Register a new accountSign in
Already have an account? Sign in here.
Sign In Now