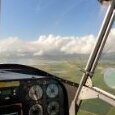
Blueadventures Posted April 18, 2020 Share Posted April 18, 2020 Hi I'm doing a first dynamic balance of a Rotax 912 ULS2 using a Dynavibe. Would be keen to here from persons who have done the same to their rotax. Just wondering where the weights were fitted. eg under propeller bolt heads or elsewhere. First run showed 0.35 at 299 degrees at my cruise rpm about 5,000 rpm (note the 2058 rpm is after gearbox ratio) I made a timber protector to ascertain where the added weight is required. I marked the side were the 299 degree mark is. Thanks in advance. Link to comment Share on other sites More sharing options...
Paul davenport Posted April 18, 2020 Share Posted April 18, 2020 I have been balancing props for some years now, using an Aces balancer. I use stick on alloy wheel balance weights which are easy to reposition . For the final solution I use one of several methods . I prefer stick on weights which if you use the inside ledge inside the spinner can give you the best results allowing you to access 360 degrees ,allowing for greater accuracy. Small washers can be used under the spinner screw also different length screws allow for some weight, but this method is only really good for small amounts of imbalance. Washers under the prop mounting is only a last resort as it does not give you the fine tune of 360 degrees. Be aware if you balance without the spinner on fitting it will in some instances throw out the balance . Balancing is rewarding when you get it right but can be frustrating. On finishing the balancing job I use a product called Sikaflex as a bonding agent, this stuff sets as rubber and unless you cut it does not let the weight go. Paul 1 Link to comment Share on other sites More sharing options...
Kyle Communications Posted April 18, 2020 Share Posted April 18, 2020 (edited) I have my own Dynavibe. With the dynavibe came some compass type charts which once you have set the reflective strip it is being the 0 deg position then the clock face is looking at the back of the prop I use the stick on weights the same as Paul on the inside rear lip of the spinner so centrifugal force keeps the weights against the spinner I dont use sikaflex just the stick on weight. But you MUST have the carbs scrupulously balanced before you do the dynamic balance Just noticed where your strip is too..you need to have the transmitter and receiver right behind the prop and I put the reflective strip on the top back side of the spinner base I also made a bent bracket that goes where your TX/RX is but positioned directly in the centre of the engine..I dont think I have any pics but will check Edited April 18, 2020 by Kyle Communications 1 Link to comment Share on other sites More sharing options...
Kyle Communications Posted April 18, 2020 Share Posted April 18, 2020 Mike You will see it at the start of the video my bracket https://www.youtube.com/watch?v=iZ8GqUNUcbM:1 1 Link to comment Share on other sites More sharing options...
Blueadventures Posted April 18, 2020 Author Share Posted April 18, 2020 Hi Paul and Mark thanks for tonight's replies. I have redone the optic sensor bracket (at home tonight) to mount behind the accelerator sensor and tape the root of the prop blade. With the set up in my post I have got balance to 0.05 which is getting near very good. Another 915 up here had the weights placed in behind the blade hub and I could not see that. He said I should place weight under the head of the prop bolt that mounts to the gear box flange. I see Edge performance mount the sensors similar to mine. It's ok I believe to mount the optic sensor were I had it (I am mounting on top tomorrow) as you turn the prop until the optic light is on then stop and measure the degrees from the accelerator position as zero (at 12 o'clock in my original setup) I did get mixed up Thursday arvo when I measured the degrees from the optic position. (Was 90 degrees out) Then got it sorted that night. Attached are some images from the net re positioning; the Edge Performance guys should know what they are doing :) Thanks also for the video. I have between 0.10 and 0.05 without the balance master (Happy with this; just need to permanently place the added weight about 6.5g) on so expect the balance master will bring it down even further. The DUC blades are nice kit. Cheers and really appreciate the comments. Link to comment Share on other sites More sharing options...
Paul davenport Posted April 18, 2020 Share Posted April 18, 2020 Good point about carb balance Mark . i have a cheat sheet with check points tracking ,engine condition engine mounts weather on the day wind speed. Be aware that gusty weather will effect the balance. Light congitions sun reflecting off rotating prop can interfere with balancer optic eye .Some times a static balance will be required before you can dynamically balance it. On some aircraft engines the harmonic balance weight bushes when worn prevent balancing altogether. If you are chasing a balance there is usually another problem. Moving the prop position on the gearbox of Rotax engines will some times help . My target is 0.05 or less but usually under this figure most people cannot tell the difference, especially on the big GA engines. Have fun, it’s rewarding getting it right Link to comment Share on other sites More sharing options...
Kyle Communications Posted April 18, 2020 Share Posted April 18, 2020 Dont forget that the rotax engines are NOT balanced either. It will be interesting when we get this new engine of mine running which is fully balanced. We have also come up with a solution to get the engine at least to a better balance by balancing the flywheel only to suit the offset of the cranks in a std rotax. It should also make a big difference as currently you are compensating the engine balance with the prop as well Link to comment Share on other sites More sharing options...
Kyle Communications Posted April 18, 2020 Share Posted April 18, 2020 Your reflective strip is pretty wide too on the prop 1 Link to comment Share on other sites More sharing options...
Blueadventures Posted April 19, 2020 Author Share Posted April 19, 2020 Your reflective strip is pretty wide too on the prop Hi Mark the manual said 1.9 inch wide. At 5,000 got average of 0.03. So happy with that. The new optical position was above the gear housing. I'll make a new mount for 912 so both sensors are over the centre line. The 0.03 reading is without the balance master fitted. The owner of the dyna is happy with my learning and the new brackets and has let me have the unit longer. I'll do some comparisons with the excelerator sensor mounts and positioning, so I can confirm my beliefs about the angle determination method. Cheers Link to comment Share on other sites More sharing options...
Blueadventures Posted April 19, 2020 Author Share Posted April 19, 2020 Finished the balance today. Relocated the optic sensor and first run (no weight) was 0.33 so added weights and the finish mass fitted was 9.25g and at 4,900 ish rpm the magnitude was 0.03 so happy with that. Will do a flight this week; some time all things considered. Images show the sensor position today and the average readings at first run (no weight) and the final run with 9.25g fitted. I am making a new sensor bracket and will do a run (in about 10 days time, need a break to do other choirs) with today's setup and then the new setup and compare the angle required etc. I'll fit a narrow reflective strip as well to see if anything changes. I expect not as edge and other use the 1.9" size reflective strip. Cheers Link to comment Share on other sites More sharing options...
Blueadventures Posted April 19, 2020 Author Share Posted April 19, 2020 I have been balancing props for some years now, using an Aces balancer. I use stick on alloy wheel balance weights which are easy to reposition . For the final solution I use one of several methods . I prefer stick on weights which if you use the inside ledge inside the spinner can give you the best results allowing you to access 360 degrees ,allowing for greater accuracy. Small washers can be used under the spinner screw also different length screws allow for some weight, but this method is only really good for small amounts of imbalance. Washers under the prop mounting is only a last resort as it does not give you the fine tune of 360 degrees. Be aware if you balance without the spinner on fitting it will in some instances throw out the balance . Balancing is rewarding when you get it right but can be frustrating. On finishing the balancing job I use a product called Sikaflex as a bonding agent, this stuff sets as rubber and unless you cut it does not let the weight go. Paul Hi Paul The weight did fit in the spinner back plate (lower left in image). I'll chase up some wheel weights as the permanent fit during the week. I did four sessions to get this far. Feel I need a break and do some other jobs at home. Still learning about the sensor positioning and the angle method to arrive at where the weight is to be fixed and the formula for the weight required. Made some differing size weight mass, 12.6 was the first, then 4.8, 3.2 and then 9.25g was what I've settled on. I returned the instrument today and my mate wanted me to keep it a little longer and keep going on things. So I'll make up a new design bracket and do another run sequence in about a week and a half. Want to do a fly next couple of days and then early ANZAC day for the past troops and airman. Cheers. 1 Link to comment Share on other sites More sharing options...
skippydiesel Posted April 19, 2020 Share Posted April 19, 2020 Hi I will give you my experience of propeller balancing. First point I made no attempt to balance my Rotax 912 ULS, only its propeller. Carburettors statically and pneumatically balanced to the best I could achieve. Two bladed Fitti ground adjustable propeller: Using a laboratory balance, I meticulously weighed (total weight, hub & tip (weight variation over span) and then adjusted to achieve the same static weight in each blade. I also checked the weight of the mounting bolts/nuts (no adjustment required). Refitted propeller – meticulously adjusted each blade to have the same pitch angle at static thrust of Rotax recommend minimum of 2200 rpm. The above efforts produced a very smooth-running engine/prop but I wanted to see if it could be made better Made appointment with “Superair” at Armidale airfield. About 30 minutes (after cowl removal & aircraft tie down) with them. I was complimented on the set up I had already achieved. Two small weights/locations (ss washers) were added utilising extended spinner/back plate locating screws (that I had brought with me for the purpose) & Nylock nuts. The trip home was subjectively very slightly smoother. When I got home, I further secured my new weights with electrical shrink tube. I was pleased with my efforts and those of Superair and would do the same again when next required. I believe my approach to be cost effective utilising fairly easy to obtain equipment and then accessing the certified equipment and skills of a professional operator to put the “icing on the cake” Link to comment Share on other sites More sharing options...
Blueadventures Posted April 19, 2020 Author Share Posted April 19, 2020 Hi I will give you my experience of propeller balancing. First point I made no attempt to balance my Rotax 912 ULS, only its propeller. Carburettors statically and pneumatically balanced to the best I could achieve. Two bladed Fitti ground adjustable propeller: Using a laboratory balance, I meticulously weighed (total weight, hub & tip (weight variation over span) and then adjusted to achieve the same static weight in each blade. I also checked the weight of the mounting bolts/nuts (no adjustment required). Refitted propeller – meticulously adjusted each blade to have the same pitch angle at static thrust of Rotax recommend minimum of 2200 rpm. The above efforts produced a very smooth-running engine/prop but I wanted to see if it could be made better Made appointment with “Superair” at Armidale airfield. About 30 minutes (after cowl removal & aircraft tie down) with them. I was complimented on the set up I had already achieved. Two small weights/locations (ss washers) were added utilising extended spinner/back plate locating screws (that I had brought with me for the purpose) & Nylock nuts. The trip home was subjectively very slightly smoother. When I got home, I further secured my new weights with electrical shrink tube. I was pleased with my efforts and those of Superair and would do the same again when next required. I believe my approach to be cost effective utilising fairly easy to obtain equipment and then accessing the certified equipment and skills of a professional operator to put the “icing on the cake” Hi Skippy For the post info could you post the total mass added, rpm dynamic balance made for and what was the cost of the job? What equiipment did they use. Cheers Link to comment Share on other sites More sharing options...
Paul davenport Posted April 19, 2020 Share Posted April 19, 2020 The Aces balancer works out weight required its self ,no calculations required. First spin it collects info and makes a suggested weight and placement angle , based on the second spin and weights placed on it it works out the effect given the distance from centre . (Hope that makes sense) 1 Link to comment Share on other sites More sharing options...
skippydiesel Posted April 20, 2020 Share Posted April 20, 2020 Hi Skippy For the post info could you post the total mass added, rpm dynamic balance made for and what was the cost of the job? What equiipment did they use. Cheers Work done late 2016, Sueperair charge was $280, all other work done by myself so nil cost = $280 Sueprair use their certified equipment (sorry dont remember what it was) that they also use on choppers & turboprops. From unreliable memory I think I nominated 2200 rpm as the engine testing speed ( I normally cruise between 4800 - 2200 rpm giving IAS of 100-110 knots fuel consumption, 1 POB, sub 13 L/hr/trip). Weights were a combination of extended spinner/back plate screws, stacked ss washers and a nylock nut/stack Weight added: 90 degree 4.554 gms 150 degree 8.08 gms Link to comment Share on other sites More sharing options...
Blueadventures Posted April 20, 2020 Author Share Posted April 20, 2020 Work done late 2016, Sueperair charge was $280, all other work done by myself so nil cost = $280 Sueprair use their certified equipment (sorry dont remember what it was) that they also use on choppers & turboprops. From unreliable memory I think I nominated 2200 rpm as the engine testing speed ( I normally cruise between 4800 - 2200 rpm giving IAS of 100-110 knots fuel consumption, 1 POB, sub 13 L/hr/trip). Weights were a combination of extended spinner/back plate screws, stacked ss washers and a nylock nut/stack Weight added: 90 degree 4.554 gms 150 degree 8.08 gms [ATTACH type=full]52486[/ATTACH][ATTACH]52486[/ATTACH] Thanks Skippy. Mass added is similar to mine. I hope to do a fly in a few days time. My new full river battery arrived today so I'll also fit that. When I make the new brackets I'll do another run up set. Then do a gopro video of the final weight added verification run. I like the idea of wheel weights inside the back plate lip from Paul and Mark. The tecnam in the hangar also uses stick on weights. I used pieces of lead sheet with 3M tape. It's good as I could form the right radius of the lead. A mate up here has a Zephyr and told me of its good fuel economy, 2 fill ups Victoria to Whitsundays. I'd like that. Link to comment Share on other sites More sharing options...
Blueadventures Posted April 20, 2020 Author Share Posted April 20, 2020 The Aces balancer works out weight required its self ,no calculations required. First spin it collects info and makes a suggested weight and placement angle , based on the second spin and weights placed on it it works out the effect given the distance from centre . (Hope that makes sense) Makes sense. That is a good feature. I apply the spec hp at 5,000 rpm for my cruise balance. Link to comment Share on other sites More sharing options...
skippydiesel Posted April 20, 2020 Share Posted April 20, 2020 No offence intended but the thought of adding lead weights sends shivers down my spine - what happens to the prop balance when you loose one ? why is your prop so out of balance that a presumably large (mass) weight (s) is required to balance it ? I strongly suggest you rethink the initially static balancing of your prop Link to comment Share on other sites More sharing options...
Blueadventures Posted April 20, 2020 Author Share Posted April 20, 2020 No offence intended but the thought of adding lead weights sends shivers down my spine - what happens to the prop balance when you loose one ? why is your prop so out of balance that a presumably large (mass) weight (s) is required to balance it ? I strongly suggest you rethink the initially static balancing of your prop I've got 75% weight compared to yours, if mine is bad yours is worse:) the props and spinner set is spot on static balance. DUC propellers are a top shelf product. The adjustment is for the whole unit drive line at the flange. If the weight came off it would go to 0.33 which is good anyway. Centrifugal force assist in holding it into the flange. The tape works for many as a strong bond. I have considered a small fastening. Link to comment Share on other sites More sharing options...
Paul davenport Posted April 20, 2020 Share Posted April 20, 2020 Point taken skip I did mention static balancing in my previous message but what in effect you are doing when you dynamically balance the prop is fine tuning a lot of other issues . Fitting the weights inside the spinner is far better than drilling holes (as I have seen) and having the risk of crack developing. And if the weight comes off?. That’s why I use sikaflex. I have seen props come back from overhaul balanced by the experts still requiring that fine tune . I suspect that it might be as much engine issues as props, but whose got the money and time to persu that one 1 Link to comment Share on other sites More sharing options...
Blueadventures Posted April 20, 2020 Author Share Posted April 20, 2020 Hi Paul with the sika do you rough up the surface of the lead weight and use a primer? Is it worth drilling a hole either end of the weight to increase the mechanical bond grip of the sika. In the marine game on commercial and other vessels we use sika to hold the glass windows direct onto the cabin structure. The sika is effected by uv over time and we either have the bond area on the glass with a ceramic black coating or apply a black primer, like cars have. Cheers and thanks for your sharing of info. Link to comment Share on other sites More sharing options...
Paul davenport Posted April 20, 2020 Share Posted April 20, 2020 I just make sure the surface is clean and free of dirt grease (Wurth brake cleaner) and apply under and over weights and to the vertical spinner surface. Weights have to be cut off to remove, a word of warning if it gets on anything it is a devil to get off your hands and don’t even try to get from clothing 1 Link to comment Share on other sites More sharing options...
Blueadventures Posted April 20, 2020 Author Share Posted April 20, 2020 I just make sure the surface is clean and free of dirt grease (Wurth brake cleaner) and apply under and over weights and to the vertical spinner surface. Weights have to be cut off to remove, a word of warning if it gets on anything it is a devil to get off your hands and don’t even try to get from clothing Absolutely agree, I do use it often in my work. Like you say it holds on and any on the skin and hands needs to be a branded off. Cheers Link to comment Share on other sites More sharing options...
skippydiesel Posted April 20, 2020 Share Posted April 20, 2020 Hi Paul - There are many Sika/Sikaflex products, may be worth recommending which one you are using 1 Link to comment Share on other sites More sharing options...
Paul davenport Posted April 20, 2020 Share Posted April 20, 2020 Auto windscreen adhesive. In the auto trade windscreens bonded with this act as a structural member. It has ,many other bonding uses, I have used it on many applications only limited by your imagination 2 Link to comment Share on other sites More sharing options...
Recommended Posts
Create an account or sign in to comment
You need to be a member in order to leave a comment
Create an account
Sign up for a new account in our community. It's easy!
Register a new accountSign in
Already have an account? Sign in here.
Sign In Now