

Hadyn Bell
-
Posts
57 -
Joined
-
Last visited
Content Type
Profiles
Forums
Gallery
Downloads
Blogs
Events
Store
Aircraft
Resources
Tutorials
Articles
Classifieds
Movies
Books
Community Map
Quizzes
Posts posted by Hadyn Bell
-
-
Hi All,
An overdue couple of pics of the fuselage build. All going well. The small problems we are seeing along the way seem to be across the board with most other builds, so thanks to all the builders for the reassurance and sharing the love!!. The spare black goop turns up today (thanks Mark) so we are back into it full stem ahead. The couple of weeks off has given me time to re organize the shed and have a little tidy up but mostly spend some time having another read through the manual and look at photo's.

-
I think that everyone forgets to mention some of the very simple things to the new builders. Plenty more cleco's, decent cleco pliers and extra black goop.I only do metal work so there is still going to be fun and games in the engine and avionics installations.The most important trick is preparation, about 1/3 of the time spent, debur, clean parts and black primer on mating surfaces. Sticks the kit together so the rivets only have to hold it in place until the primer cures, stops working on the rivets and corrosion.Another one is rivnut a lot more places that you are going to want to inspect or service so you can get back in with out drilling out rivets and repainting.
The rest are Aerokits trade secrets so if I told you I would have to kill you, or you could just read Mark's little black book, I think he probrably conned most of them out of the guru.
-
Remember "S" for smooth !!I have put in 5 days on an XL lately, one more day will have the tail feathers and rear fuselage fully riveted I expect, some one elses bum will be in it's seat is the only catch. Very enjoyable experience gained though, I am picking up a lot of clues to smooth the build, this is about the sixth one I have worked on , I think I am well and truely ready to build my own now, the minister for war and finance is definitely warming to the idea. -
Hi Bob,
Nice to see the progress. We are still a bit behind you but catching up....
How did you go with the undercarriage / strut plate that bolts onto / into the sides of the cabin and undercarriage tunnel?
Cheers
Hadyn
-
A common problem in a high salt air environment and not just aircraft. A small spray with ACF50 or corrosion block keeps the barrel lubed and working well. This will be going on my maintenance check list.
-
 1
1
-
-
If I order it now I should get in about 7 days unless it has a D.G cert, then it will come by sea freight and I might see it in about 6 weeks!! O no, does this mean we wont be building this weekend, what will one do....The joys of being stuck out in the Pacific ocean! Might end up using a tad of that wattle super etc spray can.Haydn,I ran out also, but got more from Reg quite promptly.Bob
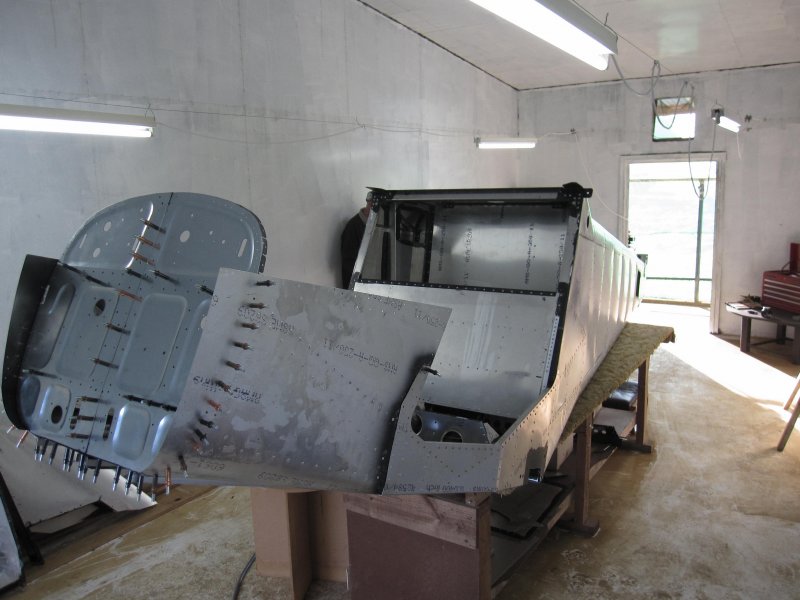
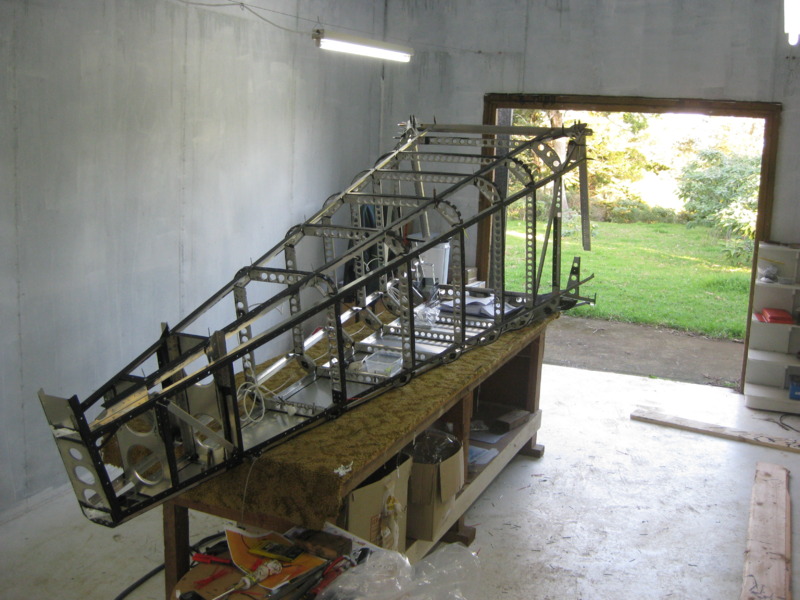
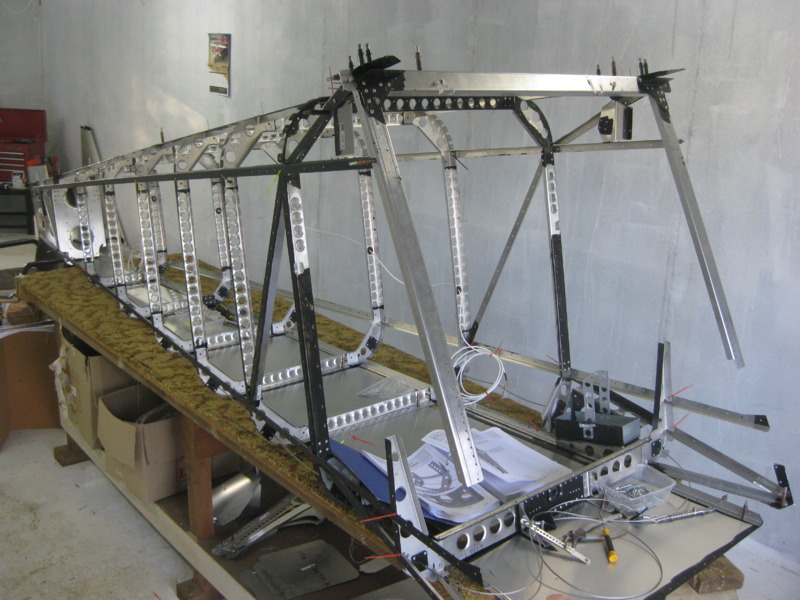
Tom pointed out that before we start the cabin build forward, while we have working room, it is a good idea to cut and fit up the baggage compartment trim and as we have the rear fuselage section all skinned off this is what we might do...
-
Hi Bob,Hi All,Sorry about my typo in that earlier post. Try 12 July instead of 21 July. One has to be so careful on this forum doesn't one?Haydn, thanks for your efforts in checking. The S rudder must be quite different to the XL if you skin over the top(bottom)of the horn.
ra, yep,thats what I am after.
Bob
Hope the info supplied by others helps get your problems sorted.
Cheers
Hadyn
-
Hi Mark,
Could you please advise what the "black goop" is as we are running out and require more of it or a suitable replacement.
Cheers
Hadyn
-
Hi Bob,Haydn,Fuselage looks to be coming along well. You seem to be making good progress.Back to my rudder hinge story. Tried to take some pics through the hinge holes but lack of depth of focus prevented me from coming up with anything meaningful. Suffice to say the hole in the bottom hinge is almost a full hole diameter too close to the rudder. As Mark says, I dont know how this could be possible, unless the horn itself is faulty. To help me check this, could you measure the distance marked "x" in one of the pics attached. It's hole centres to hole centre.
Hope I am not being too much trouble.
Bob
[ATTACH]18251[/ATTACH][ATTACH]18250[/ATTACH]
I had a look at our rudder last night, unfortunately I cant help with the info as we have skinned off the bottom of the rudder covering the rivets in mention.
Hadyn
-
Hi Bob,Mark,Mine is an XL. Realize Haydn's is an S, but didn't think the rudders were different. Don't go to too much trouble to get a measurement Mark, it may be a bit awkward in the assembled position. thats the reason I was hoping to catch Haydn before he assembled his.I will also check lower hinge part nos. to be sure we are comparing apples with apples.Bob
Sorry I haven't got back to you yet, completely forgot. I am off to the build shed again tonight so will pull the rudder out so its in my face and get the info off to you tomorrow.
Cheers
Hadyn
-
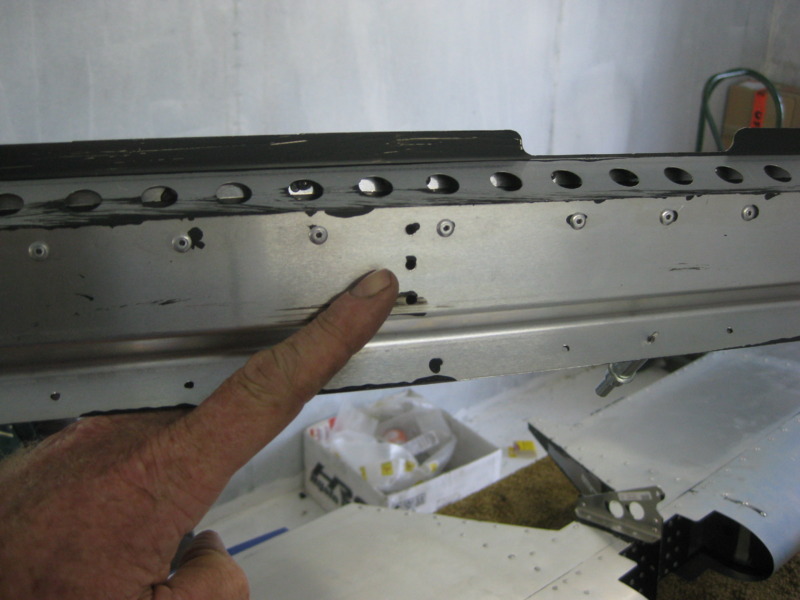
Thanks for the photo's Mark. Impressive build bench for the wings.
Our extra cleco's have turned up and now in use (not quite as many as you!). All panels and holes are lining up perfectly.
-
Hi All,
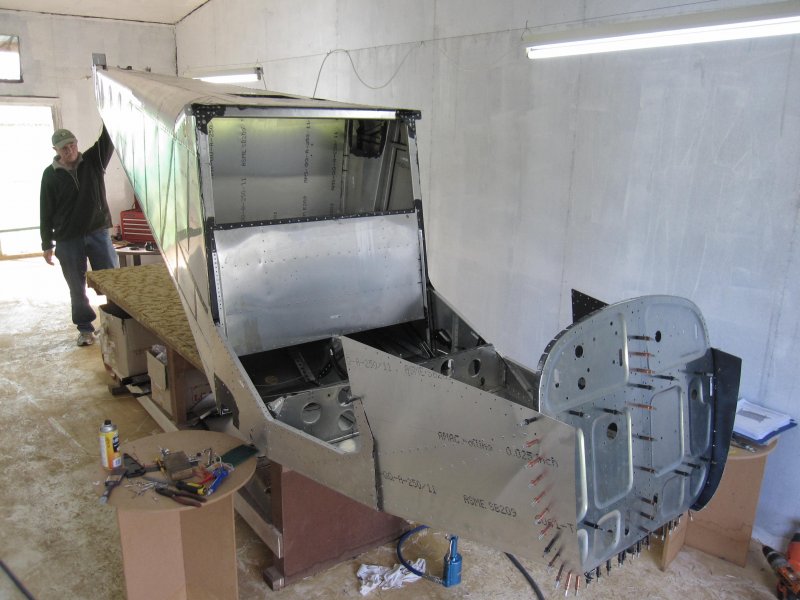
We had a enjoyable productive couple of afternoons over the weekend with the fuselage. We thought the lack of clecos would hold us up as the extras we ordered were ment to turn up on the weekly Air NZ flight on Sunday. We couldn't wait so you are not seeing cable ties holding it all together!! All parts lined up extremely well and we ended up finishing the day with the top and bottom skins in place. Haven't really read anywhere about the lack of clecos in the kit?? Paint is all ordered and will turn up on the next ship to Norfolk as we would like to get the flying surfaces painted off while we spend the time on the fuselage build.
-
H
Hi Bob,G'Day Haydn,Noticed you have finished your rudder (amongst other parts). Could you check the alignment of the hinges and post the result please? I have a problem with mine, and I'm pretty sure its the bottom hinge at fault. If yours is OK, I would like to compare some measurements to confirm this. Hope I am not imposing on you too much.Bob
Sorry for the delay as I had the opportunity of co-piloting the the locally based PC12 down to NZ, Keri Keri, Ardmore, Keri Keri, Norfolk from Sunday to Wednesday and couldn't turn that down!! Maybe im getting practice in for our oceanic flight to Keri Keri in the Sav..... 2 hours down there in the PC12, 5.5 - 6.0 in the S ???
Anyway, I think I understand what your concern is re the rudder as we had to do a little removing of some rivets on the lower hinge brackets as it was a little confusing and was only picked up when we went to fit the hinge plate. We were one row of rivets down further than we should have been, but easily rectified. Might be a little hard to show in photo's now as we have the leading edge skins on. I will have a thorough look tonight when we have our build session. As Mark pointed out you have the XL model? so im not aware of the differences between that and the S. More than happy working with you on this.
Cheers
Hadyn
-
And the photo....
-
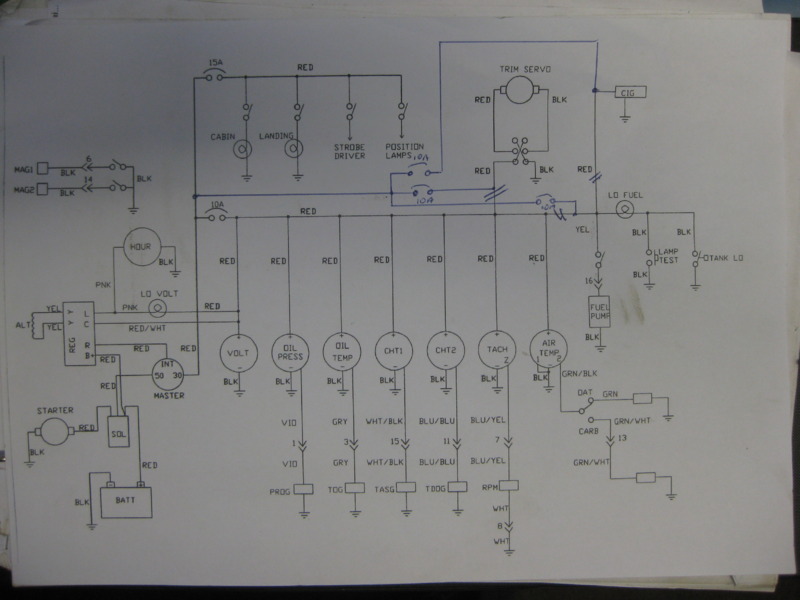
Hi Mark,
Best I load this onto your forum, not mine!!
Could you please run your nose over the Sav wiring diagram attached for your opinion on the extra fuses that I think are required. We will stick to the original harness and just the extra fuses as much as I liked your harness and fuse box. If you cant read it I can email it to you.
Cheers
Hadyn
-
Hi Mark,
Could you please run your nose over the Sav wiring diagram attached for your opinion on the extra fuses that I think are required. We will stick to the original harness and just the extra fuses as much as I liked your harness and fuse box. If you cant read it I can email it to you.
Cheers
Hadyn
-
Hi Mike,Hi Hadyn,Have you looked into instaling a ERPS (Electronic Rust Prevention System), they work, do some research. Mark has one in his Sav. They are used on Oil Rig Platforms and Grandstands. Professional Beach Fisherman swear by them, I think a must in your environmentThanks for the info, I will look into this a little more as I have not been convinced of these products in the past. One of my syndicate partners in the build of our Sav fitted an ERPS to his new 4WD ute in 2000 when he shipped it to Norfolk Island, this vehicle has just had extensive chassis and rust repairs. I have seen this vehicle deteriorate over the years when I have serviced it. Normally and my preferred method is to dismantle the vehicles and spray with inner cavity wax and coat the chassis with underseal, understanding that this is not suitable weight wise for aircraft, anyway that is vehicles and im all about aircraft at the moment. I believe with regular cleaning, hangerage and spraying with ACF-50 / Corrosion Block at least every 6-12 months we should be right...
Cheers
Hadyn
-
Hi Mark,
We discussed the possibility of you having a copy of the prop pitch tool made up that you showed me. Please advise if you were still going to get a couple made as we are keen to purchase one.
Also myself being a bigger bloke im keen to do the flap lever mod that you showed me as it worked well. Did you keep any plans on the design??
Cheers
Hadyn
-
Hi Gundy,G'day Yenn I've just installed a Vernier Throtle in my Sav and I love it. I went away from the standard Savanah Throtle to a Mcfersion style friction and didn't like it as the carb springs are to strong. It keep creeping to more Throtle. I spoke to McPherson while at Oshkosh last year they do have softer springs available. I like the idea of small adjustments. The vernier Throtle doesn't take much time to get used to. As I'm going to reduce power for landing I use my thumb. As most people are aware my Sav only has one Throtle as it only needs one Pilot. And I used a splitter which I brought from Spruce which it works great to both Carbs. Gundy.Are you able to supply any info and suppliers on the Vernier Throttle and splitter you fitted.
Cheers
Hadyn
-
Another productive weekend on the Sav. Rudder and fin completed, finalizing the building of all the flying surfaces. Will spend the next couple sessions drilling and fitting the tips to the modified mounting strips (Thanks once again Mark). Then a bit of a clean up and we are into the fuselage.
When I caught up with Mark a few weeks back he only had 2.5 hours on his new Sav and he was going on about his interest in building another one, and I thought whats wrong with this guy!..... Mark we understand now and even share a little of that passion. What and enjoyable and interesting build this is for a first build, but understanding that we have the fuselage to get our teeth into....
-
Hi Mark,
Attached is a photo (i hope) of the trim tap with the 3 holes in it. Do you recall if these holes are there for the manual trim adjustment and just need to have rivets fitted since we have the electric trim option?? Hope the head cold is sorted and you get some flying in this weekend. Beautiful day here on Norfolk, just thinking if we had the Sav finished, which way I would do my 15 minute cross around the island, to the left or to the right, round and round we go....
-
Hi HaydenIt wasn't zinc chromate it was something else I will ring Bill and find out.....I didn't fill my rivets either...deemed it way too much work for just a cosmetic effect...you can't see the rivet holes standing 2 mtrs away anyway
Hi Mark,Hi HaydenIt wasn't zinc chromate it was something else I will ring Bill and find out.....I didn't fill my rivets either...deemed it way too much work for just a cosmetic effect...you can't see the rivet holes standing 2 mtrs away anywayWould appreciate the info when you get it, thanks.
Looks as though you have had some nice wx of late so I hope you have had a few more flights and starting to get the hours up, and no more teething problems.
We spoke about the 72" prop and by the time I got in touch Tom the 68" prop was under way and we now have it here. Anyway we have plenty of strip here and we will be using the std tires supplied with the kit initially. We are only allowed to use the seal over here even though there is plenty of grass.
-
One or two days extra for the fus build, I can deal with that.... 14000 rivets to be filled, might give that a miss, LOLAnd a little more complex in the fuslage frame, takes maybe a one to two days longer to build the rear fuse. If you want the Smooth I still think filling the rivet heads before painting is more important than the shape. I have always liked the shape of the S ever since the first photo arrived. -
Not aware of any product being used to fill rivet heads?? Just something to vibrate out!! There are a few commercially manufactured aircraft that use the same riveting system and I haven't seen any rivets filled in those.That's an interesting idea. What substance should be used to fill the rivet heads?


Another NEW Savannah XL on its way
in Savannah
Posted
I'm keen to see the pic of the back support as well, im sure you understand my interest as you have seen my height and size!!
Also would appreciate info and pics of your instruments as we need to start looking at this now for down the track and your set up sounds good.
Glad to here that you got to commit some aviation on the weekend. I hope my early morning phone call gave you the inspiration to get out of bed and go fly (sorry about that).