duncan_rtfm
-
Posts
78 -
Joined
-
Last visited
Content Type
Profiles
Forums
Gallery
Downloads
Blogs
Events
Store
Aircraft
Resources
Tutorials
Articles
Classifieds
Movies
Books
Community Map
Quizzes
Videos Directory
Status Updates posted by duncan_rtfm
-
Hi,
Anyone know where I can get decals/stencils/wrap to apply to my white-painted fuselage and wings? (I'm in Brisbane).

-
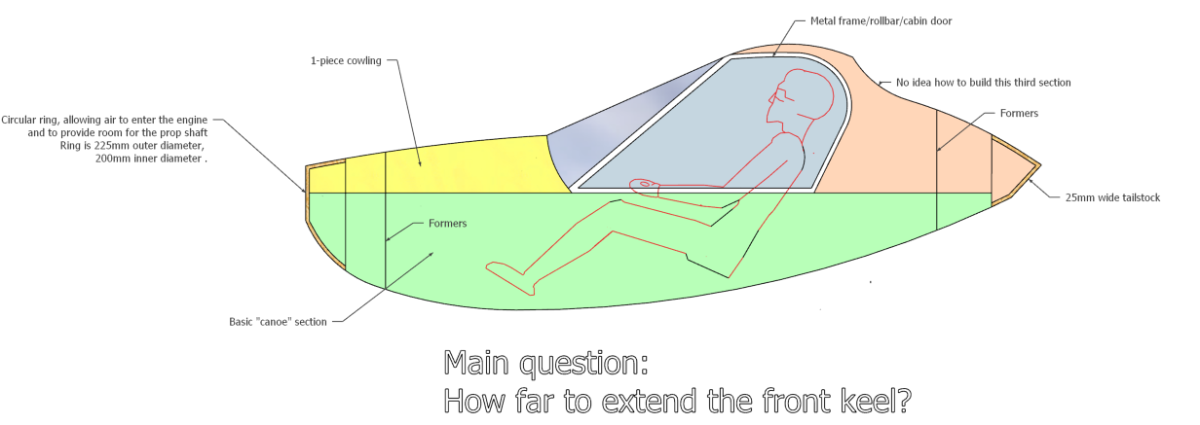
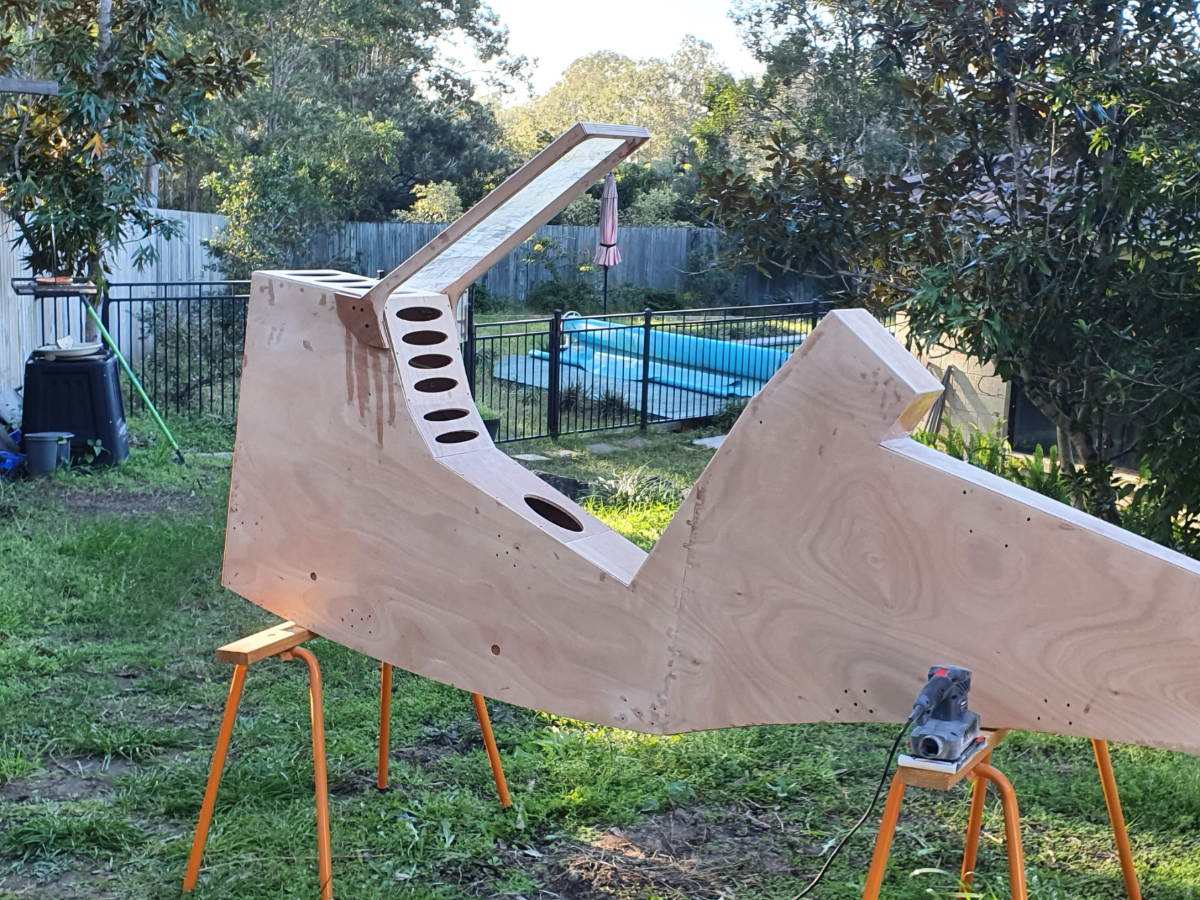
During SEQ's lockdown I've been champing at the bit, because I have been waiting for a wood delivery to carry on work on the Fleabike. So, with nothing else to do, I have designed a new plane - this time a fully enclosed single seater.
I've decided to build it with the cedar strip canoe method. I have watched a huge number of Youtube videos of people building strip canoes, and it all looks reasonably straightforward. However, all the online builders are working from plans, and don't have to make any design decisions.
My first design decision is how far to extend the front "keel". It has to accommodate a 225mm diameter ring (to allow air into the engine compartment, and to provide for the prop shaft). I don't actually know how to build this.
This is what I've come up with so far...
I'll build the fuselage in three sections. The green section is a fairly straightforward "canoe". The yellow section is a single piece cowl/engine covering. And the orange section (as you can see) comprises the roof and the turtledeck
Do I run a keel along the entire length of the green section? And the yellow? Or do I do this for all three sections?
Are there any canoe builders on this forum who might be able to help with this?

Regards,
Duncan
-
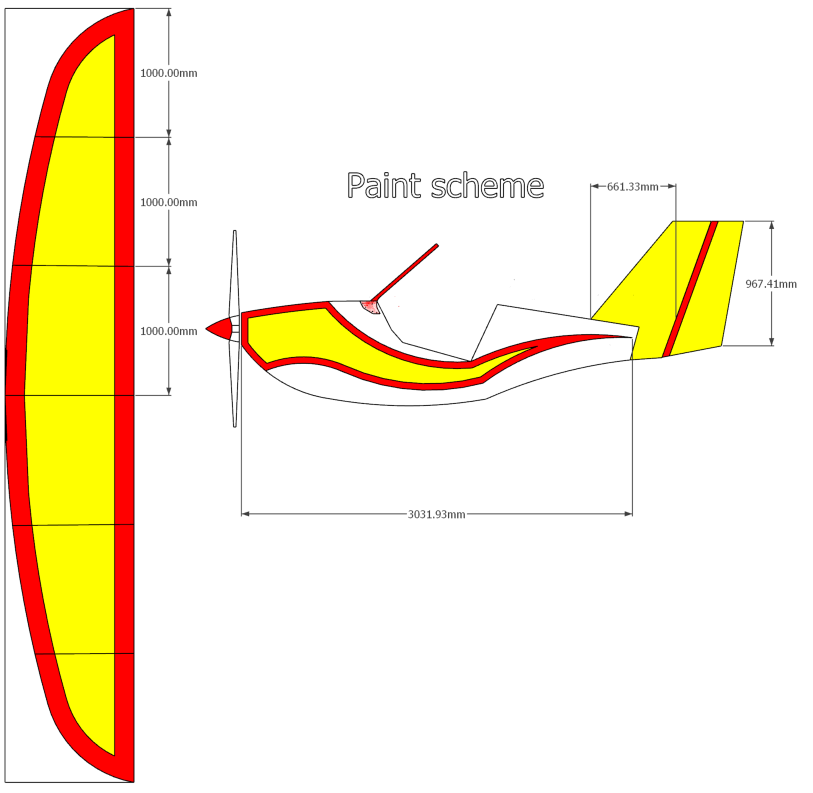
OK - the Fleabike fuselage is complete, windshield added and all sanded down. Any suggestion regarding how to paint the Bike?
I have some 117 fairing additive for West system, and I thought I might roll that on, sand it back and paint with West + pigment (white). I'm leaving the control panels, seat, seatback (i.e. the upper central spine) natural wood, but painting the rest.
Is there a better way?
-
Question:
After wasting about an hour (and two cups of coffee) on the laptop searching for suitable fuel drain plugs, not a single manufacturer/distributor cares to specify the diameter of the thread going into the fuel tank. It seems I am looking for a 1/8" NPT, but I need to know what size hole I need to cut into my tank to accommodate this. Any ideas?
Duncan -
Hi,
Is this the sort of fuel pump I should be looking at fitting (Aircraft Spruce)? If not, what do other people use?
Regards,
Duncan
-
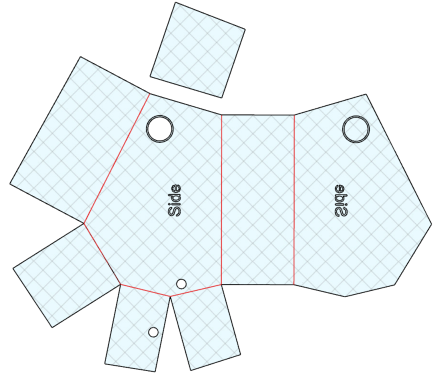
My fuel tank is a weird shape
Constructing this was proving to be a nightmare, so I created a flat-pack, which looks like this.
Sketchup can't do this, so I had to do it by hand. I'll cut it tomorrow. Basically, I'll epoxy tape along all folding seams on the inside (red lines), seal the reast of the MDF with epoxy and bend everything together when the epoxy is still in the green stage. The top is a separate piece, which will allow me to reach inside and apply the fillets. Then I'll bond the top on. If this works, I'll commit to 9mm ply.
This will also allow me to accurately measure the tank's capacity.
I have yet to find anything definitive regarding West Systems epoxy and fuel tanks (I don't plan to use ethanol-fuel). Vinyl ester worries me, because it looks like I'll have to do the complete layup on the inside in one go (including the fillets) because VE doesn't stick to VE very well.
However, I've discovered that 747 Polyester is about as gas, ethanol, diesel etc proof as one can get, and it isn't expensive. If I can find some locally, I'll go with that.
Duncan -
Question: Does anyone know where I can get Polyester 747 resin? Apparently it is completely gasoline proof.
Alternatively, does anyone have any experience using Vinyl ester resin for fuel tanks?
And lastly, how does West System stand up to fuel?
Regards,
Duncan
-
Questions:
I have built the first rough prototype of the gas tank out of 3mm MDF held together with masking tape, and it fits! Ta-Daaa! Well, it's a bit snug, to be honest, so today I'm going to cut prototype #2 out of 9mm MDF, and screw it together. If that is OK, I'll commit to 9mm ply.
Question #1: What hardware do I need to include? I've been to the marine supply stores (online) and there are so many filler caps, it's hard to choose. I will have a transparent tube on the outside of the fuselage to show fuel depth, but what about fuel pumps? Is it as simple as fitting a pipe and running it to an external pump (there's plenty of space behind the engine)
Question #2: What do I seal the tank with? I've seen videos online of a guy building a fuel tank for his boat, and he seals the inside with epoxy (West). However, I've also read that I need to use vinyl ester resin. The problem with vinyl ester is that (apparently) it doesn't bind well to vinyl ester. My plan is to cut the individual sheets, glass the inside surfaces, wait for them to cure, clean up the edges, and then bond/screw all sides together, and apply a fillet. Thoughts?
Regards,
Duncan
-
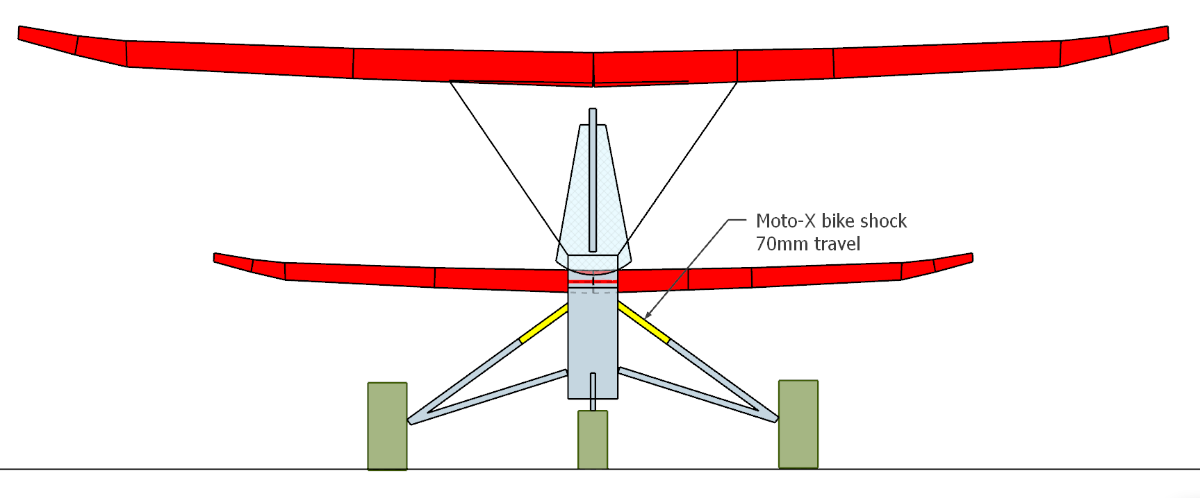
I was going to have rigid main gear struts (triangulated with two struts attached to the base of the fuselage, and one up just under the seat), and rely on the 18 inch tundra tyres for damping, but I'm thinking I may find it more comfortable to include some form of damping.
I was looking at rear shocks for bikes, and they offer 60-70mm travel, with a max loading of about 250kg each. Larger are available, of course. They are also quite reasonably priced.
Would this work?
-
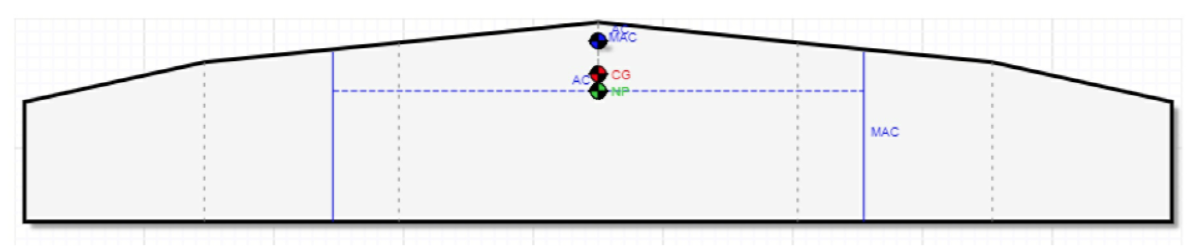
Hi,Things have gone silent on my end for a while - some minor medical issues, but mostly a lot of head-scratching over the design of the wings. I had NO IDEA how difficult designing a wing would be. And a Flea wing especially, because it is made up of separate panels, with hinges and pivot points. Sourcing the correct hinges has been a nightmare - found some some this morning which I think will do nicely. (Naturally) I opted for a swept wing rather than a rectangular one, so first I had to calculate the centre of pressure before I could position the spar to which the pivot is attached, and then I had to update the spreadsheet to check on the optimum CG.
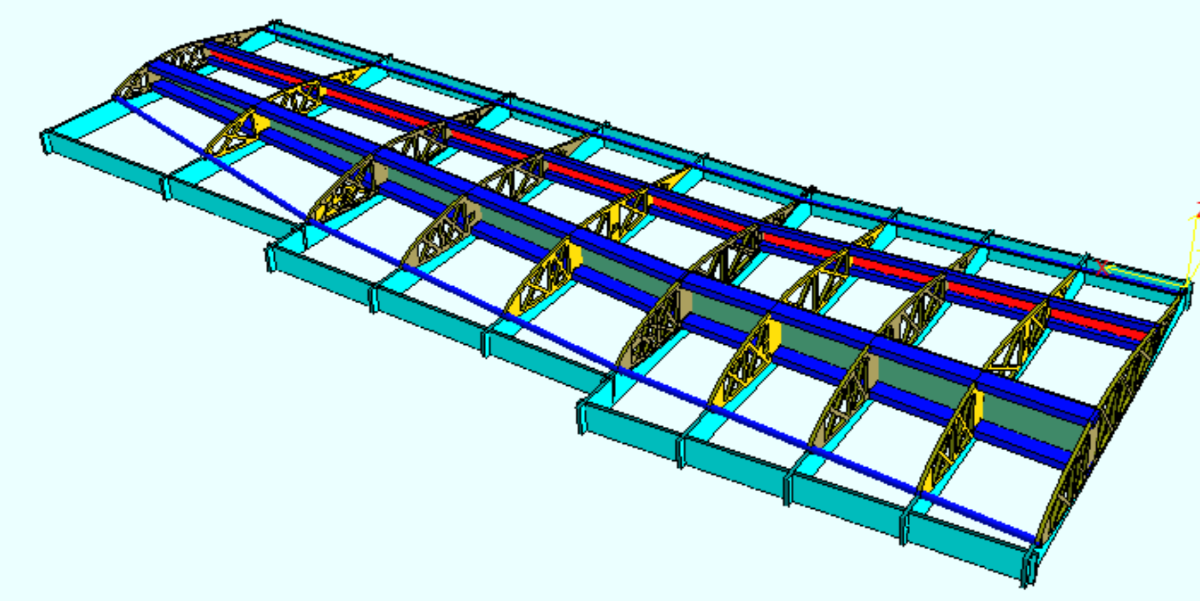
That done, I had to calculate the size of each rib, and the position of the cut-outs for the two spars. Cutting the ribs was easy, of course. Next up was cutting the cradles for each of the wing sections, so that the ribs would be perfectly spaced, and vertical, with the required 4 deg dihedral.
I trial fitted everything, and when satisfied that it all fitted together nicely, bonded the spar caps (blue in the screenshot above). I checked that the trailing edge (4mm glass fibre rod) was straight (it was). I then threaded the 16mm Tassie Oak dowel for the leading edge. Also straight, and a nice fit. I then bonded the LE in.Next job is to bond in the shear webs. They are already cut, so it will be just a matter of slapping on the West System epoxy, and clamping. There are also two 19mm x 19mm drag/anti-drag spars which, although the router cut the holes in the ribs in the correct places, it can only cut at 90 deg, so I have to "angle" the holes so that the spars will fit. And then bond them in place. By this time, the wing should be pretty rigid.I also had to design the wing attachment hardware. The rear wing consists of two halves, separated by the width of the aft fuselage (about 135mm). The inner rib is reinforced, and bolted to a metal attachment on the fuselage. The outer attach point is at the first hinge point. This hardware has been drawn, but not cut yet.Next came the drawing of the wing sheeting. Not as easy as it might sound because of the swept wing. But I've completed that now also. The rear wing will require three full sheets of 1.5mm ply.As you can see - a lot of time at the computer.So much for the wing.I have decided (based on the astute comments here on the forum) that placing the gas tank in front of the firewall - while convenient, because I could use a regular 20 litre gas tank from Bunnings and some fittings from boat shops, this was a terrible position not only because of the proximity to the hot engine, but also in terms of the change in CG as the gas gets used. So I've moved it to inside the fuselage directly on the CG.
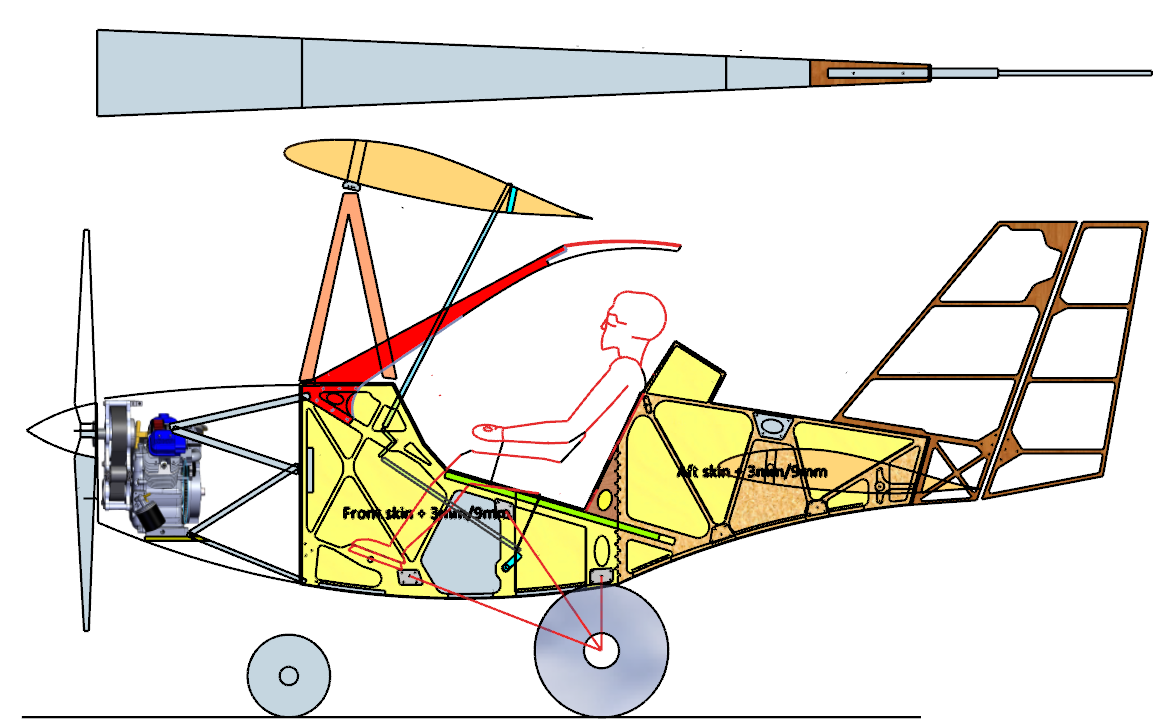
The grey area inside the fuselage in the screenshot above is the new position for the gas tank, with a filler cap jutting through the side just under the pilot's knees, out of the way. About 18 litres (about three hours flight time). I'll have to fabricate it. I thought of plywood sealed with vinylester, but it strikes me that I have a whole box of 3D Core foam, which looks like this:
Extremely light, very easy to cut on the router, and simple to laminate with a layer or two of vinylester and glassfibre. I'll prototype the tank out of cardboard, and then Bunnings plywood before I commit to the actual tank.So that's what I've been up to since last time I wrote. As usual, comments welcome.Regards,Duncan
-
OK, I've come up with a plan to take the pain out of sealing the ribs:
- Tell CAM that you are cutting perimeter with 6mm bit
- However, cut with 3mm bit
- Rib will be 1.5mm oversize
- Dip entire rib in shallow bath, filled with polyurethane varnish
- Use a brush to squish the poly into all the cut-outs
- Set aside on plastic sheeting to dry
- Rub down with fine sandpaper to remove fiber rise
- Dip again, set aside and allow to dry
- Then replace ribs in the CNC, re-cut the perimeter, but use a 6mm bit this time
- This will remove the excess 1.5mm all round, and present a clean surface for the epoxy to bond to
There's nothing I can do about the current crop of ribs, but they represent only one half of the rear wing.
Duncan
-
Hi. I'm busy sealing the ribs at the moment. So far, this is BY FAR the most tedious job. I'm rolling the polyurethane onto the sides of the ribs which takes all of about 5 minutes. But every single cutout in every rib has to be sealed as well, and this is a pain in the arse. Only completed four ribs so far. Having a tea break and gathering my loins for another four. Aaargh!
Typical rib: