
Head in the clouds
-
Posts
1,842 -
Joined
-
Last visited
-
Days Won
42
Content Type
Profiles
Forums
Gallery
Downloads
Blogs
Events
Store
Aircraft
Resources
Tutorials
Articles
Classifieds
Movies
Books
Community Map
Quizzes
Videos Directory
Posts posted by Head in the clouds
-
-
More info needed from you about what surface you are polishing, but ...No advice, no answers?Depending on which primer you used ... most of them wash off easily with methylated spirit.
Did you use Alclad or 2024 or 6061 bare sheet? Alclad surface is very soft because it's pure aluminium, consequently it polishes very easily by hand. Typical products readily available are Solvol Autosol and Reflection. I prefer Reflection. Follow the directions on the package or you can probably find them online.
If you used bare high tensile sheet then it's much easier to use a polishing machine and just do the final finishing by hand. Don't buy the cheaper small ones, they make you work harder. The ones that look like a 5" angle grinder are the go, about $90 on ebay. Better still, see if you can find one that's random orbital rather than just spins. But, the random orbital's real advantage is to help prevent 'swirls' which are more of a problem with dark colours than light ones, swirls don't show up much on white or silver colours. On black they cause all paint polishing people to have nightmares ... so you don't really need a random orbital unless you can find one easily at the right price (probably not).
Make sure you buy a multi-speed polisher, usually 6 speeds, something like 600-3000rpm. You'll start at 600 and end up using about 2000 once you gain confidence and experience.
Watch online (Youtube) videos of how to go about polishing. Start very gently. Don't even think of using a lambswool type of polishing head, they are very aggressive. Use the smooth orange foam type, add a tiny spray of water from a spray bottle to keep the polishing gentle. As the polish dries out it starts to work harder and do a better job but beware the sudden 'bite' as the surface gets hot. Run a piece of wood across the (spinning) foam surface every now and then to clean off built up polish.
You only use the polisher for putting on the polish/cutting, the actual 'polishing' (wiping off the polish) is done by hand. Many people think the lambswool buff is for wiping off the polish - it's not, it's for aggressive cutting of old and faded/chalky paint surfaces.
I finish the job with Starbrite Premium Marine Polish, do it twice within thirty days for a finish that lasts 1-2yrs.
Tip - practice on some metal offcuts securely screwed/clamped to the workbench, beware them getting picked up by the polisher and flung at your midriff like a spinning blade!
EDIT - another tip - if you get completely hooked on polishing (it's very satisfying once you work it out), it's all to do with the fineness and the type of abrasive used and the type of material being polished. Ultimately though, the finest abrasive known to man is Rouge (yes, the stuff the Parisians discovered makes the young pale ladies' cheeks look prettily flushed - and the colour in the first lipsticks). Anyway - it's properly known as "Jeweller's Rouge' and is what jewellers use to polish gold to such a fine lustre. You can buy it on ebay from time to time, it's a red powder, usually comes from UK, not expensive. You can mix a little in with the Marine Polish, to really give the final sparkle to the job, and if you rub the polish in straight lines instead of circles, you'll get rid of the swirls which can only be seen in bright sunlight anyway.
-
I see airventure Australia is going to be at Parkes NSW 20-22sept 2019. Since it's only 33 miles I will be going in the Thruster.
It would be great to get a bunch of traditional tube and rag ultralights attending, anyone up for it ?.
Sounds good to me, I'll plan on bringing the Kestrel in its trailer.

-
 2
2
-
-
Moyes Dragonfly - for towing hang-gliders.
-
It's certainly pretty ... but every photo, and also the video, shows a lot of reflex in the elevons which would be concerning me about CG position if I was the test pilot. Unless they presently have the cockpit heavily static-ballasted I'd hate to think what the consequences of a second pilot/pax would be.Or maybe not. https://www.picoshots.com/hortenaircraft/And a video: https://www.picoshots.com/p/1994163613523101916_11538608618
All flying wing stuff I've ever come across indicates the stability reflex needs to be built into the airfoil and control surfaces should be neutral in level flight. With the CG where it appears to be at the moment, that one could well come badly unstuck during a landing flare if the speed was allowed to wash off too much. Just a matter of getting the ballasting right, but I wonder why they didn't do that before flying it.
The Rego looks fake to me, I can't find any reference to G-EBWB (or G-E8WB) but to TWITTs (flying wing enthusiasts - The Wing Is The Thing), BWB is usually for Blended Wing-Body, so perhaps they're just having a play with it on the quiet before it has an official rego.
Very much looking forward to seeing their progress in future, nonetheless. Thanks for posting Phil - and for finding the additional references pmccarthy.
-
I don't think there's anything more important than having a good instructor. It makes the difference between being a safe and confident flyer, or being forever slightly on edge because of the things you were never taught ........I only wish we lived a bit closer, as I'd like to do my ticket with him. Devonport is about 3.5 hours drive away from me - standard commute for you mainlanders but a very long way for Tasmanians! Still, maybe I should camp up the north for a couple of weeks in the caravan and do a block of training with him. I know it's hugely important to get a good instructor.
And there's only one other instructor I know who is even remotely in the same class as Peter. He has so many years of experience and yet never seems to tire of teaching, as so many do. And that's often the problem - the new/young instructors are often full of enthusiasm and goodwill but don't have the depth of knowledge, varied experience or the skills to pass on, and unfortunately by the time they become 'old hands' they are often weary of instructing and become unenthusiastic, impatient and lazy. There are many exceptions, of course, but Peter is one of the bright stars in the sky (and on the ground in the classroom).
If I was you I would definitely use your caravan, choose a few days' window of good weather and do some block training at Peter's school, you won't regret it. You'll learn all the basics of course, but also those invaluable skills of finesse and survival under pressure.
-
2
-
-
You're welcome Marty.Thanks HITC for putting me on to Peter.
Not meaning to put words into Marty's mouth, but I think his intention is to run it on condition as long its critical signs bear up well......I am not sure if I mentioned it to you before but your gearbox will need a overhaul as well so be aware of that. Usually the schools with get that done at 1000 hours but of course the engine is now another 1000 hours older so the gearbox needs to be done again because the school doesnt get it done at the end of engine life
The 'Peter' referred to is Peter Reed, formerly of the Skyflyte flying school at Kooralbyn, Qld. I've known him for 33yrs and worked several years with him as an instructor at Skyflyte, and I can safely attest that he is one of the very most diligent engine and airframe maintainers I have ever come across. When Marty said he was looking for an engine I knew Peter had one coming up for replacement so I called Peter and asked him about it. As has been the case in the past for as long as I can remember, Peter has been having the oil spectrum analysed at each oil change to detect any abnormal changes to component wear rates and he has been fastidious about the gearbox maintenance - and also running the engine on premium unleaded mogas.
If my memory serves me correctly, Peter was one of the first, many years ago and well before this engine, to report the effects to the gearbox clutches, of using Avgas. Consequently he has avidly avoided the use of avgas whenever possible, and on the odd occasions where he has not had an option, he always flushed the engine at the first opportunity and refilled with new oil.
In the USA there have been countless reports of well maintained 912s running faultlessly to TBO in excess of 3000hrs in non-commercial operations, and several cases of them even exceeding 4000hrs.
Naturally I can't offer any absolute guarantees, but I will say that I would not have any hesitation in using one of Peter's ex-school engines, and just keeping an eye on suspended elements in the oil, oil consumption rate, and compressions of course.
I will also mention, as Marty did, that Peter is one of the most generous public-spirited people you are likely to meet, freely giving his time and absolute wealth of hard-earned knowledge, (of both planes and flying - he'd have well over 10,000hrs by now, most of it instructing), to anyone who asks.
-
3
-
 1
1
-
 1
1
-
-
The Xs at each end were painted out as seen in the photos of June 2016 onwards. Unfortunately it was not a quality job and from about 18 months later the Xs at each end have had the black paint washed/eroded off them and by the August 2018 photo, they are clearly visible again.
Obviously, the owners intend that the airport is open as the people on reception at the resort have confirmed this. They certainly would not have replaced the windsock so quickly earlier this month if this was not so. Tel: 07 5544 6688.
As long as the visiting pilots do their homework and realise that the originally intended displaced threshold for landing on Runway 12 is well past the parking area at 300m in and the displaced threshold for landing on Runway 30 is between the two lakes at 150m in, they should have no problems. At 1400 metres total runway length there is plenty of room for landing long.
Although these limits were set 40 years ago in an era of single and twin engine GA aircraft without consideration of modern day ultralight and sports aviation aircraft capabilities, I think it is a good idea for pilots to aim for these thresholds anyway. They were after all designed and placed in these locations with the express purpose of keeping pilots and their aircraft safely out of trees and associated high terrain.
I don't know where you got this information about "limits were set 40 years ago", because they certainly weren't. Actually the Kooralbyn airstrip was built in 1979/80 by the developers to accommodate Learjets and Citations which conducted champagne flights from Melbourne and Sydney for prospective home buyers - they weren't using any displaced thresholds ...
I was working as an instructor in the Kooralbyn Skyflyte flying school from 1987 to 1989 and there certainly weren't any displaced thresholds then either. BUT - even then, problems were starting to show up with the airstrip because the resort had been sold several times and none of the new owners had any particular interest in the airstrip, some of the owners were more interested in asset stripping the place than using it as a resort, and others never should have got involved because they didn't have sufficient funds, so the airstrip never got any maintenance and the surface progressively began to break up over the next ten years or so.
By around 2000 to 2005 the surface at the runway ends was so bad with potholes (there were plenty you had to dodge along the rest of the runway too) that the operators there decided to move the threshold to avoid knocking wheels off planes as they were landing. It had nothing to do with "keeping pilots and their aircraft safely out of trees and associated high terrain" - those of us who became very familiar with operating there were quite used to almost bumping wheels on the new resort roof approaching to 12, and at the other end, approaching or departing close alongside Mt Kooralbyn, looking up at the ridge ...
If you can avoid letting the visual picture of the surrounding hills, lakes, resort building and parallel road spook you, and just concentrate on the runway itself, it really isn't as bad as some would have you believe. With the experience of thousands of operations there, the best advice I can offer -
- has to do with wind which has a northerly component - if the wind is northerly use a left hand circuit to runway 30, track along the ridge of Mt Kooralbyn on base leg, or just to the west of it (avoid the rotor behind it), and land short on 30 to avoid turbulence on the ground about half way along the strip. If the wind is north-easterly use a right hand circuit and either land on 12 extremely short and completely stop before the cutting, or land long to avoid severe turbulence on the ground at the cutting halfway along the strip. Also - keep that RH circuit tight, approach over the LH side of the oval track/polo field, straight towards the resort then turn right onto final. Pilots making long low straight-in approaches are asking for trouble if they have an engine problem on final, there's nowhere to go, so if you must use a long straight-in approach, keep it high and scrub off the height very late, once you're sure you can glide to the strip.
When the wind is Easterly, Southerly or Westerly there are no particular turbulence hazards, other than what you might expect at a valley airstrip.
-
......
fuel has changed alot in the last 10 years, for starters there is no-longer any refineries in Australia
I think we still have four refineries in Australia - at Altona Vic, Lytton Qld, Geelong Vic and Kwinana WA, producing about 55% of all the refined fuels we consume domestically. Australian Institute of Petroleum Factsheet 09/2017.
That was 2017, but is supported by the more recent July 2018 ABC update of the Australian Petroleum Stocks Fact Check.
I think Bulwer Island Qld was the last to close, in 2015. With each of the previous closures, the remaining refineries become a little more profitable -
Roger Montgomery - why our oil refineries are shutting down.
-
That's right. And they did a great job but it does look more impressive than it really is. Even with an old Jetranger or Hughes 500, neither of which have any artificial stability augmentation, if you stick a leg into a snow or mudbank it's not difficult to hold the machine stationary even in gusty conditions - you just gently fly the machine at the point of contact. Much harder in turbulence is to hold the machine just away from the surface.Looks great, but I reckon they (Airbus Helicopters) might have really good stability (ESAS) and flight control systems. I am always amazed at how rock solid a Tiger can hover even in very gusty conditions using Radalt and Doppler.At first it's a bit unsettling running the blade tips really close to objects but if you're going to be doing a lot of confined areas ops you practice with an external observer calling out clearance distances to you and very soon you realise that before you're going to do any damage it almost appears as if you could reach out of the door and touch the cliff face with your hand. With a bit of practice it's not too difficult to work with your blade tips within a metre of obstacles. Tailrotor clearances can be a lot more disconcerting though, where you're working from spatial memory rather than visibility.
-
1
-
-
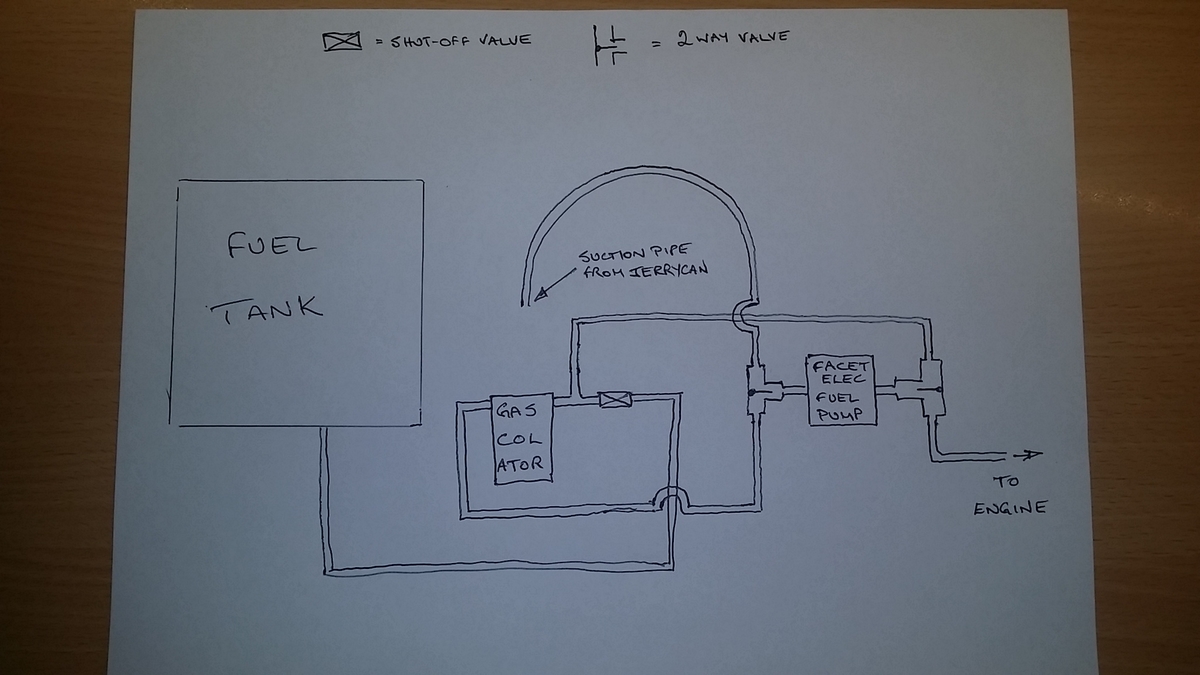
I think I've now solved the issue satisfactorily for my purposes, but it wouldn't suit everybody.
First I bought one of these -
from China for $8. It works very well and pumps a 20lt jerrycan in about 5mins to a head of 800mm. It uses 2 D cells and they supposedly last long enough to pump about 2000lt of fuel. the Chinese reckon they're safe for petrol as well as less combustible liquids and they're certainly very convenient because they only weigh about 400g with batteries so can be taken along for the ride if required.
BUT - I was standing next to the plane which was parked next to the boat and pumping petrol and thinking about the little cheap 3V electric motor running madly with its cheap little commutator and sparking brushes when I imagined the whole lot catching fire and that would be the end of plane and boat and a painful way to go for me, so I decided it just wasn't a good idea. I now use the pump to pump diesel into the 4WD, and to drain the spa filter and similar things, so it was a good purchase anyway ...
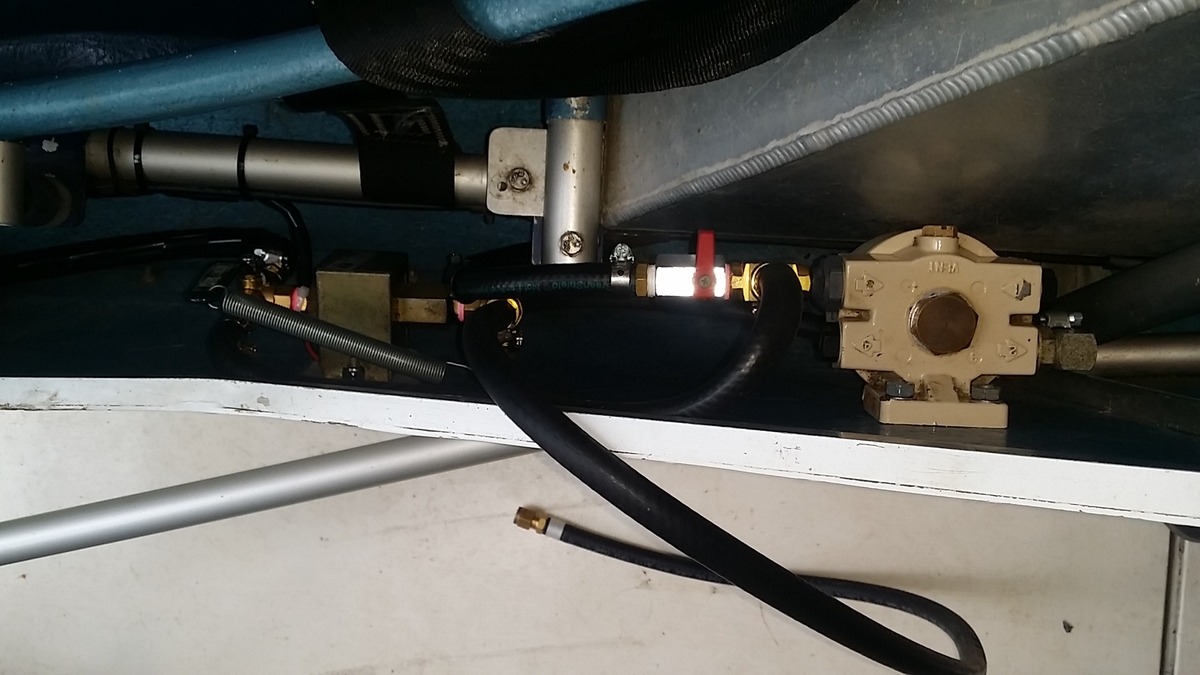
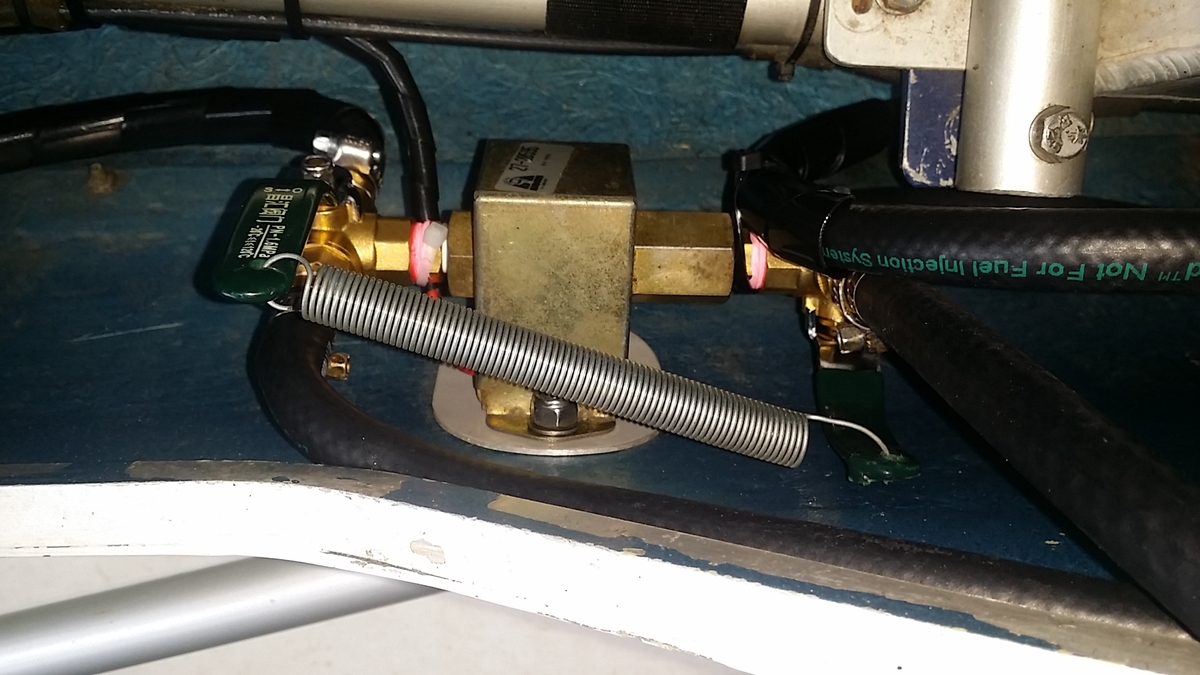
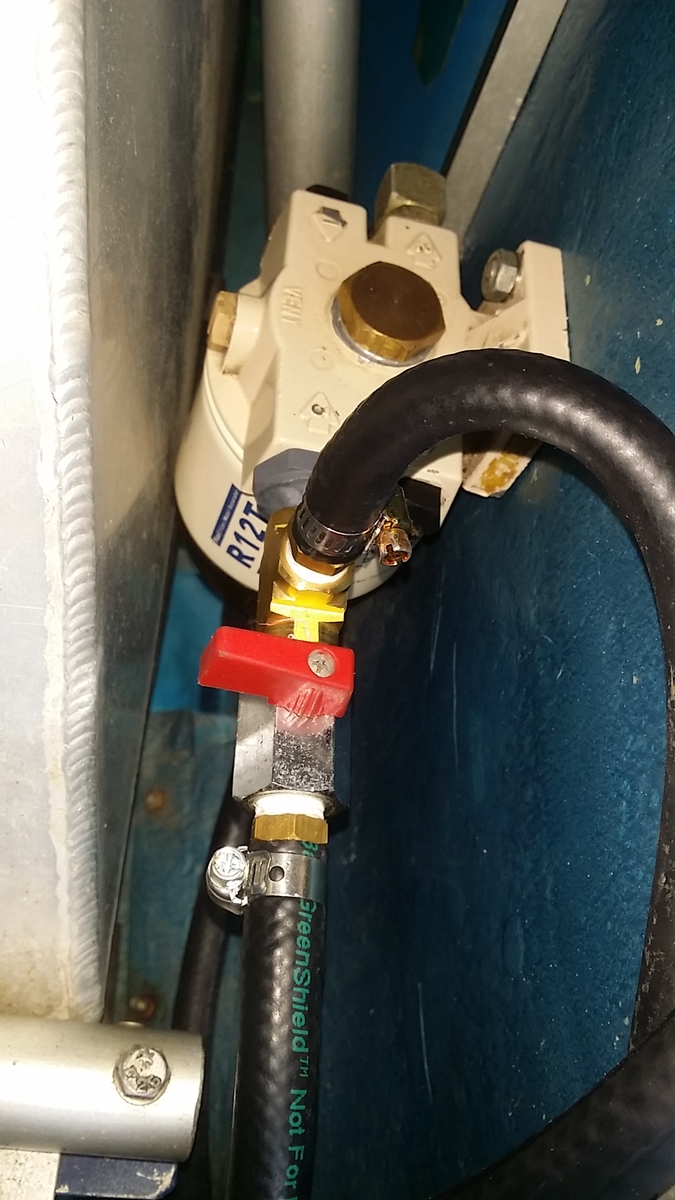
The next plan seems to be a lot better. I bought a couple of these -
and some fuel tubing, 1/4BSP barbs and re-arranged the onboard fuel pump/filter plumbing like this -
it ended up looking like the following pics if you can work them out -
and so now I can open the shut-off valve, place both 2 way valve handles in the down position, dangle the suction pipe in a jerrycan on the ground (therefore grounded) next to the plane, switch on the onboard fuel pump and the contents of the jerrycan end up in the fuel tank.
Once the refuelling is done I place both 2 way valve handles in the 'up' position and hook on the spring as a safety device to prevent accidentally closing one or the other of the valves, and I am ready to go 'up' flying. Closing the shut off valve at any time or configuration isolates the fuel tank as normal.
The onboard Facet fuel pump draws just 0.6A under full load and the onboard battery is 18AH, so the battery can run the pump for 30hrs continuously. It takes 10 mins to pump 20lt into the tank and the tank holds 55lt so to fill the tank from empty would take 30mins but uses only 1/60 of the battery capacity, so there's no worry about flattening the battery.
In reality I usually only pump 20lt or so at a time, it would only be more than that going on a longer trip when there is usually plenty of time getting prepared. Naturally when pumping fuel I need to stay around the plane so I have made a point of using the time to good benefit by conducting more thorough airframe and engine inspections than usual and it's paid off already, I checked the prop bolt torques between routine inspections and found they needed a little adjustment, and I took some slack out of the elevator controls which was immediately noticeable inflight.
The pumping might be a bit slow for some people but it works for me and now avoids quite difficult refuelling because the tank access inside the fuselage is not easy.
-
1
-
-
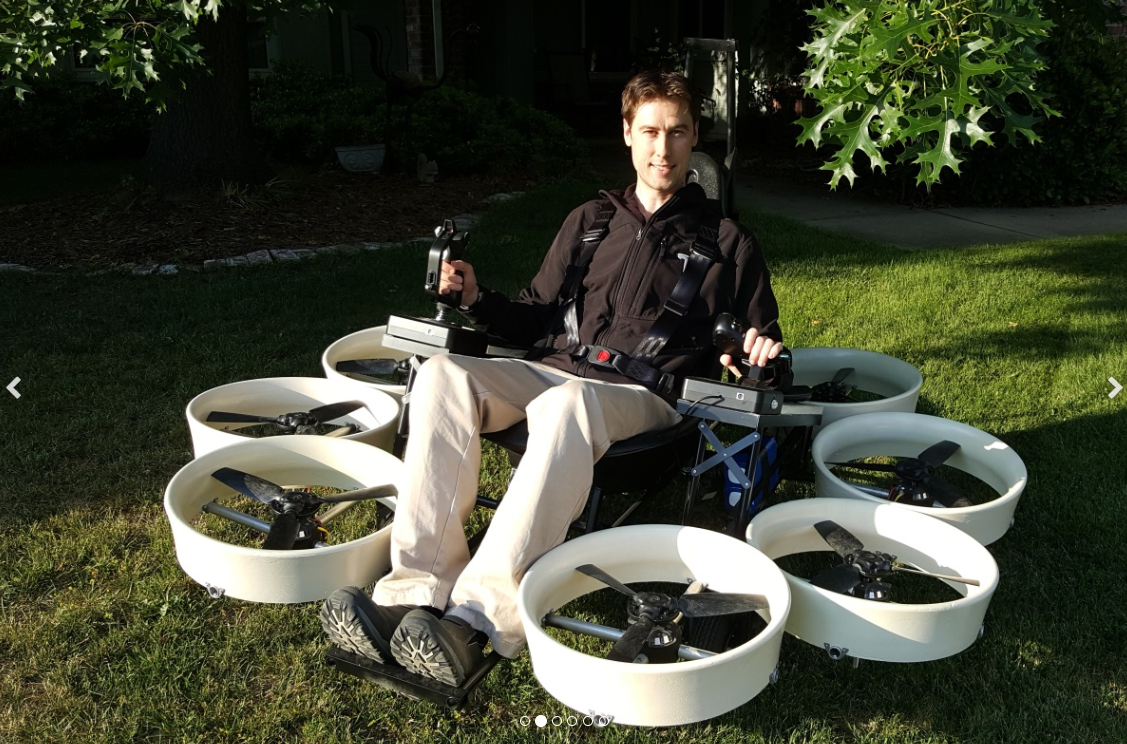
And then there's this -
Or this, which would probably scale up rather well, into a VTOL with speed and range -
And then there's ... well the list is endless, from outright crazy to brilliantly high-tech state-of-the-art. It's well worth joining the group if you want to tease yourself about the possibilities.
-
1
-
-
Much as I love the Drifter, who needs the airframe if you're going to go electric?
This would be an awesome toy, just add a ballistic parachute in case things go awry and what a heap of fun you could have. With the auto-stabilisation systems developed for drones it would be incredibly easy to fly and totally intuitive. As good as a small helicopter at 1/10 the price -
EDIT - and for anyone interested in ultralight electric conversions there's a great Facebook Group called ultra-electric: do it yourself electric ultralight conversion just click on the link and then request to join the group. They'll join you up in about 24 hrs or less and there's a wealth of info about everything aero-electric for the enthusiast.
-
1
-
 1
1
-
-
Water can get into your tanks from a number of sources.
If you don't keep your tanks full, condensation can form on the inside top of the tank overnight and end up as a few drops of water found during your next tank drain check.
Always do your drain check on level ground, move the plane if required.
Always rock the wings before doing your drain check, that will help any droplets to move to the very lowest point where the drain is, and it will also dislodge any droplets that may be hanging on the top surface of the tank - ones which came about from condensation.
There's really no need to be overly concerned and drain your tanks completely, that's what your fuel drain check is for (to remove any water that has accumulated), don't forget that the fuel pickup point is above the tank sump where the drain check is done from. Also - the very reason for having a gascolator is to trap any water that might have been missed during the drain check, or which has accumulated since, by condensation.
If you drain all your fuel out, you may then be certain that there's no water in the tank, BUT tomorrow there may again be water in the tank, from tonight's condensation, so it's not a case of getting rid of all the water forever, it's a case of constantly removing whatever water might have accumulated for whatever reason.
Water can also get in through tank vents, tank fuel filler points and I had an interesting experience where more than 2 litres got in the tank overnight during heavy rain, it took a while to find the culprit, the flexible plastic/rubber tubing of the tank vent line had developed an almost invisible vertical split which allowed water running down that tube to enter the tank freely - that was on a Drifter with external tank and breather line.
-
1
-
-
Yup, Ed Fisher design Micro Mong
-
Interplane Skyboy
-
1
-
-
IBob - in thin sheet metal you don't cut the countersink, you use a dimpling tool to form dimple recesses in both (or all) sheets. If you cut the countersink or oversize the holes you will massively weaken the joint. When you press dimples into the sheet metal you need to start with undersize holes so that when the metal stretches to form the dimple, the holes end up the right size (start with about 2.8-3mm for 1/8 rivets).
If you only have a few holes to do you can make a dimpling tool using a pair of dies (male and female) turned up in a lathe and drawn together with a 2.5mm SHCS and nut. If you have a lot of them to do then you make a similar pair of dies and draw them together with a hardened and headed mandrel in a standard riveter - naturally you don't break the mandrel each time, so that you can use it time and again, and it's hardened so that it doesn't get chewed up by the jaws of your riveter and so that it then releases easily when you take the pressure off the riveter handles. Note - don't pull the mandrel any harder than needed to form the dimple (which isn't very hard at all) with the riveter or, if the mandrel is properly hard, you will flatten the teeth of your riveter's jaws.
Alternatively, and perhaps more easily for most folks, you can use a rivnut tool and screw the mandrel into a nut (instead of a rivnut) on the other side of the dies for each hole you want to dimple, takes a few seconds longer per hole but it's no big deal in the scheme of things.
-
1
-
-
J3 Pup ...? I'm getting older mate. My memory is fine, it's just all the other baskets around me can't remember a thing ... or hear anything ... what? I heard that ... ?
-
Just to show there are plenty of others of us following ... but T88 is just too good for words!
Is it a Karaone?
Or maybe ... I think they were called N3 Pup?
Nice looking little plane, whatever it is, well done for finding all these red750, you're a champion!
-
1
-
-
I have MGL instruments and like them, but Oleg’s setup is the way to go. Muct better value for money, pretty easy to put together, He gave a really good presentation on this at Ausfly Narromine in October.
EXPERIMENTALAVIONICS.COM
DIY avionics for Experimental Aircrafts. Aviation related electronics projects based on modern microprocessors, micro-controllers and solid state sensors.
QwikEFIS might be worth considering. http://members.iinet.net.au/~ninelima/efis/index.htmlI have no connection with the author and don't use it personally, but it looks like good piece of software for Android devices.
Many thanks apm and rgmwa! I'd seen Oleg's thing before and completely forgotten about it, and QwikEFIS is new to me, so I'll have a good look at both and see where we go from there.
Are there any more like this out there that I should be considering?
-
Another crappy weather day, 7am and gusting 20kts already, so regardless that it's Saturday and the club Christmas BBQ is at lunchtime, the Kestrel will be staying in its trailer yet again. It does handle the strong winds quite well, my flight before last was in 25kts, gusting 35kts and it was all quite controllable, which is pretty good for a 150kg ultralight, but at 55kts cruise it's a long time getting anywhere, or back, depending whether 'anywhere' is into wind or downwind ... It's not even that, so much, but with the light wing-loading it can be quite a rough ride and that takes a lot of the fun out of it.
Anyway, it's probably a good thing, if the weather was always nice I'd be flying a lot more, but there would be even less progress on DooMaw.
So - having had the big tidy-up and all the various half-done parts of the project have their own project box on its own shelf in the relevant steel cabinet among the line of steel cabinets (oh, joy, I can find everything in an instant now), so it's time to get back to productive work.
Here is what I think of as rather an historic photo of the work-bench - taken yesterday, and historic because it's ancient times since the bench was last completely clear -
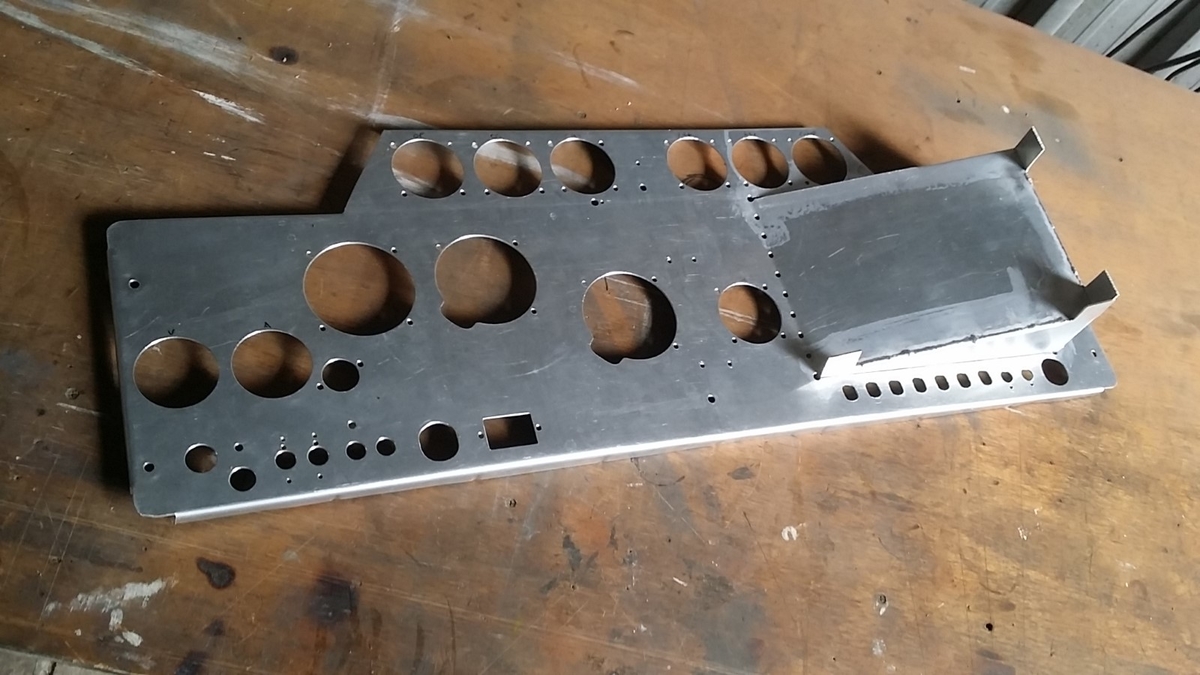
Right now there is just one thing on the whole work-bench, so even I can't confuse myself and start wondering what I was working on last! Here is a photo -
That is how far I got with building the instrument panel about two months ago. The instrument positioning looks a bit unconventional because they have to be located where they won't clash with the truss which resolves the landing gear loads, which is directly behind the panel. There's only about 3mm clearance around each instrument, so they have to be placed quite accurately, especially since the panel is rubber mounted, though it doesn't move more than about 1-2mm each way. Down the track I will invest in a pair of MGL digital instruments and do away with most of the steam gauges but for the moment, due to their $6-7k price, they will have to stay on the wish-list.
The angled flat portion of the panel is for a nav tablet and the pieces sticking up will be folded over and trimmed, to hold the tablet in place. Next stage is to make up the parts to complete the flanges at the corners and weld them in - I suppose I can still remember how to weld ...
-
1
-
-
No, actually wiring of a test rig I had set up, and they chewed a lot of the exposed 240V wiring under the house as well ...Hi HITC Re walk the plank. Set up a wine bottle or long neck beer bottle horizontal with neck over the edge of a bucket. Smeer some cooking oil on neck and sick some bread crust in the end smeared with honey, syrup or peanut paste. Mice can't resist the lure and the bucket should fill in no time. No poison so can leave them out for the friendly wildlife to devour. If you try let me know what you think of the idea. It works foe us. Cheers re wiring being eaten is it aviation grade wiring? -
So - ten weeks ago I said I was back on the case, then I found that I simply couldn't do another thing at all because every square inch of the workbench was piled high with 'stuff', mostly bits and pieces left over and not sorted and put away from previously completed or partially completed parts of the project.
I started to make the instrument panel and drove myself mad because every time I put anything down I lost it among the other detritus on the bench, or I didn't have room to set up a jig or a hand-rest.
Consequently I embarked on a 'quick' clean-up, but I have this problem, with me it's all or nothing, so I ended up searching the net and travelling far and wide to get hold of as many steel 'Brownbuilt' style cabinets as I could ... oh, I forgot to mention we had a minor rodent plague here as well and they crapped all over the work I'd been doing and chewed some wiring and other bits I had to re-do so I also spent long hours buying and testing the whole gamut of rodent annihilation devices. For anyone who's curious - they all work but though some are better than others, you need all of them if you want to win.
We don't use poisons here because we have 4-500 birds that gather daily to amuse my good wife, and some of them would eat a dead or sick mouse and die as a result, and because of the birds and the occasional mouse we also have a number of friendly pythons and they might suffer a similar fate, and neither would I wish a nasty end on the two large eastern browns hanging here looking for a free feed, even the one which took a swipe at me a couple of weeks ago ... so it's all about trying to trap the wily (rodent) baskets - the ones the pythons and browns and kookaburras don't get, that is.
Best result so far has been with the 9000V rodent zapper, though any roach will also trigger it and it's therefore harmless until reset in the morning - the magpies love the zapped roaches. The Nooski seems like a lovely and easy trap concept but with two of them and three months has only produced one casualty so far. Snap traps are a waste of time here, the rodents' great grandparents have told millennium mouse all about how to raid them unscathed, and the self resetting box trap that will catch 'up to ten mice at a time' for release or drowning, hasn't caught anything except a very apologetic cane toad who had an irresistible urge to sample cat biscuits and dried baitfish.
The winner? The walk the plank and fall in a bucket thing.
In the meantime I've been itching for much more flying the lovely little Kestrel. I've done lots of maintenance and replacing worn out things on it and it gets better and better, a few flights back I came home each time trailing long lengthens of gap strip (the fabric strips that close the gap between the wing trailing edge and the ailerons). It looked like a fair bit of hassle to replace them but I couldn't ignore the itch so ordered new fabric and the adhesive tapes and stitched them up and cleaned off the old adhesive and finally got it done - and wow, well I'd almost convinced myself it wasn't worth worrying about because the ailerons were so sluggish anyway ... but now the roll rate rivals anything I've flown, so I'm delighted. BUT - since then the weather has been totally crappy for weeks.
Okay, next post I'll tell something about the progress on DooMaw.
-
2
-
1
-
-
I've just got to say, Nobody, that I just love your forum name, modesty it may have been intended to be, and it's a classic! Gets me every time I see "Nobody said this and Nobody said that ..." love it.
-
1
-
-
I didn't take any offence - maybe you missed the 'wink' at the end of my comment? I was just somewhat bemused at your regular egg-sucking tutorials - I guess you might have been a school teacher in a previous life.HITC - No need to take any personal offence, re my opinion of the difficulty of bending 6061-T6. The 'net is full of images, of less than satisfactory attempts at bending aluminium tubing, and 6061-T6 in particular.If you have had good results, it's because you have used very thick wall tubing, and you have also used a good quality mandrel bender with tight-fitting formers.
......
Yes, of course you will have far better results with thick walled tubing, which is why I suggested it to DP in the first place. And, no, I didn't use a good quality mandrel bender with tight fitting formers, the part I posted pictures of was simply bent around my bullbar as I described earlier. Having had to 'make do' in the bush a lot of my life I have a passable understanding of what will work and what won't, since I've tried most things at one time or another.
-
1
-

.jpg.e3c17e7ca43a9c3281501eca9ab506e9.jpg)


Will RAA(Aus) raise a fee on this one too?
in Governing Bodies
Posted
Yes, I always wonder why people complain about having a big income tax bill. I wish my tax bill was $1m every year!