

Deskpilot
-
Posts
3,063 -
Joined
-
Last visited
-
Days Won
11
Content Type
Profiles
Forums
Gallery
Downloads
Blogs
Events
Store
Aircraft
Resources
Tutorials
Articles
Classifieds
Movies
Books
Community Map
Quizzes
Posts posted by Deskpilot
-
-
Wow guys. thanks for you interest in my 'little' problem. Looking forward to the results of your trials, what ever the wall thickness. Mine was 1.2 mm and I bought an internal spring mandrel. What I didn't have was the anchorage and pulling power.
-
Not mentioning any names, schools etc but where I trained took in a lad from Singapore, trained him every, let him sleep on the school sofa and sent him home, fully qualified, 2 weeks later. Obviously, he had the money up from and they had the time to keep him in the air.
-
 1
1
-
-
G'day T88, like I said previously, I don't have access to a bender and you'd need a pretty big/strong one to bend 25.. dim tube. Thanks for you suggestion all the same.
-
Thanks for your reply onetrack. I know how to bend using sand as a mandrel but it doesn't always work. It's harder than one thinks to get the sand packed tight enough. I don't have access to a bender and have resorted to plumbers in my area. Most just say it can't be done without splitting the tube (being Aluminium) As for the diameter, might be out of round 22mm, if that's a standard size.
There is one other option. A nicely welded version and I'm not a welder.
-
OK, so the planes's back in the garage as I was getting frustrated seeing it sitting under the pergola and not getting worked on. Therefore I now have a couple of questions for you and a call for help.
Q1. Does anyone know what profile the Thruster wing is or is based on?
Q2. Have any of you experience with Gurney flaps and would they improve the flight characteristics of a Thruster?
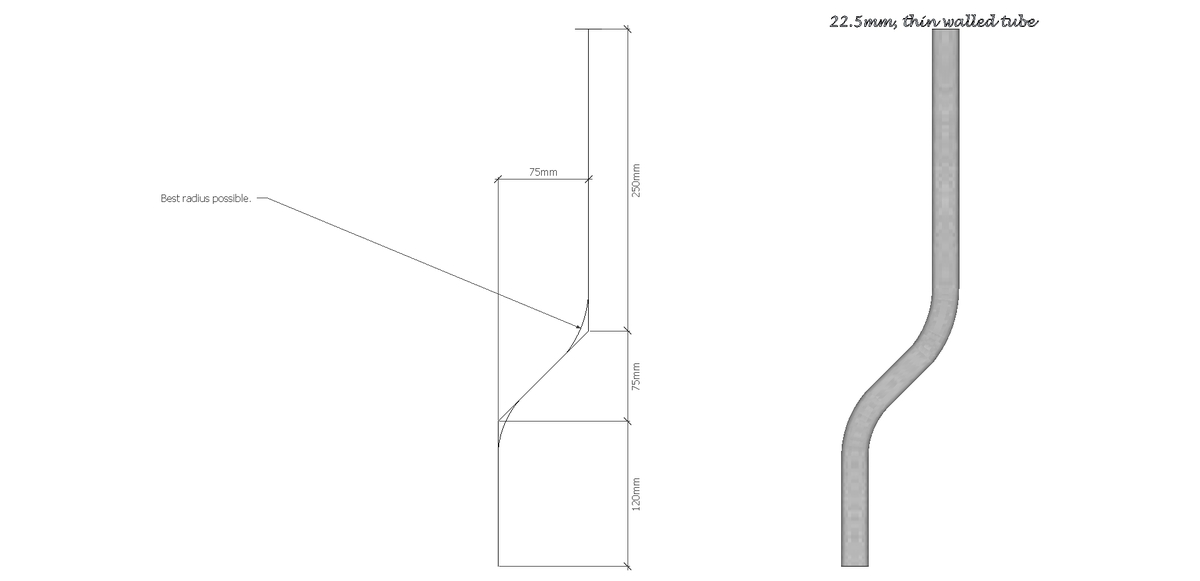
Plea for help. Can anyone make me control stick as per my plan below. I can't find anyone local who can bend thin walled alloy tube without kinking or splitting it. I'm now out of tube. Full remuneration for time and effort provided it doesn't break the bank, so to say.

-
The title says "you've never heard of". We've all heard of Concorde. Sorry, feeling 'pickie' this morning.
-
1
-
 1
1
-
-
Hmm, years ago I flew with the shark patrol, always over water. Being in the rear seat of a 172, I was instructed, if it came to it, to open the nearest door before we ditched into the ocean. This was to provide a quick exit for me, the pilot or co-pilot would then push his seat back and follow me out. I don't think we really cared where the door went as long as it was outwards.
-
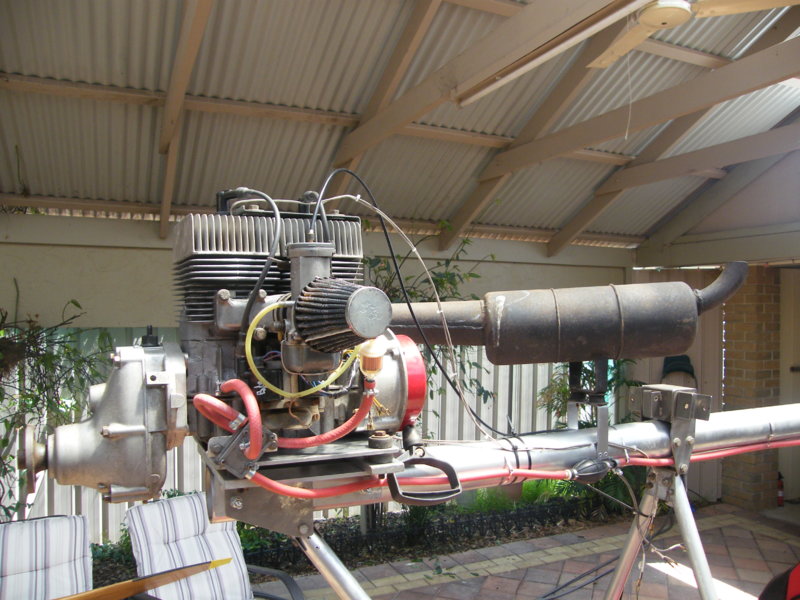
Success, now just got to tighten up every thing and refit fit the prop.
-
2
-
-
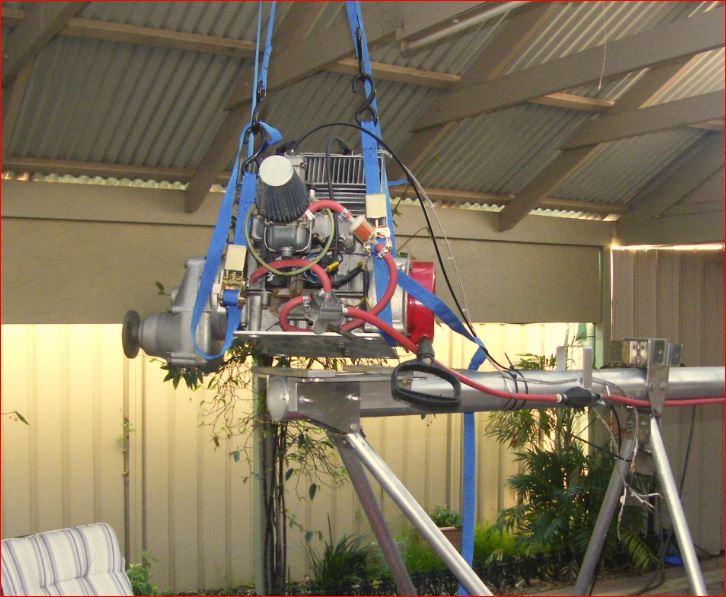
Rotating the mount plate is proving to be harder than I thought. Being on my own, lifting the engine off the plane was a no-go so, with the aid of a couple of cargo straps, I just raised it enough to get at the nuts. When I lowered it back onto the cross members, I found that they were also out of wack so I'm now figuring out where I went wrong with those. You'd think that they would be identical but not so.
-
OK, engine problem solved. I mounted my mounting plate upside down and put the trust line in the opposite direction Methusala, check the offsets on the mounting holes (see my rough lines)
-
Thanks Methusala. I just bolted it to fit the holes so it sits where it sits. I will try playing with any slack I can find.
-
OK, time for a long over due update.
Muffler fitment problem still unresolved. No doubler in the tube for the present setup so moving the mount will be no problem if I have to. Still can't figure out how there could possibly be a 4.5 cm discrepancy in the mount holes..
Control stick and top mounted, roller throttle, still unresolved. My stick broke after using too much force to get the throttle to work. Nice idea, but not enough leverage. I also broke the 3D printed throttle body. Wrong material used, I guess. I wanted something different and less 'snaggy' things in the cockpit but tried and tested wins out this time I think.
So, what to do next.
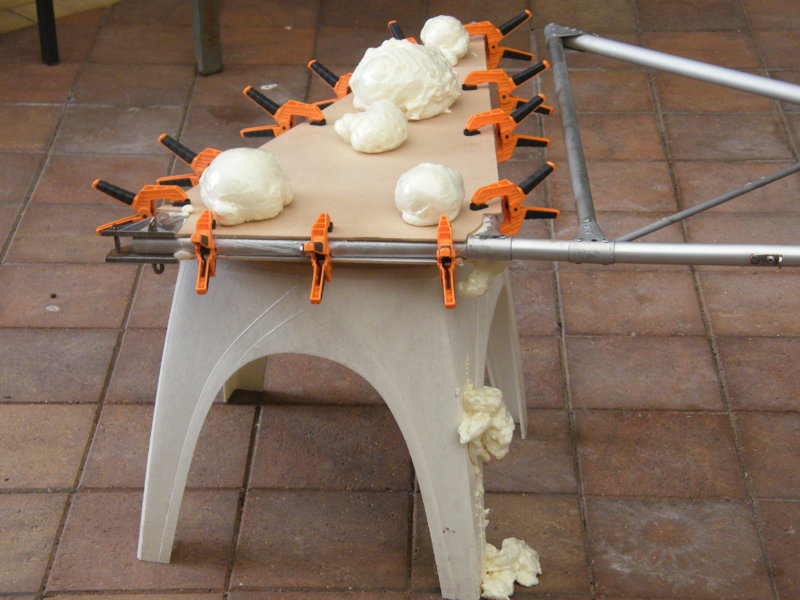
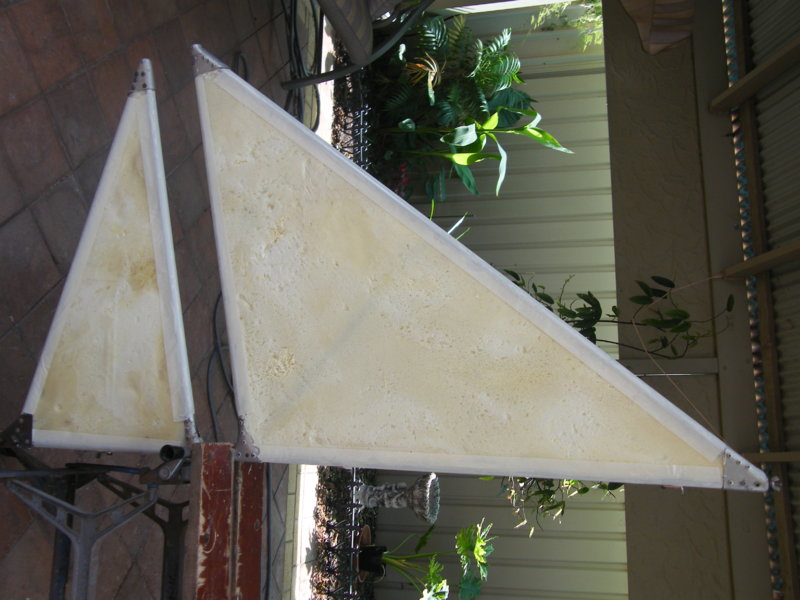
I decided to have another go at covering my fin and skeg only this time, I thought I'd go for a much cheaper material than the Lycra I initially used. I also decided to have some form of firm backing on which to press as I force the resin into the weave. This led to purchasing a sheet of insulation foam from Bunnings and cutting it to fit inside the framework. First thing I didn't like was that the board is 30 mm thick and the tube diameter is 20 mm. I don't have a hot wire knife as yet so re-shaping it was going to be a problem.
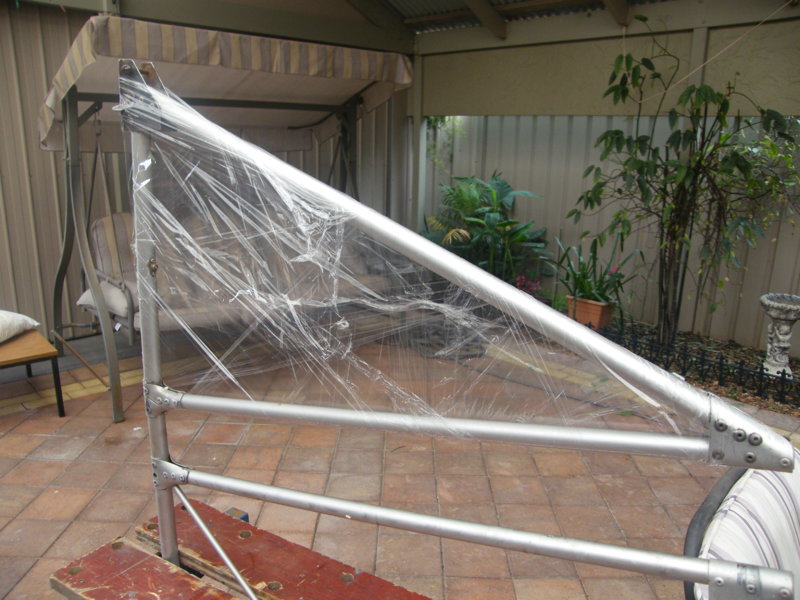
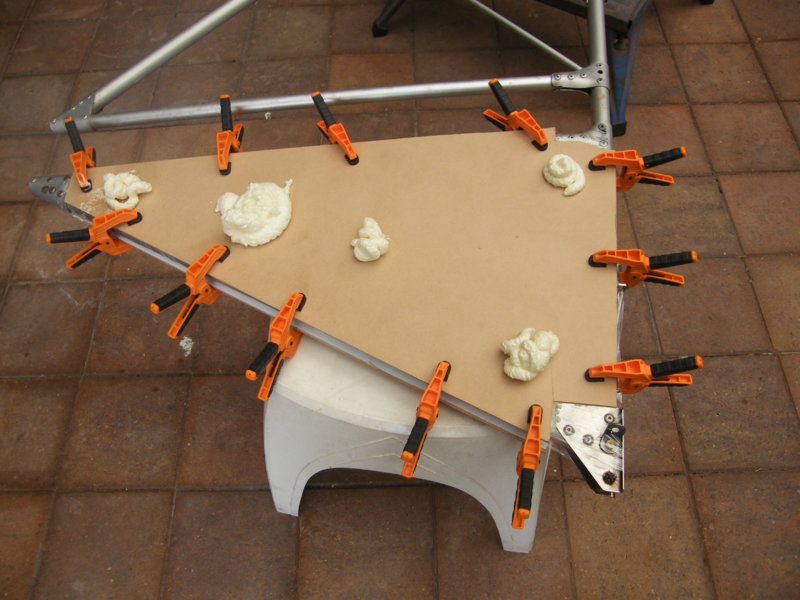
This weighed in at 5.78 lbs (2.6 kg's)and I thought it might be too heavy so I took a tip from a couple of home builders in the states who have used spray foam to complete their roof insulation (www.youtube.com/channel/UChhBsM9K_Bc9a_YTK7UUlnQ) Anyway, this is how it is going.Spray foam expands about X3 and needs to be confined so I purchased some white board and a load of clamps. Now, in order that the foam didn't stick to the board, I first wrapped the frame in Clingfilm and then clamped on the front and back boards, the front one having access holes. I burnt matching holes through the film with a pointed soldering iron.
Now comes the fun part. Just how much foam does one squirt inside. Oh well, trial and error time. After all said and done , nothing ventured, nothing gained. I thought it was going well after spraying in the evening, but next morning..........
Over done it me thinks. Time to clean it up a bit. Ah, just remembered, foam needs moisture to fill out and set so I squirted a small amount of water mist into each aperture before filling with foam.The film worked well and the boards came off easily. However, the coverage didn't go too well but will be usable I think. So press on.
This final image is after I had reworked the foam some what. The main problem was that the boards, clamps and stiffening batons clamped across the fin fill, did not prevent the boards bowing outwards and thus ending up thicker than the tube by about 4 mm both sides. By taking to it with a fine cut saw, a small Surform rasp and glass paper, I took off all the high points. Filled some voids and then taped over the tubes so that the resin doesn't stick to the tubes. You never know if this lot has to be removed at some future time. BTW, Instead of c/film on the fin, I just sprayed my boards with cooking oil. Worked well and didn't effect the foam at all.Now I'm going to keep you all hanging as I choose a cheaper material (Lycra is about $35 per meter), and work out a better way to mix resin and harder. I've decided that I won't be repeating this process on the other flying surfaces (filling with foam, that is) but will try another idea and a lighter hand to boot.
-
Congratulations Cookie. Thought I recognized the plane and background but had to check your details to be be sure. I used to be a member of the flying club there,(Aldinga)
-
-
Quote: The Board was particularly pleased with the overall improvement in our safety record, where we recorded our safest year in ten years. In all we recorded three fatal accidents during the financial year, the lowest since 2017. Our serious accident rate has also halved in the last four years. End quote.
The Board has no influence on this aspect of safety. It is entirely in the hand of our pilots and instructors. Me thinks the Board is looking for a slap on the back anywhere they can get it. Now if they could find a way to REDUCE annual fees, I'd be in line to give them slap on the back.
-
2
-
 1
1
-
-
The other planes in the hangar wouldn't be effected SO LONG as you're in reverse mode.Slip stream is going out the door and not into the hangar. FWIW, although as said, this is a wonderful aircraft, I would still prefer to see a Blackburn Beverley land, go into reverse, back up the run way, open it's clam shell doors, lower it's ramps, disgorge a personnel carrier and a Land Rover and about 100 soldiers, raise it's ramps, close its doors and head down the runway and take off. All in about 10 minutes. Happy RAF memories.
-
To what are you referring Birdseye. Perhaps you've posted on the wrong page.
-
I like it. Time will tell if anything comes of it.
-
Welcome to our forum mate. We're looking for the same thing. You got anything we might not of seen before.
Do you fly and if so, what?
Doug
-
I got quoted $130 for a meter square of 1.5mm thick, way too pricey for my pockets. If necessary I'll try 1.mm but not sure if it'll be strong enough. Luckily, there no flat portion trying to push it's way through the air.$180 for a 2400X1200X2 sheet at Newcastle. -
What ever you do, don't get Acetone near it. They hate each other
I'm now trying to find replacement polycarbonate at a reasonable price.
-
OK. First point, why mid wing? I can't remember my reasoning then but now....mid wing gives one the ability to see over and under the wing when in a steepish turn (coming onto base leg for instance)
Why a co-axial pusher prop.........just to be different perhaps Given to choise, I would have gone for 2 contra-rotating props for a less swirled airflow over the tail feathers.
ICE instead of electric for longer flight times and ability to go X country. Not all airfield would be able to recharge batteries.
Yes, chains get hot, are noisey and if one should break, that a lot os metal flailing around to do untold damage around and behind it (tail feathers)
This was just a design for design purposes really so no actual flight data was included. I would have been happy with about 90 knots cruise @ 13 lpm fuel burn.
If I were to take this up again, I'd also include morphing control surfaces to make it really a one off special.
-
Bill, what are you referring to.I can't make out your connection to earlier posts. Please clarify.
-
Well I'll be. What a turn up. I thought this subject was long dead and buried but I'm sure happy to see it resurrected.
Greeting Bill, new members always welcome, as is your input. Might I suggest you do read all the thread and don't go off at tangents as I originally asked.(not that you have.....so far)


A short story, then a long journey
in Thruster
Posted
Please keep it friendly guys. I don't care what the bend radius is. At I said, if necessary, weld up 45* angles