tecnamman
-
Posts
33 -
Joined
-
Last visited
tecnamman's Achievements
Active member (2/3)
-
Hi there fellow Tecnam flyers....just a quick one I found today. Removed the exhaust pipes and muffler IAW Service Bulletin 16 UL ( Exhaust pipes reinforcement - mandatory) and discovered cracking in the muffler mantle. This topic is covered in SB 10 UL (Muffler spring attachments rings inspection - recommendation ). The cracks were in the area as described in SB 10 and require welding ( I inspected the muffler for cracks in the affected area when the SB first came out in early 2008 and again in 2009 ).They were visible to my 'advanced' middle aged eyes ,and under a 10 X magnifier were easily identified. I don't know if this a common problem in older a/c, but suspect it might be as my engine has only done 160 hours on the air switch...haven't been doin much aviating of late. Would be keen to know the experience of other Tecnam jockeys out there regards this one. Cheers for now
-
If I had to replace one on mine...... Go to.....http://www.camloc.co.uk/QuarterTurnFastenersEnglishnew.pdf Complete catalog of Camloc fasteners... identify the one you need...then to the local supplier of Camlocs Cheers
-
have tried the local (Victorian) importer for Gold fren pads and they don't seem interested...have emailed Gold Fren in Czec....awaiting reply...keep you all posted if any joy
-
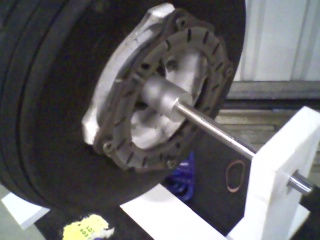
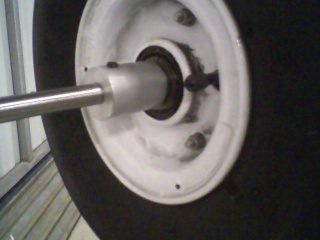
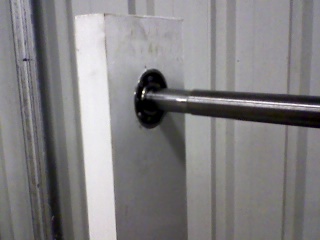
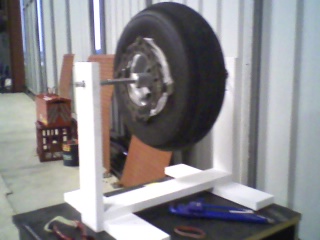
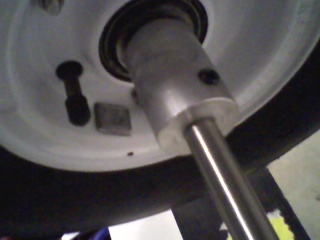
If anyone is having problems with main wheel shudder on takeoff ( and nose wheel shimmy on the t/o run ), I offer this home made solution to try... cost me about $50-60 to put together ( you need a lathe or a mate with one). If anyone is interested and motivated enough to make their own, PM for details. You can buy them commercially from a few m/cycle accessory importers but they range in price from about $250-400. Interestingly, it required about 50-60 grams to balance the mains with the discs attached. Best of all....it works!! Some images ( please excuse the poor quality, taken with phone camera).

-
Spent the last hour trawling thru the Brembo catalogue for m/cycle and scooter pads......absolutely no joy....could only find 1 pad set out of a hundred or so listed that runs on the inside of the disc!!! The catalogue is very extensive and appears to cover all M/c's and scooters ever made! Ah well, might be as I said, only made for a/c. Cheers guys
-
Roly The other option is to have the backing plates relined...I know where I can get it done here thru a contact in the auto brake biz....you would have to ring around or search the net for suitable brake shops that reline and give advise on suitable pad material etc. I know someone here who had pads made, but they are too hard ( I tried them) and don't work as well as the originals....hence my advise to talk to some experts re what grade of material you need. Cheers for now
-
They are made by a company called Marc Ingegno in Italy for Tecnam...if thats any help. Check this link.... http://www.marc-ingegno.it/index.php?option=com_virtuemart&page=shop.browse&category_id=12&Itemid=53&lang=en Would be surprise if the Tecnam agent in the UK could not supply a set of brake pads?? To the best of my knowledge, the calipers are specifically designed for light aircraft use only. The pads are expensive in OZ due to our currency but would not expect to pay too much in the UK?? Cheers
-
Hi Jeff Go to Marc Ingegno and check out the catalogue. They manufacture the wheels, brake calipers and discs for Tecnam:- Catalogue If you want to buy anything from them, suggest you go rob a bank first..needless to say I've made prior enquiries and their very pricey...not to mention the freight, the pathetic state of the Oz dollar against the Euro etc... Some Tecnam owners have converted their mains to 6.00 x 6. I'm sure Bruce Stark (Tecnam Australia) would be able to help in this respect. I know Ruth Presland of Tecnam South Island (NZ) has done this conversion. I've personally witnessed a new Sierra with only a few hours on the clock get a flat on landing, although I have 150 hours on mine and to date (touch wood) have not had a problem. Having said that, I operate off bitumen 95% of the time. I need to be careful what I say, but I have been told that the tubes in the mains ex factory are, shall we say, not as good as Michelin Airstop...the tube I've been recommended to use. Would suggest you rotate the mains on the rim at about 75 hours to even up the wear (due to the positive camber of the mains).The mains are 'real' aircraft tyres speed rated to 120 mph..no problem there. I run 23 psi in the mains and 15psi in the nose wheel. By the way, the nose wheel (Sava) is speed rated to 30 kmh...(and that's from the Marc Ingegno website). Would be interested to know if you have any brake issues???(refer previous threads). Cheers
-
Ossie Hopefully, hopefully, one day, in my liftime, the RAA will be in a position to conduct regional workshops run by experienced engine mechanics/reconditioners to teach owner maintainers how to look after their engines and the pitfalls to look for. I agree with you that newcomers shouldn't have to keep reinventing the wheel, and most LAMEs and level 2's who work on RAA should inform their customers the things to keep an eye on. I have a background in automotive maintenance and would desperately like to learn more about aircraft maintenance but where do you start???...no courses to study unless you know a LAME or level 2 who is willing to teach you. Perhaps Floods...seeing as how they are the Aus agents for Rotax....??? Anyway, this is way off the topic but something that urgently needs addressing and a good subject for another thread....?? Cheeers
-
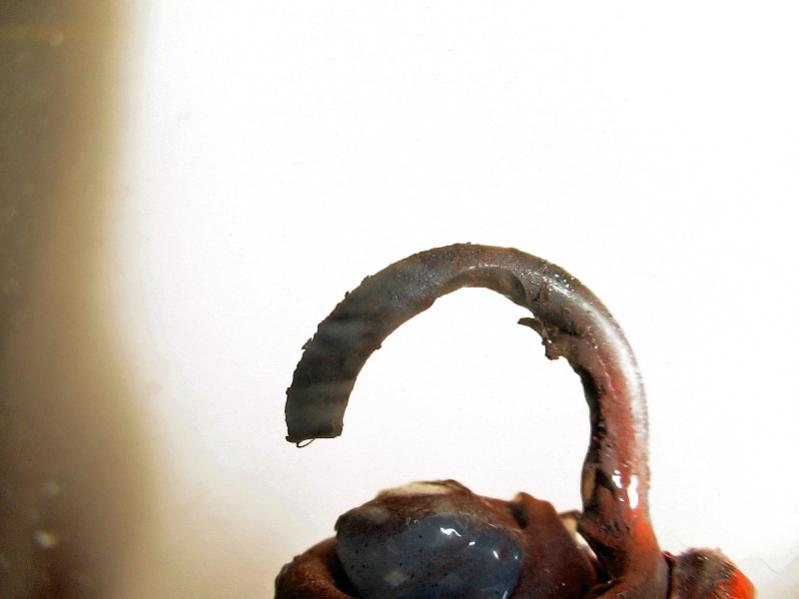
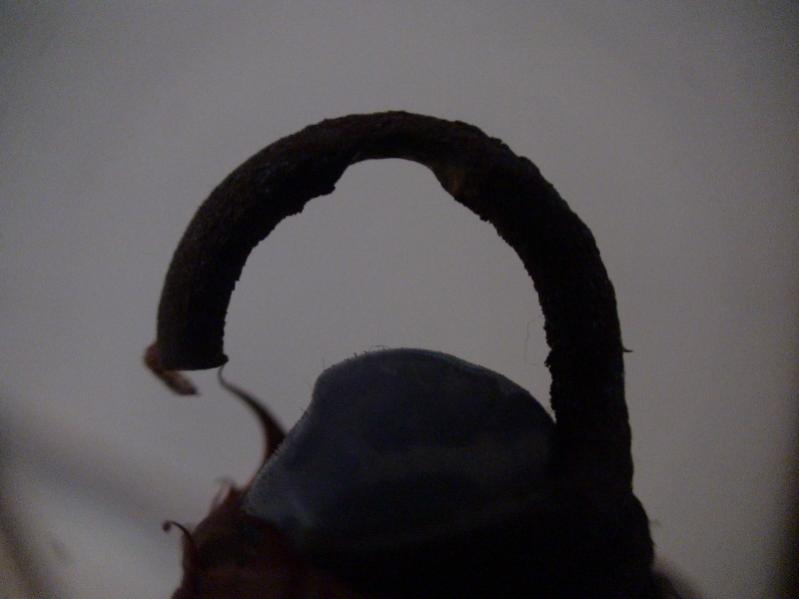
Johnm Hopefully.. photos of an exhaust spring attached showing the extent of erosion after approx 100 hours. I couldn't find one of the badly worn ones to show you.... this one is about half through. The anti seize is Loctite 771 but also available in Permatex etc..available from bolt bars, bearing shops etc. Use sparingly as you don't want excess falling on the muffler. If I was flying a 'pusher', I'd be checkin the springs with a microscope before flight..a spring into the prop..ouch!! Since I filled the springs with silicone I haven't broken another one but note they are still wearing...but like cloudsuck a couple of springs went 'missing' in the first couple of months until I remembered that we used to do this to the exhaust springs on our MX bikes, as they tended to suffer the same fate. I don't believe applying beads on the outside of the spring is as effective. Cheers
-
Hi Johnm...in response to your question about replacing the tags...no I haven't replaced them yet, but I noticed at the last oil change and general engine inspection that the apex of the spring eyes had worn very thin on a few of the springs, and I'm certain I would have lost a couple by the next oil change from fatigue. I changed all the springs as a precaution with new ones and applied high temp nickel anti seize to the tags/springs...too early to tell yet if this will reduce the wear factor (only done about 10 hours since applying) but works in other engineering applications so reasonably confident. I have also filled the spring centres with high temp silicone rubber to reduce harmonics...this is recommended by Rotax but not widely known. My engine has 130 airswitch hours , and like you I was very surprised/alarmed to find the tags had worn so much in so few hours. I haven't measured the tags with a vernier, but the Mk 1 eyeball estimator says 25 %. A few of the springs had worn down to 50% of original diameter, some a bit less. How many hours has your engine clocked? Like you, I would like to hear from any LAME's or Level 2 guys who have had to replace the tags. I remember ringing Bert Flood and asking about this problem ....they gave me the Rotax recommended spacing between the tags but can't recall at present....suggest giving them a call, I've always found them very helpful and happy to give advise over the phone. Hopefully some Rotax gurus out might like to add their 2 bobs worth so we can both find out! Cheers Johnm
-
Have conducted several 'experiments' in an attempt to find out more about the Tecnam brake shudder problems with some interesting findings (and hopefully solutions) PM me if your Tecnam brakes are shuddering and perhaps I can point you in the right direction. Would also be very interested to know other theories/suggestions... Cheers
-
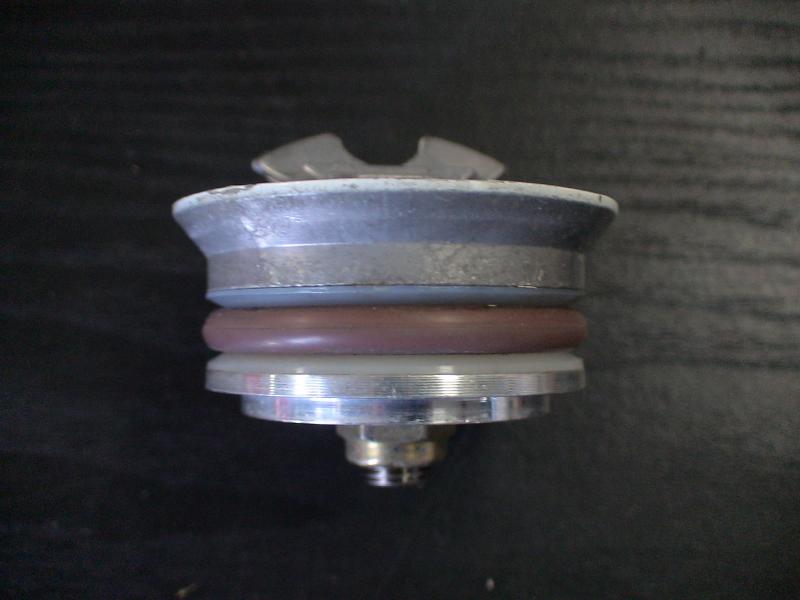
Cloudsuck You can see the nylon gaskets either side of the o ring in this photo. (right click on thumbnail and click Open Link) Cheers
-
Briefly, trim the nylon gasket between the top and bottom halves of the cap. I didn't even notice it until it was pointed out to me by someone more knowledgeable than I. He trimmed it for me. I think, from memory, the cap has to be in the closed position when you do this so the gasket is squashed out proud of the cap slightly. Trim the gasket very carefully with a sharp knife being careful not to nick the o-ring. It's only slightly proud so you wont need to trim much off, but it makes a difference. Also, if the cap is really tight to close or tight going into the tank neck, you may need to adjust the 'squash' on the o-ring by loosening the nylok lock nut say 1/8th of a turn out and then turning the lower half of the cap out against the locknut and retightening. If you decide to adjust the cap, make sure the cap lever is in the closed position when you loosen the locknut, otherwise you risk damaging the lever. Closing the lever stops it turning. So, it's either the o-ring or the nylon washer or both thats causing the problem. I found the caps really annoying to remove but resisted the temptation to use screwdrivers and keys etc to lever them off....god only knows what happens in flight schools!! However, a little at a time on the adjustment is the order of the day.. If you decide that the above advise makes sense, when you race off to the hangar to have a look, let me know if you agree and the outcome:thumb_up: PM me if need be. Cheers
-
I really haven't got a fix for you Tim... but on the odd occasion I venture away from home base ,and will be leaving 'baby' out in the cold overnight, I just tape over the caps with wide masking tape if I know I've got to add fuel in the morning or dip the tanks. The only time I've every had water in the Sierra tanks was at Bordertown. It had been a cold night and I foolishly removed the fuel caps to dip the tanks. I realized afterwards that I might have done the wrong thing..sure enough the next time I fuelled at home base ( I use MoGas and a Mr Funnel) and did a fuel sample (my Sierra has fuel drains, I had them put in and why they are fitted standard ex factory astounds me), there were traces of water from the cold morning in Bordertown.This is not rocket science, but its safe and it doesn't matter if you forget to remove it before flight. The tapes in the away from home kit. I fly to Bairnsdale every so often as the other half and 'outlaws' are natives of the district. Like to meet other Tecnam owners to exchange stories and experiences. Perhaps you could private message me you mobile? p.s while were talkin about tank caps,if your tank caps are hard to remove I have a simple cure for the problem, it works and was shown to me by another Tecnam owner. Cheers