

Ross
-
Posts
729 -
Joined
-
Last visited
Content Type
Profiles
Forums
Gallery
Downloads
Blogs
Events
Store
Aircraft
Resources
Tutorials
Articles
Classifieds
Movies
Books
Community Map
Quizzes
Videos Directory
Posts posted by Ross
-
-
As a slow kit builder of the J160 the biggest help I would like would probably be exposure to more L2s and other builders of composites. The dilemmas that the inexperienced builders face every day really slow you down as you do jobs in the wrong order or unsatisfactorily as you might discover later on. I have only had substantial contact with one other builder of a J160 and he lives about 500+ Km from here.
I think if I were silly enough to build another one I could do it in a fraction of the time although accumulating the available disposable assets might still be a limiting factor.
I would rather spend the time flying - A flying friend I met in Davis, California about twenty years ago told me after I told him what I was doing said to me
"In my experience people either build aeroplanes or fly them. They generally do not or can not do both".
That did not do much for my state of mind as I see the various syndicate members and private owners around this area fly their aircraft all over.
A big plus for being a kit builder is the better understanding you gain of the systems in your aeroplane and some of the limitations and compromises made in the building or assembly of that kit and the requirements of a sensible maintenance program.
Regards
-
When I trained at YGTH in the previous few years past the only flying training was done by up to three instructors employed by the Griffith Aero Club which either owned or cross hired private GA and RAAust type aircraft for flying training. The newly apponted GA CFI at the time had just got his full RAAust accreditation so he did all the RAAust instructing mostly for GA pilots who wanted an RAAust Certificate but they could not do the aerobatics that they might have done in their GA aircraft.
Trainees had to join the Aero Club and to sign on and be bound by their rules in relation to flying fees for training and private hire and agreements over possible insurance claims.
I think I was their first RAAust student if not I was certainly the first in the brand new LSA 55 2.2 Jab that I flew there owned by Norm Raworth. I think it had 5 hours on the clock when I did my first flight circuit in it. It had a vacuum pump and a set of instruments to go with it.
Of the three instructors of that time two have gone to airlines and the third left to do some contract aerial work.
I think GA training is continuing with a previous CFI and Norm is going for his full RAAust instructor rating in his LSA Jab.
Regards
-
Hi Tomo, welcome to the forum. I came to RAAust flying fairly recently with some experience in flying sailplanes (gliders) so had to do lessons in the older Jab LSA 55 with a young instructor (younger than me) who did not talk as much as I expected.
I realised later, after getting my ticket etc that to speed up the process I should have been talking to the instructor a lot more while I was flying so that he would know what I was thinking and what action I was contemplating and what alternatives I had thought of if any! It would have been more productive of the time and money spent. It was enjoyable enough but on reflection I think I could have learnt a lot more.
On strangling the stick, I discovered in flying in gliders that if I looked at my hand on the stick occasionally and if it looked all white with all the blood squeezed out of it it was time to let it get some air. Just hold it with thumb and index finger to get the circulation back in the hand and stop the wings shaking!
But the shaking could be easily cured by actually letting the glider or plane fly itself for a few seconds hands free! The instructor is not usually impressed though if you actually let go the stick so you would probably need to distract him a bit.
Regards
-
Hi Knightly
I could see that you appreciate the danger.
I am just adding some true detail of what has happened to emphasize the danger for others.
Regards
-
I saw the result of an accident at Coleambally some years ago the result of a farmer welding an air compressor to a LPG gas cylinder to be used as an air tank for the compressor.
The farmer eventually died after about hour suffering from such gruesome injuries that I will not describe them except to say that a Vietnam veteran who also saw it said that it was as bad or worse than anything he had seen in Vietnam.
It took me over six months before I could sleep at night without a very vivid picture of those injuries in my mind and the sound of his wife's screaming.
-
05-01-2008
Well I think I bought enough black fuel hose to replace all the plastic fuel hose. I have cut most of the pieces to length and hopefully they may only need a bit more cut off as they are hooked up to the wing tanks.
[ATTACH]4663.vB[/ATTACH]
Still a bit of tidying and securing required. In the meantime all open fuel line ends are blocked with AN4 bolts to prevent our mud wasps etc from finding new homes.
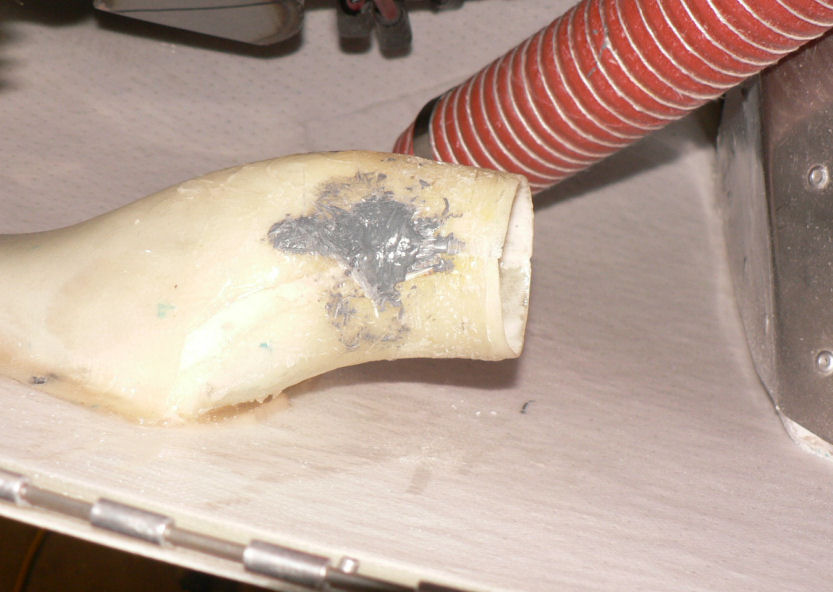
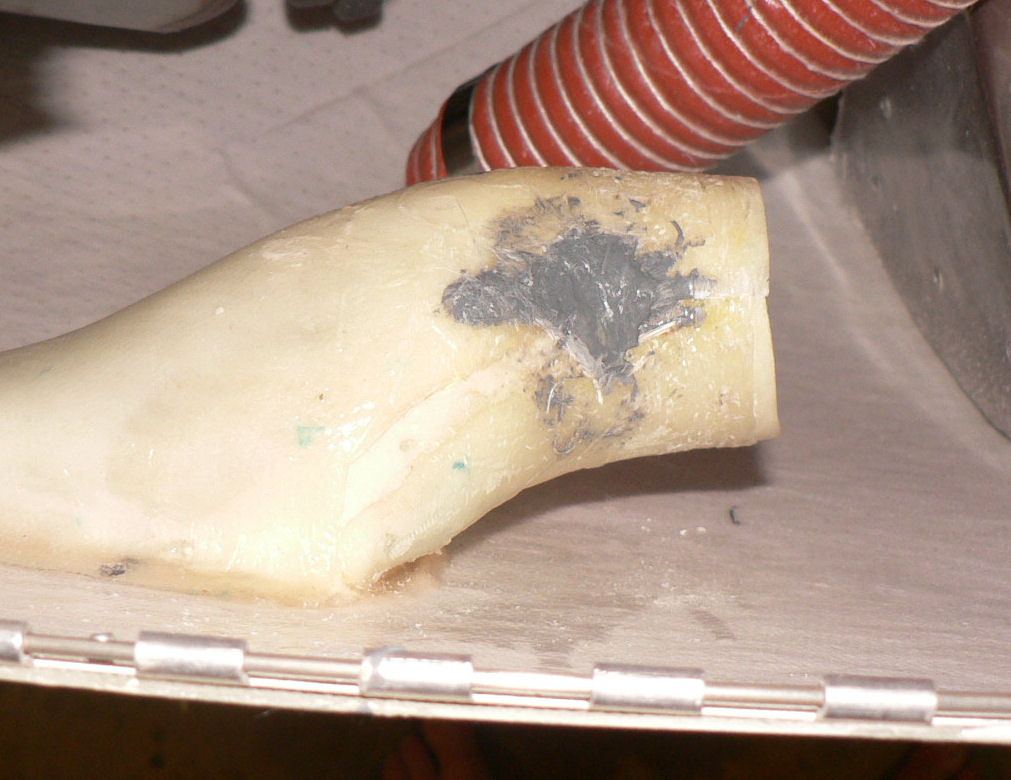
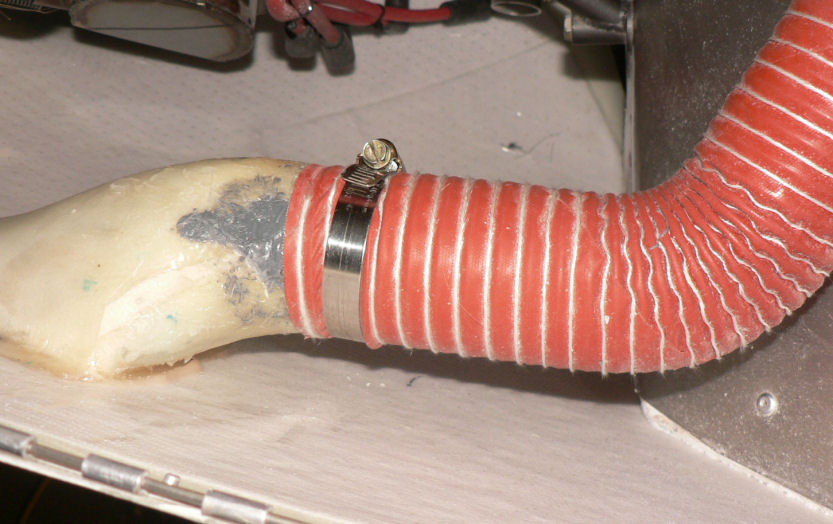
The scat hose was too tight a fit on the cowl fitting so I removed the scat hose and cut about a 1/4" strip out of the fibreglass fitting along its length starting from the open end near the air cleaner. Then it was heated up with a hot air gun and clamped together using the scat hose clamps.
After cooling it was checked for size against the scat tube. It was then roughed up with some emery cloth cleaned with acetone then tacked together with quick setting araldite and a small piece of fibreglass cloth placed across the new join.
[ATTACH]4664.vB[/ATTACH][ATTACH]4665.vB[/ATTACH][ATTACH]4666.vB[/ATTACH]
After setting the scat hose was refitted to the fitting.
A better fit with room to finish it off with another layer of glass.

-
My J160 is yet to start but a cold pull through is generally "all over the place".
So what I do is every few days or so spin the motor up on the starter motor with both ignitions off, no fuel in the system anywhere, no plug leads and keep it up until oil pressure stabilises for a few seconds.
Pull throughs after that are generally good (to my unexperienced ear).
Regards
-
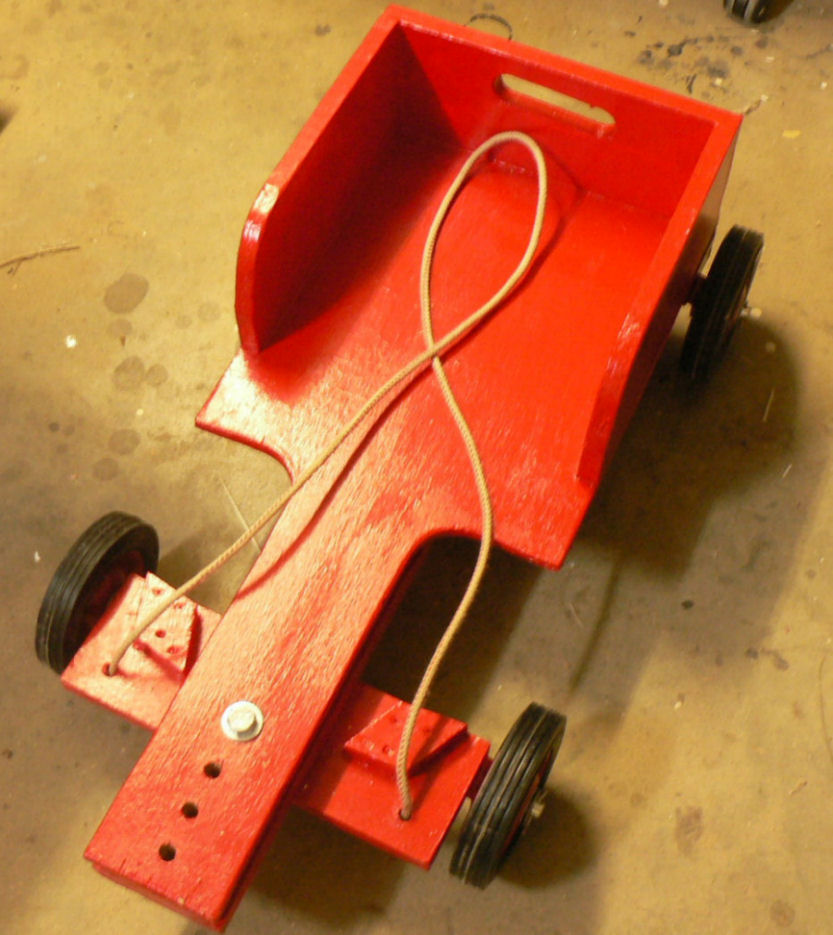
31-12-2007
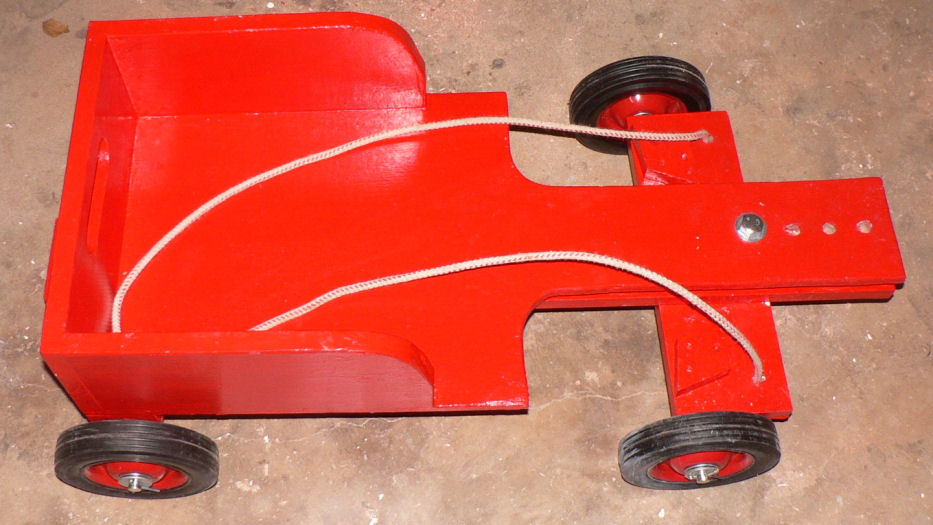
Well the billy cart was a success so that our daughter was getting plenty of exercise dragging Tom & then Charlie up and down the driveway before they returned to Sydney. I moved the front wheels out another hole.
A bit of work done on the Jabiru today. The max temp here was about 38 degrees C and about one degree less in the carport garage with the J160.
Cut an extra hole for the top hose - air out - from the header tank so that it was not too sharp a bend and it rose as it exited the header tank.
[ATTACH]4640.vB[/ATTACH][ATTACH]4641.vB[/ATTACH][ATTACH]4642.vB[/ATTACH][ATTACH]4643.vB[/ATTACH]
Had to buy extra hose locally and discovered that at $7.18/m incl GST it was $1.15 dearer per metre than that supplied by Jabiru but no extra freight.
[ATTACH]4644.vB[/ATTACH][ATTACH]4645.vB[/ATTACH]
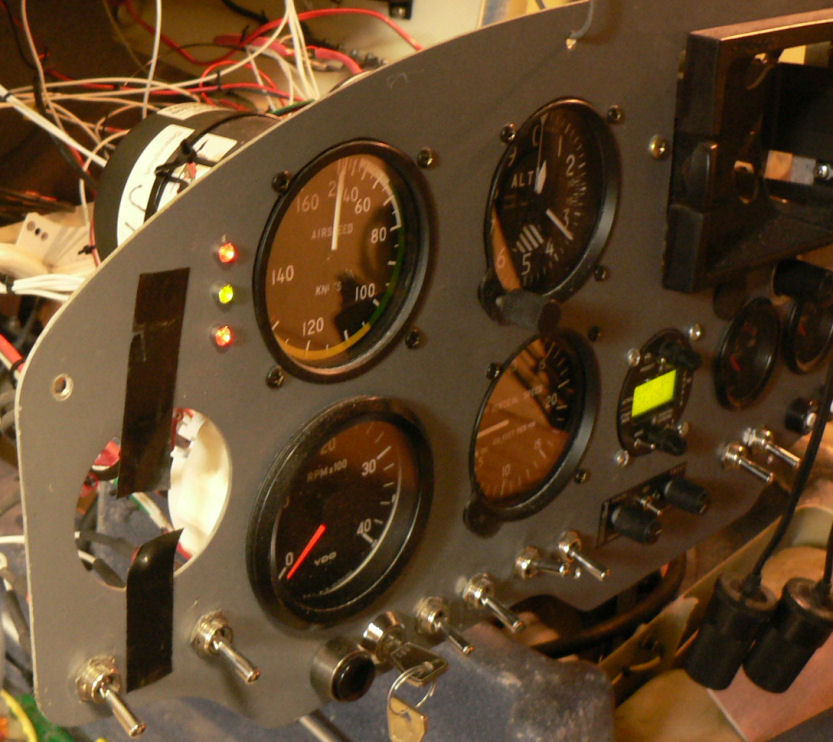
Hooked up the flying instruments ASI, VSI and Altimeter the static air hose and the hose for the air speed.
[ATTACH]4646.vB[/ATTACH]
Had to take a pic with the lid on!
Gotta go and have a red or two!
-
Thanks Ian
But the proof of the pudding will be the test flight on Tuesday morning by the grandsons (5 yr old & 2 yr old)! It would be safe enough here but their mother would want brakes and an electric motor on it for Sydney suburbs. How much is a set of Jabby disk brakes and a golf cart motor, & charger.
They probably should leave it here but then would probably need an upgrade each year, wider, longer, more powerful, longer range, faster, more load carrying capacity, more instruments (some instruments), more comfortable suspension, more streamlined (less drag) and cheaper to run!
Regards
-
22-12-2007
Finished off the billycart.
[ATTACH]4623.vB[/ATTACH][ATTACH]4624.vB[/ATTACH]
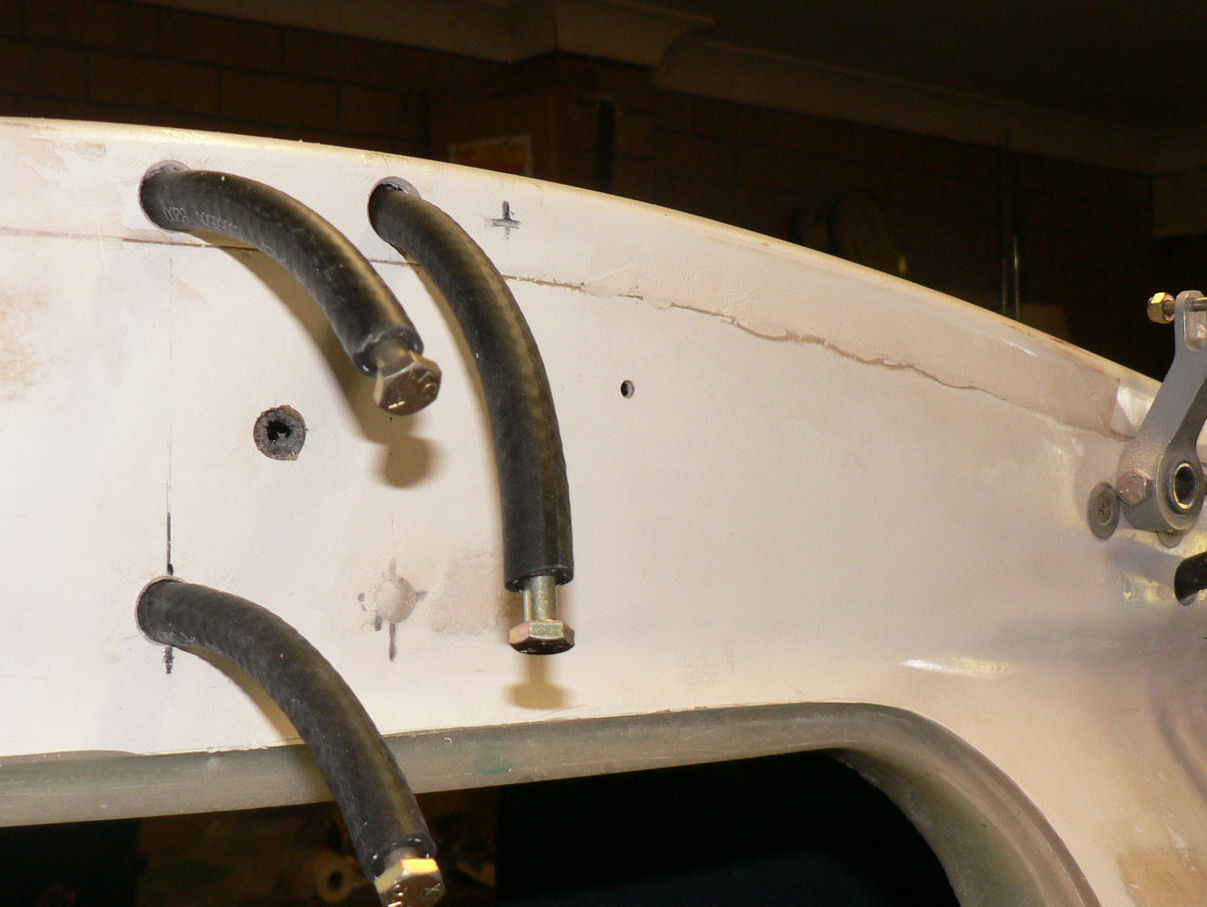
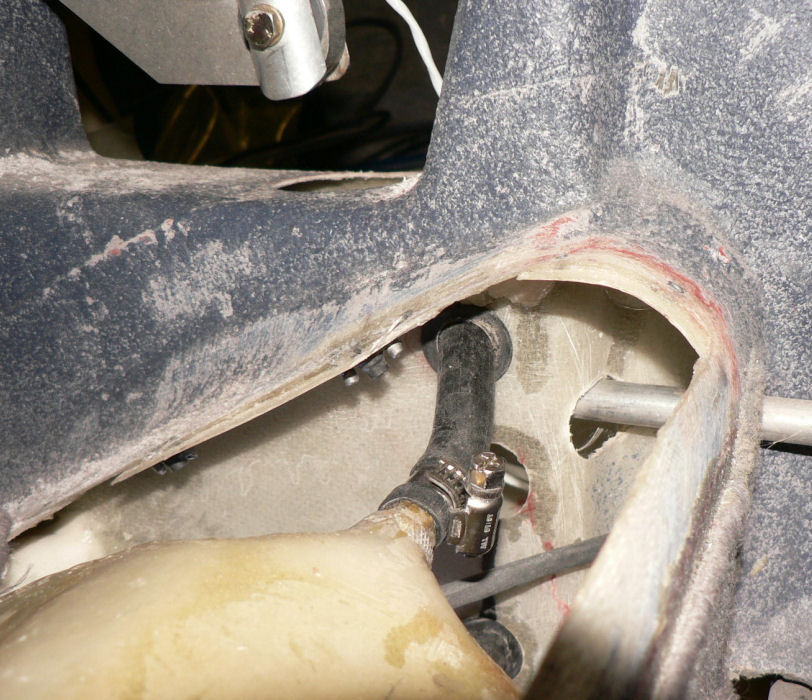
Continued to work on replacing the plastic fuel lines.
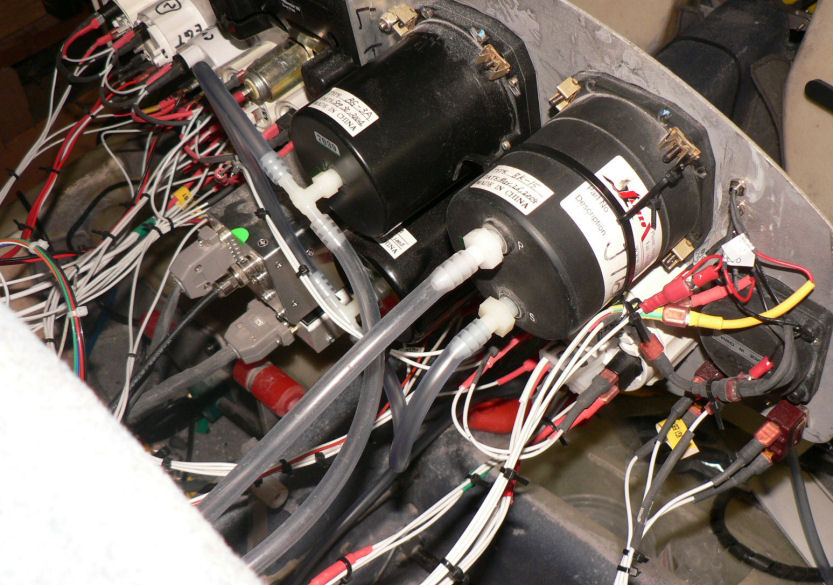
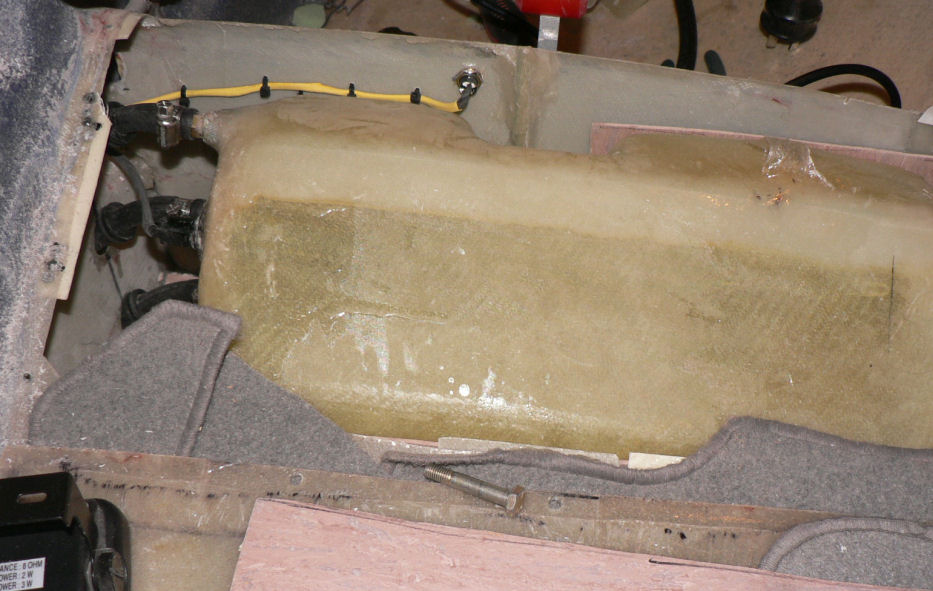
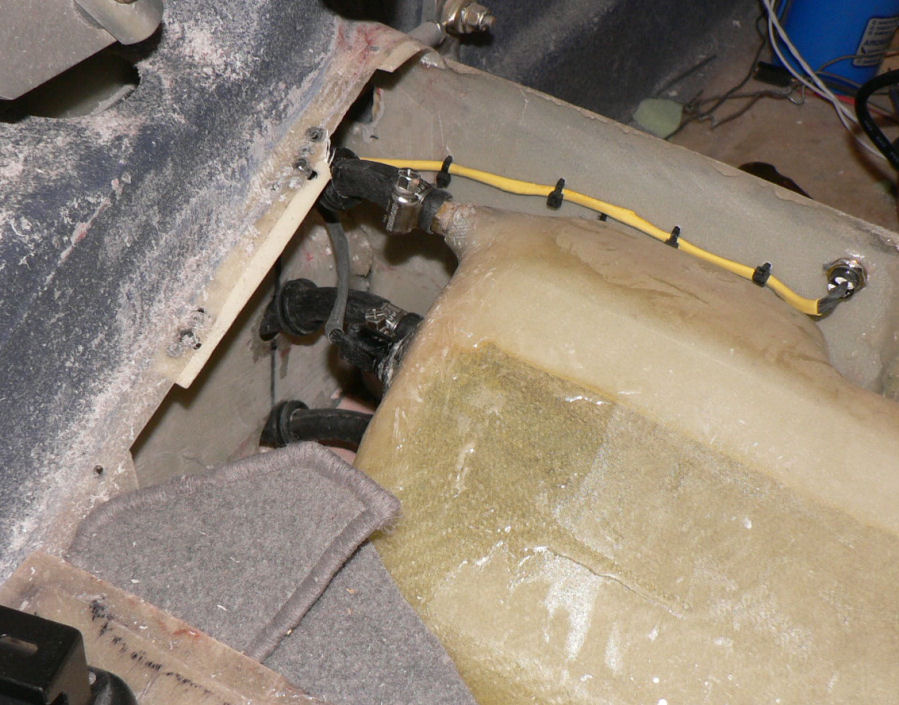
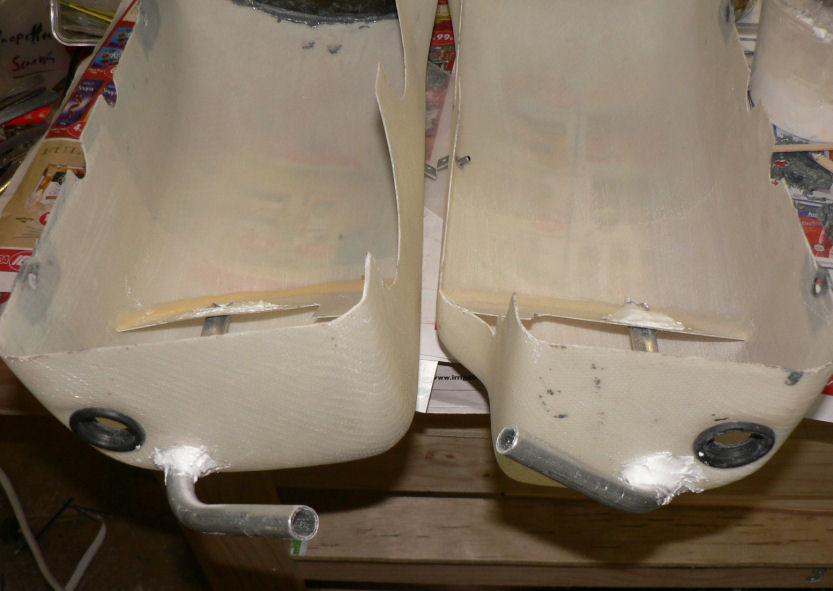
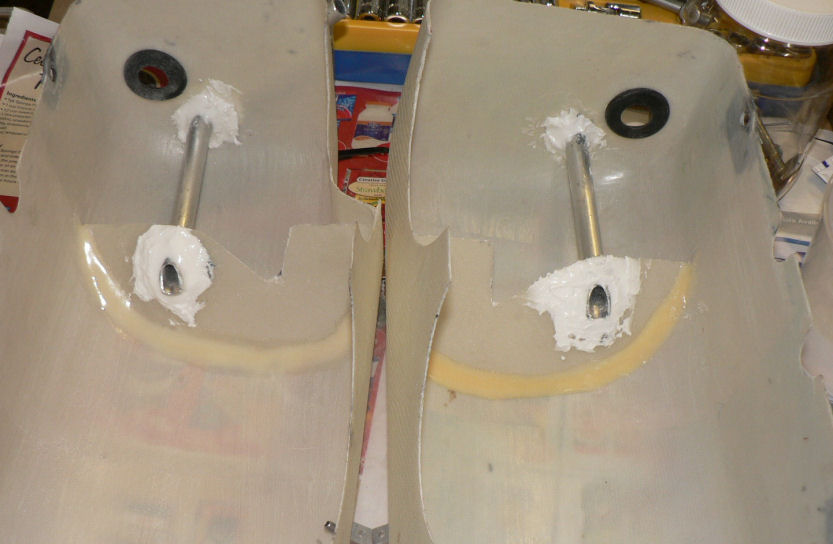
The header tank under the pax seat has a problem with the alignment of the hoses. See pics. I shall have to move the hole for the breather line, the top one, up so that there is no reverse slope on the line back to the wing tanks.
[ATTACH]4625.vB[/ATTACH][ATTACH]4626.vB[/ATTACH][ATTACH]4627.vB[/ATTACH]
The bottom two lines are probably OK.
But the breather line, the top one for getting rid of air in the header tank needs to be on a continuous rise back to the wing tanks, otherwise it could suffer a failure to get rid of all the air in the header tank due to fuel in the breather line if there is not a continuous rise to the breather in the wing tanks.
The pic indicates that the rod for the brakes is conflicting with the position the line needs to go back into the centre console. I shall have to cut an extra hole above the brake actuating rod and keep the breather line level or on a continuous rise back to the wing tanks.
That will not affect the reliability of the low fuel signal light from the header tank but it could will just occur sooner than normal because the header tank might always have some air in it or it could possibly even occur before there is a low fuel state in the wing tanks especially if the air in the header tank will not or cannot be returned to the wing tanks because of the reverse slopes of the line.
-
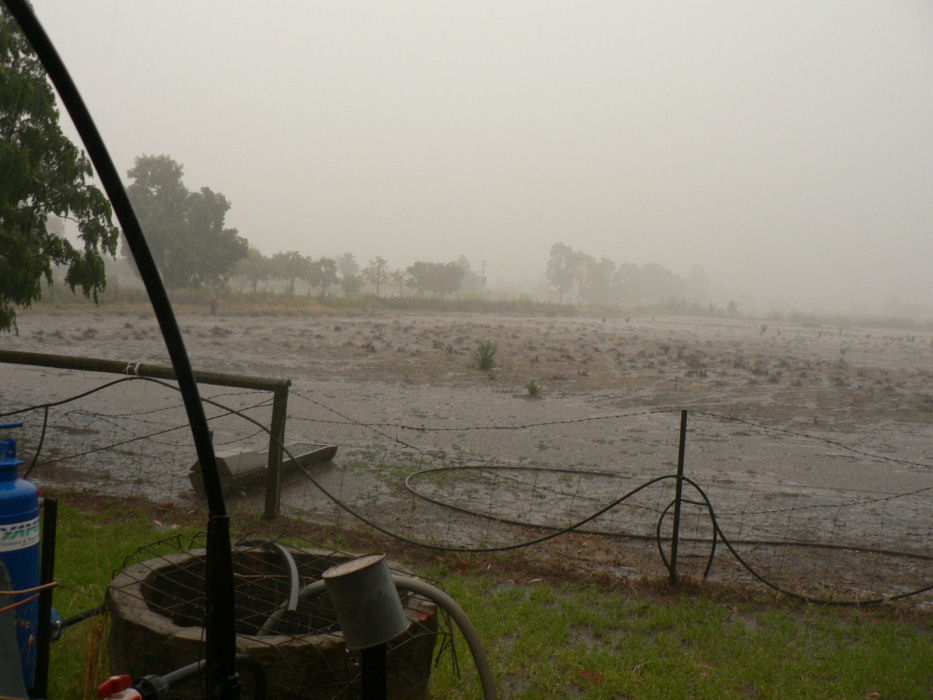
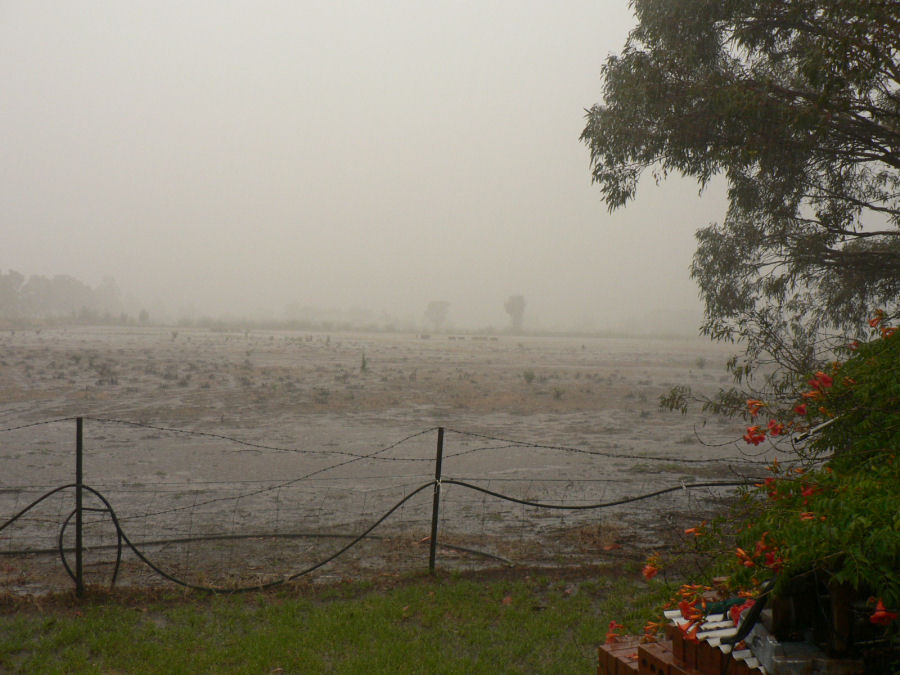
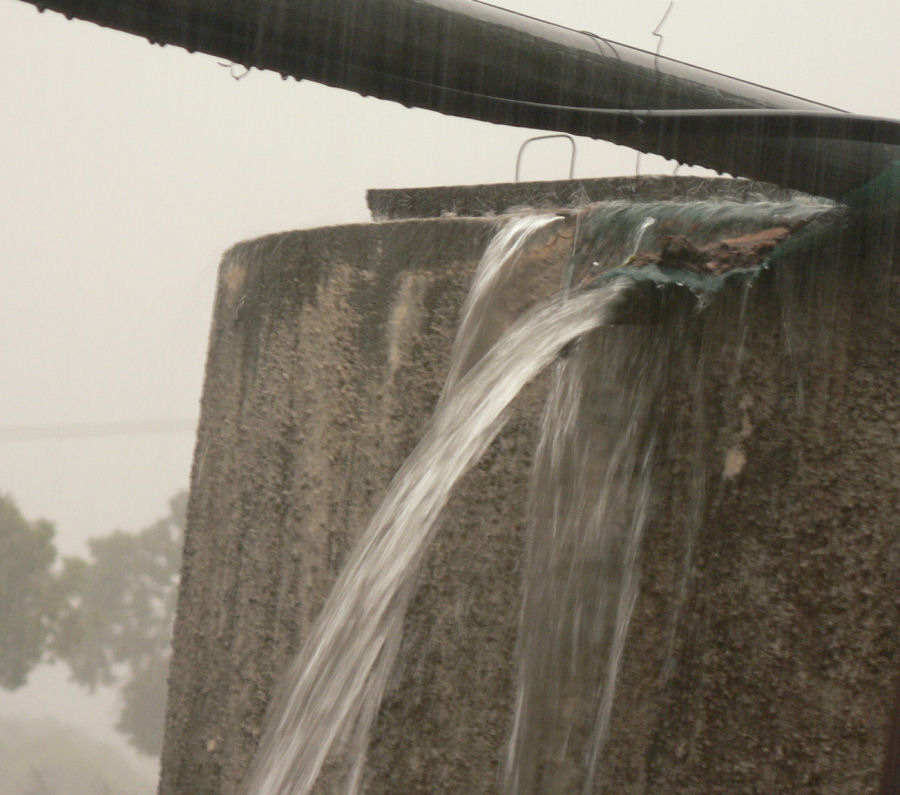
21-12-2007
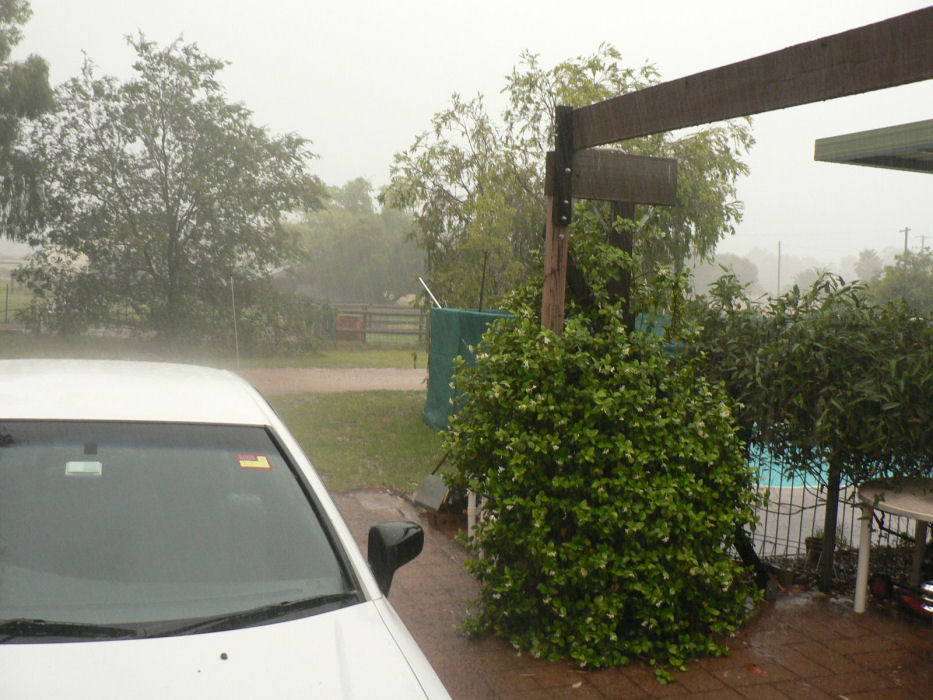
Slight digression today. Cleaned out some gutters as a big storm was predicted.
There are some sheep about 150 metres from the camera in pics two and three.
[ATTACH]4614.vB[/ATTACH][ATTACH]4615.vB[/ATTACH][ATTACH]4616.vB[/ATTACH][ATTACH]4617.vB[/ATTACH]
We ended up with 45 mm of rain here (although Yanco got quite a bit less) probably the biggest single fall of rain we have had for a couple of years but fairly useless for most people at this time of year for this area except perhaps some orchardists. It did top up our water tanks and watered all my wife's pot plants with the overflowing gutters.
The storm is just crossing the Snowy Mountains catchment now. The storm won't make much impression on the dams unless there are many more of them.
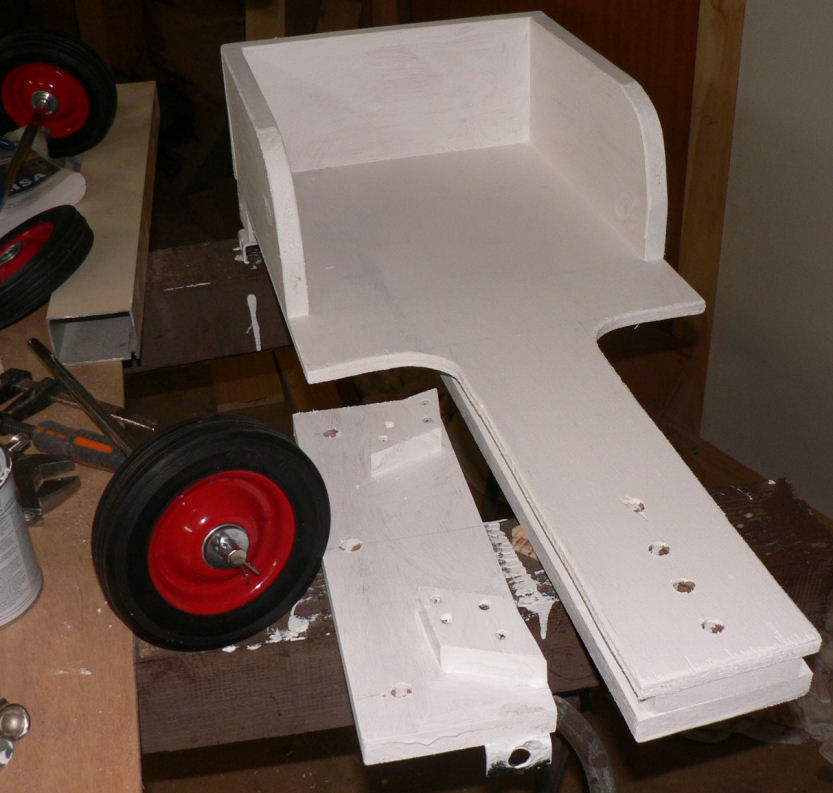
Did some work on the small billycart for the grandsons for Christmas day. Basically completed it except for adding a basic rope steering system and the finish coats of paint - only undercoated so far.
[ATTACH]4618.vB[/ATTACH][ATTACH]4619.vB[/ATTACH]
Made the length to the front wheels adjustable and provision for a tow bar and a hand hold at the rear end. Suspension is a bit basic - there is none.
-
I vaguely remember years ago some issue about a Commonwealth regulation about not being able to have an airstrip within 10 miles of a certified airport.
Brobenah (Leeton) was outside the distance from Narrandera. I think it is 14 nm and about 24 nm from Griffith without checking it out on the GPS.
-
20-2-2007
Drilled another hole in the panel below the other two warning lights. Inserted the red LED and connected a couple of spades to the wires.
Pulled out the header tank. Extended the wires from the float warning switch. Drilled a hole into the centre console from the recess for the header tank under the seat. Ran the header tank foat switch wires into the centre console to the firewall end of the console.
[ATTACH]4608.vB[/ATTACH]
Connected one lead from the float switch to the +instrument bus & the other to the +red wire on the red LED.
Connected the black - earth lead on the LED to the earth bus.
Turned on the main switch all warning lights went on. OK.
[ATTACH]4607.vB[/ATTACH]
Turned the header tank upside down - the low fuel in "header tank warning light" went out. OK.
-
I heard a couple of things that might help.
All below assumes the instrument is working correctly.
The pressure sensor might not be well earthed because of the thread sealer used mounting the sensor - the cure was to use a copper washer from an injector off another engine that fitted the base of the sensor nicely and gave a good earth connection to the engine.
Another earth potential problem is the earth bus mounted behind the instrument panel if it is made of aluminium - although aluminium is a reasonably good conductor (low resistance) it quickly forms a high resistance oxidised surface when exposed to air that can affect instruments that are essentially voltmeters as has been mentioned in other posts.
Of course all the other connections that make up the earth current pathway from the sensor to engine and back to the instrument via the earth bus need checking as well.
To test this theory of a good or a bad earth you could make up a test lead with alligator clips on each end. The lead needs to be long enough to connect the body of the sensor back to the earth connector on the back of the instrument.
If you connect this up soon after the engine has been running with the oil hot - if there is a problem with the earth connection the connected lead should immediately change the temperature reading without doing anything else and change again when it is removed.
Regards
-
19-12-2007
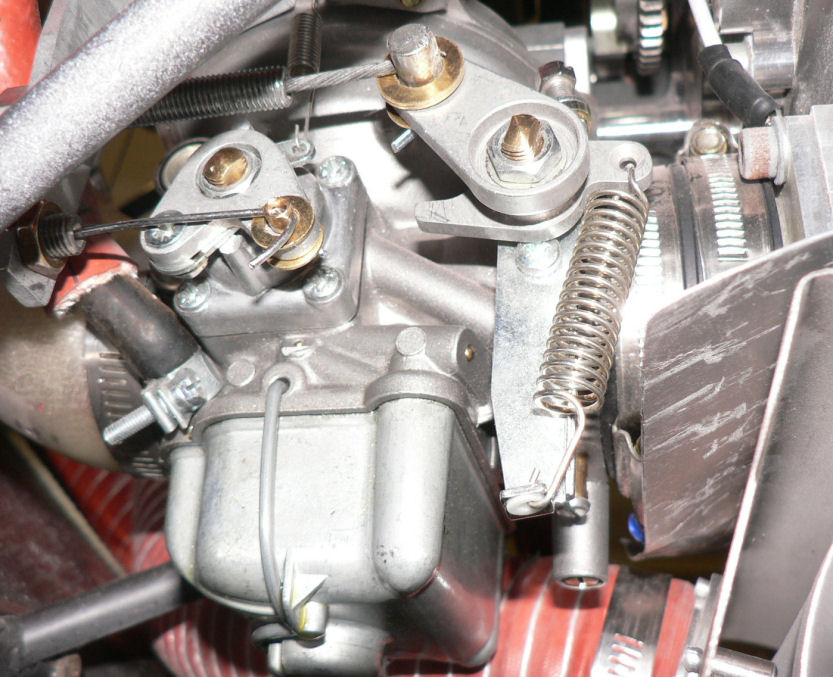
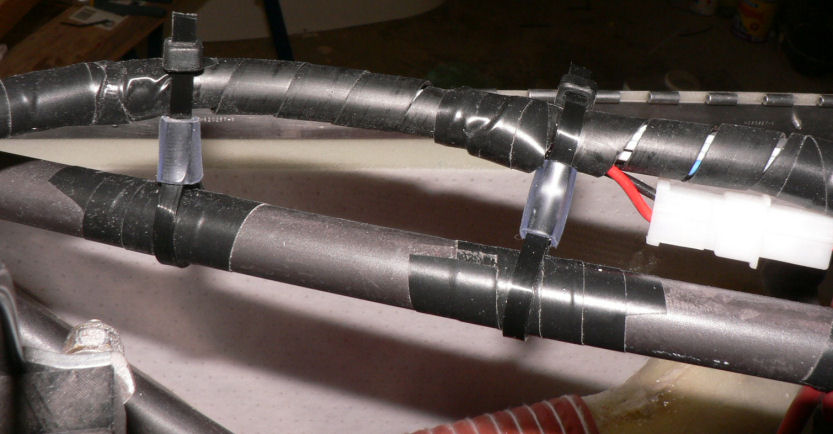
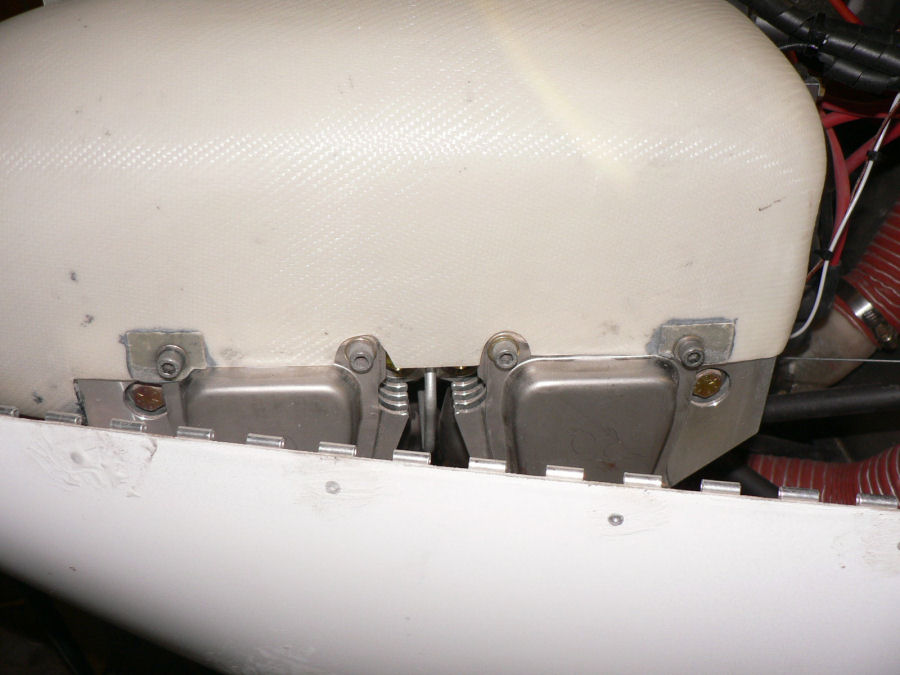
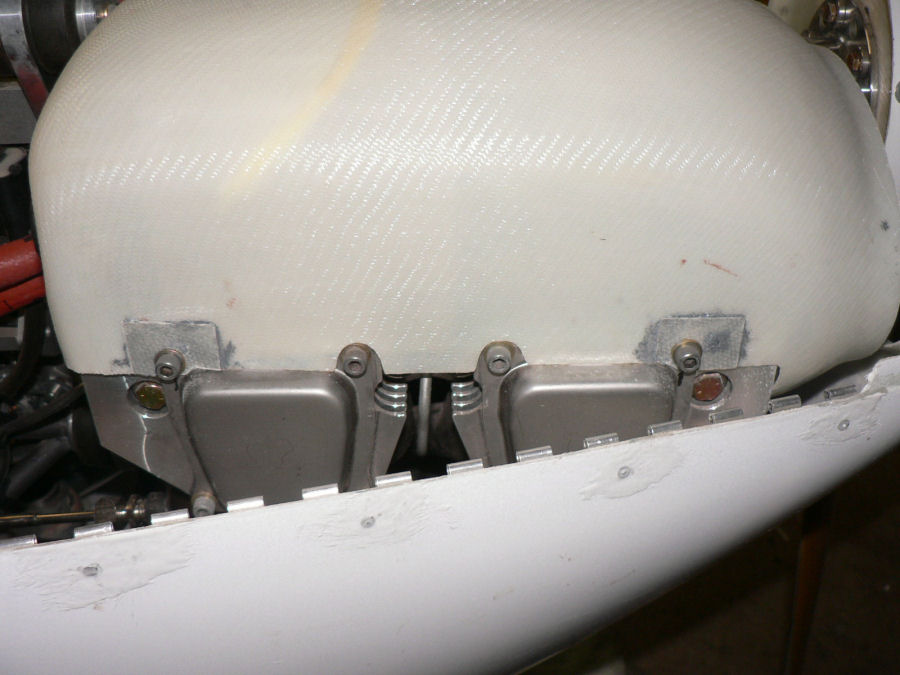
Added hooks to retaining clips for springs to steady the engine cooling air ducts.
[ATTACH]4597.vB[/ATTACH][ATTACH]4598.vB[/ATTACH][ATTACH]4599.vB[/ATTACH]
Blocked an unwanted hole in firewall.
[ATTACH]4600.vB[/ATTACH]
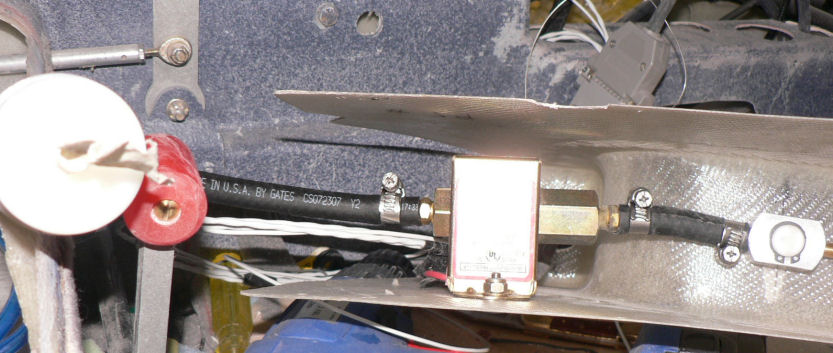
Started replacing hose and clamps from carburettor back to the wing tanks.
[ATTACH]4601.vB[/ATTACH][ATTACH]4602.vB[/ATTACH]
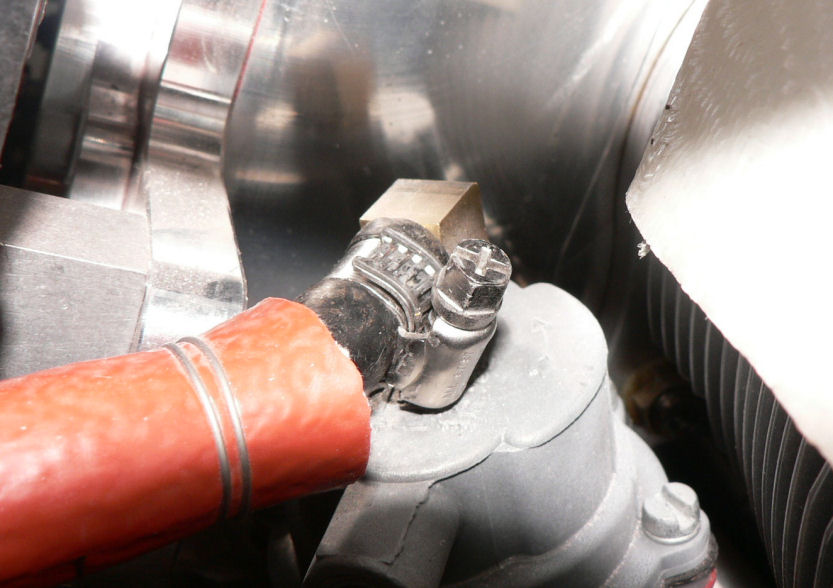
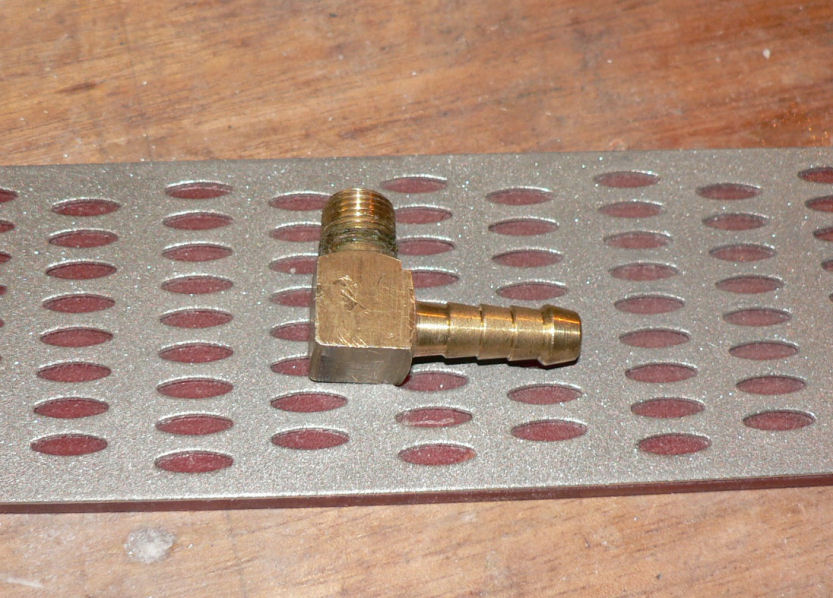
Removed the elbow from the "electronic" fuel pump so that hose to firewall with inline filter will be curved rather than straight.
[ATTACH]4603.vB[/ATTACH][ATTACH]4604.vB[/ATTACH][ATTACH]4605.vB[/ATTACH]
No pic of the assembly connected to firewall yet.
It will be easier to change the in line fuel filter with a gently curved hose.
[ATTACH]4606.vB[/ATTACH]
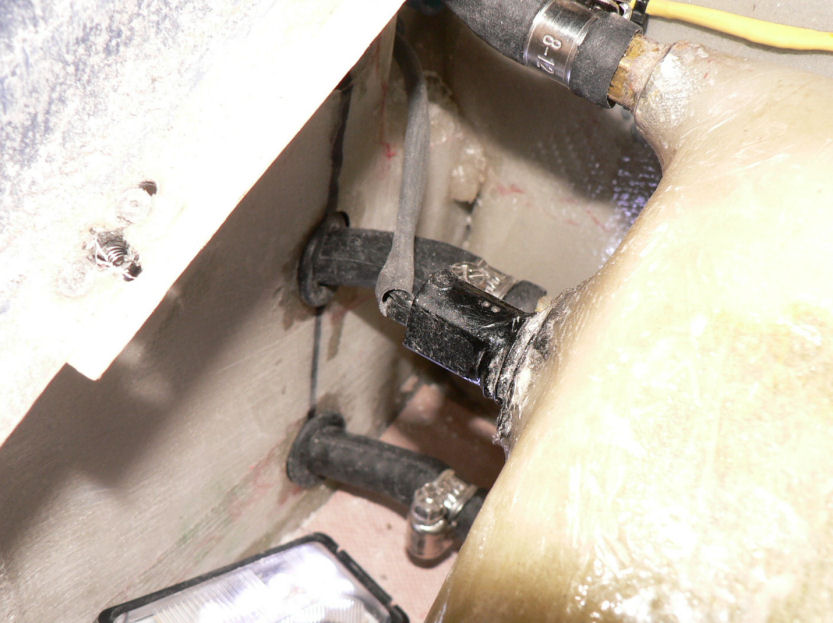
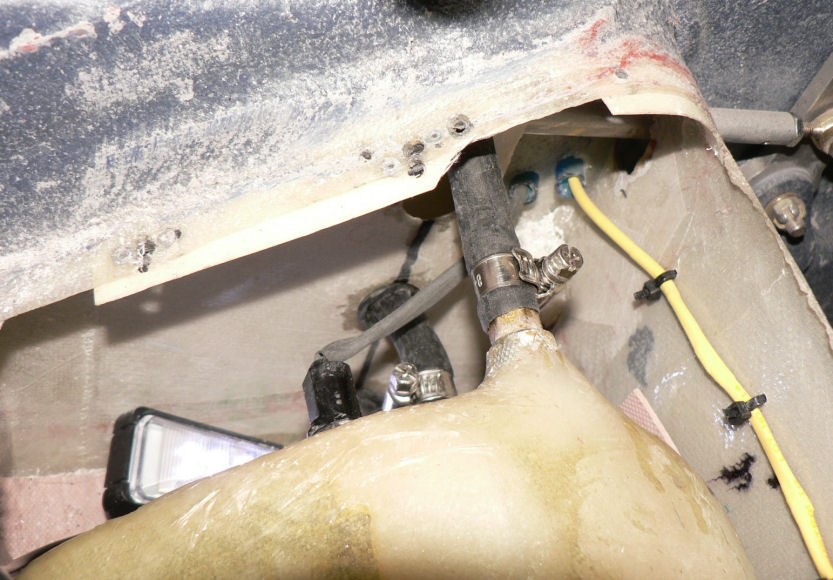
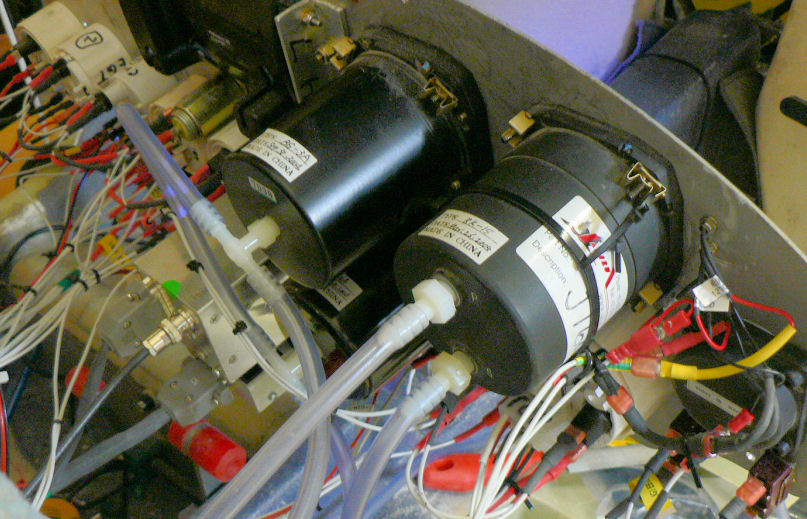
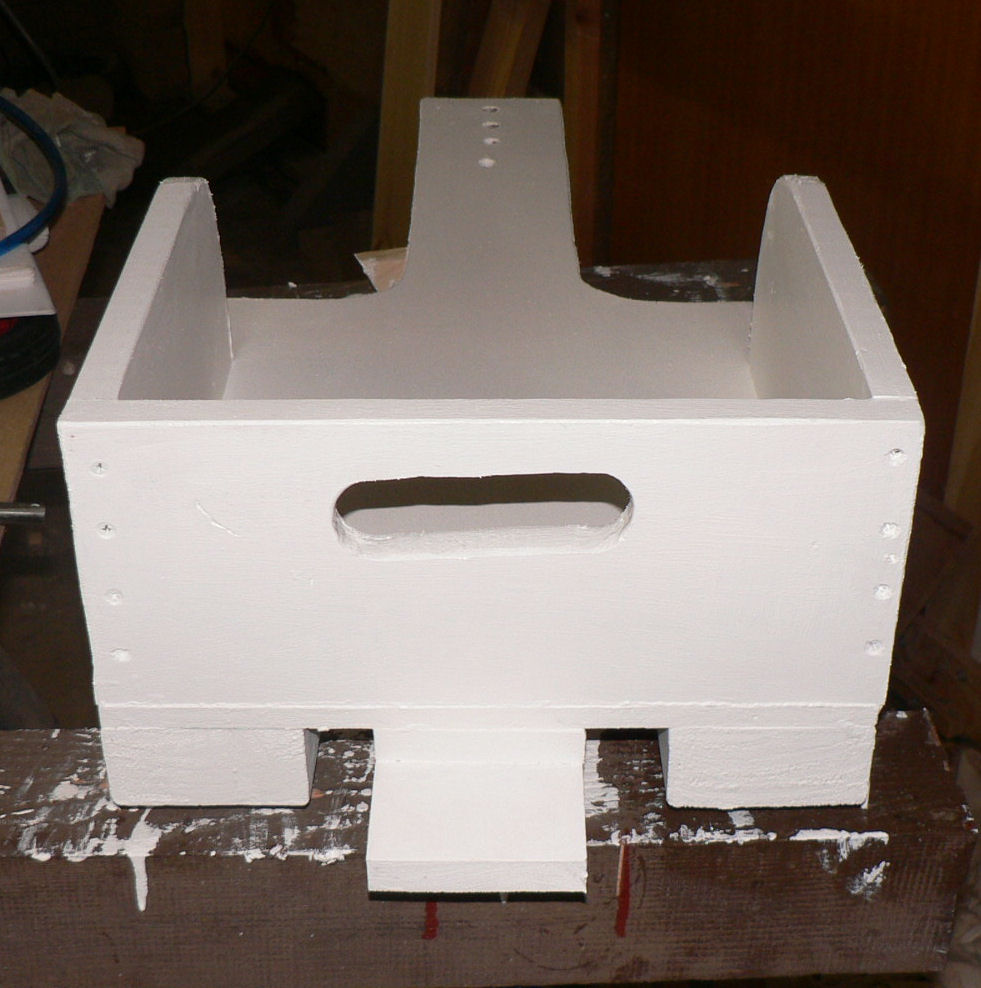
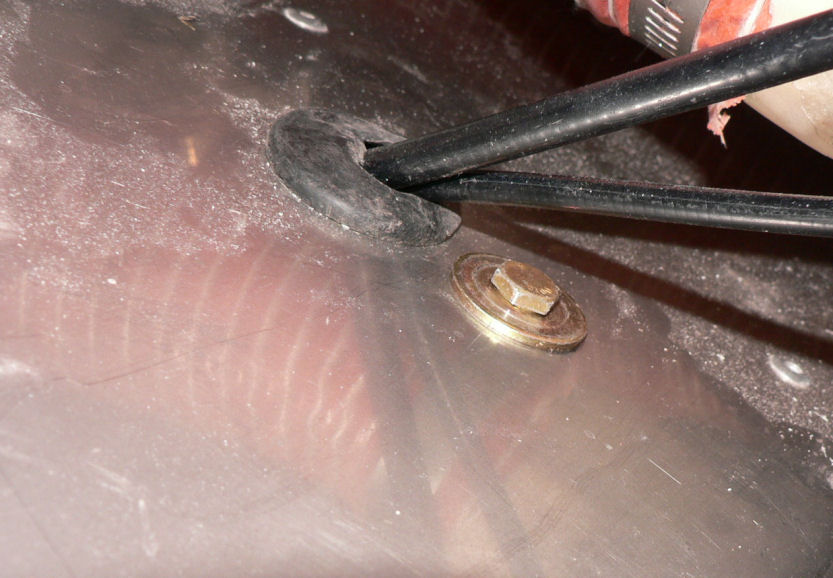
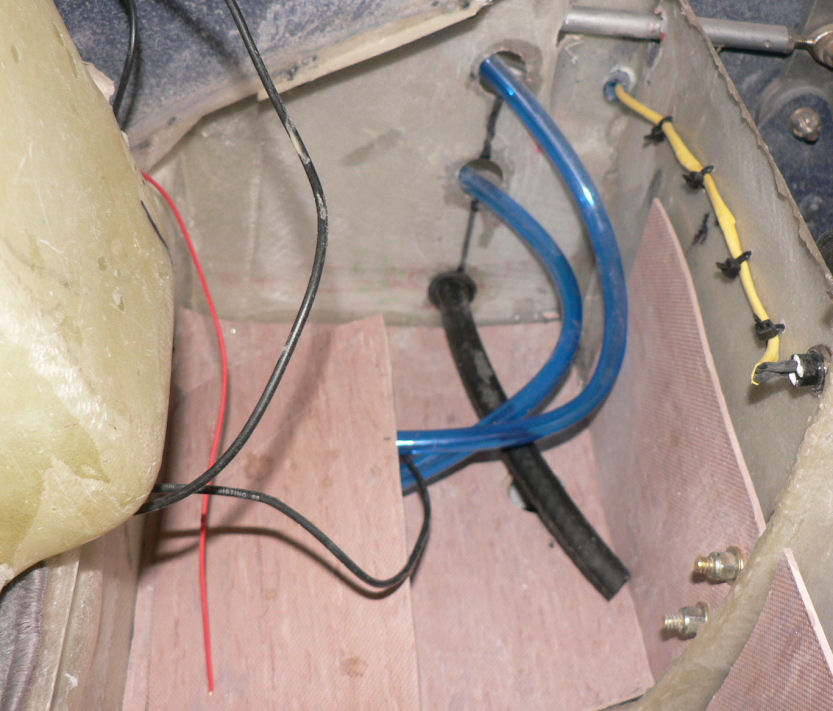
Only got as far as the header tank under the pax seat. Middle hose position is fuel from tanks, top position is breather hose position, bottom (black) hose position is fuel from header tank to firewall. The two loose wires are from float switch in the header tank for low fuel level in header tank warning light.
A bit of foregoten wiring to do inserting another warning light in the panel for the low fuel level. I knew that extra red LED would come in handy for something.
Got some more supplies for the Christmas Day billy cart project, paint, timber, and screws.
-
18-12-2007
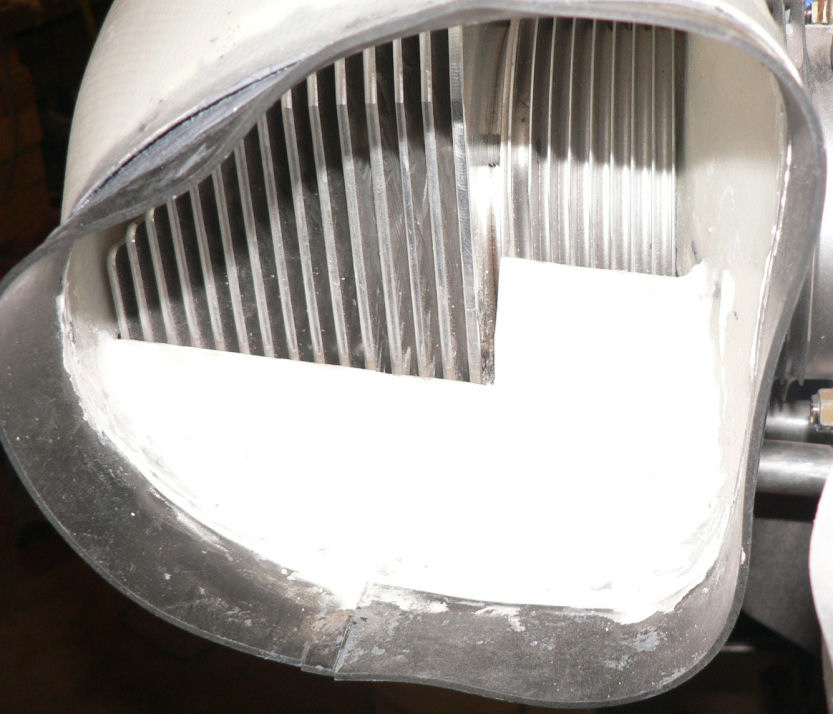
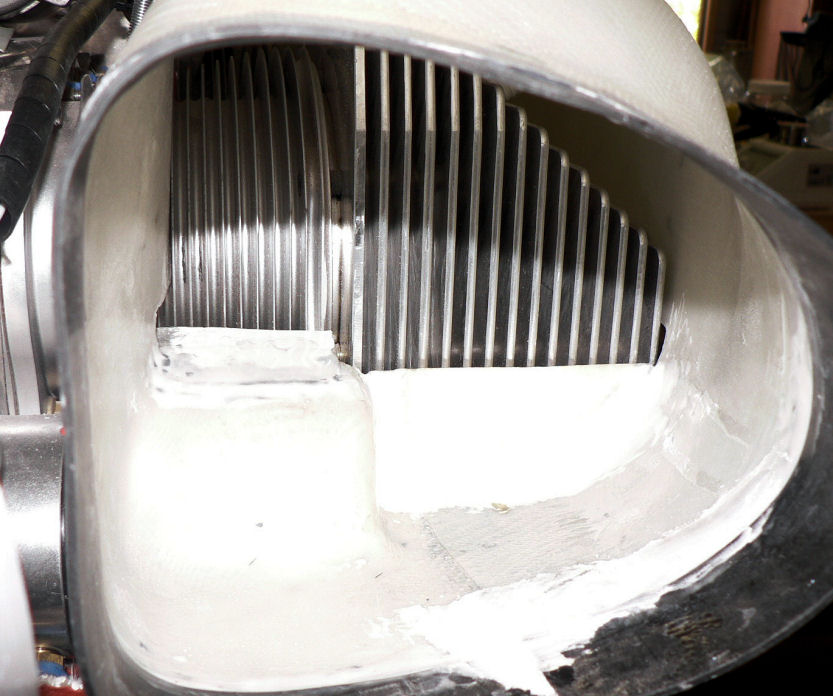
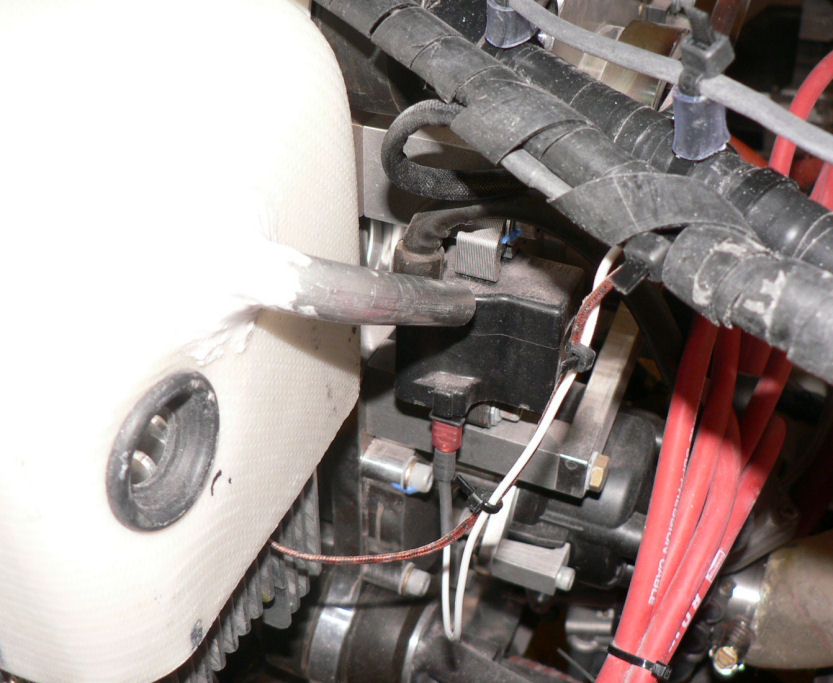
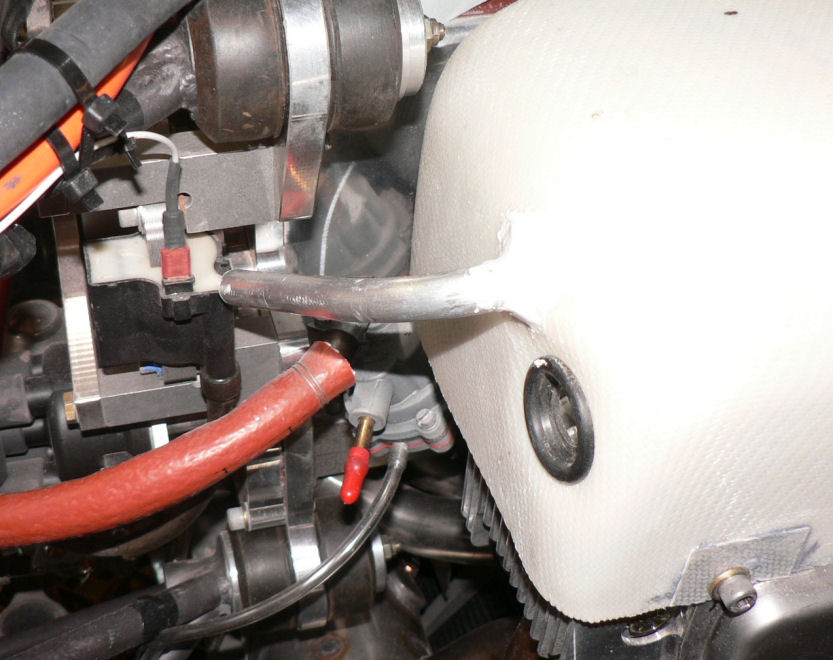
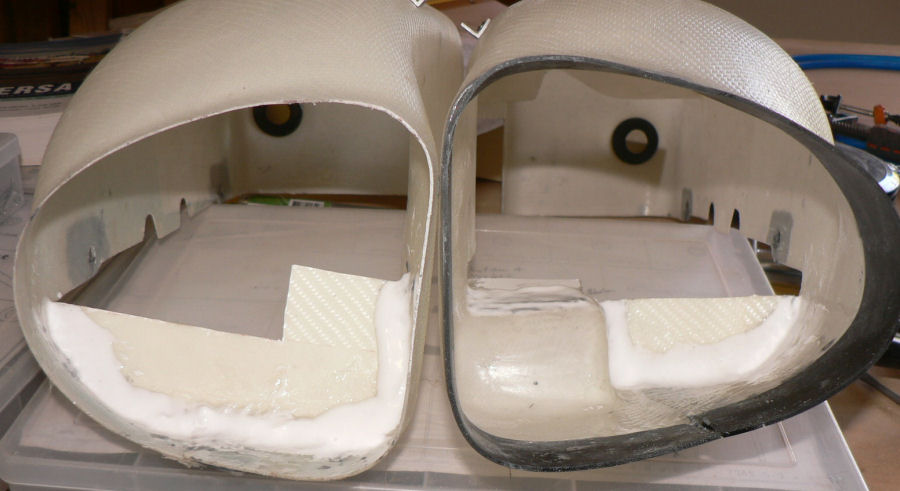
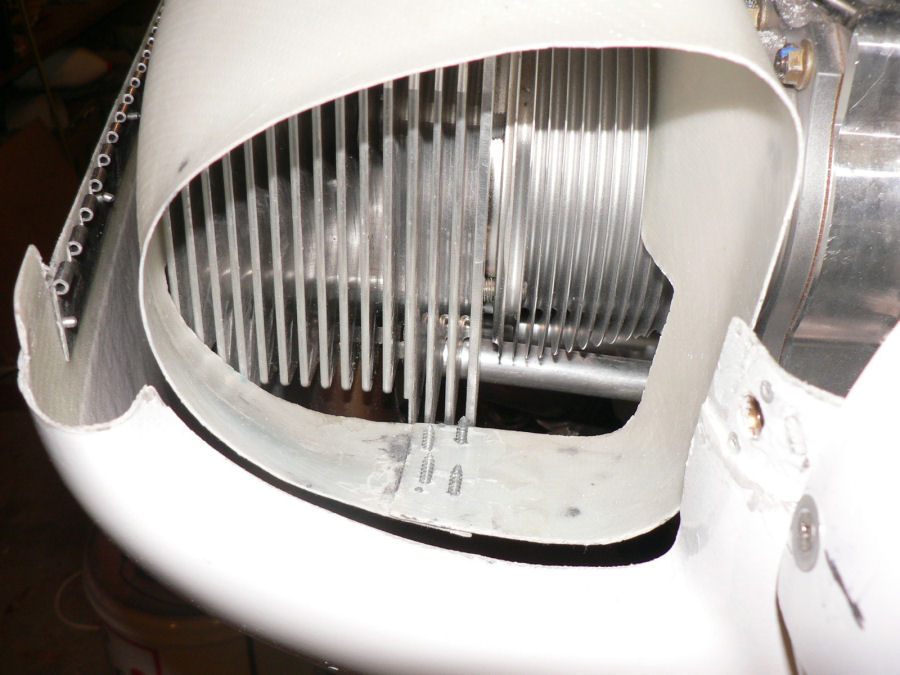
Pre-fitted & Tacked & then epoxy filled around the aluminium Coil air cooling tubes into LH & RH engine air ducts. They were set up to blow ducted air onto the two coils.
[ATTACH]4592.vB[/ATTACH][ATTACH]4593.vB[/ATTACH][ATTACH]4595.vB[/ATTACH][ATTACH]4596.vB[/ATTACH]
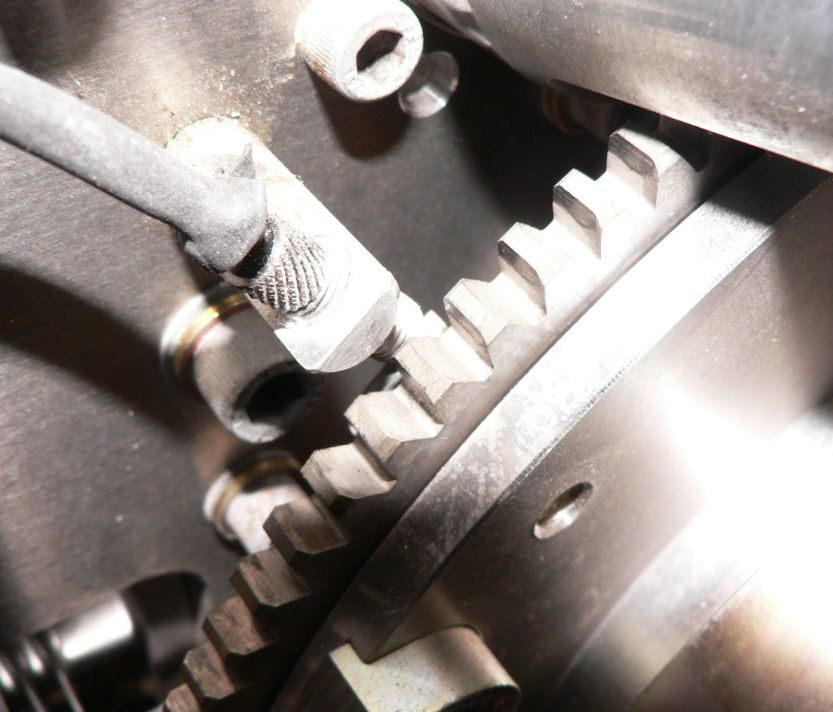
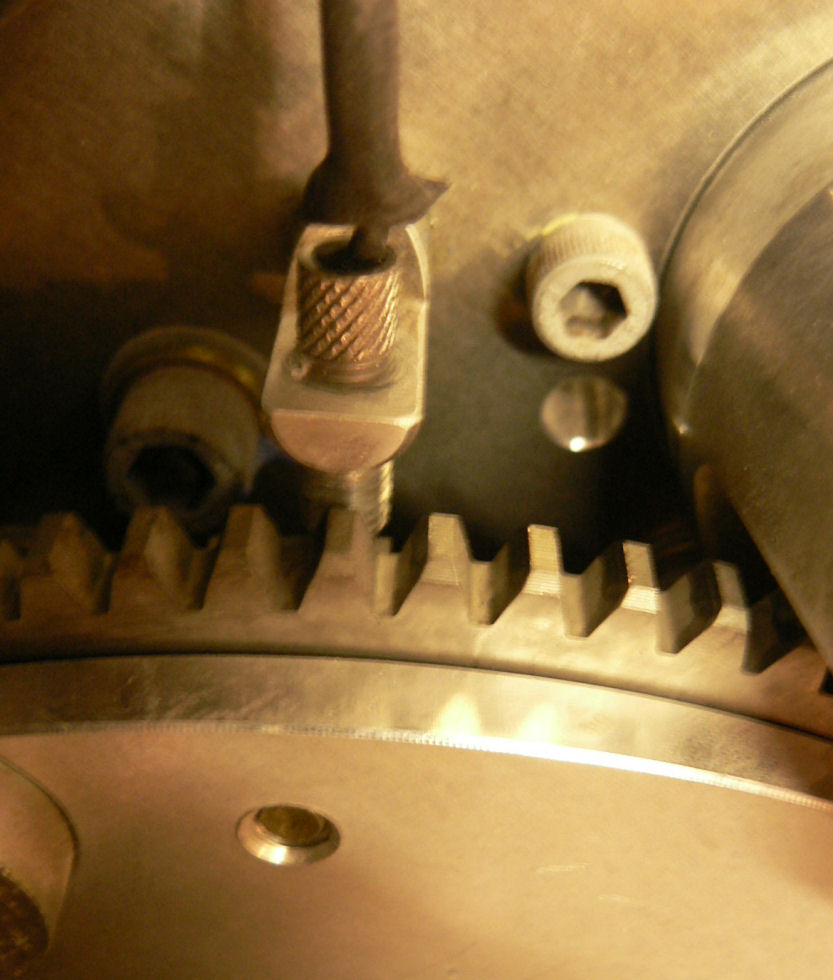
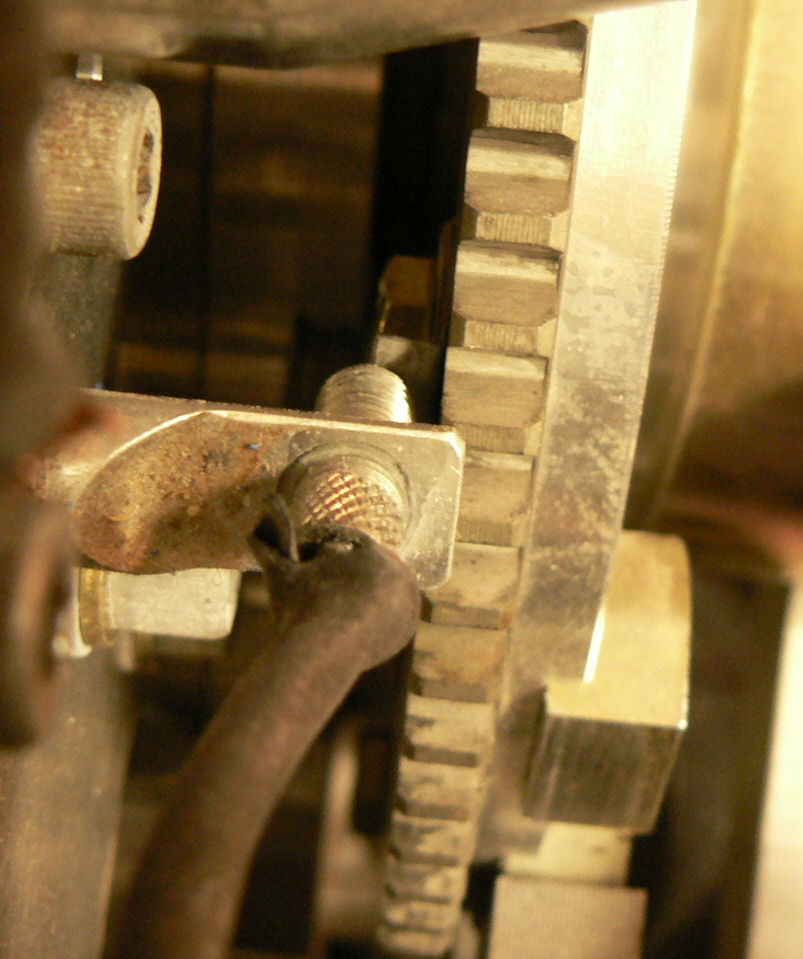
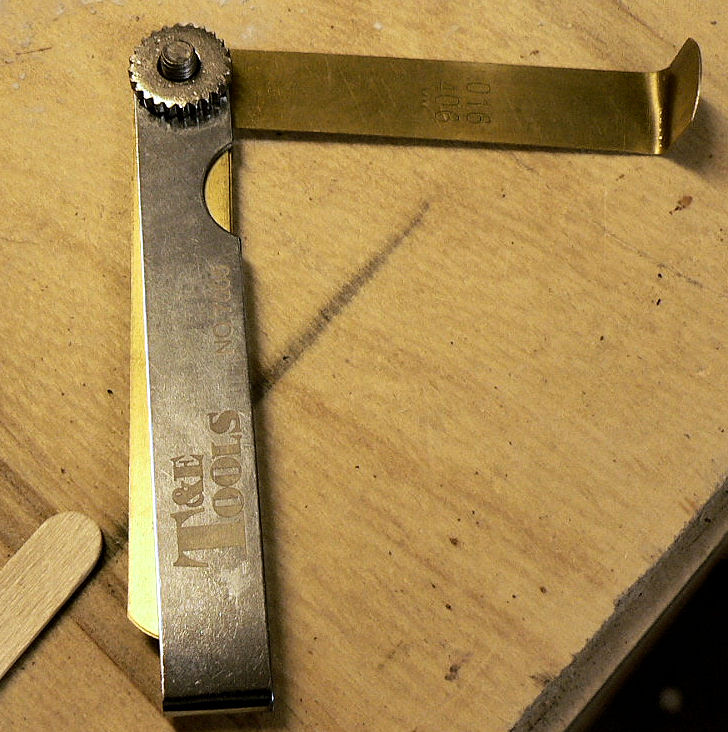
Rang Jabiru to get the Gap for the Tacho magnetic pick up. For the magnetic pick up, according to Jamie it should be 0.45 mm or 0.018"
As I had already mounted & wired the sensor I had to remove the cable ties, disconnect the wiring and remove the magnetic pick up and the two hexagon lock nuts on it so that the sensor could get near the tab on the back of the starter motor ring gear. I could not get a lock nut on the tab side of the mounting point because of lack of space .
So I set the gap to about 0.42 mm using a bent brass feeler gauge to get into the gap adjusting the knurled nut head of the pick up by hand. Once the gap was set it was locked in place with super glue on the thread.
[ATTACH]4588.vB[/ATTACH][ATTACH]4589.vB[/ATTACH][ATTACH]4590.vB[/ATTACH][ATTACH]4591.vB[/ATTACH]
The wiring was reconnected & cable ties applied.
[ATTACH]4594.vB[/ATTACH]
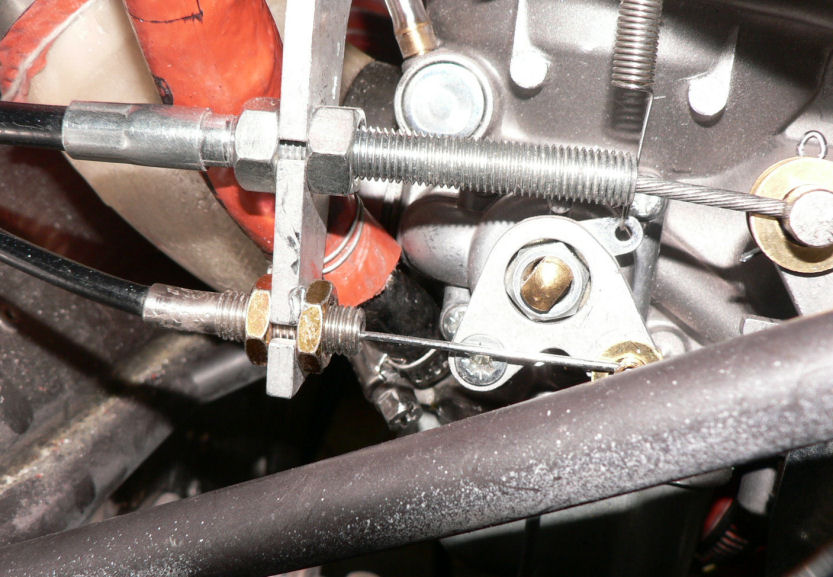
Added brass washers to the throttle & choke controls at the carburettor end of the cables & installed new split pins.
-
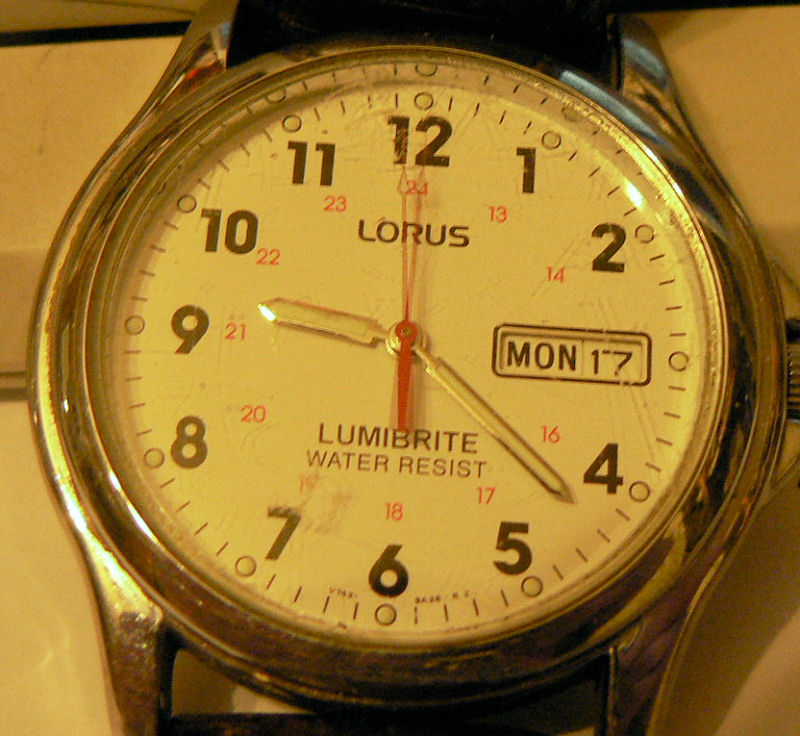
Hi Geoff
I have this theory that the instrument faces should be white and the indicator hands should be black.
So when you switch from looking outside generally at bright light with your eyes with small pupils to inside at the panel your pupils won't have to dilate so much and your eyes have a greater refocus need the more the pupils dilate because of dark instruments.
So if the instrument faces are lit the eyes should not have to adjust so much when switching back & forwards from outside to inside and therefore quicker.
[ATTACH]4584.vB[/ATTACH]
But they would probably be better if the faces were white like my watch face but it needs better coloured hands or black.
When I was learning to fly the Jab at Griffith it always seemed to take too long to focus on the engine instruments and absorb the message and the radio was even worse being mounted at the bottom of the panel.
If I were doing the panel again I would arrange it in groups so that one glance would cover a whole set of instruments.
That's my story and I'm sticking to it. I'm definitely not flying at night.
It was also something that I could get working as the engine has these tags all over it saying something like
"Do not ground run this engine etc...."
Regards
-
17-12-2007
Epoxy, flock & fill both LH & RH side ducts.
Attach insertion rubber to RH air duct using Loctite quick adhesive
Reattach some cable ties using Nev Whites stand-offs.
[ATTACH]4579.vB[/ATTACH][ATTACH]4580.vB[/ATTACH][ATTACH]4582.vB[/ATTACH][ATTACH]4583.vB[/ATTACH][ATTACH]4581.vB[/ATTACH]
-
Hi Peter
This morning I was speaking to Neville White (see RAAust mag story) who lives at Merungle Hill (Leeton) about the duct attachment holes.
He suggests a nicer solution would be to epoxy some semicircular stainless steel bits to the ducts instead of my fibreglass scraps. The sharp cornered pieces could induce stress concentrations to start off the failure process again.
I am inclined to believe that the fibreglass is getting too hot going by the straw brownish colour that seems to predominate in all the badly worn ones that I have seen. Maybe another solution might be an insulated washer under the duct to keep some of the heat off the fibreglass. Mechanical fuel pumps can have that problem in cars causing vapour locks requiring a heat conducting resistant gasket between it and the engine.
He also suggest using some stand-offs for the wiring cable ties off which I will take some pics for the next post.
I have wired up my instrument lights and note that they draw about 1.5 amps when my mains automatically regulated battery charger is operating. I was wondering if any one knows if LED lights are available for that style of light.
Regards.
-
I looked up my current ERSA effective 22nd Nov 2007 with the next issue to be effective on 13th march 2008.
According to it Moree is a plain CTAF with an AFRU on 126.7 megacycles.
So it may be used by a VFR pilot without a radio but if he has one it must be used.
If it were a CTAF® it could not be used by a VFR pilot without a radio.
I heard of a pilot test flying an aircraft after a major having a radio failure. So he landed on a farm airstrip (which he knew well) made a phone call to the aero club and asked for his arrival back at his home aerodrome without radio to be broadcast from the club radio at a prearranged time. It was an MBZ at the time.
For any additional information check the current NOTAMS for that aerodrome from Air Services.
Regards
-
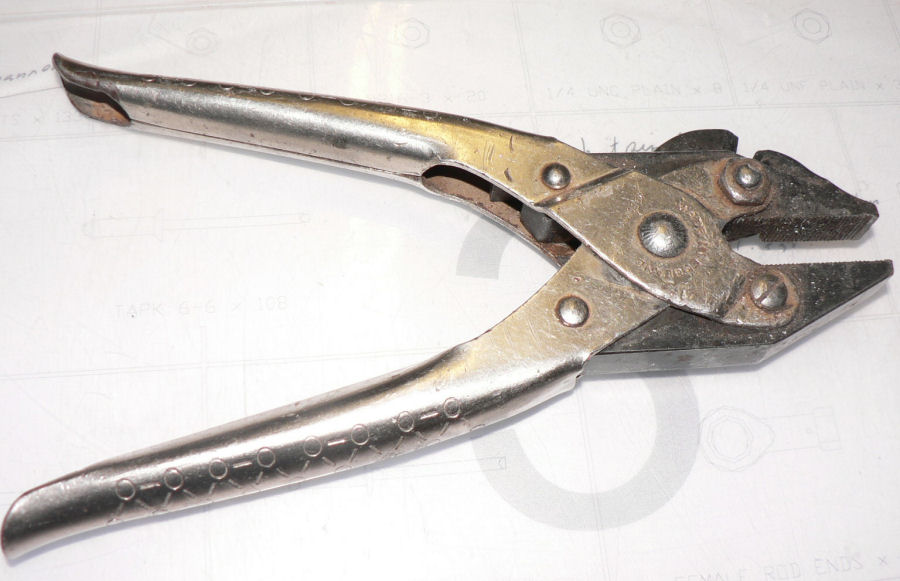
Another way out of the problem might be to put a little dab of opoxy mixed with flock in the second hole of each location where a self tapping type screw is used and then insert the self tapper.
If you are unable to extract them later with a Philips head screwdriver I find that a pair of Fencing pliars specifically designed to handle high tensile wire will allow you to grip them hard enough to rotate them for extraction.
[ATTACH]4564.vB[/ATTACH][ATTACH]4565.vB[/ATTACH]
The jaws in these pliars are hardened steel and unlike most pliars stay parallel as they are opened or closed. They will also cut spring steel without damage to the cutting edge.
Regards
-
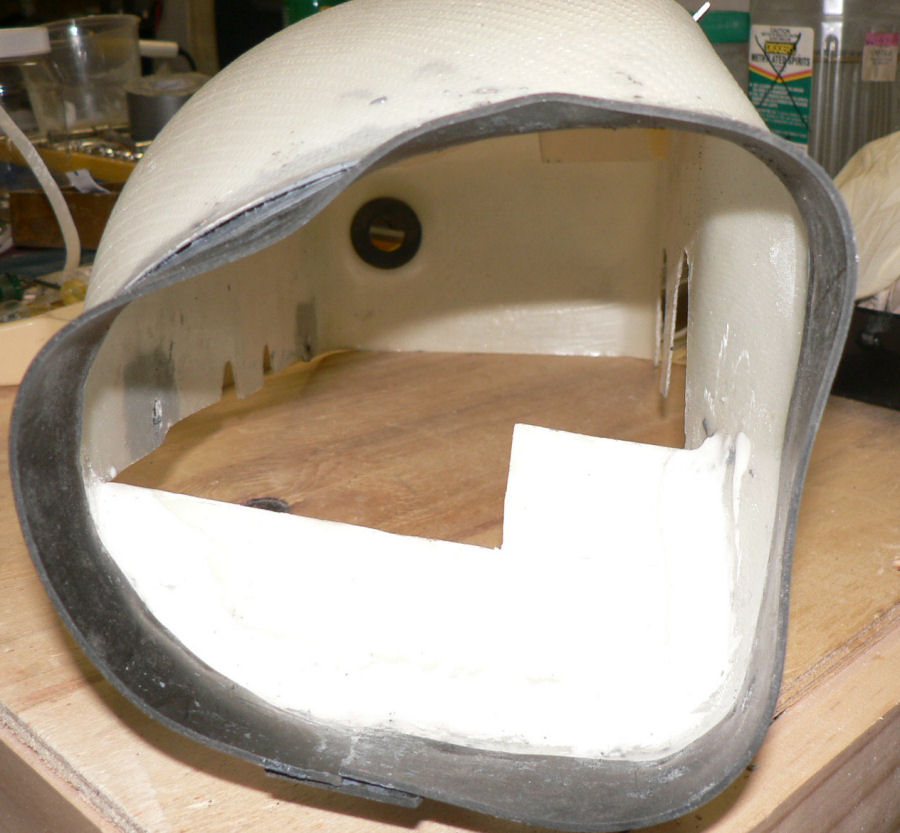
15-16-12-2007
Used Loctite Quick Adhesive (a "10 minute epoxy") to tack the LH Ram air cooling duct opening hole size. The epoxy is a horrible grey colour and sets very quickly and is very hard to get out of the tube - old stock? - although it seems to work very well. It is the same price as 5 minute Araldite in Leeton.
It is easy to mix as the hardener is pure white and the resin is black so when mixed is a uniform grey colour.
Improved mounting hole alignment of cooling ducts to the tappet covers for both LH & RH ducts sides and reinforced the hole positions with an extra layer of fibreglass attached with loctite adhesive.
Every Jabiru I have seen with the top cowl off shows wear in these duct mounting holes.
Pre fitted LH cooling duct & trimmed it to give about a 12 mm or 1/2" gap between the duct and the edge of the cowl air entry hole. This will allow the insertion rubber to be pushed out over the lip once it is fitted.
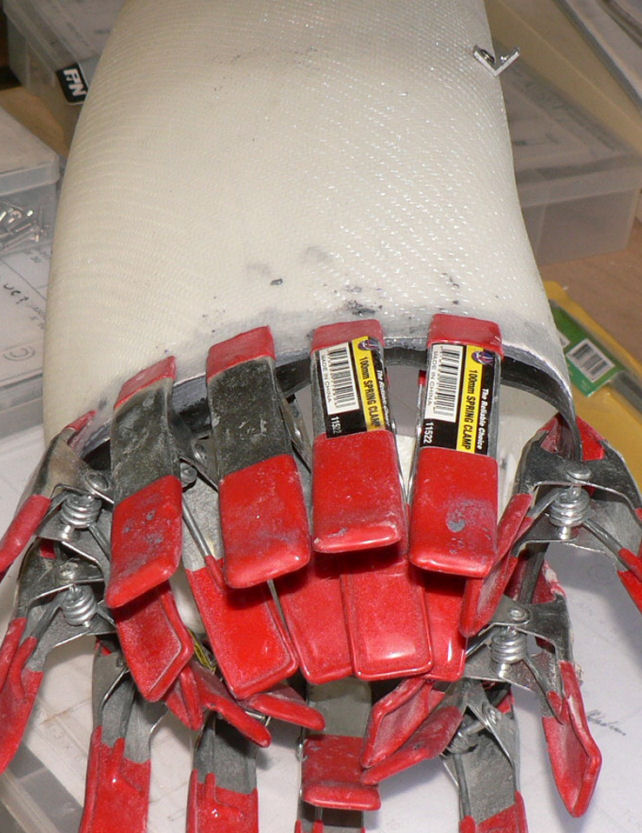
Fitted insertion rubber supplied to LH cooling duct.
Roughed up the insertion rubber and the matching part of the duct with emery cloth. Cleaned both surfaces with acetone.
Applied quick setting Loctite adhesive to both surfaces and clamped rubber using multiple spring clamps.
Adjusted opening of RH cooling duct to more closely match the cowl openings. Set the opening using epoxy adhesive again.
AS above adjusted the gap between cowl lip and duct to about 12 mm.
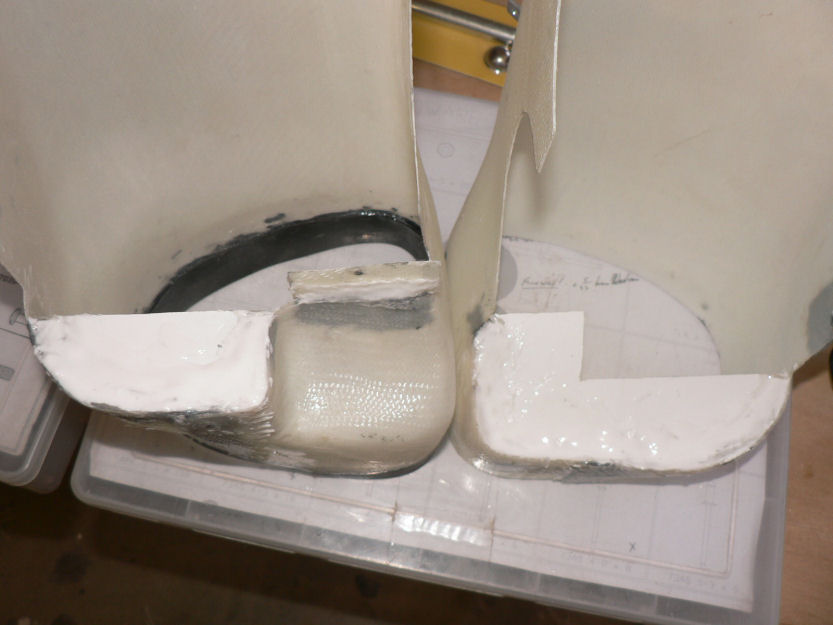
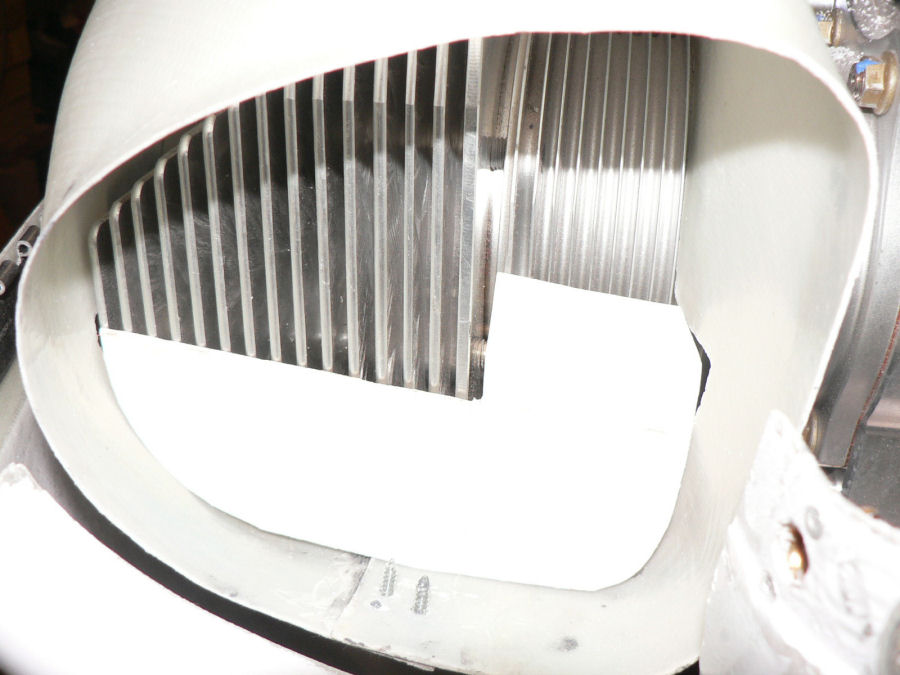
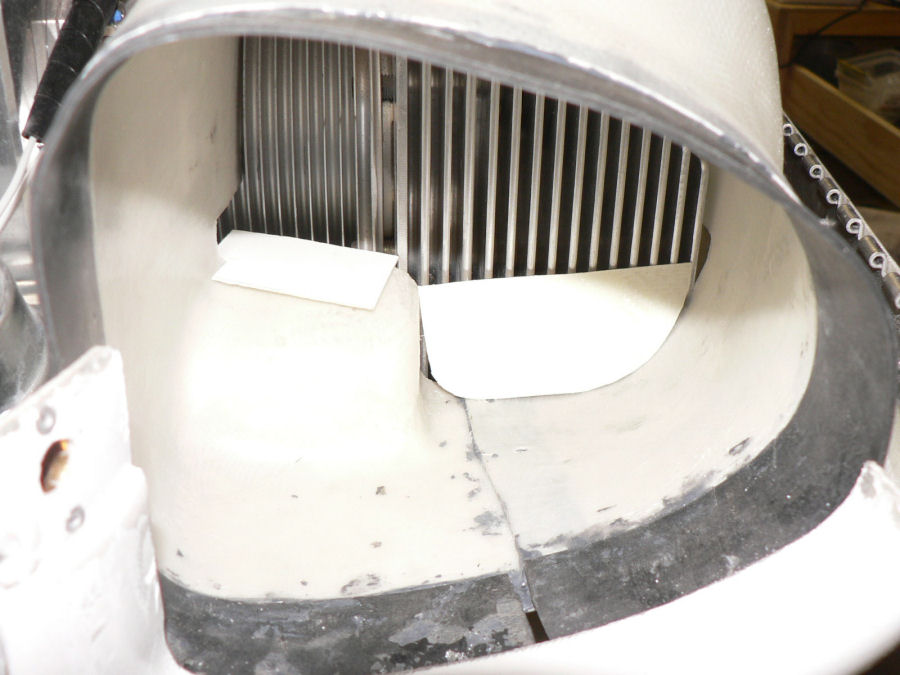
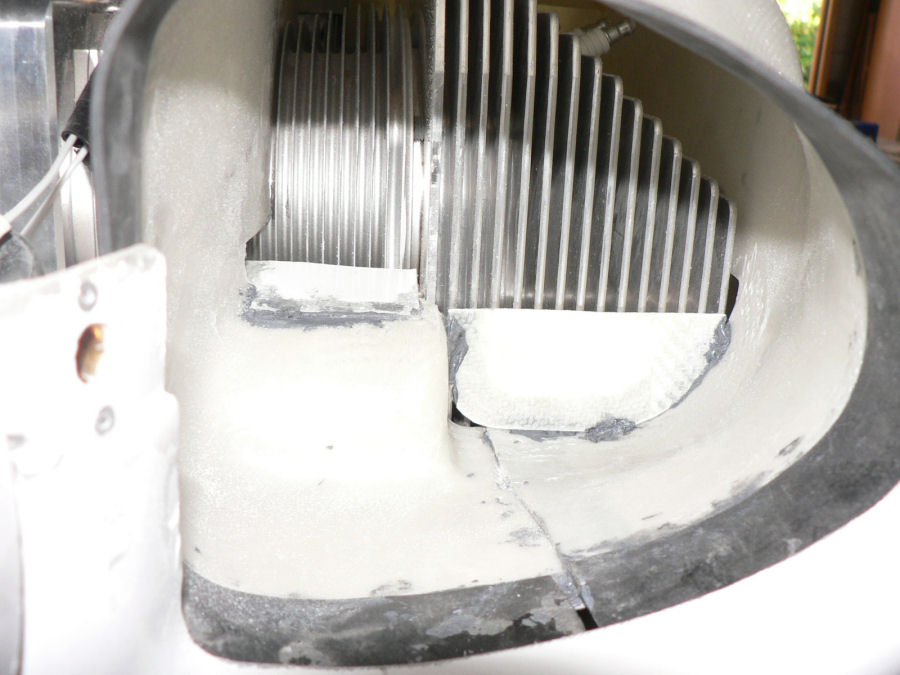
Checked the air gap inside the ducts between the duct and the first cylinders on each side. The gaps on both sides would let a lot of air escape without cooling the cylinders.
So made up pieces to tack inside the ducts using the quick set epoxy - they will be flocked in later more securely. These pieces should force most of the air to go over the top of the cylinders and come down between them and over the end ones.
[ATTACH]4556.vB[/ATTACH][ATTACH]4557.vB[/ATTACH][ATTACH]4558.vB[/ATTACH][ATTACH]4559.vB[/ATTACH][ATTACH]4561.vB[/ATTACH][ATTACH]4560.vB[/ATTACH][ATTACH]4562.vB[/ATTACH][ATTACH]4563.vB[/ATTACH]
-
The 296 also has 12V 24V cigar power supply that automatically charges the battery if it is low as well as running the GPS. If the external aircraft 12V fails the internal GPS battery takes over depending on what options you set up.
Regards
-
Hi Alan
I note that your "nuts" that are used between fairings look like the push on type that were commonly used on some car panels years ago together with self tappers.
I ordered an extra supply of retained nuts from Jabiru (the type that require two rivets to secure them) and are mated with a machined SS screw either CSK, Pan head or hexagon head as required.
My bottom cowl uses CSK stainless screws with the retained nuts. The instrument panel uses on my #14 J160 kit pan head screws with retained nuts. The locking tabs for all the control hinges use pan head screws with the retained nut (held by two pop rivets).
I have used them to secure items like fairings to fairings around the UC legs and struts & the strut fairing to fairing on the wing connection and the extension to the centre console between the pilot & passenger.
I still used the self tappers to connect removable fairings to the fuselage.
There is far less chance of these screws with retained nuts falling out, getting loose or the hole enlarging when compared to using the self tapping screws.
Regards


Even Compressions
in Jabiru
Posted
Hi Peter
Attended a wedding in Eltham over the weekend and heard vague reports of flash flooding around your area so returned to Leeton via the freeway as far as Benalla and then Tocumwal on Sunday afternoon. We found 18.5 mm in our gauge when we got home to Leeton just on sunset.
Regards