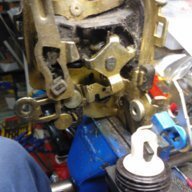
ahlocks Posted April 12, 2008 Posted April 12, 2008 Hi all, Noticed some oil seepage from the base of the fuel pump over the last few weeks and during the 100 hourly today, I removed the pump and confirmed the origin as seepage under the gasket. I'm suspecting that I didn't torque the bolts up tight enough when carrying out the pump replacement service directive about six months ago. I've reseated the pump and will continue to monitor it and will replace the gasket if the seepage continues. More importantly though, how the hell do you torque the bolts up to specification? I can't get a socket and torque wrench onto the bolts to torque 'em up to spec. Cheers, Steven B.
vk3auu Posted April 12, 2008 Posted April 12, 2008 I had the same problem. It went away after I tightened the bolts a bit more. Can't remember how I did it now, but from experience you get to know what is pretty close to the right torque. Don't use too big a spanner. David
ahlocks Posted April 12, 2008 Author Posted April 12, 2008 Thanks for your reply David. I just used a normal ring spanner and tightened them until I got nervous. I took the pump right off and checked and cleaned up all surfaces and re applied locktite. Wasn't game to just tighten them up without using thread lock.
Guest aircraft1 Posted April 12, 2008 Posted April 12, 2008 Use a crows foot spanner and torque wrench.....
ahlocks Posted April 12, 2008 Author Posted April 12, 2008 Thanks Aircraft! Just found this.... http://www.geocities.com/motorcity/downs/3837/torqwren.html Torque Wrench Adapters Adapters can be used at the drive end of a torque wrench. That is, should one need to torque a tubing fitting or a fastener that cannot be accessed directly on line with its axis. A crows-foot on a torque wrench is an example. Adapters can be fabricated from old tools or any of the cheap tools found in stores like (in the St. Louis area) Big Lots or Hoods. Adapters can extend along the wrench’s centerline or extend out at 90 degrees from the drive end. Any angle between 0 and 90 degrees is possible. At angles other than 90 degrees, dimensions of the critical parts on the wrench as well as some simple math are required. Adapters extending at 90 degrees from the drive end induce no error in the scale reading--see Fig. 4. Adapters should not be used on ratcheting type torque wrenches. The distance between torque centers can and does change as the wrench ratchets around the drive head. An exception is where the ratio of torque center distance (A) to the torque arm length (L) does not exceed 0.10. A crows-foot used to torque a tubing fitting will seldom exceed this ratio (A/L). Tips Handy tips that should be obvious: Get a good purchase on the fastener and apply torque with the wrench perpendicular to the axis of the fastener Clean threads are essential but lubrication of threads should be in accordance with design requirements Select the correct torque wrench for the application range Keep the tools clean and don’t toss them carelessly into a tool box or around the work area Store toggle type wrenches with the dial seting somewhere within the lower 25 percent of the range Use torque wrenches only for their intended purpose While preparing this article, some questions arose as to why a handle extension could not be used on a rigid-frame wrench. My research material indicated that such a wrench a could be grasped anywhere along it’s length. So why not beyond it’s length? The instructions for the use and care of a Craftsman “Micro Tork” warn against the use of an extender. It is stated in bold type face; “Their use will result in erroneous torque readings, and may damage the grip or adjusting screw.” In my garage laboratory, I contrived a device to extend the handle which would not damage the grip or adjusting dial. Rudimentary tests did not prove the handle extender introduced error. I would follow the manufacturer’s recommendations in any case. I’m no physicist!
Guest Cloudsuck Posted April 14, 2008 Posted April 14, 2008 Mine has been leaking since new (37 hrs) but seems to be leaking from the weep hole. Floods told me they will get me a new fuel pump but there are none in the country, none in europe, none in the world and to keep flying and hope the leak goes away. I'm still waiting and the oil is still leaking.
Guest aircraft1 Posted April 14, 2008 Posted April 14, 2008 Do what we used to do to leaky water tanks, it will probably work on the engine. Throw a handfull of cement powder in the oil tank and when the leak contacting the air makes the cement go hard you have solved the problem. Works on metal and cement tank leaks so should work on the oil pump.
Yenn Posted April 15, 2008 Posted April 15, 2008 It will not work with cement and oil. The oil will prevent the cement from adhering. Oil is used to allow formwork to be stripped. Try superglue instead.
ahlocks Posted July 4, 2008 Author Posted July 4, 2008 Following up with this thread, the oil seepage never "settled" and was actually leaking around the plunger seal and out through the vent holes as well, making an 'orrid mess under the cowl. I bit the bullet and phoned Floods to buy a replacement and after discussing the problem they sent a new one under warranty. Yay Floods!:thumb_up: Put the new one on today and torqued it up with the new set of crowsfoot spanners specialy purchased for the job. Actually, the crows foot spanner allowed for getting the pump off and on with out removing the lower cowl, so it's no longer just for use with the torque wrench to get correct torque.:big_grin: A quick engine run to check for leaks, cowled 'er up and then a couple of tight circuits and all appears good. The pressure is a pooftienth lower, but with no obvious ill effect. We'll see how long this one lasts... Again, big ups :thumb_up::thumb_up: for Bert Flood Imports. Cheers! Steven B.
Recommended Posts
Create an account or sign in to comment
You need to be a member in order to leave a comment
Create an account
Sign up for a new account in our community. It's easy!
Register a new accountSign in
Already have an account? Sign in here.
Sign In Now