

bexrbetter
-
Posts
5,107 -
Joined
-
Last visited
-
Days Won
184
Content Type
Profiles
Forums
Gallery
Downloads
Blogs
Events
Store
Aircraft
Resources
Tutorials
Articles
Classifieds
Movies
Books
Community Map
Quizzes
Posts posted by bexrbetter
-
-
As Bex pointed out, for once a totalitarian government had a big advantage by controlling its population
Maybe not intentional, but you have made that sound bad to some people. The truth is the Gov here works very closely with the people keeping them constantly informed, and has a good track record in these situations.
I see in another forum that one American is complaining about the previous Avian Flu: "I was appalled at the powers that state governments have, enforceable by police powers, to mandate behavior of individuals and businesses. I hope that we do not get to policed quarantine". poor attitude really, and a non-acceptance of what's going on.
In other news on this theme, hordes of Chinese are currently flocking back to China where they believe it's far safer during this period after seeing how individuals in their various Countries they are in presently are behaving.
-
 1
1
-
-
After a few days rest again I did some more. Good that I'm slowly getting back to strength, but **** my knees are still a bit weak after a year of laying and sitting around, oh well, just got to keep pushing ...
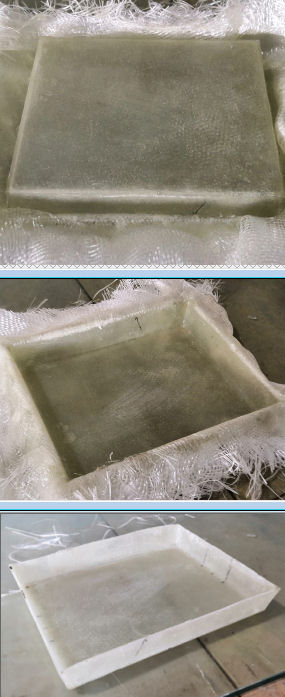
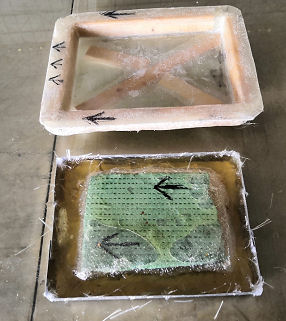
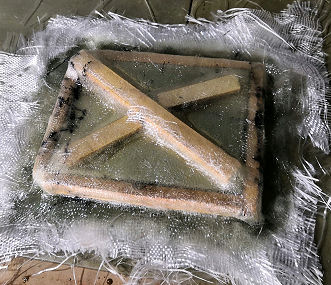
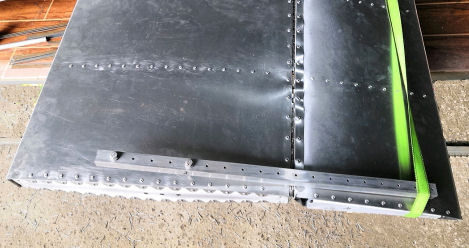
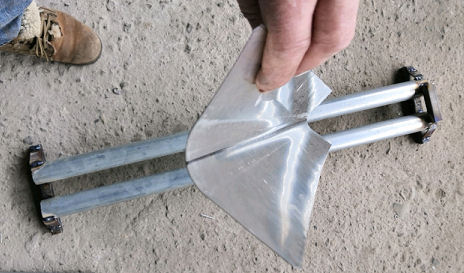
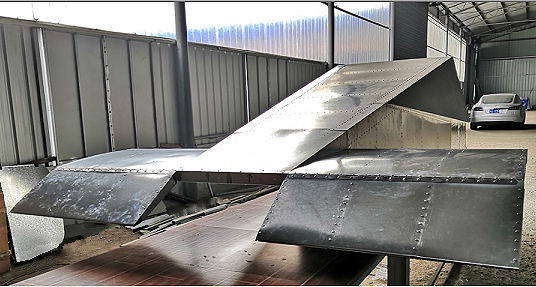
I molded up my gusset/joining plate and pulled the part out this morning, now affectionately referred to as the 'ashtray' (thanks Marty) ...

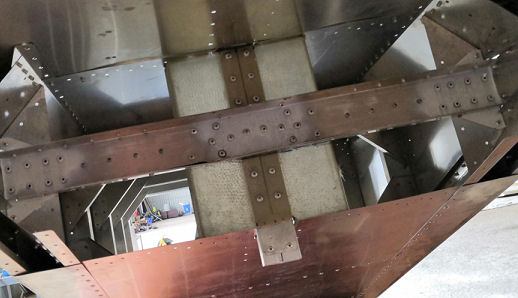
.. and this is what it does, joins the HS front spar to the upper and lower rear fuse sheets, and the mid-way post for the upper and lower VSs ...
-
1
-
-
That's COMMERCIAL pressure, nothing like driving yr truck!!
Why do you think they had to bring in all the truck Laws about mileage and hours, rest stops, and the very expensive truck time/distance cameras we have.
That's right, people were being killed and killing others due to commercial pressure.
-
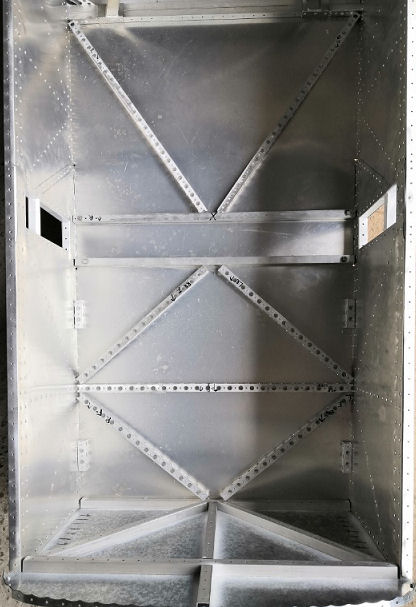
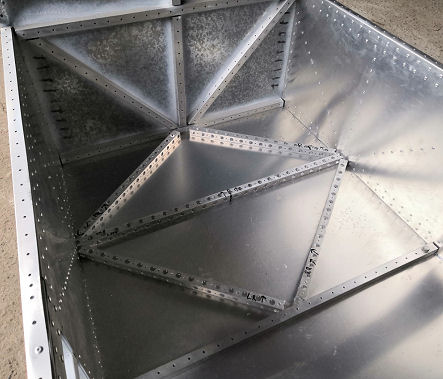
Floor is almost ready for a sheet of plywood...
And just a quick vid for somebody else of the 'allen key' deburring tool for inside tubes ...
-
Hi Bex,
Nah, gave it up in my late teens.
what are the fibreglass trays for?
It's a gusset/connector plate that ties the HS front spar, middle VS post and upper and lower rear fuselage sheets together.
Simple, eh?
-
1
-
-
.
Donations.
.
-
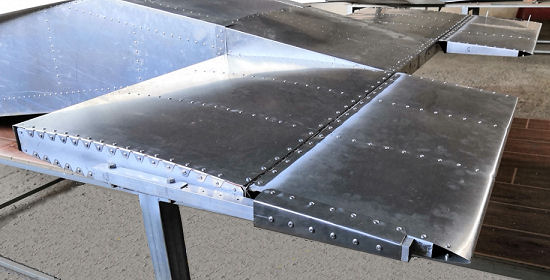
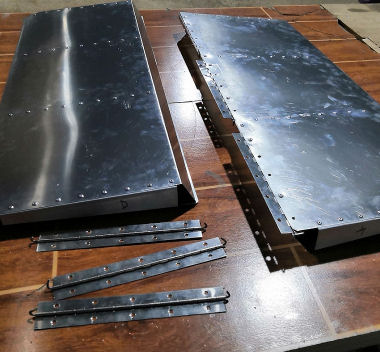
The front floor board supports are in...
Pulled my (outer) mould off, it's fine, and using the same pattern for the inner mould by merely filling it up with resin and a bit of matting, with a chunk of foam to take up a lot of the volume.
I can use the same pattern for the inner because it's a simple rectangle with all sides tapered, and the inner will simply wedge into the outer. Will test the theory tomorrow alt=:)https://www.homebuiltairplanes.com/forums/styles/default/xenforo/clear.png[/img]
-
So I don't really see what's different with this virus,
Well there's enough info out there that you should know.
I suggest you have a look what's happened in Italy via these various charts, including recovery ..
Italy Coronavirus: 9,172 Cases and 463 Deaths - Worldometer
-
I see an issue with the virus that should be mentioned.
Some of you would note that the virus seems to be under control in China, well that's a truth that doesn't apply to most any other country in the world, and offers a false hope.
Most Chinese live in high rise apartments, in secured housing compounds, around 500 to 2000 people. With the virus crackdown, every home can only have one member leave per day, unless you have a work pass. Your temperature is tested at the gate when you leave, and when you come back in. Same when you arrive at work.
So anyone who's temp is up, are spotted immediately, and either self quarantined and observed, or off to hospital.
This simply isn't going to happen in many countries with individual housing, many people will go days before they realise they are sick. This is what's happening in Italy right now and why it's spreading so fast.
So please don't relax on this just because it appears it eventually gets under control by China's example, it's a completely different culture.
I keep telling ya's, keep up the Vit C daily, 500 to 1000mgs daily, you can't overdose on it, and what's it going to hurt?
-
 2
2
-
-
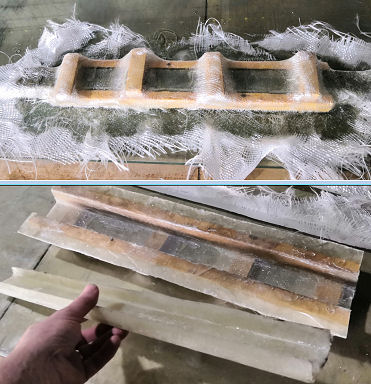
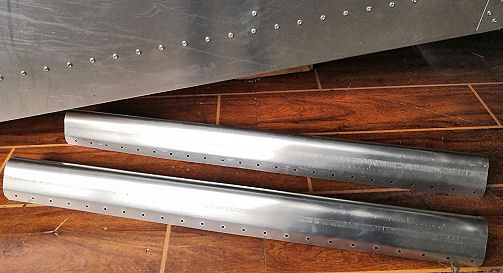
I decided I need a C Channel and another part easiest to be made in fiberglass, so moulded up a 50mm/2" steel tube and pulled a piece
and handcrafted the other part which the mould will be ready tomorrow..
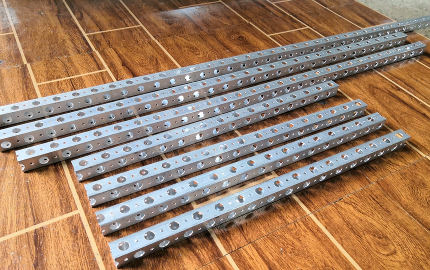
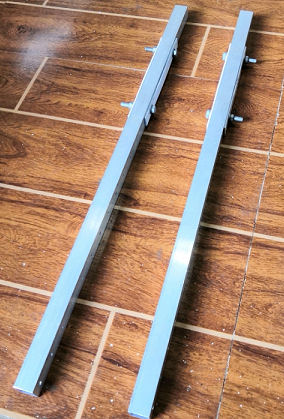
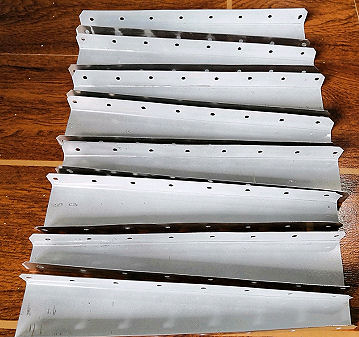
Preparing some Swiss-Cheesed floor runners, all press drilled, I don't mind it, but it's boring after the first hundred holes, so can't wait for my CNC Router to arrive soon ....
-
1
-
-
(questions courtesy of Diana Fisher of the ABC Inventors show)
"What colours does it come in?" ....
Looking good, Bex. I might have missed that bit, but have you done aerodynamic testing of the design?
The slab sides would likely increase spin resistance.
Basic CFD. Some changes were made due to that.
Does Kerrogs K-Nine contain traces of dog?
Of course, but if that puts you off, try the Kerrogs Fee-Line.
-
1
-
 2
2
-
-
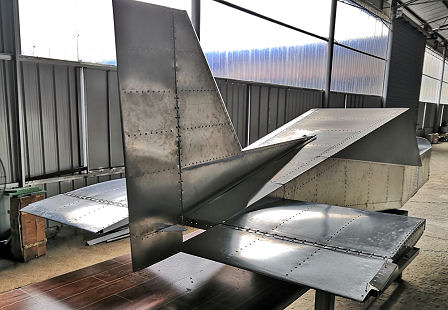
Bex, is the rudder only held in place by the rows of rivets either side, or is there a post I can't see linking it to the fuse?
You mean the VS?
If so there are 2 posts, one at the rear and one where the leading edge meets the fin, well there will be after i build them today, and you still won't be able to see them even when they are installed.
As soon as I am finished this bowl of Kerrogs K-Nine Cereal, it's off to the factory to make them.
-
I had to have a few days rest, recovery after last years open heart still takes a bit out of me, but getting there, just slower than I would have liked.
But anyway, enough of that, I don't want you guys to get all upset and misty eyed over me and start donating money, well ok, a little if you insist, I promise to not spend it on expensive whiskey - 12 year old will be just fine.
Yesterday and today I played around with the VS and Rudder, measuring and figuring how to operate it. I ended up adding an extra rib next to the one at the edge of the tail, slotting the rudder, and slipping a lever arm through to be sandwiched between them, and riveted in place. Worked out quite nicely, though I will be changing the lever arm out for a different shape one.
-
1
-
-
If the Aus government ever lets you out of China!! :-D
Which reminds me, lock up your china!
Likely not me, Dad will put up with you, I mean, put you up for a day or 2. A few Forum Members are based at Goolwa airport too.
Make sure your passports are up to date, and get in early for your visa applications.
-
1
-
-
Firstly a warning to you all, lock up your silverware.
I can likely arrange a day or 2 to sleep, shower ect, and see the sights in Goolwa, SA at the mouth of the Murray depending on exact dates. Great train trip and visit the dock with the paddle steamer ect.
-
1
-
-
.
It has been bought to my attention this morning that a couple of Members here have been sharing a story about Chinese cutting up humans, and canning them as 'Corned Beef" for shipment to African Countries.
I have deeply investigated this today and want to offer assurances to those concerned that absolutely no children or dogs are being added.
....
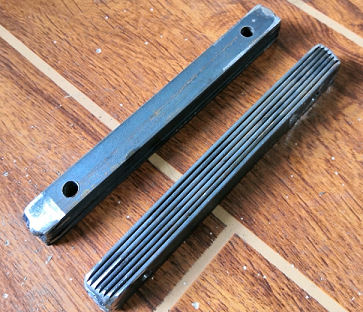
Quite proud of myself today, I arrived at the factory in the morning with not a clue how I was going to balance the Elevators, and by the end of not only figured it, but had 90% of it finished.
I grabbed a 25mm (1") square tube, cut some 19mm (3/4") flat steel and slid them inside the tube,
... sat it on the Elevator and juggled the tube and the weights around a bit, until it balanced. Got to seek out a reasonable ratio of length and weights.
The longer the lever, the less weight, the shorter the lever, the more weight required. At first I settled on this ..
But it was a bit long, so I got it a bit shorter by adding a couple more strips of steel on the outside (better fastener perch anyway), and now the Elevators sit where they are supposed to. They actually center themselves because the weight is a little below the hinge point.
I will tidy it all up and make some fiberglass covers at a later date, not important for the moment.
.
-
but my wife said she thought white would be better.
Are you even allowed to say that these days?
-
1
-
-
Got to love a Fishbed
No love for a Fagot?
https://en.wikipedia.org/wiki/List_of_NATO_reporting_names_for_fighter_aircraft
-
1
-
-
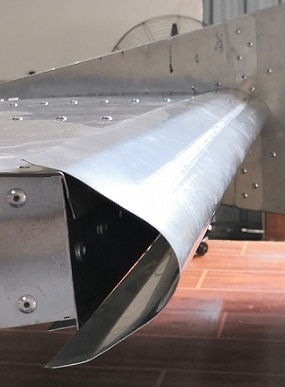
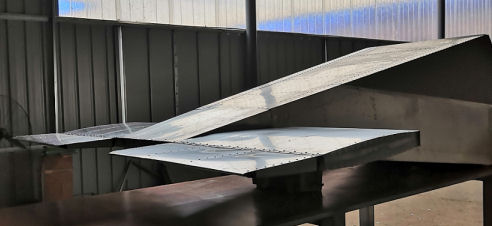
Anyway...
This morning I did the other side Elevator leading edge, so here's the picture to replace the one I lost yesterday with the workpiece fully pushed into the jig ..
This of course means no need for dancing Gay Spiderman (Sorry Kasper).
And the end result, 2 leading edges for the Elevators.
I hope you won't be offended when I say that it has a charming 1950s soviet era look to it.......
Here's a picture of a charming 1950s soviet era aircraft, thanks for the compliment ....
-
2
-
-
Yes it does.
It's a paradox.
It's like a UFO, it is identified, it's a UFO.
.
-
 1
1
-
-
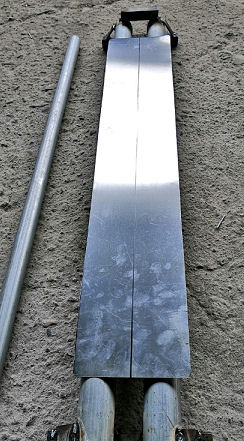
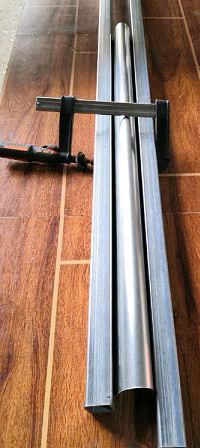
Today I made a quick rough as guts jig from some scrap laying around to help with some leading edges
2 pieces of 50mm/2" pipe, some 25mm/1" square and some gussets.
On the right is a piece of 32mm/1.25" pipe.
There's about a gap of 38mm/1.5" between the 50mm/2" pipes.
Note the end close to camera has a bar across the top, I call it the end with the bar across the top.
Note the other end does not have a bar across the top. I call it the end with no bar across the top so as to avoid confusion. I was considering to call this end Rupert, but finally decided on the former.
Center your work over the pipes.
Hook your 32mm/1.25" pipe (or smaller if you want sharper radius) under the bar.
Lever the pipe down all the way through the gap, I put a 25mm/1" tube inside the end for leverage, and once down all the way through, I stick another in the other end as well to push that one all the way down. But you need to hold the first tube down - you may need another person to help depending on length of your workpiece. Note that the lever pipe has no name.
I managed to lose the picture of the workpiece forced all the way down, so here's a Gay Spiderman dancing ...
So when you remove it, it will springback a bit. You can get a bit more bend by laying a few sheets of newspaper or cloth to tighten the gap some.
It's still a little big here.
So to pinch it further, a couple of anything suitable, square tubes here, and clamp then together, removing and checking as you go. Make sure you tap the workpiece down with your hand s you go as it can pop up in one corner as you squeeze.
You still here? What, you think there's more? What do you expect for nothing.
-
6
-
-
.
Trying to make headway with the Elevators
-
1
-
-
nice looking machine Bex.
Not arrived yet, don't care what it looks like as long as it performs. Hmm, I've said that before after a few drinks ...
More on the Elevators today, made the ribs up, and started adding the hinges ..
.
.
-
1
-
-
Wow.
They look so neat, they might be hand crafted!
It's a PIA!!
The laser shop is still closed of course, and my newly ordered CNC Router obviously has been delayed to be built because they are obviously closed as well. I'm hoping the CNC Router will eliminate the laser shop completely.

 (questions courtesy of Diana Fisher of the ABC Inventors show)
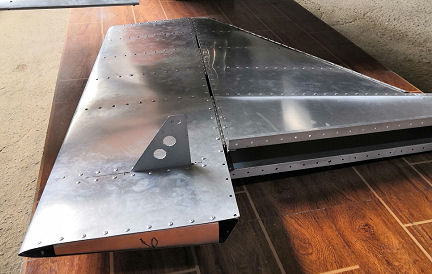


Marty d's CH-701 build log
in Zenith
Posted
If you need ashtrays, I'm your man!