

fred cenko
-
Posts
109 -
Joined
-
Last visited
Content Type
Profiles
Forums
Gallery
Downloads
Blogs
Events
Store
Aircraft
Resources
Tutorials
Articles
Classifieds
Movies
Books
Community Map
Quizzes
Posts posted by fred cenko
-
-
It beeps throughout the flight,I cant hear mine as the engine noise is greater than the beeping as I fly a powered parachute.For an enclosed cockpit aircraft I would mountHow is this wired up so that it doesn't beep/flash the rest of the time?the control box in the engine compartment where you wont hear it during the flight.
-
I use a strobe control box that sounds a beeping sound and a red flashing light,the sound is turned off when you turn the isolator switch off to remind you in case you forget to take out your key.You just connect itI use the same style as The one that Kyle uses. I always take the key right out when I want it off, which takes any guesswork out of it as to whether it is still on or not:thumb up:.Incidentally the only time it gave me trouble was when I left it on and it flattened my battery, but I guess that was more operator error:whistling:
to you reg/rectifier.Hope that helps.
-
 1
1
-
 1
1
-
-
Howdy all.I have a brand new Aerochute front floor and a used pull start recoil with all attachments.I am
selling them as I have installed an electric start system and the floor came with the kit which I do not need
as I already have one.I can sell the two separate .The floor is $143 new from aerochute Ill sell it for $70 plus
shipping the pull start is $50 plus shipping.
-
It would be interesting to see the overall performance with this new 55 inch wider blade Bolly compared to the 63 inch prop
-
Took the big 110 kg fella up today to see how the 59 inch fixed pitch bolly goes, no problem at all very happy with it.With the old IVO it would have struggled.
-
1
-
-
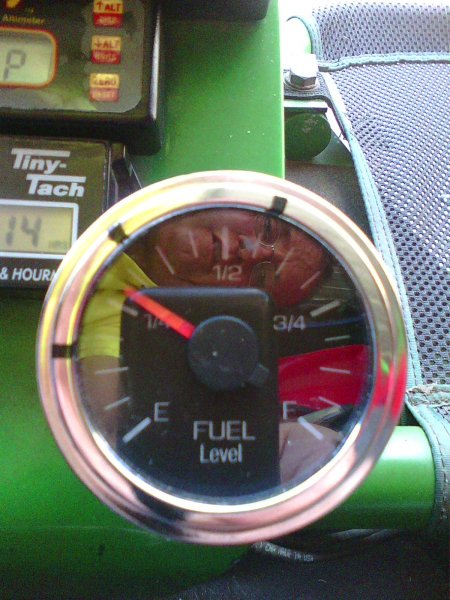
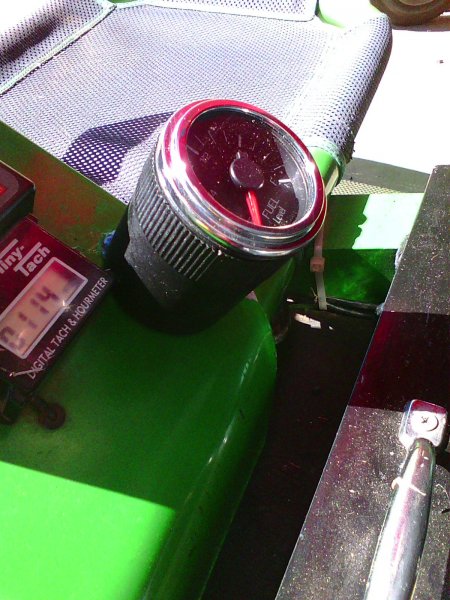
I like the face on the dial of that gauge. It appears to have a wider range of movement than most others and should be more accurate. If it could be disassembled to change the face I would think a new face actually marked in liters instead of 1/2, 1/4 etc would be fantastic. It appears there would be room for that which you would not get on a normal gauge with less movement showing from empty to full. Looks like the total cost landed for both sender and gauge is about $124. Pretty good value i think.
Glad you like it and I could be of some help.Ive done some searching around and this set up is the best price going around.I liked those ultrasound fuel flow readers you clamp on your fuel line,but for $2000 AUD a bit pricey for a paddock machine.If you are interested in buying the gauge and sender and have trouble getting the brass nipple,Ive got a couple here I can send out to you.I like the face on the dial of that gauge. It appears to have a wider range of movement than most others and should be more accurate. If it could be disassembled to change the face I would think a new face actually marked in liters instead of 1/2, 1/4 etc would be fantastic. It appears there would be room for that which you would not get on a normal gauge with less movement showing from empty to full. Looks like the total cost landed for both sender and gauge is about $124. Pretty good value i think. -
Hi Kev,This is what your true readings will be on your dial.The sender being calibrated on empty one inch above bottom of tank,will give you 4lts reserve about 15mins flying at 15lts p/h,then my tank being a standard Aerochute tank 34lts filled to the brim. Then I started adding 7.5lts,marking 1/4,adding 7.5lts again marking 1/2 adding another 7.5 lts markingHi Fred, I will presume you have the standard Aerochute tank from your previous descriptions. I will use my tank as an example as I know they did vary in size a little bit. As the tank is not square or rectangular, but more triangular the only times your gauge is accurate is when the tank is full or empty. My tank is 400mm high and full is 34lts. Down 1oomm (3/4 on the dial) is approx 29lts left in the tank, Half way on the dial is approx 21lts left in the tank, 1/4 on the dial is approx 13lts left in the tank.First 1/4 used is 5 ltsSecond 1/4 is 8 lts
Third 1/4 is 8 lts
last 1/4 is 13 lts
By calibration I meant the gauge needs to be able to be calibrated at various levels to read correctly, and to date no one has found one that is suitable. As you can see, if you are flying and have used 1/2 a tank according to the fuel level the gauge reads, you have actually used 13 lts, and still have 21lts left, a lot more than half your fuel. Actually closer to 2/3.
This is a big reason no one uses them. I would think however you could possibly remove the face of the dial and make a new one with the 1/4, 1/2 and 3/4 markings in the correct place. That would make it very reliable
Cheers, Kev
3/4.Empty and full already calibrated stays the same.Cheers.

-
Hi Kev,This is what your true readings will be on your dial.The sender being calibrated on empty one inch above bottom of tank,will give you 4lts reserve about 15mins flying at 15lts p/h,then my tank being a standard Aerochute tank 34lts filled to the brim. Then I started adding 7.5lts,marking 1/4,adding 7.5lts again marking 1/2 adding another 7.5 lts markingHi Fred, I will presume you have the standard Aerochute tank from your previous descriptions. I will use my tank as an example as I know they did vary in size a little bit. As the tank is not square or rectangular, but more triangular the only times your gauge is accurate is when the tank is full or empty. My tank is 400mm high and full is 34lts. Down 1oomm (3/4 on the dial) is approx 29lts left in the tank, Half way on the dial is approx 21lts left in the tank, 1/4 on the dial is approx 13lts left in the tank.First 1/4 used is 5 ltsSecond 1/4 is 8 lts
Third 1/4 is 8 lts
last 1/4 is 13 lts
By calibration I meant the gauge needs to be able to be calibrated at various levels to read correctly, and to date no one has found one that is suitable. As you can see, if you are flying and have used 1/2 a tank according to the fuel level the gauge reads, you have actually used 13 lts, and still have 21lts left, a lot more than half your fuel. Actually closer to 2/3.
This is a big reason no one uses them. I would think however you could possibly remove the face of the dial and make a new one with the 1/4, 1/2 and 3/4 markings in the correct place. That would make it very reliable
Cheers, Kev
3/4.Empty and full already calibrated stays the same.Cheers.
-
Gday Kev True Kev just place some markers around the gauge when doing the calculations as your pouring in the fuelHi Fred, I will presume you have the standard Aerochute tank from your previous descriptions. I will use my tank as an example as I know they did vary in size a little bit. As the tank is not square or rectangular, but more triangular the only times your gauge is accurate is when the tank is full or empty. My tank is 400mm high and full is 34lts. Down 1oomm (3/4 on the dial) is approx 29lts left in the tank, Half way on the dial is approx 21lts left in the tank, 1/4 on the dial is approx 13lts left in the tank.First 1/4 used is 5 ltsSecond 1/4 is 8 lts
Third 1/4 is 8 lts
last 1/4 is 13 lts
By calibration I meant the gauge needs to be able to be calibrated at various levels to read correctly, and to date no one has found one that is suitable. As you can see, if you are flying and have used 1/2 a tank according to the fuel level the gauge reads, you have actually used 13 lts, and still have 21lts left, a lot more than half your fuel. Actually closer to 2/3.
This is a big reason no one uses them. I would think however you could possibly remove the face of the dial and make a new one with the 1/4, 1/2 and 3/4 markings in the correct place. That would make it very reliable
Cheers, Kev
What I can really say about these gauges is I have emptied and filled a few times over to check the reliability and the accuracy of the needle is always spot on, no variations that was my main concern.I think as you said they are
a safety issue,i think not a luxury but a necessity,nothing worse than taking up passengers of different weights thus using more or less fuel and then
running out of fuel because one simply guessed wrong.At least with the gauge you know where you are,but it does not mean i throw away the old wrist stop watch.
-
Hi Kev,sorry the second link was meant to show the capacitor sender,but you can still scroll down that link and it will give you the sender you will need it is 16 inches longhttp://www.ebay.com/itm/Fuel-level-sender-capacitor-type-no-moving-cut-to-length-10-16-0-5-5V-output-/261453858570I forgot to ask if your gauge is able to be self calibrated. The reason being the shape of the tank will mean a big error on the gauge as for example, half the fuel capacity is probably less that 1/3 up the tank.What sender did you use, there was no e-bay link to that, just 2 links to the gauge itself.Kev
just click the picture of the capacitor to verify the lengtht is the right one you will order.No the shape of the tank has nothing to do with the fuel level calibration it just reads
the fuel level on the alluminium tube, here is a link to explain how they work,its too much to write about https://www.youtube.com/watch?v=0du-QU1Q0T4.Its got the instructions how to calibrate on the link I mentioned before,just turn the screws eitherway on empty then the same when full,it explains it on that link on ebay i mentiond before, they are very accurate believe me.No I did not get it in writing from Steve,but Ill try
-
Yes it is allowed I have spoken to the manufacturer of Aerochute prior to installation, and he is ok with it as long as there is no drilling into the framework as there is not, as I mentioned in my post and not affecting c&g mtow,handling performance.Yes its true the Raa does not tell you too much on 95.32 mods what is allowed or not,one has to proceed with caution.If there are future rules implemented no problem,just unscrew the the sender and re screw the old plug back into its original position.I'll be the spoil sport and ask is this permitted on a factory built aircraft?95.32 is very different from other CAOs as it does not require within itself the factory built aircraft (other than LSA and experimental LSA) to not be modified ... BUT- check with Aerochute on their manual for the aircraft - you are required to comply with the Ops manual under the RAA seperate from CAO 95.32 on mods ... and if it says no mods then this is not allowed and therefore flight is not permitted
- check with the RAA Tech Manual ...
On tech manual you may need an umpires decision (Tech Manager) on this one as current tech manual in modifications (section 3.5) is silent on 95.32 aircraft - RAA either forgot they had them under their remit or they accepted that 95.32 is silent on mods therefore despite being factory built they are free for all on mods ... but tech have tried doing odd things on 95.10 machines in the past without statutory authority and only came around after pointing out lack of authority ...
But the new tech manual MAY have something coming that might bite and require you to either un-mod or get a sort of approval
But at least its not MARAP as that is limited to aircraft operating under 95.55 which excludes 95.32 and 95.10
And yes folks - the above does appear to mean that there is a group of factory built two seaters that can be modified without reference to RAA tech or any engineer AND they can them be used for training and hire for reward ... anomaly? Yep
Indeed if your manufacturers handbook does not require no mods it would seem that any weightshift of PPC can be modified to your hearts content and nobody can stop you.
Now anyone got a spare IO360 and pusher prop, I've go an old Raven with a dead 447 ... =;-O
-
More fuel gauge and sender photos for Aerochute
If you have no Rectifier/Regulator on your machine for the 12v power source, then get a 12v7ah battery from ebay it fits nicely under your seat with velcro that is if you have a
floor already on the machine ,then wire a 1 amp fuse and a online switch
-
Gday all
Dont know if anyone has come up with this idea yet,but here it goes and it works pretty good.
IO purchased these on Ebay for $100 AUD its very easy to instal and fits the Aerochute perfectly,no drilling
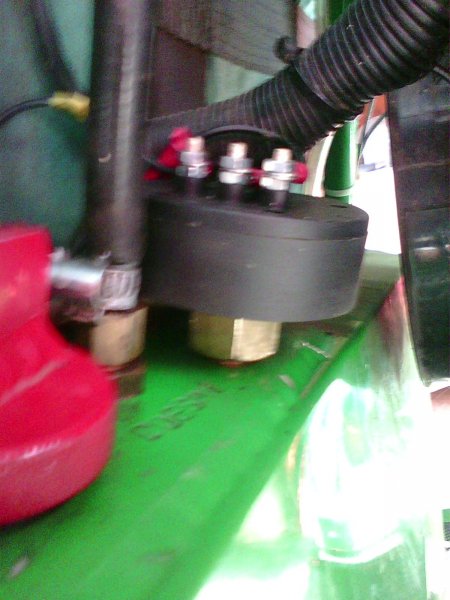
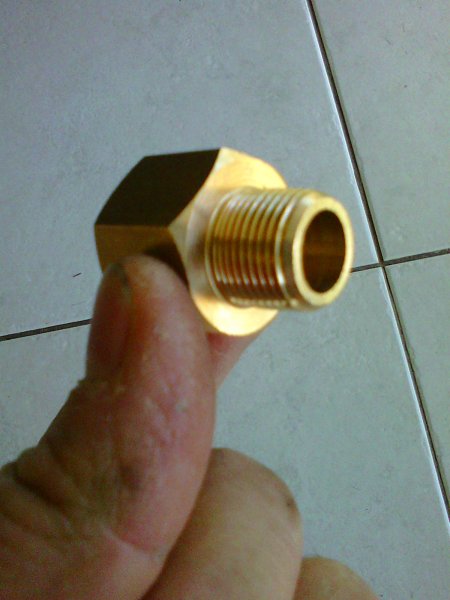
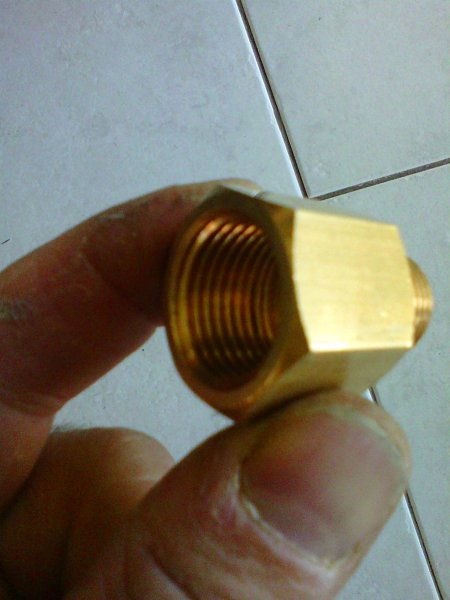
only the brass nipple reducer you can get from Enzed or any hydraulics dealer see picture.The size for nipple is a 1/2 inch BSPT female thread reduced to a 3/8 BSPT male thread,see photo.You will need to carefully drill a 22mm drill into the female thread to the end of thread,then carefully put a 13.5 mm drill right through then
drill and tap a 5mm thread on the side of hexagon nut for your locking grub screw.First smear some Threebond 1104 grey synthetic rubber liquid gasket which is great for petrol resistance,around the thread and inside the female drilled out end,you can get that liquid gasket on Ebay,save you running around.Lock it
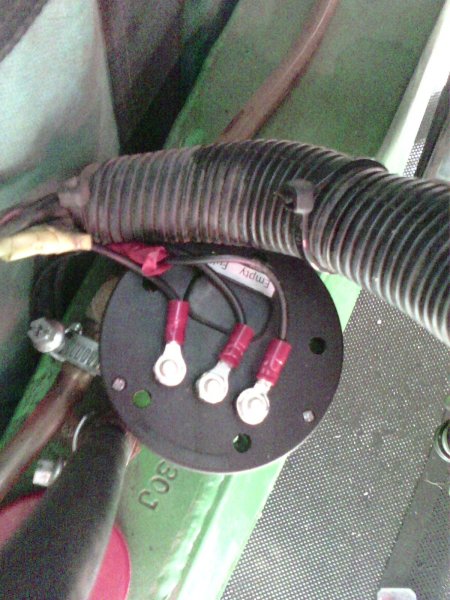
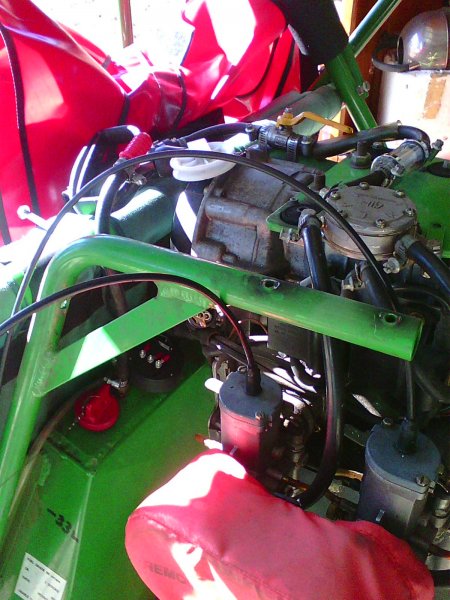
in place.Then take out the threaded plug on top of your tank,you will need to undo and swing out the Engine
support bar to be able to slide in your 13mm 16 inch long capacity sender see picture, this is already perfect to go into your tank as it is 1 inch from your bottom tank to give a fuel reserve when on empty,nip up the nipple not
over tight and thats it for your sender.The gauge I put on my console see picture is on a 52mm gauge holder from ebay .The needle does not move around everywhere while your flying as there is no moving float.You can also get these gauges and senders at Aircraft Spruce .com.but the sender is 24 inch long,but you can cut them to 16 inches,they are $80 AUD more plus shipping.I have been out flying twice and they work great.Have fun
http://www.ebay.com/itm/261697663603?item=261697663603&viewitem=&vxp=mtr
http://www.ebay.com/itm/261697663603?item=261697663603&viewitem=&vxp=mtr
Sorry cant upload the other pictures,the support bar is the one which runs down the fuel tank which it also
supports.If you come unstuck I am happy to send email some more photos.Cheers.
-
Gday all
Dont know if anyone has come up with this idea yet,but here it goes and it works pretty good.
IO purchased these on Ebay for $100 AUD its very easy to instal and fits the Aerochute perfectly,no drilling
only the brass nipple reducer you can get from Enzed or any hydraulics dealer see picture.The size for nipple is a 1/2 inch BSPT female thread reduced to a 3/8 BSPT male thread,see photo.You will need to carefully drill a 22mm drill into the female thread to the end of thread,then carefully put a 13.5 mm drill right through then
drill and tap a 5mm thread on the side of hexagon nut for your locking grub screw.First smear some Threebond 1104 grey synthetic rubber liquid gasket which is great for petrol resistance,around the thread and inside the female drilled out end,you can get that liquid gasket on Ebay,save you running around.Lock it
in place.Then take out the threaded plug on top of your tank,you will need to undo and swing out the Engine
support bar to be able to slide in your 13mm 16 inch long capacity sender see picture, this is already perfect to go into your tank as it is 1 inch from your bottom tank to give a fuel reserve when on empty,nip up the nipple not
over tight and thats it for your sender.The gauge I put on my console see picture is on a 52mm gauge holder from ebay .The needle does not move around everywhere while your flying as there is no moving float.You can also get these gauges and senders at Aircraft Spruce .com.but the sender is 24 inch long,but you can cut them to 16 inches,they are $80 AUD more plus shipping.I have been out flying twice and they work great.Have fun
http://www.ebay.com/itm/261697663603?item=261697663603&viewitem=&vxp=mtr
http://www.ebay.com/itm/261697663603?item=261697663603&viewitem=&vxp=mtr
Sorry cant upload the other pictures,the support bar is the one which runs down the fuel tank which it also
supports.If you come unstuck I am happy to send email some more photos.Cheers.
-
Ironically watching Aircrash Investigations yesterday they had the show about the Air Peru passenger jet that went through the exact same ordeal,but was not as lucky due to
pilot error it got caught in the middle of a super cell downdraught but neither pilot made an attempt to apply full throttle killing 40 out of the 90 people on board.
-
Id assume since he never had a pilot certificate to start with ,he must have not registered his aircraft at all, as he would have thought it would be futile,and his stupidity snowballed from there to where he is now.
uh oh that aint looking goodbut then it is up to the owner make sure that aircraft is registered and air worthywhat happened to the list of registered aircraft on the raa site neil
-
 1
1
-
-
Seeing the news today about the PPC incident,apparently the pilot was not injured as he quickly put his trike away and drove away before the police arrived.Hope they find him,pardon the french but what a jerk.
-
https://www.youtube.com/watch?v=sjFIB1L3BPU
Have a look at this for skylarking .Some pilots come in all different forms.
-
That would be great if the new council would keep it open to the public and not lease it out to a aero club,as there are no landing fees or club memberships there yet as I understand.Thanks for the info all.
3 PPC'S Flying Oakey QLD
in Powered Chutes etc Usergroup
Posted
I use the Go Pro 3 camera mounted on my helmet set on the extra wide mode that gives you the curvature of the horizon that Go Pros are famous for.Good video Cosmick and the legs too.