mcrowley
-
Posts
115 -
Joined
-
Last visited
Content Type
Profiles
Forums
Gallery
Downloads
Blogs
Events
Store
Aircraft
Resources
Tutorials
Articles
Classifieds
Movies
Books
Community Map
Quizzes
Videos Directory
Everything posted by mcrowley
-
I took the time to look at your second link to the pic, sorry! Unfortunately, now I want one too ;-) I think I've heard Valter mention your Uncle's name. I'm at the painting stage, then on to finish up the controls, etc. I'm waiting for my engine as well, except it is the 3.3L Corvair engine.
-
Mattk793, welcome! I am also building a Savannah in Texas, where are you located? I'm in Midland... A prolific builder in Wyoming has built several with a center console... is this what your thinking of?

-
Here is a link to the 100 HP version on a Zenith 701. Try not to grimace at the landing ;-) I love that sound!
-
Building it myself, although I'm following a well established conversion manual and using high end aircraft grade conversion parts. It puts out 128 HP on the dyno. I'm currently learning how to paint :-)
-
That's my thinking, I'd rather have long term protection over a few ounces. I'll also be a little heavy but should climb well as I'm building a 3.3L Corvair engine. Thanks for your thoughts, I enjoy your progress!
-
Did you glue it down as well? Did you prime and paint the interior before the carpet install also? I'm at that stage and I keep dithering about putting a protective paint on the interior or just glue the carpet and save a little weight? Thanks!
-
Lyndon, did you apply the carpet before installing the rudder petals or after?
-
I've experienced the incredibly docile power off stall of the Savannah S. Would the Savannah pilots mind telling me how she behaves in a full power stall? With full flaps and with no flaps? Thanks!
-
My understanding is that it's a floor mounted console for the radio/intercom and headphone jacks. I'm not using it in mine either, I like the open floor space.
-
That is how it "mixes" the opposite movement needed for the ailerons while also providing the exact parallel, symmetrical movement for the flaps giving us our "flaperons." The back and forth movement tilts the whole assembly for the raising and lowering of the flaps function. I think it's brilliant engineering!
-
 No, it rotated quite smoothly without one.
 -
I'm merrily building along on my Savannah S and have run into a question that I can't clear up with the blessed construction manual. I'm installing the seat pans (or seat bottoms) that curve between the seat back bulkhead and the seat longeron. Does the forward edge of the seat pan go under the seat longeron lip or on top? Many thanks!
-
Everything works great as long as you line up the holes in the tank :-)
-
Yes indeed.... do not follow the template in the manual, I did for the first one and pulled my hair out because it doesn't line up. I placed the tanks in the second wing and marked the place where the pre-existing holes in the ribs line up with the tank. Much better! I should have mentioned that before...
-
All fittings are complete in the wings. I left the lines long to give me the option of adding valves if I decide too once I install the wings on the fuselage... Still can't decide the options of valves or the simplicity of straight plumbing...
-
iBob, the way that worked best for me was to get the wings skins all riveted up, leaving the last few holes on the leading edge simply clecoed together. Next I strapped the wing down so that it can't move when is came time for a friendly shove with the wingtip. Next I eased the big, rounded, leading edge of the wingtip into place. With some wiggling, I then eased the trailing edge into place while applying pressure to keep the leading edge as tightly forward as I could. The clecoed trailing edge wouldn't allow the tip to drift aft, keeping the leading edge fairly rounded around the wingtip. Once I was satisfied that the tip was as far into the wing as I wanted (basically as far in as possible to give the rivets the most to grab, right to the edge of the "flat" area before the slope started), I then drilled one of the holes nearest the trailing edge one handed and snuck a clecoe into hole. Once that clecoe was in place, everything held nicely allowing me to methodically drill and clecoe each hole as I went, giving me a fairly flat and wrinkle free install of the edge. I started with the center of the leading edge, then alternately worked around the wing on both sides toward the trailing edge. I DO NOT recommend my first effort.... I placed the wing tip, drilled and clecoed it into position, then wrapped the leading edge around the wingtip much like the wing was done. Seemed like a good idea, but the straps caused dents that took much elbow grease to work out, I still have a slight depression in one place. So.... the second wing is better than the first! Oh well, my next airplane will be perfect! ;-)
-
I say we have a Hoerner style wing. While the wingtip is rounded from a top view, it's slanted outward like the Hoerner.
-
iBob, I also put the specified Loctite on the inside as well, so far it's passed the pressure test and the slosh test...
-
I threaded mine through, then slipped an old piece of hose over the neck which allows me to hold it with pliers while I tightened up the outside nut...
-
I forget where... but somewhere gave the suggestion which I followed of using the left over L braces if you have the extended fuel tank (4 tank) option... Also, to reach those rivets, I really ground down my hand riveter and had a friend fashion a little 45 degree wedge with a hole though it the size of the stem. That way one face of the wedge faces the rivet square on, the other face allowed the rivet tool to be at an angle. Make sense?
-
I thought of placing a tube on each side, while there is certainly room to do so, I thought I'd start with this and see how it goes...
-
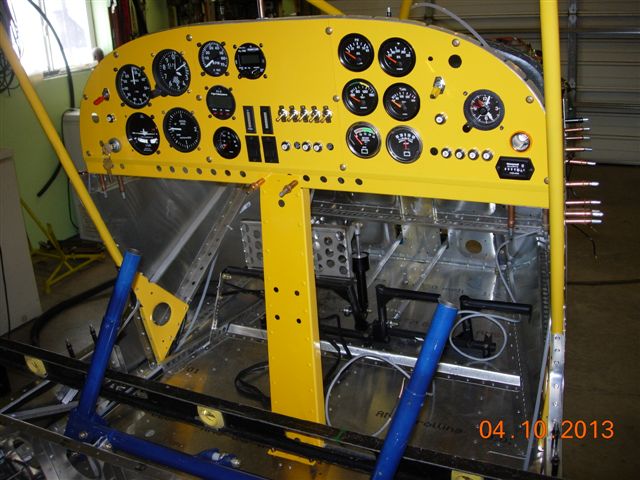
Well... So far I'm pretty happy with my baggage tube extension. This tube is not intended for any real weight, only the barrel of a rifle, a fishing pole, or something that is too long to fit in the baggage compartment. I've only added less than 1/4 pound of weight and seemed to have increased the strength of the fuselage. I'm quite happy with the rigidity and strength of the installation.[GALLERY=media, 3733]Cutting a 4" hole by mcrowley posted May 23, 2016 at 10:59 AM[/GALLERY][GALLERY=media, 3734]4" hole for extension tube by mcrowley posted May 23, 2016 at 11:00 AM[/GALLERY][GALLERY=media, 3736]Support bracket by mcrowley posted May 23, 2016 at 11:04 AM[/GALLERY][GALLERY=media, 3735]bulkhead supports by mcrowley posted May 23, 2016 at 11:02 AM[/GALLERY][GALLERY=media, 3737]Extension tube endcap by mcrowley posted May 23, 2016 at 11:06 AM[/GALLERY][GALLERY=media, 3738]Aft view by mcrowley posted May 23, 2016 at 11:07 AM[/GALLERY]
-
What a beautiful bird !!! Sigh...
-
Obviously it's your preference.... but I split the lid on my crate. In fact, I spit the lid crosswise in the middle and cut about 2" off the top edge of the crate at each end. This allows me to use the crate as a work table, but I can slide either half of the lid either direction to access parts. I am building in a two car garage so I don't have the space to take everything out of the crate and put it on shelves. I also put a caster wheel under each end of the 4x4 braces under the crate, this allow me to easily move the crate around the garage, even with structures sitting on top... just thought I'd mention what worked for me :-)
-
E Excellent work! I'm sorry I wasn't available to post earlier... I learned to drive the stem out by supporting the head on a washer and tapping the stem out with a hammer. Then I cut the rivet with a rivet cutter, reversed the shortened rivet "right side up" and tapped the stem back in while supporting the rivet with a washer that was just slightly larger than the rivet body. This method supported the head well enough to keep it from being deformed.