Chris Willars Posted August 10, 2009 Share Posted August 10, 2009 Now that I have landed here in Aus and can finally get started on making a workshop:clap: I was wondering what tools I would need to build a Cheetah/Sierra. I have had the DVD from Gary (oh he makes it look sooo easy:laugh:) and the planes look GREAT....... Any advice on kitting out the workshop from you builders out there. p.s. had a great time reading Slarti's and Biggle's adventures building theirs, hope they are still as much fun as the first flight. Chris Link to comment Share on other sites More sharing options...
slartibartfast Posted August 11, 2009 Share Posted August 11, 2009 Even better now Chris. I built mine (as you would know) in Garry's hangar where absolutely everything was available, so I can't really advise. Give Garry a ring, he'll set you straight. The single most useful is compressed air. Driving the rivet gun saves you some very sore wrists. I look forward to seeing you airborne. Link to comment Share on other sites More sharing options...
batesey Posted August 11, 2009 Share Posted August 11, 2009 Hey Chris, I'm currently building one of Gary Morgans Cheetah Sierra 100's (taildragger) with my Dad. As Slarti says, a Rivet gun and compressor are the first things you'll need. I had my rivet gun breakdown after the first day of laying up one side of the fuse, had to do half the other side by hand. LUCKY my dad was able to pull the bugger apart and have it up and running to complete the fuse...my hand was killing after doing the gussets on one side. I can give you a bit of a break down as to what I have acquired in order to make building a bit easier. Compressor Rivet Gun Hand Rivet Gun Imperial Socket and Spanner set Drill Press (used for more than just drilling) 2 in 1 Sander and Linisher Grinder Set of Files, Small round to Large Flat...Fine Right Angle Ruler Long Metal Ruler Protractor Spirit Level Plumb Bob Power Drill Cordress Drill 1/4" HSS Drill Bits 5/32" HSS Drill Bits 3/16" HSS Drill Bits 1/8" HSS Drill Bits Range of Pliers Clamps, Clamps and MORE Clamps Clecos 100 of each 1/8, 5/32, 3/32 ? - (i'll have to check that) Cleco Pliers 12" Gilbow Straight Tin Snips (Dont get the Bunnings "Aviation" maked Snips.) Olfa Knife (From USA) Centre Punch and the list goes on... I know that there is more that I just cant remeber at the moment, but I currently have a Blog running on my progress...you can check it out @ www.bx2.com.au Among the pages will be one on how I setup my workshop/tooling. I am in the process of adding the last month worth of building. Every time I have a spare minute I seem to be working on a plane...LOL. I have hundreds of images that will accompany the posts as well. I will make a more formal announcement in this forum once I am certain that the blog is working to my liking. Hope this sorta helps and if you get a kit, happy building.:thumb_up: Cheers, Toby Link to comment Share on other sites More sharing options...
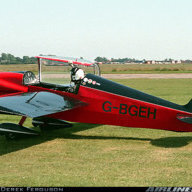
Yenn Posted August 11, 2009 Share Posted August 11, 2009 You seem to have it pretty well covered, except for the finishing. Are you going for a polished finish or paint and is the lower half of the fuse fabric or aluminium? I notice on your site that you have a heading saying taildragger, but only nose wheel aircraft are shown. I am assuming those photos were taken in Gary's workshop. I am just waiting for the share market to stabilise and allow me to access aome of my tied up funds to buy a kit. I was quite impressed when I did a test fly. Link to comment Share on other sites More sharing options...
batesey Posted August 11, 2009 Share Posted August 11, 2009 Hi Yenn, Yes, my site will be updated tonight, I have some time to myself and like I said, have a months worth or builders logs to put up there. The pics you see at the moment were only from Garry's site and used as place holders while I designed the Blog. This will change...count on it! I see the finish as a little way down the track and thus have not invested in any equipment that I don't immediately require. That being said I will have an image of my aircraft and it's final color scheme up shortly...It's going to blow away the conventional graphics you see on most aircraft...my background affords me the ability to make this plane of mine a little different than the norm. I was telling another forum member that it took my dad and I exactly 3 minutes after the test flight to make a decision and order the kit...Why three minutes you ask. We were both giggling like little school girls and it took us a while to compose ourselves. Cheers, Toby Link to comment Share on other sites More sharing options...
Chris Willars Posted August 11, 2009 Author Share Posted August 11, 2009 giggling like little school girlsHaha, I do that every time I fly anything, still cant believe I can fly, its GRRRREEEAAAATTT!!!!!!!! Thanks for the tool list Toby, kinda what I thought but I will ensure that if I go ahead I will make sure I have all the right ones. Glad you are building with the 3rd wheel at the back, where it should be, looks better that way. ( no offence all you nose wheelers, dont have a tail wheel rating yet). That's where mine will be. Slarti, glad you're still enjoying (green with envy), I will give Gary a call nearer the time. Might hire a local plane and fly down to taree (is that right???) to have a go in one myself and then probably get into lots of trouble by parting with a substantial amout of cash:hittinghead: Fly safe Link to comment Share on other sites More sharing options...
Recommended Posts
Create an account or sign in to comment
You need to be a member in order to leave a comment
Create an account
Sign up for a new account in our community. It's easy!
Register a new accountSign in
Already have an account? Sign in here.
Sign In Now