batesey
-
Posts
37 -
Joined
-
Last visited
Content Type
Profiles
Forums
Gallery
Downloads
Blogs
Events
Store
Aircraft
Resources
Tutorials
Articles
Classifieds
Movies
Books
Community Map
Quizzes
Everything posted by batesey
-
Hi Altifly, I can only tell you from my experiences with the Sierra, but having seen many pictures of the cheetah's construction, and from speaking with a couple of the cheetah builders, there is nothing that the novice builder won't be able to do. I'm pretty sure Garry can also pre-build the wing spars, reducing time and complexity for the build. Many have purchased Garry's kits because of simple though process that went into the aircraft design and the ease of the build. Now granted, there are some things that might set you back a little until you get to grips with a certain tool or technique, but that's what Garry and the rest of the builders that you will have contact with are there for...to help :-) The cheetah uses fabric (like Ceconite) for the lower half of the fuselage, tailplane, rudder and the back half of the wings. The 40 or so kilo difference comes from a few things...most of that weight would be because most Sierra builders have been putting the heavier 6cly Jabiru motor in. The fuselage tubes are bigger and yes, the metal skin would also contribute (although not much). Basically the Sierra is beefed up a bit to take the larger motors. You mentioned safety and stall speeds...one thing you won't even know has happened in a Morgan Aircraft...LOL...seriously, the ones that I have flown are just so gentle....they give a slight buffet, you release the stick pressure and away shes goes again. No erratic wing drop, no violent dropping of the nose, nothing. I'm not sure of your rules in France, but the planes can also be fitted with a BRS if you are so concerned with accidents. Onto your question about the removable wings. The claim of 10 minutes from rigged and into a trailer is true...albeit with practice (not something you really want to rush anyway). I have personally seen it, I have also helped re-rig one of the planes. The wings are large and probably too cumbersome for one person to install them alone. You really do need at least two people for the wings, one at the root and one at the tip. If it had to be done alone, I would probably build a unicycle type wheel for the wing-tip (like many glider pilots have) to aid in getting the wings out of a trailer and onto the plane alone. The tailplane is easy as...slip them onto the tail main spar, push in the pin and secure with a clip and you are ready to go. Hope that answers you questions :-) Cheers, Toby
-
Hi Altifly, Unfortunately I'm not able to give you a really accurate number of hours for the total build time at the moment. I have not updated my blog in quite some time (years). On my blog I have a running counter of the time taken so far. I have kept an accurate diary of the entire build process so far, with some 3000 pictures to document (in detail) the entire process. I really need to get a move on with updating the blog. If I find the time I'll see if I can get a rough estimate of the hours taken to get the plane to where she stands now.
-
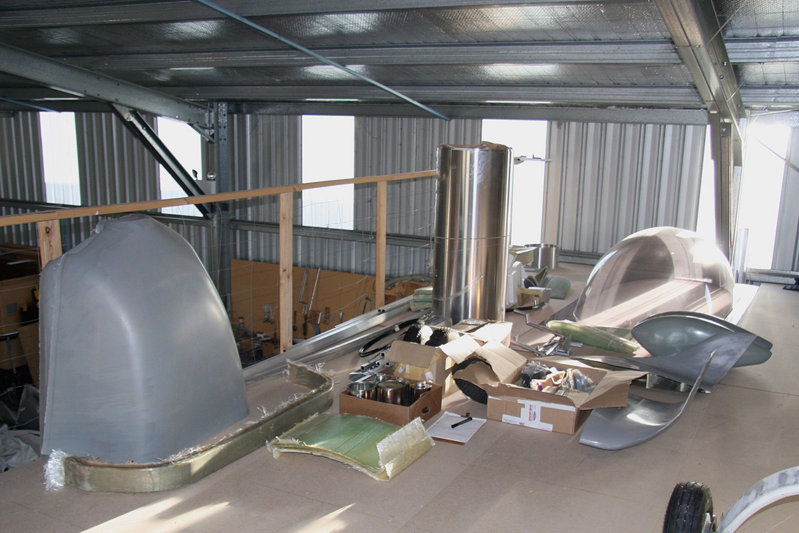
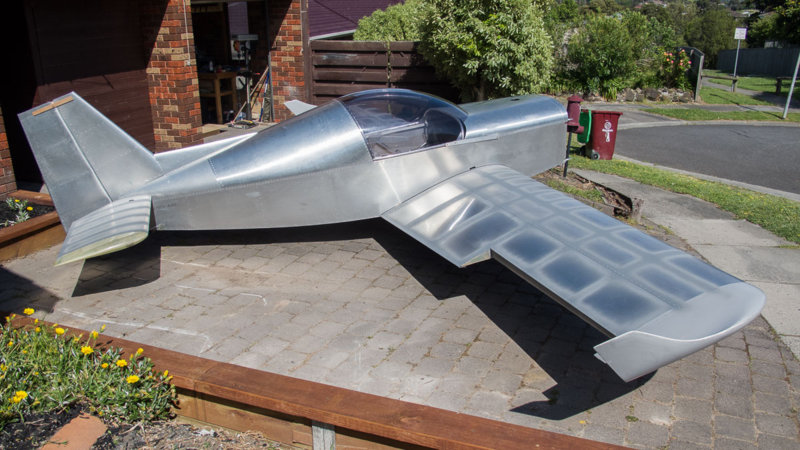
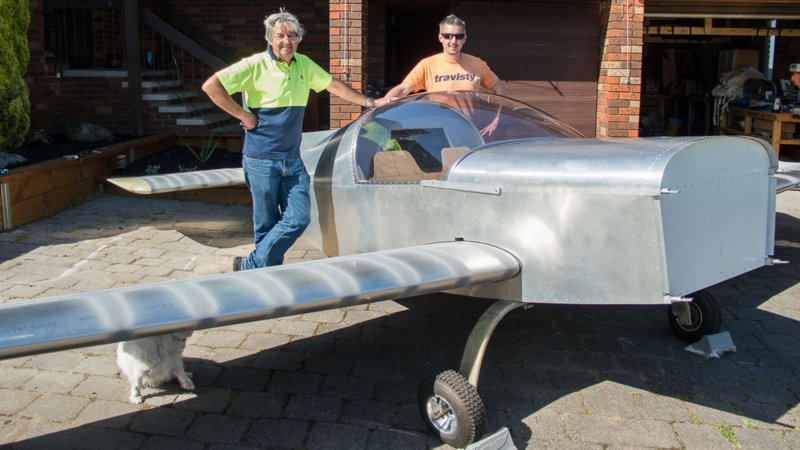
Altifly, Further to my previous post, here is the info related to the Kit. First let me start by saying...this is NOT a CNC pre-cut, pre-drilled, pre-bent Aircraft Kit. There are however a fair few pre-made parts and I'll run through them shortly. Below are the pictures of my Kit as I picked it up: What the pictures above show is what Garry calls the basic Airframe Kit. My Kit included a few optional extras. I'll list them below to make it clearer. The pictures don't show the engine, engine mount or instruments. The firewall forward package will be ordered at a later time, when the airframe is complete. Kit Contents: -Aircraft Plans -Aircraft Construction Manual -Aircraft Construction Photos -Aircraft Construction DVD Video -All AN Aircraft grade Bolts, Washers, Nuts & Fittings -Plywood for floorboard and various other applications -Aircraft Grade Sheet Metal (various thicknesses) -Aluminium square section for fuselage -The Logerons are marked and measured at the factory for easy install of the main spar carry-through and various other components) -The Lower Longerons are also Pre-Bent at the factory to give the desired fuselage shape -Aluminium square section for fuselage Uprights and Diagonals (Pre-cut to length) -Aluminium Plate for main spar (marked) -Aluminium Angle section for Main Spars -Aluminium Round Section for Wing Drag Spar -Chromoly Steel Tube reinforcement insert for Wing Drag Spar -Aluminium Round Section for Canopy Frame -Pre-Bent Trailing edges for main control surfaces (Ailerons, Flaps, Elevator) -Pre-Bent Aileron Hinge Section -Aluminium Round Section Tailplane slip on Spars -Welded Steel Main Frame / Spar carry-through -Stainless or Colorbond Firewall Sheet metal -Steel fin post (Pre-bent) -Main Spar sheer web (Pre-Cut and Marked) -Chromoly Steel Tube Tailplane carry through Spar -Fitted Nylon Tailplane Bushings -Pre-Made and Welded Tailplane Mounts -Pre-Made and Welded Tailplane Control Horn -Pre-Made and Welded Dual Control sticks (Optional Extra) -Pre-Made and Welded Engine Mount Fuselage Pins (these are the pins that attach the engine mount to the aircraft) -Pre-Made and Welded Rudder Pedals -Nylon blocks for Rudder Pedals -Bowden Cables (Ailerons & Elevator) -Stainless Steel Cable (Rudder Control) -Nylon Rudder Control Guides -Elevator Trim Wheel and associated bungee cords -Pre-Made Aileron Mass Balance Arms (weighted) -Wheels -Axles -Tires -Disc Brakes -All Pop Rivets (various sizes and in generous quantities) -All Solid Rivets -Hinges for Ailerons -Fuel Tank drains and Fittings -Composite Resins Pre-Made Parts: -Engine Cowling (Top and Bottom halves) -Composite Seat Bases -Composite Undercarriage Main Gear -Composite Wing Tips - Large Finned Version (Optional Extra) -Blown Canopy (Optional Extra) -Composite Wing Ribs -Composite Tailplane Roots -Composite Tailplane Ribs -Composite Tailplane Tips -Composite Instrument Panel -Composite Wheel Spats (can't remember if they were an optional extra) -Composite Fuel Tank and Baffles -Composite NACA Air Vents -Air Vent nozzles (mounted in cockpit) I think that's about it...I'm sure that I have forgotten a few small things here or there. That been said, there has not been a time during my build where I have had to ask Garry for something extra...everything required to get my plane to where it is today, was in the kit. Once again though, if I read through this post later and find I have left out any info that is needed, I'll update it in another post. Here is a couple of pics to show how the above Kit Contents now looks. I'll do my best at another time to address some of your other questions concerning the building of the kit. Hope the info has been helpful. Cheers, Toby

-
Hi Altifly, I hope the following info helps clear up a few things concerning building one of Garry's planes. I am building a Sierra 100 Taildragger. I know most of your questions are focused on the Cheetah, but the similarities between the two aircraft are not that far apart from one another. I'll start by providing a list of tools that I'd acquired in preparation for the build; this list will also include tools purchased during the building process. Not all of the following tools are deemed absolutely necessary, but some of them sure did make light work of what some may call arduous tasks. Drills: -Cordless Drill -Powered Drill -Drill Press -Drill Bits ranging in various sizes (many, many drill bits ) -Right Angle Drill attachment Air Tools: -Air Compressor (with a long hose) -Pneumatic Rivet Gun (for Pop Rivets) -Pneumatic Rivet Hammer (for Solid Rivets) -Heavy Steel Bucking Bar (for Solid Rivets) Metalwork Specific Tools: -Hand Rivet Puller -Cleco Fasteners (3/32", 1/8", 5/32" & 3/16") You are going to need about 250 1/8" Clecos, this is the most used Rivet size. I think I had more actually. -Cleco Pliers -Metal Shears (12inch Straight cut...not the serrated kind!) -Metal Files (various Course, Fine, Long, Short, Flat, Round...) Hand Tools: -Spanner and Socket set (Imperial Units) -Screw Drivers -Hammer -Pliers (wide grip and pointy nose) --------------------------------------------------------------------------------- -Belt Sander (hand) -Bench-top Disc Sander/Belt Sander (Linisher) -Grinder with cut-off discs -Jigsaw (with a range of Metal Cutting Blades) -Compound Saw -Dremel (for small and fiddly cutting and sanding tasks) --------------------------------------------------------------------------------- -Metal Rulers (Long and Short) with imperial and metric units -Right Angle Ruler -Measuring Tape -Spirit Level --------------------------------------------------------------------------------- -C Clamps -F Clamps -Quick Grip Clamps -Bar Clamps -Spring Clamps (a cheap range of various sizes) -Ratchet Tie-down Straps -Small kitchen scales (to measure composite resins) -Vacuum Cleaner Others Bits and Pieces: -Sharpie Markers (red, green, blue black...thin point) -Mixing Cups -Wooden Stirrers -Rubber Gloves -Masking Tape -Sand Paper (for metal & various grits) -Protective Eyeware The list for this section could go on a bit, but I think you get the idea. If I have left anything out I'll update it with another post I also found it really useful to have a computer in the garage. This made it easy to reference Garry's supplied images and DVD Video without having to move away from the work bench. In my next post, I'll try to give you some more complete info about the kit itself and what the builder can expect to receive. I'll also upload a couple of pictures from when I picked up my kit...those images along with my description should provide you with enough info on what is prefabricated by Morgan Aeroworks and what duties the builder is expected to perform. Cheers, Toby
-
OK, Leergewicht = empty weight Nutzlast = usefull load Vollgewicht = MTOW Hope that helps :)
-

Video: MWFly's New Experimental and LSA Engines
batesey replied to fly_tornado's topic in Aviation Videos
Kyle, this pdf had a List of prices, but it was published in 2011: http://www.mwfly.it/pdf/eaa%20sportaviation.pdf Might be best to shoot them an email directly to get up-to-date prices. -
Computer Generated Imagery
-
Isn't there something in the regs that state that without the nav endorsement, your takeoff and destination airport must be the same?
-
LOL, nice one Tomo, speaking from experience, I wish all the comms here in Deutschland were spoken in English...LOL. The following video was sent to me by a friend of mine over here, If you flip the concept of the video on it's head, this is what it's like for me here sometimes...LOL https://www.youtube.com/watch?v=inCVwzFiN3g
-
Hey Greg, No, have not touched the plane for about 4 months now :-( but that's only because I'm currently living in Germany :-) I'm coming home soon and I hear the weathers been warming up...have no fear, I'll be putting the build back into action upon my return. Probably see ya down the field too, gotta get some flying done :) I hope all is going well with your flying!
-
Hey Guys, These are the graphics that were done for Tim Morgans Twister. Only took us a couple of days to have the aircraft back in the air after applying. There is a bit if work getting them to form around the rivets correctly, but after working the vinyl a bit they went down well and Tim hasn't told me of any issues to date with the application. Cheers Toby
-
:thumb_up: Roger, Wilco! Although it may be slow rest assured that updates are imminent! Thanks for the support guys, Toby
-
Thanks for the explanation of the rivets Kevin, very informative indeed. I have yet to check which ones were purchased but they were as per Garry's instruction. Thanks again Cheers, Toby
-
Hey Guys, I have been working on updating my Blog with HEAPS of info but it is taking me a while...sorry! I hope the following video is enough to tide some of you guys over for now til I get the blog up-to-date. This was taken on my phone (the quality is not the best) on the 19.01.10 and illustrates where we are currently in the build (sort of). What you are seeing is the Wing Spars with Ribs attached, rigged up on the fuse to get the angle of incidence and location for the rear drag spar. Currently the drag spars are in position and skinning of the fuselage bottom has been completed. Next is the Fuse side skins and then onto some serious wing build'n fun. [YOUTUBE]<object width="425" height="344"><param name="movie" value=" type="application/x-shockwave-flash" allowscriptaccess="always" allowfullscreen="true" width="425" height="344"></embed></object>[/YOUTUBE]Cheers, Toby
-
Hey Chris, The rivets were purchased from Economy Bolts...I rang Garry to find out what they were and after a bit of ringing around found that those guys sold what I was after. I'll have to check the pack to see what they are, I'm pretty sure they are Aluminium Rivets but don't quote me on that. I'll check tomorrow when I'm building!
-
Hey Dano, Thanks for the interest in the builders blog. We are still busy building and I have HEAPS of stuff to put up on the blog but time hasn't been on my side for the past couple of months. Rest assured that once I start putting more stuff up I'll let all of my loyal followers here know. To date the Wing Spars are pretty much complete and we had her all rigged up the other day. I have a small video of it sitting in the driveway with wings on (well spars anyway) and I gotta say it looked NUTS! I'll endeavour to put the vid on the Blog ASAP. Cheers Toby
-
Hey Chris, The Gussets are bent in a small 30" Bending Brake...the large bends like the one on the parcel shelf (yet to be posted) are done by using 2 bits of wood, a vice and 2 clamps. I actually have this stuff ready to be put up on the blog, just have to pull my finger out and finish off the descriptions of some of the pics. I'll have this stuff up on the blog soon so you can see. Cheers Toby
-
Hey Guys, Sorry for the lack of updates over the past couple of weeks...I got thrown quite a curve ball, but work has progressed and I will endeavour to put up as much stuff as I can over the coming weeks. We are currently working on the Wing Main Spars. I'll let you all know when I have put some posts on the blog. Cheers Toby
-
Hey Guys, Yeah, it's as I thought, Microsoft have changed the way pages render in IE8 and thus have broken what was working, AGAIN! Thanks Micrsoft!!! This happens EVERY time they update software.Then we have to keep adding crappy code to accommodate their crappy browser. No other web browser does this..such as life..it's gonna take time to fix (if I can be bothered), in the mean time, if you would still like to follow my progress, I suggest that you download Firefox and use that to view not just my site, but any website. Cheers fellas...I hope you guys are motivated enough to get FF and still view my blog. Toby
-
Hey Mick, There are no longer any issues that I know of with the blog...I have everything back up and it's been running for the past 5 days without any issues. Can you describe the problems you are having. I know that Wokbat1954 (my dad) was having issues with the new IE8 so I told him to use FireFox. I exclusively use FireFox to browse the web on both Mac and PC, the blog works flawlessly on both. As a side note, empty your internet cache and see f you can refresh the site...it may be that your computer is stuck on old cache. Let me know how you go. Cheers Toby
-
Seems as though after a very long night, I am back up and running. Thanks for your patients guys and once again, enjoy the blog. Cheers, Toby
-
No wonder it would hurt!
-
I'm working on the problem guys...seems as though it's not just my site but a global server attack. What a waste of time.
-
Qwerty, Thanks for the input. I have a range of saws at home for cutting various materials but immediately went for the Hack saw with diomond blade for one reason only. My Compound Drop saw is large and we simply ran out of bench space to be able to utilise it. Lucky there wasn't that much that needed cutting...LOL.
-
Hey Gomer, All valid questions, I had the same thoughts when I bent the longeron into position. The short answer is no...Not one twist in the longerons or the rest of the fuse what so ever. I probably could have just left it the way it was and just made sure the tail and firewall were the same height, but I am a stickler for perfection (just ask Dad) and actually bending that longeron to my liking is what took up most of the build time that day. Once complete, you wouldn't have been able to tell if they were different, but it would have just bugged me had I not done what I did. I can assure you that our airframe has not one twist in it and is perfectly square. The stresses from bringing the tail and firewall together are immediately relieved by the gussets that hold them all together. There is no need to try and prebend or post treat anything, you would probably only weaken the structure. I think Garry told me that each of the Longerons was rated to about 32g or something like that, so PLENTY of strength there. Once all of the Formers, Verticals and Diagonal tubes are fixed in position and riveted in you can just feel the strength...and I haven't even skinned the outside yet! This is one tough and RIGID airframe. Hope that answers your questions. Cheers Toby