

rick morawski
-
Posts
254 -
Joined
-
Last visited
-
Days Won
1
Content Type
Profiles
Forums
Gallery
Downloads
Blogs
Events
Store
Aircraft
Resources
Tutorials
Articles
Classifieds
Movies
Books
Community Map
Quizzes
Posts posted by rick morawski
-
-
Put another aircraft build log on the fireHe is in Tasmania...... gotta the workplace warm, or you get to inclined to stay out of it.
-
I did it a few nights ago, had no problems getting into the site, but agree that navigation once inside is a bit troublesome.I have just enrolled and had several issuae with the site.I was given an ID and a password. Copied this from the site and was told incorrect. The password has two zeroes before it, I was not told that.Next I have to accept the conditions, but cannot find what they are.
Finally when I get into the site it appears to be a load of headings which when picked do nothing. Has anyone else tried this site?
It looks as if it is the usual half cocked RAAus approach.
The thing I didn't like was communication once finished the exam, or should I say, lack of it. I got emails all the way through the preliminary study quizzes and exam results, but after that....nothing. Still don't know if I passed or failed or how long I should wait before trying to find out....frustrating!
-
Yes, that's the area.At the place in red ? (In the picture) -
Hi Francois,
Assuming that your aircraft is a Savannah because you posted in the Savannah section.
That stiffness problem with the controls sounds like the aileron control rod spherical bearings binding with the bell crank at full flap and full deflection. Check them or get someone familiar with the savannah to check them, access through the big hatch in the bottom of the rear fuselage. They should have a couple special spacers on one side and one on the other of the spherical bearing. If the original builder just used standard washers on the AN5 bolts, or the spacers in th wrong order, then it will bind. I think that's what it will be, hopefully.
Cheers
Rick
-
 1
1
-
 1
1
-
 1
1
-
-
Ask Dan, he reckons he can get anything.been searching around...cant seem to find any in Brisbane1.6mm seems pretty thick, I don't think the original is more than .025 or .030".
-
To upload pics, have them loaded on your device, hit reply button, type any reply you want, press upload file just next to post reply button and select pictures you want from the pop up window.how do I upload pics ? -
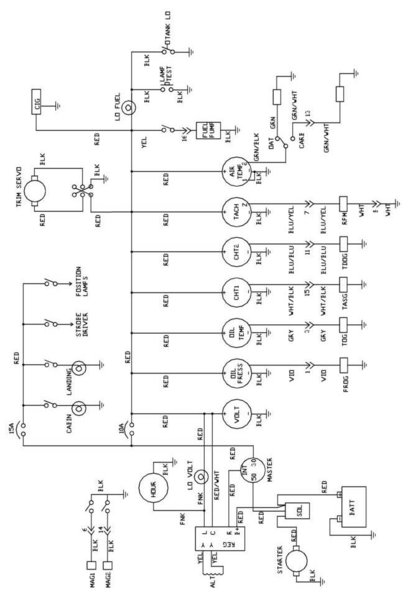
Here's a wiring diagram that I had handy.
-
Hi,Hi, I have a question , where is the difference between a savannah vg mtow 520kg and savannah vg 560 kg?ThanksFrancois
The differences are-
1)Double plate front strut to wing attachment. (Easy to see if you are checking)
2)Thicker front wing attach plate.
3)extra doubler angles inside the Lower rear fuselage.
4) extra frames inside the rear fuselage, in between the original frames, so rear fuse frames are only about 300 mm apart.
Hope that helps.
Rick
-
1
-
 2
2
-
-
No problems at all. Usually 3 stops per day, one refuelling. Cruising with about 115 kts average groundspeed every day. Bit of shitty low cloud first day departing, but perfect after that. Glorious weather today here at Narromine.That is huge - how many stops Rick? Any issues?-
2
-
-
Pain for you maybe, godsend for me. Just flew a Savannah from WA to narromine in 18 hrs flight time with that westerly all the way, yeeha! Nobody there yet.The 30 knot westerly predicted by windyty is going to be a pain, swings north 35kt late Sunday. Not sure how many of us on the north coast nsw will be able to make it-
5
-
 2
2
-
-
Hi Trackley,Hi guys can i adjust (tilt forward) the rudder pedals on my vg for more comfort with my L1 or is it part of the flight controls. Left for an L2?The pedal position is locked by the length of the steering rods that attach to the nose gear leg.
It is possible to move them forward if there is any thread showing on the spherical bearings, by screwing them into the rod and thereby shortening them a bit, or they could be cut an re-tapped but the amount would be limited by the adjustment left on the rudder cable adjusters.
And yes, this job best left for some experienced L2, and would have to be second checked and signed off in logbook.
Cheers
Rick
-
The sender is the later 0-20mA type and needs to be used with a compatible gauge(you need a plug and terminals). Your kit probably has the older gauge used with the VDO resistive type sender, but you haven't shown us what type you have.My engine has a honey well oil pressure sender. It has two wires. I'm presuming an earth or a power supply is the extra one. ( my kit only has one wire in the loom ). Secondly will my gauge be suitable for this sender. I see a lot of issues with leaking senders etc. So keep this or just buy the correct sender new.Thoughts LyndonIf there is an incompatibility issue you have to either change gauge or sender. Probably easiest to get a resistive sender because you don't need to muck around with the wiring. Downside is those resistive senders can break down often.
Rick
-
Ha ha. Seriously though, check that you have used the correct washers on the "Heim" joint. They are very small spacers really, usually a pack of them in the kit. Follow the instructions, two on one side, one on the other. Then the ball joint will not rub on the levers.Well that will be another day. Moving that compaired to working under the plane in the hole will be a breeze. I have noticed that with full flap my alerons are not as smooth as compared with zero flap. I've had a look and fiddled with it all. Seems like the hymen joints are at there max and complaining somewhat.Lyndon -
Been a long time since I've seen one of thosehymen joints-
 1
1
-
-
Pretty much good to go with nothing in there. You can put 6mm bolt in to limit aileron travel but I have never used it. Check aileron an other control travel at final assembly.Do I fit bolts and lock nuts here. ?? Or is pretty much good for travel as is. I can't find anything in the manual.Lyndon -
Next time put it in before you put the seat back/luggage shelf in, much easier on the back.
-
No I wouldn't bend the brackets to get the flaps unit in. Do it with the unit in place, not impossible but difficult.I have a question. I'm working in the hole under the plane and have just done all my fuel lines. I must admit this is a lot of fun ?? Oh to be young and fit. My manual states to rivet the brackets on. This is easy without the flapperon unit and impossible with it in place. Before I go and rivet the two brackets ?? They will I take it flex enough for the flapleron unit to be squeezed in between the two brackets.Thanks Lyndon -
It's offset to counteract P factor of prop. Rotating prop wants to go a bit left so it is offset to the right.Just aligned my pedals . After building it this far I just noticed when sighting up my front wheel the engine is of set about 20 mm. It occurs in the engine mount. Someone smarter than me will tell me why ???Lyndon -
Yes, brass fittings in the fuel pump with suitable sealer. You need 3/8" hose from aluminium tube supply to inlet of elect fuel pump, 5/16" from outlet of elec fuel pump to inlet of of mech fuel pump, 1/4" from outlet of mech fuel pump to inlet of fuel spider and 1/4" out of all the fuel spider outlets. Note the fuel spider has two outlets with restrictors- they are for the fuel pressure gauge and fuel return line. Have a look, you should have the fittings in the kit.What are you guys using for the carby fuel line outlets by 2. Just an ordinary brass barb with some sealer ???. My Rotax manual lists nothing really. I did read that the fuel lines to the pump is 5/16 and from there it's 1/4 to the carbs. Thoughts ??LyndonCheers
Rick
-
I've always turfed them in the bin.
-
Hi DanGreetings all;I have about 1 cm clearance between the forward corners of my exhaust silencer (muffler) and the bottom cowling. I wrapped the silencer ends with a couple of layers of exhaust pipe heat wrap (held in place with safety wire) and applied two layers of reflective/adhesive heat shield to the inside area of my lower cowling. This was still not sufficient to prevent a spot of scorching of the paint work on the outside of the cowling.Has anyone else encountered this issue and- if yes - how did you handle it?
I am considering cutting a couple of circular holes right through the fiberglass cowling to permit some airflow in these areas as well as providing a little more clearance between the silencer and cowl.
Response?
Canada Dan
I think just about every Sav has had a problem with cowling proximity to the exhaust.
Most just cut the cowl to give enough clearance, some re-glass the clearance hole with a bulge.
Cheers
Rick
-
I've had a couple engine mounts repaired and autopilot servo brackets welded onto the torque tube (by an aircraft welder) no problems.
-
I have not seen an instruction on the carpet and i have built six of them. Just separate all the parts and dry fit them where you can. some of those bits I've never figured out.Yes I know what they are for in a general sense. But before I go drilling holes I would like to know where they go. My manual has no chapter on carpet or angles that go on top of it. A pic of some ones floor or a pic of the extract of the manual would be most helpful.Lyndon -
i told you what these were for yesterday, post #491Pics. Don't take the numbers as gospel.-
1
-


Skykits rampage
in Aircraft General Discussion
Posted
Skykits renamed it the Rampage for the US market. They don't sell ICP aircraft anymore. They've morphed into World Aircraft Corp now.
I don't think there is any Vimana aircraft in Australia (could be wrong there). Reg Brost of Aerokits is the importer of ICP aircraft in Aust. You could enquire to him.
Cheers
Rick