
rick morawski
-
Posts
254 -
Joined
-
Last visited
-
Days Won
1
Content Type
Profiles
Forums
Gallery
Downloads
Blogs
Events
Store
Aircraft
Resources
Tutorials
Articles
Classifieds
Movies
Books
Community Map
Quizzes
Videos Directory
Posts posted by rick morawski
-
-
I'm pretty sure SF021 goes on the forward omega on the cabin floor , the two SF022 go on the rear omega. they are installed after the carpet to protect it.I have some parts I can't find a place for nor in my parts book or manual. SF021-SF085 and 2 x SF 022. Any help would be great. There is only a certain number of times I can go through through the manual in a day.Thanks LyndonDont know about the SF085.
-
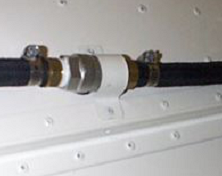
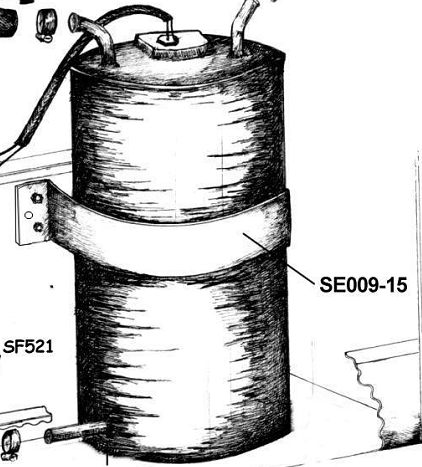
if you mean the saddles like in this pic, they are just cut from .016" scrap and shaped to fit then drill and rivet. I see in another pic you have some copper saddles on the bench, dont use them on your plane, they will start corrosion.Fuel Lines and tap question. The fuel line under the fuselage shows three clamps which I dont have in my kit. I only the single hole type with the rubber insert which is for for my engine I think. also the fuel tap has a bracket SE 009-15 that I also dont have. A pic of this bracket if any one has it please so I can make one.Thanks Lyndon
The SE-009-15 is a strap of .016" about 450mm long X 30mm wide with tabs on the end for fixing. it goes around the reserve tank to hold it behind seat, nothing to do with the fuel tap.
-
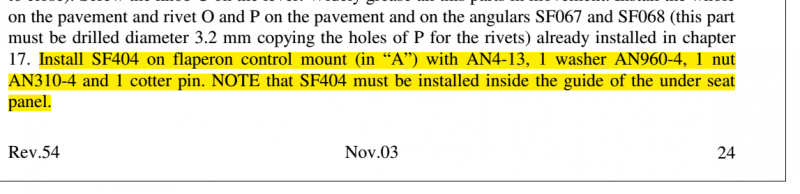
an4-13 drilled shank bolt, washer, castellated nut and split pin goes in there, see screen grab below.Bolt or bushes question. My flaps rod to the mixer. My manual shows nothing 're this area. Any info would be grateful. It's sloppy so something goes in here.LyndonIn the picture you posted of course you will have to remove the zip tie, but you also have those doublers on the inside instead of the outside, as per the manual and it is splaying the sides outward thus the slop. Move them to the outside and squeeze the sides back in parallel.
-
 1
1
-
-
it may well bugger you:roflmao:Filter issues. Bugger me my cheap filter was to long for fitting the exhaust. So I found a Short one off a Briggs and Stratton engine. -
I would love a fuselage rotator but have never had the spare cash to build one. I suspend the fuse in the spray booth with wire, high enough for the painter to get underneath. I don't spray paint myself I leave that to experts, looks so much better than what I could do.I get to buy more tools! Do you guys also rotate the fuselage for painting, or is that not practical?.
Yes I have considered it, would be handy for outside jobs so I don't have to lug a compressor with me, but in reality I wouldn't buy one when a pneumatic one comes included with the kit.Has anyone considered using (or have used) a battery operated rivet gun rather than an air operated one? -
Hi BobThank you, Steve.My build table is 1200 wide, it sounds as though I'd be best to put that to one side, as there's another builder wants it, and make the fuselage bench from scratch. Easy enough with cheap ply & tech screws.Any suggestions about height? I'm a very average 5'9".
Thanks.
I reckon best height for you is worked out by arm straight at sides, hands outstretched, palms parallel to floor, height of bench is distance from palm to floor. Can also be calculated as dick height, but that's not very PC:oh yeah:
Cheers
Rick
-
Just looked at the manual and they don't show any washers and use loctite 243.Thanks for that. Lock or plain washers ??.Lyndon -
There should be four of M8 X 35 Allen head set screws and washers in the engine installation parts box.
Torque to 40Nm.
I think the manual says to use loctite but I drill and safety wire them because I've seen a few lost or loose ones on motors around about.
Cheers
Rick
-
Enlarge it if necessary, I usually do that with the pedal mounting blocks. I usually leave out the friction block altogether, it adds too much friction and I like the throttle free and easy.My friction block is way to small in diameter. Has anyone else found this. I'm not wanting to rush in and enlarge it ??? Lyndon
That blue fuel hose used to come with the older kits.I see some wanky blue fuel line in some of the threads. I do like it in the engine bay. Where does one get this stuff.Lyndon -
I get AN bolts from ASAP Aircraft Spares in Caboolture in Qld. Very easy to deal with, just sent an email with my list and they sent back a quote real quick. Was $11.30 for Aust. Post prepaid satchel.Anyone know where I can get some of these an03-5 bolts in Adelaide. Postage is very high on the net for a few dollars worth of bolts.Lyndon -
For F**K sake Skee lighten up.Lyndon, for F**K sake, keep your build questions to your build thread, your spamming atleat my mail box....
I don't really understand what you are having trouble with, maybe post photos. There's nothing really squeezy about the cabin roof. When I assemble a Sav at the airfield everything is done, just a matter of bolting up the parts. Takes about a day.The manual shows fitting the cage. Then I find it hard to squeeze the top cabin skin in past the cage with out damage ???. Does anyone do it the other way around ???.Secondly.My plane will be stored for a time before going to an airfield for the wings to be attached. I would like to do as much as I can in my workshop before this. I see the manual shows some parts that can't be fitted before the wings. In reality what is the minimum I have to leave off to fit the wings. I do propose to pre paint all parts ??
Thanks Lyndon
-
Toss the adjuster it's not used.The light Mmm. I have a cover that attaches to the wing. A hella light with an adjuster that seems to go no where. The manual shows nothing from what I can see .Lyndonthere will be two small teardrop shaped bits of aluminium with three holes in each bit. They are doublers that reinforce the mounting holes that bulges out the front of the shroud. in the box that the light was in should be two he head self tapping screws. Put on screw in the mounting hole and with the light inside the shroud turn the screw into one of the mounting holes on the side of the light (use lubricant and reverse it often or you will break a screw). Then flex the shroud around the light body and place the other screw in.
-
Hi Lyndon,Gday. Pitot tube. I can't find it my manual. Is it sf621. Part number. Also fitting of the hella light in its little shroud. Any pics or info on fitting both of these much appreciated.LyndonThe pitot tube is a piece of 6mm aluminium tube L shaped, about 450mm long with one bend 90 degrees with about 75mm one end (dont ask me which end
)Not to be confused with the fuel return tube which is similar size but has 2 bends. they are usually all taped together with the 10mm fuel tubes.
don't put it on permanently till final assembly at the airstrip or it will get bent for sure, actually most sav builders cut it short and then join it back up with a bit of 8 x 6 rilsan tube so it will flex when someone bashes it while not looking.
The light shroud is pretty simple, rivet the teardrop shape doublers on with 2 crush rivets each, then using the self tapper screws that come with the light attach to the shroud. You have to flex the shroud around the light a bit and hold your tongue in the right position to do this. Then position the assembly on the wing in the position shown in the manual, drill through the holes, cleco as you go, deburr and rivet.
cheers
Rick
-
Hi MarkI spoke to the local owner of that 701 today. He got the Pegastol wing as a kit but he doesnt have any of the paperwork. He is trying to find the number of the guy in WA who bought it...he thinks the guys name is S. T. Liew or something like that if anyone knows himI know Siew, the owner of the Pegastol/701 in WA. He lives not too far away from me and I do maintenance on his plane from time to time. I also built the only other Pegastol kit in Aust, unfortunately I also wrecked it. (but that's another story) I still have the assembly book around - maybe! The fuel tanks are roto Moulded poly, I had four tanks in mine, the exta tanks were outboard of the struts.
I'm surprised you're considering building Peg wings for your Sav, last I saw you were sold on a Rans kit? what happened to that?
As JG says in that article, I don't think the Pegasair wing will fit the sav, and to change the front to rear spar measurement would change the wing profile blah blah blah. But building the whole plane would be the go.
The guy that bought the Pegastol rights was in Alaska I think, had his number a long time ago but never spoke to him. He never produced any new kits, just built the last Peg wings. The templates and jigs are probably in his back shed gathering dust. The guy at the start of the video was Giles Boulanger, a director of the company and a WW2 bomber pilot, a legend.
Call me if you want more info or photos ( I think I still have some)
Cheers
Rick
-
 1
1
-
 1
1
-
-
Looks awesome, well done Lyndon!Done one rebuilt Rotax. What a lovely little engine to work on .Carbs rebuilt. Gearbox. Long motor. Drip trays fitted. Should run like a treat.Hope to hear about a successful run up soon.
-
I think there is a mod for the jet needle, a little oring on top to stop the circlip turning and wearing through the groove.On another note I have overhauled the carbs. Quite surprised to see one carb as almost had the jet needle worn so much on the c clip it has almost cut it clean thru.Lyndon -
Hi Ho,A question or two1 Where does one source some 17 mm radiator hose for the 912?2 My 80 hp 912 has Evans waterless coolant, Should Evans be changed at certain number of
hours or years?
3 Are there other coolants suitable for the 912?
any and all comments/advice greatly received.
Bert Floods in Melb. Have the hose you want or any other Rotax bits.
I think Evans coolant is not recommended by Rotax anymore. I always use 50/50 distilled water/glycol.
Cheers Rick
-
1
-
-
Bob if you want to make short rivets (you won't buy any) you need to hammer out the mandrel from the rivet, cut the rivet shorter, replace the mandrel, voila, short rivet. I tried it this afternoon on a couple rivets, took about five minutes. It revealed another problem, the stem of the mandrel sticks out of the rivet head a tiny bit when pulled, no big deal to carefully file it off if you only have a few.Okay...having read up on multi pull rivets, then filed one open lengthwise to see inside, then tried a shortened one anyway, I seem to be missing something completely here:Surely, if you shorten a blind rivet, you are cutting off the head of the mandrel that does the compressing when the rivet is installed?When I shortened one (with hacksaw, I don't have
The only thing I can think is that maybe using a rivet cutter crimps the rivet onto the remaining mandrel at the cut, so allowing some sort of pull. But if so, I can't see that the result would be very reliable?
-
Hi Byron, did you sort out your engine problem? Let us know what it was.
Cheers
Rick
-
I've notice when people new to the air riveter tend to hold it too hard against the rivet head, so when it recoils it is pushed back onto to the rivet or worse onto the skin. The trick is a loose grip with no pushing pressure so it recoils in your hand away from the surface. You'll quickly get the knack anyway. Have fun:smile:So. Today, finally, after all the preamble, I got to pull some rivets. And did that feel good!That black stuff is a little like maple syrup, in that it mysteriously finds it's way onto tools, doorknobs, and various flat surfaces. I'm going to have to get my system sorted out there: I trimmed a small roller to 20mm wide, and that works fine, now I need to organise a less messy way to get the stuff onto the roller in the first place. It seems to skin and dry very quickly (which is great once it's applied) so I'm guessing it needs to be kept in a closed container of some sort between rolls?Question: I find that I am sometimes marking the heads of the rivets with a little nick or raised edge. I guess this is sometimes bounce in the gun, sometimes not holding it quite perpendicular.
I checked that I am using the correct size tip.
I tried steadying the tip with the other hand and that seems to improve things (although it's going to be just a bit slower).
I also backed off the pressure from 6 bar to about 4.5 and i think that helped too.
Are there any other tips or suggestions on this? What pressure are others using?
-
It's an 18 X 1 mm thread.
-
I had same fault symptoms and was broken kill switch wire same as Kasper, except mine was about 15mm away from the ignition box so I just had enough wire left to do a repair. Lucky me.
-
Hey Bob,
A good organisational idea is to pin up all those little bags of bits on a pin up board, so they are all immediately visible and secure so you don't have to sort thru boxes or whatever, just a tip that works for me.
-
Yes of course, there are no a3 countersunk , I usually drill them out to 1/8 and use the a4 countersunk.Thanks, Rick. I think I have all those, though I will check. I've spent hours looking, and I have all the smaller stuff spread out and quite easy to search.What I am looking for are countersink A3. Seems most never find them, but some do!
 )
)
Lyndons Savannah VG Thread
in Savannah
Posted