
rick morawski
-
Posts
254 -
Joined
-
Last visited
-
Days Won
1
Content Type
Profiles
Forums
Gallery
Downloads
Blogs
Events
Store
Aircraft
Resources
Tutorials
Articles
Classifieds
Movies
Books
Community Map
Quizzes
Posts posted by rick morawski
-
-
Maybe the flap lever disengaged(if you had them engaged). If the flap mechanism detent is not fully engaged in the slot it can let the flaps go with quite a bang. Happened to me once on landing round out, nearly soiled my undies. Now I always make sure I feel the release knob come up when setting the flaps.Couple of weeks ago while coming to land in a slide slip (left rudder and right aerlon) I did hear even through my noise cancelling headset strange noise something like structural break somewhere from left side . I did think of aerlon break or controls break but could not identified any problem plane behaved as usual with no probnlem . Since then I did performed thorough inspection of struts attachment points inside the wing all the contorols including elevator and vertical rudder fin and could not find anything . Can anyone suggest next step please . It could be something as simple as something moved in my luggage compartment behind me (I had during this flight tie up steel spikes there, but would be easy way out )I know similar incident on the glider when aerlon linkage disengaged mid flight with similar noise and pilot lost control on one aerlon managed however to get the glider to airstip and landed OKCheers
Rick
-
 1
1
-
-
Nobody knows where that distance is measured. Dont worry, if you mounted the frame up with the jig in the correct holes then it will fit. The important bit is the diagonals on top must be equal before drilling. If the vertical legs are long and foul with the extrusion from the cabin side its ok to trim enough to fit and no more.Wing distance ????. 728 plus or minus 1mm. Measure from where. The front mount has two lugs and guessing the wing locates in the center. Distance between the front and rear lug. Or center of both. I only want to drill these once. Yep I want the wing to fit first time. Advice ????Thanks LyndonIts harder to get the first hole in the vertical leg because you have the jig clecoed on but you will get it.
-
You're not building an RV here, dont worry too much about airflow.Would make sense to put it on the outside surely for air flowMost builders put it (the cowl) on the outside for ease of removing cowl to check the motor.
Factory ones come with the cowl inside and the manual says put it inside. You figure whats best.
-
I'm pretty sure it doesn't say to use the black rivets (you found them huh???)
It uses A5 (your normal bigger rivet) where the holes line up with the firewall, and soft squeezed rivets at the front in the smaller holes. you may not even need the small rivets, they are just to hold the corners down because of the curve of the firewall.
What's not in the manual is that you can put the plates on the outside if you are putting the cowl inside, and you put the plates inside if you are having the cowl mounted outside. If you are having trouble now you are really going to cry when putting on the cowl, inside or outside???

-
1
-
-
I upload it again in a different format
Basically it means the edges of the cabin side skin should be on the outside all the way around.
-
If its not specific about rivet direction then its your choice. I rivet from bottom up, as you say - looks better.
I see from the second photo that you have the cabin side inside the floor, should be the other way, cabin side under the floor. See page below (highlight is mine).
Chapter 15 FRONT FUSELAGE ASSEMBLY.pdf
Chapter 15 FRONT FUSELAGE ASSEMBLY.pdf
-
Yes, needs a bit of caressing into position.
-
Solid wireThank you Rick, Is had a look on the A-820, is it a complete solid wire from the handle to the torque tube cranck ? or a mix cable + solid wire ?I saw on your post that you made a modification on the firewall crossing.Thanks for your explanations Mark, in parallele, i will look for that, we call that in french "presse étoupe"
Eric
-
Hi erd72
I used the A820 friction lock/ solid wire control from aircraft spruce, part no. 05-09436
In your original post you said you wanted something that's "plug and play", these controls are not that. They require a fair bit of work to fit.
-
1
-
-
Looks beastly.
Hope it comes with a stepladder.
-
here, the dimensions in the picture are where you drill a hole, put a grommet in then the wire thru.Where does it come out on the rear fuse skin -
where abouts what? me no undystandyNo worries. Thanks. Where about s in the rear of the fuse -
just have it 50mm or so out the top of the fuse at the back to connect to the cable coming out of the stab, run it (through grommets in the fuse frames) sort of diagonally a bit till you get to the bottom. Make sure you have it the right way round or you will be swearing alot later.On the floor ??? Main concern is it comes out through the hole in the top skin where an elevator cable comes out. What to get my length right-
 1
1
-
-
No, run it down the left side of the fuse, under the left seat, up the left side of the cabin footwell, to the back left side or the instrument panel where it should joyfully meet with the trim switch and indicator.I'm running my trim wiring in the fuse prior to final riveting. I'm thinking it comes out the top of the top skin under the the little cover that is front of the fin. I have some dimensions but no instructions. From there I will run it to the battery ??Lyndon -
I agree with Rank, useless. That area cops a lot of stress in a hard landing situation. Better use the spec rivets or A5 instead.Bottom of fuselage. Skins corner with a longeron inside and out ??-
 1
1
-
-
No hugs here.Rivet advice. I have bought some longer a4 rivets. They are plain without the center grab section. See left rivet. Kit a4 is in the middle and kit a5 on the right. I have asked one person who said they Will be fine. But before I get riveting I need a hug and someone else to tell me these are fine to use on my aircraft. ??? ThoughtsThanks LyndonWhere are you intending to use them?
-
 1
1
-
-
Yes, just a small plastic bag full, maybe less than 100. Usually in the same box all tha A4 rivets came in.I have yet to use a a 5 flush rivet do the kits must use very few. Seeing I haven't seen one yet -
Flush rivets are countersunk rivets, they will be there next to the A3 rivets you couldnt find. Have another mummy look.Flush a5 rivets in this section. I can't seem to find any in my kit but a bigger concern is that can one really make it truly flush. Why wouldn't I drill another two holes in the bottom plate and just rivet it all with a5. From what I can see they must want the upper hinge captive ??? LyndonWhat I do is get everything thats in a plastic bag like nuts, bolts , rivets etc and stick them up on a board with drawing pins, lined up with each box they came out of. if you take it off the board you mark the board where it was so you know you actually had it. It works, all the little bags are there to see, no searching. Honestly every person who has built a kit (including myself) has sworn there's something missing, only, embarassingly, to find it later on down the track.
I've run out of the long 1/8th rivets for the fuselage bottom. Are these specific or can I just buy them locally.they are Avex rivets 01661-00416
Easy to get them off Reg at Aerokits or
Infastech (Australia) Pty Ltd
891 Wellington Road
Rowville, Victoria 3178
Tel: +61 3 9765 6400
Cheers
Rick
-
1
-
 1
1
-
-
Yes correct, they are the aileron horn stops, see control section.I have looked everywhere in my manual. No mention of fit these or even a pic. I can find them in the parts list. Sg011 x2. They look like they belong here and hold the inspection panel. Am I correct ???Lyndon -
Hi Carlos
I think it would be the tyre is out of balance. The "tundra" tyre is really a golf cart tyre and they don't bother with balance issues when manufacturing because they only go slow. When they are put on an aircraft where they go fast then balance issue can show up.
You could swap the tyre with one of the mains or get a new one but still no guarantee it will be balanced. I read where one guy tried five tyres before he got one that was good enough.
Cheers
Rick
-
1
-
-
Yes you could put in electric trim cable and battery cable and battery box (if you are having battery at the back hatch), and baggage compartment back and bottom, unless you want to torture yourself trying to crawl in there and rivet it afterwards.One question. Button up the fuse. Nothing I need to do. Eg cables wiring. ??? All can be done easily afterwards. ???Lyndon -
what are "these"?These need longer rivets than supplied in the kit too, to do the job properly. -
Have a look in the section called "controls"Then I seem to have one block left over. I have five of them. ??Should be a picture like the one below.
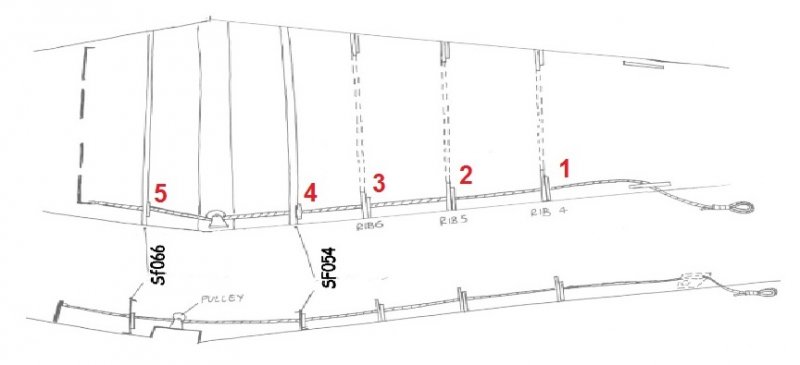
I put the numbers in, see 5 nylon blocks
edit : there is a trapezoidal shaped one that goes thu the skin right at the back
-
No, leave the most forward nylon block to go on the seat front when you do the cabin/forward fuselage.Ribs ???A question. Manual is a little vague.On the cables. One nylon block on the rear of each rib. 4 5 and 6. The a block on both sides of the longeron ???
Thanks Lyndon


Savannah S dream machine
in Savannah
Posted
Hi Guy
I find fitting the cowl one of the most frustrating jobs in the build, sometimes they go easy, most times not!
I have fitted them both inside and out but last few have settled on putting it inside.
Problems to look out for when fitting it inside are - Naca scoop on top cowl fouls with top of left carb, need too leave adequate clearance at rear of spinner for withdrawal of cowl. Advantages are neat and tidy tight fit at rear of cowl, disadvantage of fiddly removal so as not to scratch the spinner.
You seem to have found the problems of fitting outside, though I have found that interference at the water radiator mostly can be fixed with tighter fitment if pipes and large HD zip ties to hold up the rear end. Advantages are easy removal for engine servicing, disadvantage is the often loose look of the fitment.
Choices, choices