Bigglesworth
-
Posts
379 -
Joined
-
Last visited
Content Type
Profiles
Forums
Gallery
Downloads
Blogs
Events
Store
Aircraft
Resources
Tutorials
Articles
Classifieds
Movies
Books
Community Map
Quizzes
Videos Directory
Everything posted by Bigglesworth
-

Building "Cowboy Up", a Cheetah Kit
Bigglesworth replied to Bigglesworth's topic in Morgan Aeroworks
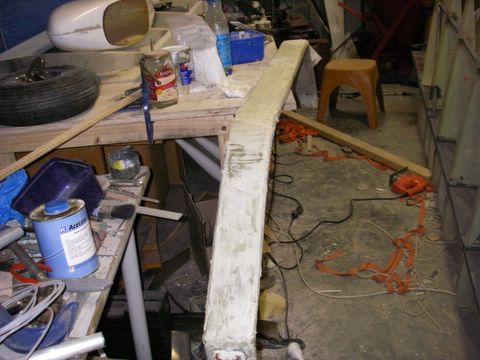
Odds and sods More time wasted on birthdays last weekend; another 21st. That took all Friday night and a lot of Saturday, but it was worth it I suppose. Now back to the plane. Lots of time spent on things like filling, sanding and more of the same. I got the undercarriage leg finished to my satisfaction the other day. That means I know how much Vinylester resin I have left, and can use the rest to double proof my fuel tank. Then that is finished. Those 2 things have been bugging me since I started, either with ugly bubbles or with leaks. I mean, who wants leaks in a undercarriage;)? In the way interesting things I got done, I got some acoustic insulation on the firewall. I am using a form of lead vinyl which is very good, and very heavy. So not much of it. I tried sticking it on with a standard glue stick, not the best, will wait to see how it dried. I started on the fabric covering 'be' Started with an elevator. First made sure everything was sanded. Then cut out the basic shape of fabric, I used pinking shears since I think it makes a stronger bond. I had a hard job finding a pair of pinking shears, not even the sewing shops had them. Eventually my boss's wife found a pair which she kindly let me borrow ;). Once I had the basic shape, I wrapped it around the elevator, and cut it the exact shape. Including the compression joins. Now here I made a major error with minor consequences. (Um, isn't it always the other way). I have never fabric covered before, and the instructions are minimal, so I didn't thin the glue . This meant it didn't penetrate properly. For those of you who have no idea about glueing fabric; the glue is first bruched on the surface, where it dries almost instantly. The fabric is placed over it, then more glue is brushed over it and rubbed through the fabric. This reactivates the glue underneath and makes a strong bond. If the glue is not thinned (with acetone), it goes off before it gets through the fabric, and rubs into lumps, and uses too much glue. Anyway I think I can fix it up with a bit of thin glue. Also, I decided to heat shrink it already (I still didn't know I was wrong with the glue, I just thought I did an ordinary job, and hoped it would come better). This was fun. But it wasn't quite as good as I hoped. It took the major wrinkles out but not the small ones in the glue line. Maybe I can make sure they are stuck down all around, then sand them off. I'm hopeing. In any case, it should fly, it is mainly looks. [ATTACH]3577.vB[/ATTACH] I also got one wing walk in. A piece of offcut either side scribed to the wing curve and fibreglassed and rivetted to the rib. The rivets aren't in the original, but I like them better than just fibreglass. then one in the middle which sits on the drag spar and strut. Glassed all this in, and when it was set, I stuck the sheet of ply on it. Just used Balsa Cement. (can you tell I used to do a bit of modelling?) It holds my weight but that is not a fair test, I am a lightweight, will have to stand on it and hold a fuel can or something. [ATTACH]3576.vB[/ATTACH] [ATTACH]3578.vB[/ATTACH] I made the back for the parcel shelf. I knew this would be hard to get right, an internal scribe is a real . So I traced the profile of the bulkhead on it, then measured the extremes of what the back wanted to be. Turned out about 60mm all around. So drew that curve, cut it out; and it was close. Had to cut an extra 20 or so mils from around the middle of the curves. But this was just scribe and cut until it fitted. I could just glue it in where it is, but I want to make it removeable. I want to put 2 6x9 speakers in it, run them from a head unit CD player with 50watts per chanel, bridged to 100watts. Should be good. Anyway to make it removeable I will make brackets out of aluminium angle and glue these to the fuse, and screw the back to them. [ATTACH]3579.vB[/ATTACH] I put the 2nd wingtip together. [ATTACH]3580.vB[/ATTACH] Notice the difference in method from the first. I put a spacer in this one to simulate the width of the wing, and I only clamped it right on the edge. The first one was made too flat, and has a dip in underneath. Not big, but not perfect either. I also put more clecos in this one. Why not? I have plenty, and the holes are easy to fill. So basically that was my weekend. Apart from painting the instrument panel (grey hammertone, hides any defects [there wasn't any to hide, except in the painting; these don't get hidden]) and cutting out the top of the aileron. Need some rivets and 3/32 clecoes to keep going there. Oh, and I also got the fuel tank hole cut in the top deck. To find this, I marked a cross on the tank cap, measured where the hole should be, drilled a small hole here, put the deck on temporarily, then looked through the hole to find the centre of the cross. Took a few holes to get this, but once the whole area is cut out with a large holesaw, none of the other holes matter. I think that is about all. By the way of advice, if you run out of 4-4 countersunks, don't bother trying your local hardware, mine took 2 weeks to stuff everything up, just get them from Garry, lots quicker. (maybe not if you're in WA, kfowler may want to ignore this) I might get some sleep now, late night on the plane tomorrow.
-
Building "Cowboy Up", a Cheetah Kit
Bigglesworth replied to Bigglesworth's topic in Morgan Aeroworks
Thanks for the comment, Don. It was actually your article in the RAA mag that was the clincher for me buying my plane. You quoted that Bible verse "but they that wait on the Lord shall renew their strength. They shall mount up with wings like eagles.........." Isaiah 40 And when I randomly opened my Bible the night after I read the article, I read that exact chapter. What was I waiting for?:) I was thinking of putting that verse on a placard on the dash, just to always keep in mind who keeps this plane n the air. -
I gotta finish building my plane first. Gimme a break. :)
-
Friends don't let friends take home ugly men Women's restroom Starboard, Dewey Beach, DE Beauty is only a light switch away. Perkins Library, Duke University , Durham , NC If life is a waste of time, and time is a waste of life, then let's all get wasted together and have the time of our lives. Armand's Pizza, Washington , DC Fighting for peace is like screwing for virginity. The Bayou, Baton Rouge , LO No matter how good she looks, some other guy is sick and tired of putting up with her ****. Men's Room Linda's Bar and Grill, Chapel Hill , NC At the feast of ego everyone leaves hungry. Bentley's House of Coffee and Tea, Tucson , AZ It's hard to make a comeback when you haven't been anywhere. Written in the dust on the back of a bus, Wickenburg , AZ Make love, not war. -Hell, do both GET MARRIED! Women's restroom The Filling Station, Bozeman , MT If voting could really change things, it would be illegal. Revolution Books New York , New York . You're too good for him. Sign over mirror in Women's restroom Ed Debevic's, Beverly Hill s ,CA No wonder you always go home alone. Sign over mirror in Men's restroom, Ed Debevic's, Beverly Hill s ,CA ~~~ and perhaps the most realistic one ~~~ A Woman's Rule of Thumb: If it has tires or testicles, you're going to have trouble with it Women's restroom Dick's Last Resort, Dallas , TX HOW TO STOP PEOPLE FROM BUGGING YOU ABOUT GETTING MARRIED Old aunts used to come up to me at weddings, poking me in the ribs and cackling, telling me, "You're next." They stopped after I started doing the same thing to them at funerals.
-
Building "Cowboy Up", a Cheetah Kit
Bigglesworth replied to Bigglesworth's topic in Morgan Aeroworks
Ian is a legend for this Morgan Aeroworks section ;);) -
Building "Cowboy Up", a Cheetah Kit
Bigglesworth replied to Bigglesworth's topic in Morgan Aeroworks
Stits says "USE STITS OR YOUR PLANE WILL CRASH, DON'T JUST USE CHEAPER PAINT" or words to that effect. That is helpful when stits won't paint the metal. I will be fine, Garry's doesn't even have flex in it -
Or if your worried about noise, do the young fool thing like me: have a radio with music input, turn it up loud. All solved. Actually I will put even better than sisal stuff in mine. Only problem is it weighs 4kg per square metre. can't put much in.
-
Building "Cowboy Up", a Cheetah Kit
Bigglesworth replied to Bigglesworth's topic in Morgan Aeroworks
Glad you found the colour, doing better than me there. Do you have any idea of paint types and additive you're using? I am still (weeks) waiting for a definitive answer from the nearest Spies Hecker dealer with a quote. (I want top quality [i bought a Cheetah, obviously I want quality] and he has no idea what to tell me to put over the fabric. I think etch primer with flex-add will do but.....). As to air compressors; I have one on hand. I would give up otherwise. Well......maybe not, but it would be slower. I don't want to find my colour on a car. Small town, someone is bound to say "oh, you copied that beaut ute that whatsisnames cousin bought off whatderyoucallim's uncle" And I don't want to have to say yes. Also I have never seen a colour like I will use. I haven't told all painting details yet. ;) I will try to keep up, but I think delivery times will force me to lag behind. Still, a few months is a pretty quick time to finish a kit. Godspeed with your building. -
Building "Cowboy Up", a Cheetah Kit
Bigglesworth replied to Bigglesworth's topic in Morgan Aeroworks
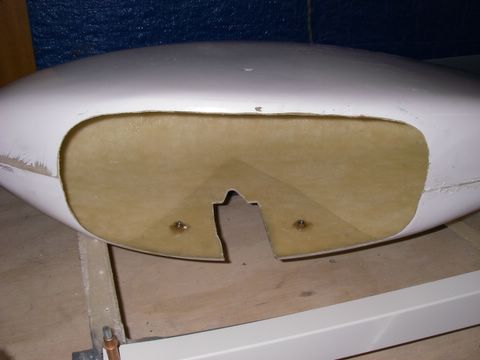
Ail-ing-erons No pics for this forgot my camera. I started on the ailerons the other day, they are the things which make the wings rock. I might get a sticker for it "when the wings are rocking, don't bother knocking" So I started off by putting the wingtip on. This got me the trailing edge worked out. Then I put the trailing edge piece onto ribs 4-7. About now I started thinking I should make sure I could reduplicate this on the other side. Oh dear:;)6:. About 50mm difference in the length of the trailing edge.:black_eye: So now to work out what happened and what to do about it. Eventually I worked out it had something to do with the shape of the ribs and the fact that I had only squared them with a set square. One side was splayed and one inward. But on the bright side, rib number 4, the important one for the the position of the aileron, was the same. So one wingtip will overhang the rib, and nothing else will be any different. Then I measured in to find the position of the aileron mount bracket. It was meant to be 255mm in, but due to various factors, (like the moon being in scorpio with venus rising. I will blame anything) there wasn't quite the space I wanted. And to top it off, the aileron sheet seemed too small as well. Maybe it would fit, I'm not sure.(never am. Unless it is a matter of opinion, then I am always sure.) Anyway, I decided to make it a bit smaller. I can't forsee this having any great effect, maybe slightly less aileron response, but it always had response to spare, and they are still large ailerons. In any case, for 90% of the time, they will be neutral. So I measured to where it would fit nicely, plus about 10mm extra(I hate not having anything to play with and then spending all the time trying to stop things jamming when an extra 10mm would not matter either way.) Then cut the hinge plate to fit, made sure that the aileron would have clearance in the full down position, and clecoed this on. Still can't rivet it since I am still short of countersunk 1/8th rivets. Useless local hardware. And I can't make the ailerons yet, I need some 3/32 clecos which I don't have.'wb' See what I mean about Slarti having it easy? I also spent a lot of time filling and sanding the undercarriage leg. Got it almost done. I got the spats made and fitted. This was a bit of a nuisance. Garry marks the bolt positions on each side as reference points. Very handy, if they would be right.;) In the end I had to slot one hole a bit and put a larger washer on it to hide the slot. His system will make it very easy to take the spats off if needed, even the bolts have the nuts glassed on to stop them turning. This needs to be. I will have to put better tyres on than those 2 ply ones. One of them already went down:sad:. it is just too slow to find the leak, and now it seems to have fixed itself;). Methinks tubes at least. Getting back to the filling of the leg; I ran out of Q cell (not Garry's fault. It is had to anticipate someone spilling it often) and went to get some more. But I couldn't get it in small amounts. So I got some microsphere blend stuff. It works a lot better, heaps easier to work with. And that means less sanding. I also got one side of the cabin lining in. held a sheet against the side, marked it, cut it and it didn't fit. Cut it again and again, now it fits:confused:. I need that soon to mount the motor controls on. When I win lottery. Stop press, some pics. I took them the next day.
-
Building "Cowboy Up", a Cheetah Kit
Bigglesworth replied to Bigglesworth's topic in Morgan Aeroworks
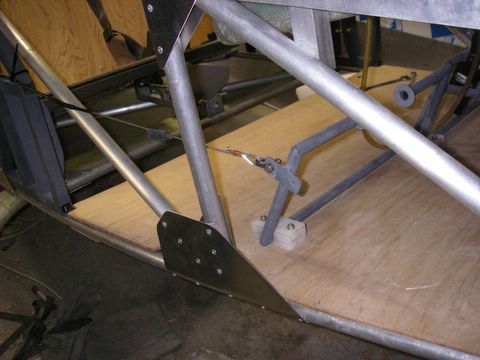
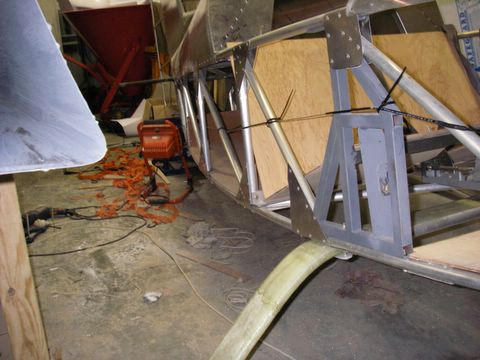
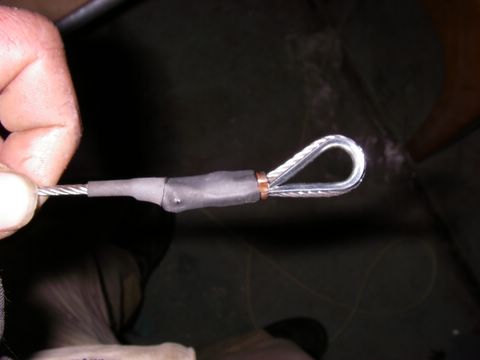
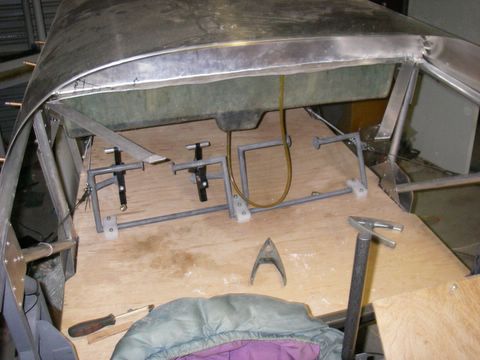
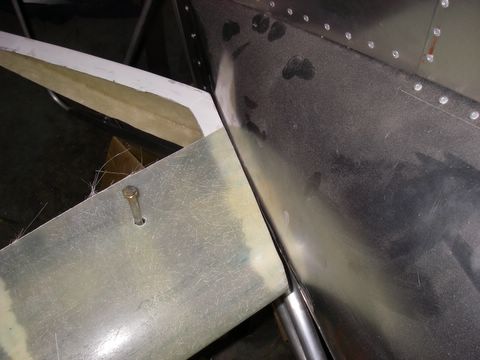
Wagging tails and other funny bits. The rudder now works, this means that I can sit in it and make it wag its tail and make engine noises and imagine that I can fly. . Of course while doing this I am not getting any work done.. So you could say progress leads to a loss of productivity. Something that didn't lead to this scenario was the sanding, filling, sanding etc of the stabilators. This was a mongrol of a job. It took me hours and hours and I never seemed to be getting anywhere. But now they are ready for covering which makes me happy. And covered in fibreglass dust. :;)4: Back to the rudder. It was reasonably simple to route it, then I just cable tied it off temporarily, slightly crimped the rear Nicos and adjusted the front ones to where I wanted them. I made them as far forward as possible so that large people would fit, and small people can put clamp types on the cable. I crimped these slightly to hold them, then took it all off and got it fully crimped. I put heatshrink tube over the cable ends to neaten them up. [ATTACH]3520.vB[/ATTACH] This seemed to work, but the heatshrink was a bit loose, and when it slid off., there was no way it would go back on. I will get some self amalgamating tape for it I think. The crimping worked fine and they fitted again:clap:. But I ran into problems when fitting the brakes because I had set the pedals forwards, the brakes wouldn't fit nicely. I will need 90degre angles for them. I think I mentioned this before and said I would try to get them into future kits; Garry says he didn't need them so I guess it is just my fault. So I cable tied it back into position, and I will get some glue onto the hidden areas as well just in case it tries to move. I also got the instrument panel made. There has been an update since I got mine, so Garry kindly sent me the updated base at no extra charge;););). I had to put the front deck temporarily back on to get the height, worked that out then cut the panel leg off at the right place,fibreglassed it and clecoed it to the new base. All looks sweet. A bit more filling but not as much as earlier. Mounting it was simplish. There are 2 brackets which hold the top to the front bulkhead, and the bottom just screws down to the floor. Of course it feels like chasing your tail trying to get it straight, but no-one will notice it anyway. Especially once the fur trim hides all the gaps. Now I just have to get instruments and switches to fill it. Not so cheap:sad:. Just got a quote from Jab for a motor with options, $15300.:black_eye: And that doesn't include a cabin heater. Will be hard at work paying for that. Had to work the milkings last week for 4 days morning and afternoon, thats why no posts for a while. Was way too tired. I am starting to work out a wiring system for it.;) I should not be left alone with a Jaycar catalouge, the plans I have for it are rather tricky, but they include an alarm system, and various warnings, all at very little cost and weight. And an eventual dual battery for the CD player (maybe even DVD player) driving 2 6 by 9 speakers which should pump;).
-
Building "Cowboy Up", a Cheetah Kit
Bigglesworth replied to Bigglesworth's topic in Morgan Aeroworks
Who wants to take bets on how long it will be before Ian creates a Morgan Aeroworks section? -
Wanted Goat Slaughterer to become Level 2
Bigglesworth replied to a topic in AUS/NZ General Discussion
Do foxes, rabbits, ducks etc count? Especially for someone already a mechanic. I should be home and hosed I think. -
Hey, I work as a lawnmower mechanic part time. I think if anyone can make this real, it would be me. "see it at Natfly next year"
-
My sister looked at a horse which was resting 2 diagonally opposite feet: Shouldn't it fall over if it only uses 2 feet?
-
Building "Cowboy Up", a Cheetah Kit
Bigglesworth replied to Bigglesworth's topic in Morgan Aeroworks
That looks like one sweet plane on the up and coming. Mine feels old already (jk). Also with Tim's professional help, you have got excellent build quality there. If I was an investor, I know which company I would pick to back. I think it won't be long before Morgan Aeroworks will be large player in the field of recreational aircraft. I got my propellor today thank you very much, it will be turning a bit later than yours I think. Not that I work slower, but I have to wait for all my individual extras whereas you can get them off the shelf. Lucky ba....... -
Just "climb like a Sierra" Enough said
-
Just got some pics of the sierra from Garry today. Looks excellent, won't be long now.
-
Most of them can be answered, The most relevant here is Why do Kamikaze pilots wear helmets? Um... they are attached to their goggles which they had to wear to see in the slipstream. Makes sense when you know. Funny anyway, And when you know the answers it is more funny to laught at the minds which boggle at these Questions:laugh:
-
That bloke in the photo either is not the involved or has good insurance :).
-
Building "Cowboy Up", a Cheetah Kit
Bigglesworth replied to Bigglesworth's topic in Morgan Aeroworks
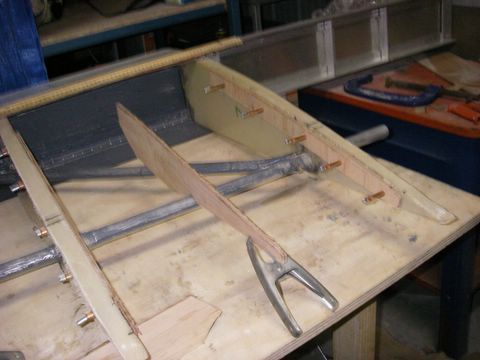
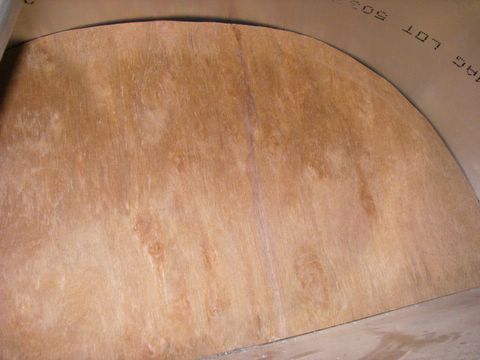
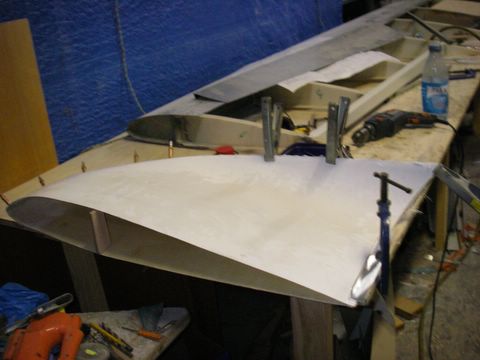
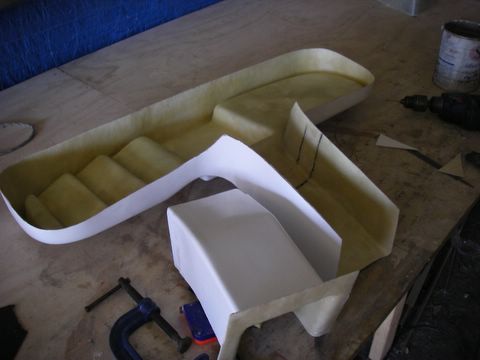
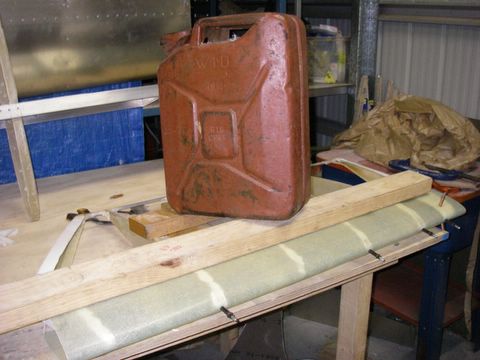
The front of the back Now that I have set up the stabilators, I can now build them fully, then balance them, then the rear of the plane is finished to covering, Yee-ha!! The leading edge of the elevators is a sheet of fibreglass. Simple to fit, just put clecoes wherever neccessary to hold it on reasonable, put a board over it with a weight to hold it together, and fibreglass it together. Easy as 3.14 (pi) When I had put the stabilators on, I noticed that there was almost contact between the side of the stabilator and the fuse. So I had to take a bit off the stabilator. This meant that I first had to put a few layers of chop strand in the corner that I had to trim. It ended up alright. [ATTACH]3421.vB[/ATTACH] The outside end of the stabilators are tapered down. This plays merry hell with the leading edge sheet. It can be held down with a multitude of clecos, but it still witt have ripples. Apparently the fabric pulls these in so they are not to be worried about. I set it all up, then roughed up all the areas to be bonded, mixed up some Q-cell and stuck it together. I love Q-cell, it always reminds me of Sci-fi books; they always have a Q switch or Q factor or something Q in them;) So that was left to set. I was worried about the clecoes being stuck in, but they came out fine. [ATTACH]3420.vB[/ATTACH] I rough trimmed it with the hacksaw because there was lots of overhang, then rough sanded the rest with the flap wheel. it then needed a filling of gaps with more Q-cell. I will sand it smooth tomorrow. I even got the 2nd one done today, it went just as easy as the first. Filling, sanding and then fabric time. That will be fun:).
-
Long Live Bundy Ginger beer 'be' 'The beer you can, and should, drink and fly' Good story, will help a lot of newcomers realise what its like. Most people have no idea before they start. Hope you are flying soon
-
Melbourne cup might be rescheduled now :( see how horses sneezing can affect the lives of recreational pilots. Isn't life full of twists and turns? I'll still be there, horses or no.
-
I'll be in it if I get my plane built in time for my leg, but I think the south coast of NSW is pretty well covered already. I'll just have to get it later. BTW what happened to the Pist'n broke trophy? wasn't that the same sort of thing? It suits me a bit more.
-
Building "Cowboy Up", a Cheetah Kit
Bigglesworth replied to Bigglesworth's topic in Morgan Aeroworks
Something else I might warn future builders of: don't set up the root rib too close to the fuse. The sheet can hang over bit and that way the rivets in the rib aren't too close to the edge. Like mine are.:black_eye:. Borderline I should say, they will do and I don't anticipate cracking, but an extra 10-20mm would have been good. -
Building "Cowboy Up", a Cheetah Kit
Bigglesworth replied to Bigglesworth's topic in Morgan Aeroworks
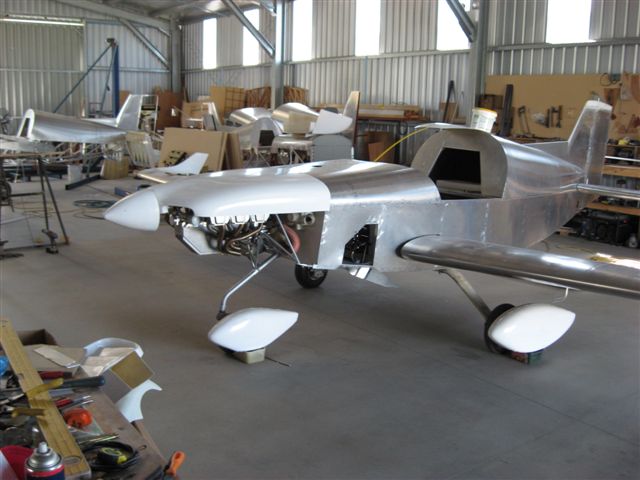
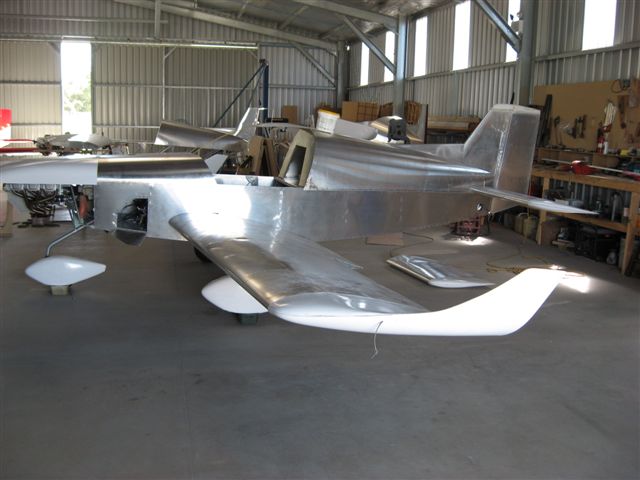
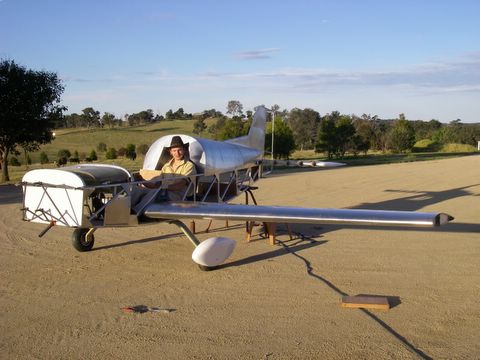
flapping things I finally can make it flap its stabilators. This is a really big step forwards since it meant that I can sit in my plane, make engine noises, play with the controls, AND THEY ACTUALLY DO SOMETHING, it is just like its finished then:). Playing aside, time to do some real work. The stabilators are built around a piece of 40mm tube which slots over the steel tube which is held to the plane. The stabilators are held on by a bolt stuck through them and the steel tube. It is not tightened up, so it can be long enough so it can stick through the skin and be removeable, that makes the stabilators removeable for small doorways. Interesting note, the distance between the outer extremities of the stabilators when fitted is just under 2.7 metres. I think Garry, as an ex-chippy would have know that a standard roller door is 2.7 metres, and thoughtfully made it so it fits. He likes to make it easy for people. This bolt which holds the stabilators on has to be tight. That way it will stay in, and totally stop movement. First the plating has to be sanded off the stem since this will wear off otherwise leaving a gap, then the hole has to be reamed to exactly the right size so the bolt has to be tapped in with a hammer. Now to find a 5/16th reamer to borrow off someone is rather difficult; no-one has one that small. So I had to buy my own for just this job. Cost me $35 off ebay. If anyone want to borrow it for building a Cheetah, let me know, I don't need it anymore. So first I positioned the stabilators. I put the joystick in the neutral spot, not too fussy, there is plenty adjustment in the cable, then set the stabilators (any shortening for stabilators? takes too long to type:sad:) in the neutral position. They sat a bit loose on the tube, so I wanted to put some aluminium tape around it to hole it tight, but I didn't have any, so insulation tape will do for now;), better change it before I fly it. But on the other hand, it will probably work just as good. The normal way to set up the stabilators is to set a straight edge across the trailing edge and drill it there. But I found I could sight it better. [ATTACH]3390.vB[/ATTACH] Thats Lex in the background Then I found that that was wrong too. I had made a slight (3-4mm) twist in one side, and a straightedge would carry that twist into the setup. That is, if one side is out by 4mm in one metre, over 2.64m, it would be out about 10mm which is a lot too much. So the way I worked out to level them was to look from the back and line the trailing edges up with the main tube, and adjust them so they both lined up the same. That way errors can be averaged out and not talked about:confused:. [ATTACH]3392.vB[/ATTACH] It isn't too bad. So then the neccessary prayer before any major work, and drilled it. This was the first hole in the plane which needed a pilot hole, but I had a 9/32 drill as a final and any wobbling would go too far. Then came the real annoying part: I knew that the 9/32 hole needed very little reaming since I had tried it out on some scrap, but I didn't know that with a lot of tapping, the bolt fitted into this drill hole. I didn't need the reamer after all:clap:. Actually, it might be a bit too tight; it went in alright in the afternoon sun, but when I took them out it was in the evening and a bit cooler, it needed a fair wollop to take them out, that would look good; wacking your plane with a lump hammer:laugh:. The other side went in much the same, only, of course it can't all go well, both bolts are at noticeable angles to the side, my drilling was a bit out. Oh well. Change subject,,,,,,, don't you think it looks like Frankenstein??? [ATTACH]3391.vB[/ATTACH] While I had the plane out of the shed, I couldn't resist putting the wing on it to see if (cross that out) HOW it fits. Actually it is good. See I marked it with the trailing edge too high because thats how it wanted to sit, then I allowed for a packer under the drag spar mount which evened things out; it sits about perfect. Talking of putting the wings on; I asked Garry how important it is to get the wings square, he said I could measure from the centre of the firewall, and if they're withing 3 foot of each other at the tip, she'll fly beautifully. Now that's the sort of building I can do ;);). I had to cut the seat around the drag spar but that was easy enough, then I got to sit in it and play wonderboy aviator (all Spike Milligan fans will know that that is a twisted quote from the Goon Show, very funny show that was). So I got to sit in it, with some temporary upholstery and check out how she feels and: :;)7::;)7::;)7: she does it for me already, and she's not even built yet, let alone flying. [ATTACH]3393.vB[/ATTACH]