Bigglesworth
-
Posts
379 -
Joined
-
Last visited
Content Type
Profiles
Forums
Gallery
Downloads
Blogs
Events
Store
Aircraft
Resources
Tutorials
Articles
Classifieds
Movies
Books
Community Map
Quizzes
Videos Directory
Everything posted by Bigglesworth
-

Building "Cowboy Up", a Cheetah Kit
Bigglesworth replied to Bigglesworth's topic in Morgan Aeroworks
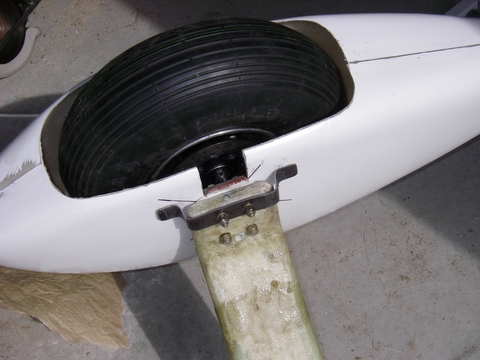
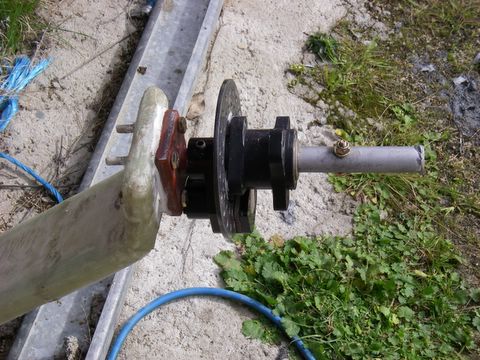
Them things what go round and round and flat. Wheels are neccessary on an object designed to sit on air.;) However, they are not very important to me since I hope they will not be used too much, I want to stay up there if I could:big_grin:. I have told you about when I fitted the axle stubs to the leg, what I didn't tell you is that I forgot to coat the stubs with vaseline or similar and now I have Buckleys and none of getting them off. Not that this is neccessarily a bad thing, but I wanted to be able to. So I have them tight on. I then slid the brake system over it. I got the disc brake option for a few extra dollars, but I am the first one to do so, so there were teething problems which didn't matter too much. Garry has been very good about it; when the spacer tube which holds the wheel on was too short, he made me another one the right length, so that sorted out easily. The whole brake assembly is held on by a tube over the axle which has a bolt through it. To get the last bit of movement out of the assembly, I slid the caliper back over and held it tight while I did up the grub screw. Not that it wants to be tight, but it needs to be firm. The spat was next, this has one bolt at the front which screws into the end of the spacer, and two at the back which hold it to a bracket which needs to be bent to shape. The centre holes are marked out on the spats so they work for reference points, I simply measured the shape of the cutout, marked it and cut it. It fits snug, and it easily removeable to change a tyre. (quite likely occurrence seeing they are 2 ply tyres. Um... bindis?) The bracket at the back is made from a bit of steel flat, a bit of a nuisance to bend, but I soon got used to the large radius curves it makes. I will still do more on the spats later to lower wind resistance. While I was working on the brakes (they are BX1000 brakes by the way, independant toe hydraulic, good/better than GA), I looked at fitting the brake line to the master cylinders. Uh Oh. Problems. The fitting is on the bottom, roughly where the floor is. So either drill a hole in the floor (possible, that would hide the lines) or find another way. I slid the cylinders as far up as they would go, still not enough, it would crimp the brake line quickly, so I think I will have to buy some 90 degree angles, and maybe still need to carve a bit out of the floor. If this works I will tell Garry and the chances are the next kits will have all the neccessary parts.
-
Building "Cowboy Up", a Cheetah Kit
Bigglesworth replied to Bigglesworth's topic in Morgan Aeroworks
All over again As I said, by the time the 2nd wing is done, it is getting monotonous. On the other hand, new mistakes are always cropping up so there is always a new reason to make a plane builder realise that he is still nowhere near perfect. I have got the 2nd wing D box drilled, cleaned up and countersunk/ dimpled. And that horrible deep scratch taken out of the sheet. Yes, one of those things which make you mad. I was innocently drilling holes in the wing thinking how easy this plane building lurk was, when IT happened. I was drilling near a strap. These straps are plenty long and have a lot of overhang. The overhang was right next to where I was drilling. And you can tell where this is leading.......... I caught the strap with the drill when I was about halfway down the hole.The drill bit bent but it was still able to deeply score the sheet about 30mm from the hole towards the the rear. I spent over an hour with the file, then 60 grit then 150 grit then 400 to get it smoothed out. Now it is weak around one hole, but at least it won't crack. Also it is in a place where I can keep an eye on it and if it starts to play up, I will put some paint over it so I won't see it ;):confused:. I didn't meant to say that, but someone stole my delete key:;)1:. So I got the 2nd D box done, no pictures, you wouldn't be able to tell them from the last lot. A few interesting new points. This time I focused on getting the sheet sitting hard against the ribs before I drilled it, also I put about 5 rivets per rib on the underside of the leading edge. I will be interested to see if this makes the sheet sit perfect without any ripples. Will let you know if it does. (if it doesn't, I'm not telling anyone I went to all that work and still failed to get it right:)) I ran out of rivets the other day as well. This is not really Garry's fault, I used countersunks in a lot of places where he allowed for Unis. And I probably closed the spacings by about 2-3 times what he has; he is pretty mean with rivets while I am the opposite. So I need about another 400 or so which should turn up on Friday. Hardware takes too long :;)1:. This time I got the bend right on the sheet. I waited until my boss had time to help me, and we did it slowly, probably fitted it about 5 times at least before I was happy that it sat right. I took a photo of the last time to show how much it needed.The real killer is the differential in the root and tip. By the way, My boss got his GFPT on Saturday 'be'. Everyone say Good onya Lex. He reads this forum although I think he is yet to make a post.
-
Good old Bugmenot try name:[email protected] Password:password that'll get you in
-
Try Bugmenot and see if it is on there, I will check
-
Building "Cowboy Up", a Cheetah Kit
Bigglesworth replied to Bigglesworth's topic in Morgan Aeroworks
Glad people like to hear me speak, they normally tell me to shut up;). Over 1100 hits, thats the most attention I've got since.....um.....well...... better not talk about that. Seriously though, my posting here might take a fair bit of typing time, but it means I have a whole bunch of experienced people out there to help spot mistakes before they become fatal. This is important to me since I will not be able to get a professional to check it out before I cover it (the nearest is too far away) and I am by no means a professional myself. So it is mutually beneficial to me and the readers, and that is the way the world should be,;). -
Building "Cowboy Up", a Cheetah Kit
Bigglesworth replied to Bigglesworth's topic in Morgan Aeroworks
Too cold I tried doing some more work on Tuesday, but it was too cold. I have found a poem which describes my feelings entirely, just see if I can post it. " WINTER " a poem by Abigail Elizabeth McIntyre Sh*t! It's Cold ! There was a winter pic with it, but not worth including. Hope no-one else suffers from it like I did. PS, I got a bit done, but not enough to write....um....(not home) about. -
With a handle like yours, was you medical cancelled because of insanity?. You'll fit in with us.;)
-
Building "Cowboy Up", a Cheetah Kit
Bigglesworth replied to Bigglesworth's topic in Morgan Aeroworks
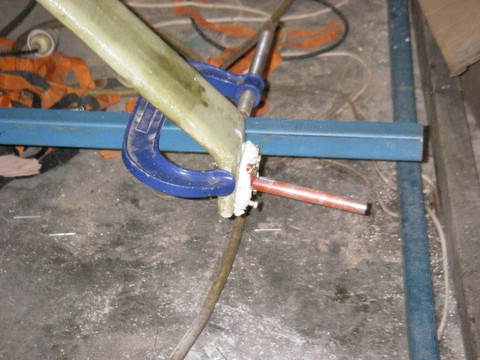
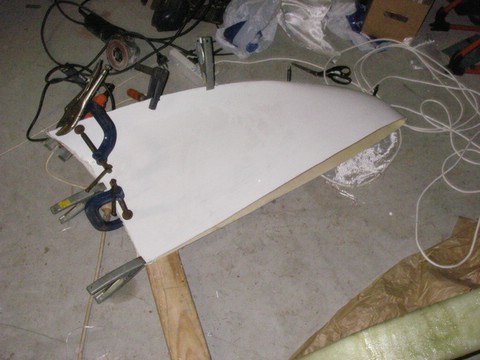
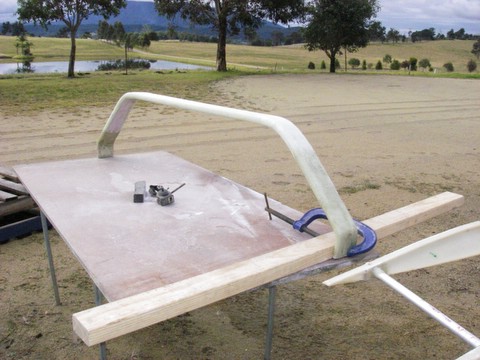
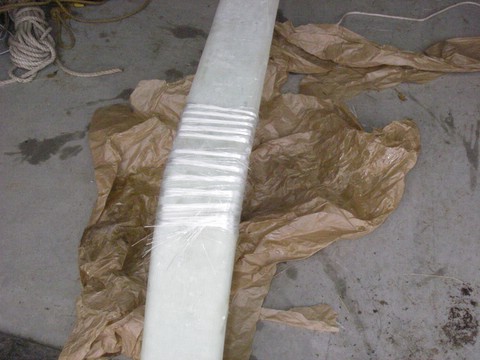
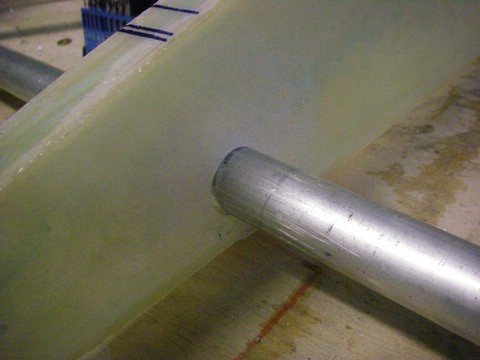
Nice legs............ Something else I did over the weekend was set up the axles. Pretty simple. I mounted the undercarriage, then fixed the axles loosely to it. I already had drilled the holes for mounting the axles, but I had drilled them straight when they needed to be sharply angled down, wriggled the drill until it was right. The angle for the axles is 1/8th forward at the tip, and 1 inch down. I set up a bar underneath it to sight forwards to, and I clamped a bar to the side to sight the up and down. [ATTACH]3344.vB[/ATTACH] [ATTACH]3345.vB[/ATTACH] All was set to fill in behind it with bog, but my mind was too cold/late at night. I mixed up the wrong bog (polyester instead of vinyl).'wb' Luckily I realised before I put it on the leg, but I still didn't want to waste the bog, so I used it to finish up the wingtip I started on the other day. (did I tell you about that, can't remember). picture from earlier [ATTACH]3346.vB[/ATTACH] Then I mixed up the right bog, and spread it behind the axle mount. Moved the axle so it was touching at the bottom but angled too far down, then I slowly tightened the top bolts up until it was right, and did the same on the other side. Now that I see it, I probably took more out of the leg than I had to to fit the brake line: the bog keeps it out about 10mm. So now it has some legs, but there isn't enough space in the workshop to leave them on, I keep tripping over them. Actually with the green legs (I haven't filled them with Q cell yet) it looks a bit like a frog. Just don't tell Garry I said that. ;) [ATTACH]3343.vB[/ATTACH] I also got the rudder cables worked out, forgot to take pictures though. It wasn't very hard, I just worked out where they were meant to go, cut a hole in the cargo bay back for them, cut pieces of tube for them to run in beside the frame, a bit of extra tube where the load is, front and back, then positioned it all up. Crimped the back first, then worked out where it felt right and crimped the front. Crimped, that is, with the pliers. I will undo all the cable ties and take it to someone who can do the job properly for me. Then it will be able to wag its tail to show how happy it is to be built.:;)4:.
-
Building "Cowboy Up", a Cheetah Kit
Bigglesworth replied to Bigglesworth's topic in Morgan Aeroworks
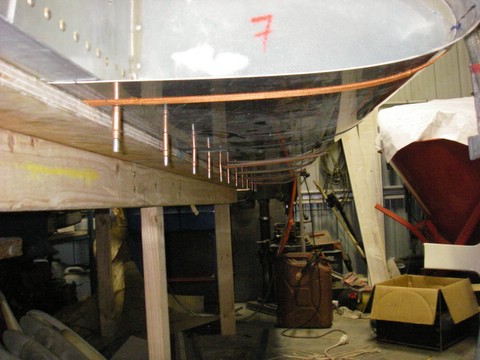
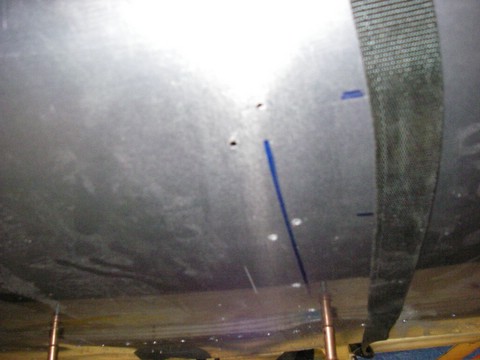
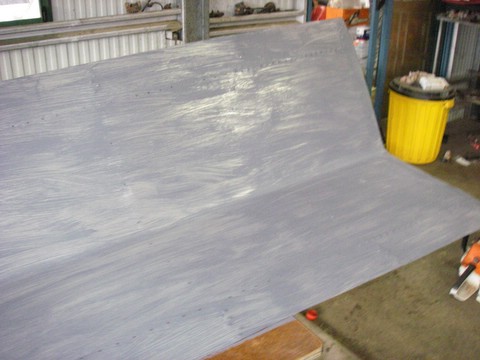
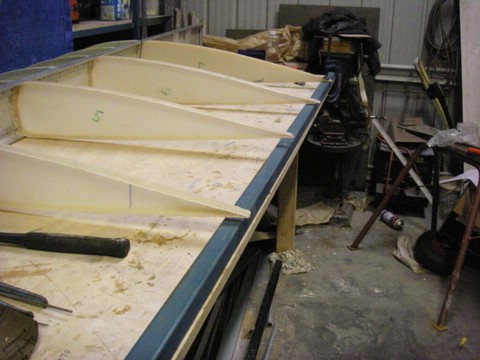
More about da box So last Tuesday I left the wing sitting there all ready to be drilled. When I got back last weekend, I first checked that the washout hadn't moved. Of course during those days, the water in the level had changed so I had to readjust that. It was in doing this that I realised that I had made a grave error the other day; the water level at the tip is used to measure the washout, I had set it up with the water mark level at the front of the bench, and measure at the back. measuring about 600 away at funny angles is very susceptible to parralax error, I was out by about 4mm. Shifted the water line so it is level at the back (easy to line up) and measured at the front (hard enough when you can get to it). So all was set, BUT: the only thing holding the wing in position was its own weight on pieces of packing, so drilling from the underneath was likely to disturb it. So I started on the underneath knowing that I could still adjust it before I did the top. Ever tried to drill over a hundred holes upwards? from sitting position? My arm was very painful at the end. But I got it done, and clecoed. Well, just clecoed, I only have 20 clecos of that size, hardly enough for a 3 metre wing. [ATTACH]3337.vB[/ATTACH] Anyway, so I set the wing up again, it hadn't moved much (maybe 1-2mm), then started drilling again. Once I had the top side of the spar drilled, I could loosen off the ropes one by one to get to the ribs and drill them. Now that is easier than it sounds. Being fibreglass, the ribs are slightly flexible and could be anywhere within 50mm of their correct position. Actually they all were OK and I was worried for nothing. What I should have worried about was that I would not notice the rib because it was so thin, think I missed it and drill another hole beside it before I realised that I was right the first time. [ATTACH]3338.vB[/ATTACH] Bugger.:black_eye: It is all covered with fabric so it don't matter.:;)2: Well it doesn't matter compared to the next problem I found, I should have rechecked the ropes before I started drilling; they must have stretched slightly since I had set them up, now the sheet was about 5mm away from the rib underneath.:;)1:. I didn't like it but too late now, just held it down and drilled it, tried to cleco it, but they don't exactly hold in fibreglass, so I just had to assume the set amount of rivets would do. Once I had drilled all I could get to, I shifted the wing and drilled all the rest. There was only the trailing edge ribs which I couldn't get to, and I figured they couldn't move much if there was no load on them. So...... All holes drilled. And there was a heap of them too. That sounds like logic: what sheet has the highest stress on it? So what sheet has hundreds of holes drilled into it? . Maybe they work on the principle of the Salada crispbread: it will never break on the perforations..;). I took the sheet off (gently, if I ruined this sheet, it was a new wing; no hope of picking up the holes again) then started cleaning the holes up. Inside of the sheet was just taking off all the dags, then from the outside I had to dimple some holes and countersink the rest. The dimpled holes are where the sheet attaches to the trailing edge ribs, this is covered so it doesn't matter it it sits a little proud. Where it attaches to the spar between the root and next rib, it is meant to be unis there. But I am fussy, I put dimpled countersunks, then had to countersink the spar. All the extra work for a little less resistance. Then I wanted to have some metal protection on the inside of the D box where I couldn't see it to monitor corrosion, so I painted the whole lot with etch primer. This is meant to be sprayed on, but it wasn't worth getting the spay gear out for, so I brushed it on since no-one will see it. probably only got 50%coverage on the first coat. [ATTACH]3339.vB[/ATTACH] But by the 2nd it was OK. I then roped it back up. Set the washout up again and started rivetting. I started from the leading edge where I figured that if I had to drill them out I wouldn't hurt the fibreglass, and it was still laterally moveable once the were attached. I soon realised what I had expected: there weren't enough rivets in the ribs to hold it flat. Either that or I hadn't done a good enough job:sad:. Too late then, I finished rivetting off the rest, then turned the wing over to get a better look at it. Agreed with myself that it needs more rivets, so I drilled some more holes and fitted about another 2 to each leading edge. When I drilled these, I had the air duster on them to blow away all swarf so that none got into the wing. The sheet still ripples slighty in places, but not too bad. [ATTACH]3341.vB[/ATTACH] Talking to Garry later, he said his also has some ripples, he said that he has seen it done perfectly, but it required the use of at least 150 clecoes. A bit different to my 20.:). Anyway so it is on, I am happy that I got the washout right, and its sits reasonable. What more could a plane builder want? [ATTACH]3342.vB[/ATTACH] [ATTACH]3340.vB[/ATTACH] Now I have to do the other one, more of the same headaches. I don't know whether to get it perfect or keep the plane symmetrical, I think I will try to get it perfect and end up symmetrical anyway.:confused: Thats the problem with the wings: there are 2 of them. It gets boring by the 2nd one. Something tells me I have a short attention span.
-
I agree with that, regulation needs to be there, but the question is; how stringent will it be. If it is just red tape, it will only stop the honest people. However, if it is governed by RAA and not CASA, it should be alright:).
-
Building "Cowboy Up", a Cheetah Kit
Bigglesworth replied to Bigglesworth's topic in Morgan Aeroworks
All suggestions will be considered. Thanks for posting. When the D box is tied on, the only thing stopping the spar from twisting is the friction between the d box sheet and the ribs. This is not much and easily allows the wash out to be adjusted later. I had to move the trailing edge about 25mm from where it naturally sat to where it had to be. This needed negligible force to move. Now that I have put the d box on, it is hard to move it 5mm either way from where it was set up to. I will tell you all the full story tomorrow, I'm too tired now. Local dairy farmer needed a hand with the morning milking on saturday so I was working from 6:15am and only stopped working on my plane at 2:00 this morning. Slept in big time this morning, but I still need more sleep. If there are any interrogation officers out there who want to legally use sleep dep. just give you prisoners a kit aircraft. -
2nd Question, Answer: you have just lapped the last bloke, no idea what position you are in.
-
I found this on another site, During a recent business trip to Boeing's Everett, Washington, factory, I noticed several 747 and 777 airliners being assembled. Before the engines were installed, huge weights were hung from the wings to keep the planes balanced. The solid-steel weights were bright yellow and marked, "14,000 lbs." But what I found particularly interesting was some stenciling I discovered on the side of each weight. Imprinted there was the warning: "Remove before flight." Maybe thats what j:censored: ultralight engineers are neglecting
-
Building "Cowboy Up", a Cheetah Kit
Bigglesworth replied to Bigglesworth's topic in Morgan Aeroworks
I got it tight with next to no bubbles in the end, would a vacuum have made it still stronger? I can't see it doing so since I left no space where a vacuum could hold it further in. It probably would still have made it easier though. So do you leave the vacuum running until the glass starts to set or just to get it in position? -
Building "Cowboy Up", a Cheetah Kit
Bigglesworth replied to Bigglesworth's topic in Morgan Aeroworks
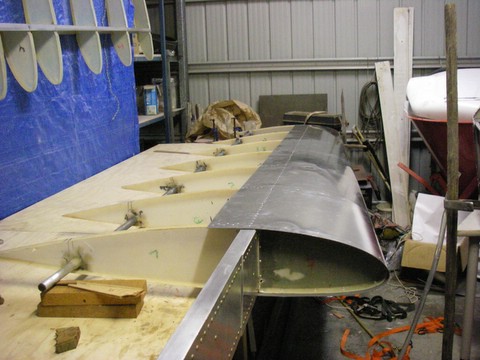
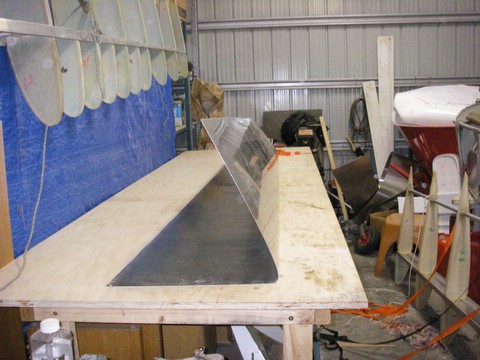
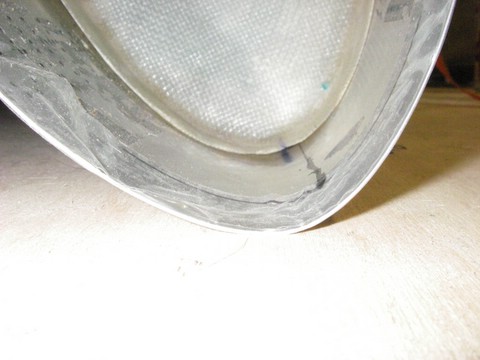
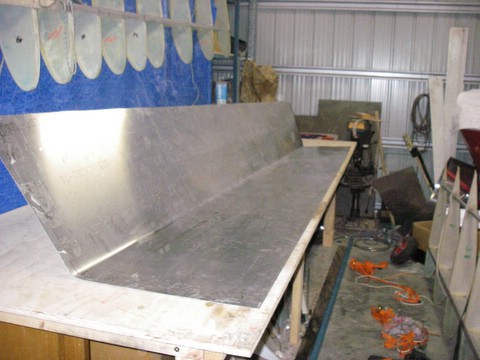
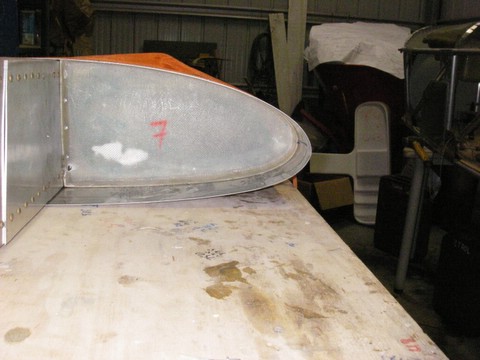
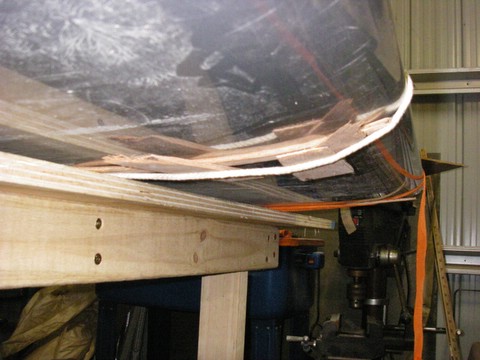
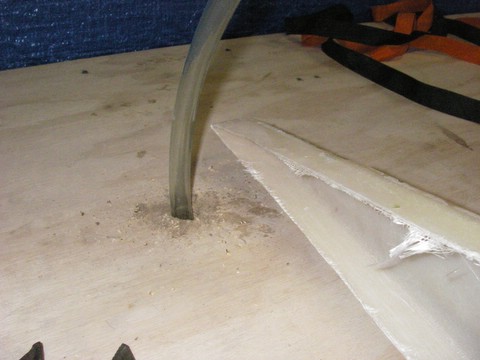
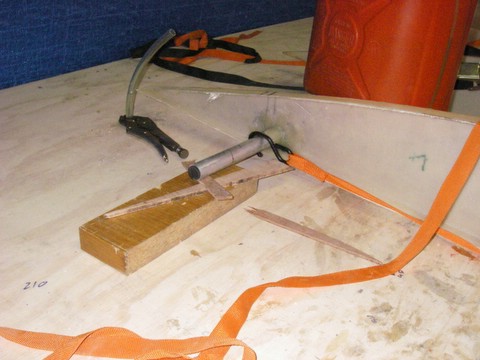
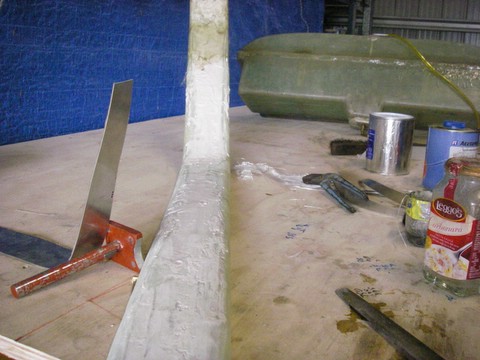
D box or Da B**ch So the wing looks like a wing, all it needs to make it stable is a piece of sheet aluminium wrapped around the front. I like the sound of that, nice and easy. So first, cut out the shape of the sheet. Thats not too hard. Well, not if you are not crammed for space, and carrying a sheet by yourself and get a horrible little dent in it. Ok so that will have to be flattened out, or at least flattened in and the rest filled. The sheet is covered with fabric anyway. So the shape is cut out, now it needs to be pre-bent. I made up 2 bits of scrap with the profile of the ideal bend for the root and tip rib, so now I know what the sheet should look like. To bend the sheet, 2 people are needed. Well unless you are the only one there and are too impatient to wait for help. I pre bent it myself. Got it almost right (I thought anyway). So then I fitted it to the wing. I had bought a handful of cheap ratchet straps to pull it back with and thank God I did. I still had to use a couple of ropes and I never got these anywhere near as tight as the straps. Even when I raided my bosses supply of tie downs, I still had to use one rope. Anyway, no matter how tight I got the straps, the bottom still wouldn't come up to the rib. Rang Garry, "how close does the sheet have to be to the rib" he said pretty close but I might have to pack it out with wood. Started doing this, but needed too much wood, figured it needed more bending, I did that myself as well, and being annoyed at having to pull it off I gave it a good bend. Mistake.:black_eye: [ATTACH]3299.vB[/ATTACH] I put this on and the leading edge wouldn't pull in. [ATTACH]3300.vB[/ATTACH] So I had to unbend it. This needed two people. And was still very difficult. And took about 4 tries.'wb' [ATTACH]3301.vB[/ATTACH] I still unbent it a bit more after this pic was taken. But then I made up a feeler gauge buy fileing a rivet tail down, and when I couldn't fit about 0.75mm through the gap at the front, I figured it was good enough. I generally work to 1mm accuracy. ( about 10 times GA standard):;)2: [ATTACH]3302.vB[/ATTACH] So now, a day too late, it fitted not too bad. I still had too fit a few well placed pieces of wood. [ATTACH]3303.vB[/ATTACH] Then I had to set the wing up in a spot where I could get to the spar top and bottom to drill it. It balances with the spar just over the edge of the bench so I set it up there. Of course I didn't fit a waterline there so I drilled a hole in the middle of the bench to put the waterline through. Sounds a bit extreme but iots my bench, I can do what I want with it:confused:. [ATTACH]3304.vB[/ATTACH] [ATTACH]3306.vB[/ATTACH] I then blocked up the drag spar at the root and tip until I got the root level, and the trailing edge of the tip 18mm up. [ATTACH]3307.vB[/ATTACH] [ATTACH]3305.vB[/ATTACH] The exact wash out isn't important, it is only important that both wings are the same, otherwise it is only good for circuits. In one direction;). So before I fitted the ribs to the spar, I held the two tip leading edge ribs together and marked the same reference point at the front on them, and did the same with the root. Now I just have to get the other one with the same mistakes and it will fly straight. Talking of mistakes. I got ANOTHER dent in the sheet. Don't ask me how, I just noticed it later on and was extremely annoyed. I still haven't drilled the sheet yet, it was late when I finished setting it up and I didn't want to do anything that critical that late. So I am trying to thing of problems now, before I make them on Friday. Help me brainstorm, I have got the sheet tight to the ribs, have got the trailing edge lined up, have the washout 18mm up at the tip trailing edge....... What more do I need? Actually I need more Clecos; I only have 20 1/8th clecos and something tells me I wish I had more. But 10 either side should hold it. especially if I don't move it. I also will need more countersunk rivets. The kit supplies uni rivets for a lot of work, but I preferred the countersunks and used them up there, now I will need more. Also, after I drill it, I have to take it off and clean it up (do the counter sinking/dimpling etc) and while I do that, I want to coat the inside and the spar with primer for protection. Despite all assurances, I want to be sure of the D box since I won't notice it if it corrodes. I will just use a bit of etch primer, since it really doesn't need anything so that should do. The inside of the D box is pretty special in as much as once it is fixed on, there is no getting inside it. (Adam Sandler impersonation "And not many people know this, but you can hide your weed in there:laugh:")
-
Building "Cowboy Up", a Cheetah Kit
Bigglesworth replied to Bigglesworth's topic in Morgan Aeroworks
Fool tank and other fibreglass disasters {The updated fuel tanks are a lot better, don't let this put you off} The fuel tank is comes in 2 pieces which are meant to fit together but don't really. The instructions say 2 layers of cloth to join it. So cut tank to make it fit, sand up area to be bonded, then fit fibreglass. Nice and easy. There one fuel tank. Only problem is that it leaks like a sieve. Check instructions. 'When fuel tank leaks, put a patch of fibreglass on it" so I did. In the general area of the flow anyway. Got annoyed when it leaked for the 5th time. Painted the whole of the join with resin. Thats better, only a few leaks. And no more resin. Now if you've ever tried to get vinyl ester resin in small quantities, you will know the difficulties. Nearest shop is 3 hours away in Canberra, and then they had to get it from Sydney.......... Anyway, I finally got some, and started patching again, this time thick resin. It did eventually look like a bond, and at last count there was only one small pinprick. It was then that Garry mentions that the best way to do it is to put down 2 layers of cloth, then give it 2 coats of resin; isn't it obvious? Now that makes sense. Anyway the end is in sight. That probably doesn't interest you since it was all my fault and there is a new tank design now anyway, but it frustrated me so much that I had to tell someone:;)4: The other thing which needed the vinyl ester was the undercarriage leg. It has to be first cleaned up, then covered with cloth, some uni glass around the stress areas, then filled and sanded. I just gave it a rough down with the rasp, got all the bubbles out, then put the cloth and uni on. Mistake. First, it should have been sanded to a streamline shape. And when it has the sharp corners, the cloth won't follow it and bubbles big time. So it was either try to fill it or start again, and as you know I am fussy with some things. So one fine day I hit it with the flap wheel in the angle grinder. Took off all that I had done before, and a whole lot more. Smoothed out all edges, and tried not to weaken it too much. Then I filled it BEFORE I wrapped it. This meant a lot less bubbles in the cloth, and a lot more strength. I put more uni around it and wrapped it TIGHT this time, it couldn't come away. Now it looks better. Of course, just that day I wrapped it, I spoke to Garry and he said that it need more uni. Oh well. It can go on top of the cloth. Then I still have to fill and sand it. And fit axles and wheels to it.
-
Building "Cowboy Up", a Cheetah Kit
Bigglesworth replied to Bigglesworth's topic in Morgan Aeroworks
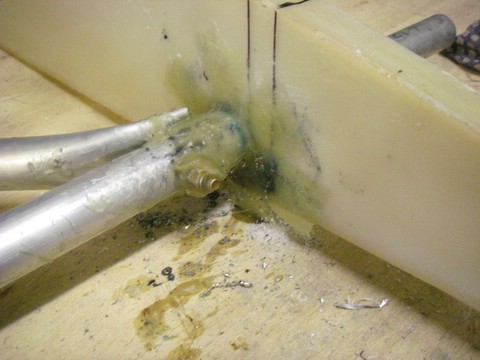
On a wing and a prayer. So the next step was to finish fitting the drag strut by the simple expedient of drilling a hole and putting a bolt in.;) Actually the bolt also had to go through the drag spar, and had to be in the right spot. The spar has to be spaced right so it has the right amount of overhang to be able to fix it to the fuse. And of course another 10mm because it looked like one of those thing susceptible to the disease of shrinking while you while you work with it;). So I had that in. Then I had to set the ribs up at right angles (they were at all sorts of angles, none of them at the 'right' :confused: angle) And then I marked where they sat on the spar. Then I took the drag spar out. Ever tried to pull a rod out of 7 tightly fitting holes in ribs which insist on jamming? Well I can tell you it is not easy. So it was out. Then I got a piece of 60 grit paper and scratched my nice spar. This flies in the face of what the rest of construction is, but the fibreglass has to be made to bind somehow. I was very careful when doing it to only score along the tube, across leads to mild cases of death, cureable only by resurrection:black_eye:. While I was getting into this scratching thing, I also scratched up the ribs (and then I started scratching all over as you do when there is fibreglass dust around:laugh:) Actually I forgot the ribs the first time, put the spar in, then had to take it out again, now wasn't that fun?:;)4: Anyway, so spar is in, everything is scratched, cd player will be alright for the 2 hours I will have fibreglass on my hands (Dire Straits can alway go around a few times), Ready to start glassing. First, I cut a stack of 1x2 inch pieces of chop strand. These are glassed at a right angle between the tube and the rib. 3 per layer (actually it should be 3.14, but budget cuts, you know :;)1:) So mix up resin, start work. I soon realised that a neat job was impossible and let it get everywhere, I cleaned it up later when it was still not fully hard. So. 2 layers of glass, both sides of the rib, 7 ribs, leaning close to the job to see what I was doing,,,,,, I get high on building my aeroplane:keen:. While I had the resin out, I also mixed up some cotton floss (strong paste) and gummed up the drag strut bolts. Now they will never come loose (and what did they say about the Titanic? I will add 'if God is helping me' and that will make all the difference) So, now the same thing to the other wing. Sounds simple, hey?:) Actually, it was almost just as hard, there is always some new problems, but nothing worth writing about. Anyway, that was the easy part as I later found out.... On a side line, the steel inserts had traces of rust in them. So I soaked them in Lanox (lanolin based anti-corrosive), then to keep it in, I put a rubber plug in the end. Just that morning my boss had got some plugs he mis-ordered and wanted to get rid of. And they look professional too.
-
Building "Cowboy Up", a Cheetah Kit
Bigglesworth replied to Bigglesworth's topic in Morgan Aeroworks
Ok, so who's winning? You may have a motor, but I have a tail, cargo bay, floor and a fair bit more (just wait for today's installments) Wings you are just ahead of me, but maybe not for long. We'll see. Thanks for posting anyway. It is good to know what the competition is up to. What else make it the Mark 2? Winglets (I like them) raised turtle deck (not for me thanks). Anything else I will get jealous of? PS You made the same mistake as me, and Garry in his prototype: Look where the front cargo door will be fitted. You will have to trim that gusset on the front side. Just like all of us -
To anyone who thinks they are not computer literate
Bigglesworth replied to Admin's topic in Aviation Laughter
Help desk in Canada: Press Ctrl A Canadian caller: So I press Control, eh, but nothing happens, eh. -
A priest was being honoured at his retirement dinner after 25 years in the parish. A leading local politician and member of the congregation, was chosen to make the presentation and give a little speech at the dinner. He was delayed, so the priest decided to say his own few words while they waited. I got my first impression of the parish from the first confession I heard here. I thought I had been assigned to a terrible place. The very first person to enter my confessional told me he had stolen a television set and, when questioned by the police, was able to lie his way out of it. He had stolen money from his parents, embezzled from his employer, had an affair with his boss' wife, taken illegal drugs and he had given VD to his sister. I was appalled. But as the days went on I knew that my people were not all like that and I had, indeed, come to a fine parish full of good and loving people." Just as the priest finished his talk, the politician arrived full of apologies at being late. He immediately began to make the presentation and gave his talk. "I'll never forget the first day our new priest arrived," said the politician. "In fact, I had the honour of being the first one to go to him in confession." Moral: DON'T EVER BE LATE
-
If a small child is choking on an ice cube, don't panic. Simply pour a jug of boiling water down its throat and hey presto! The blockage is almost instantly removed. Before attempting to remove stubborn stains from a garment, always circle the stain in permanent pen, so that when you remove the garment from the washing machine you can easily locate the area of the stain and check that it has gone. Don't waste money buying expensive binoculars. Simply stand next to the object you wish to view. Clumsy? Avoid cutting yourself while slicing vegetables by getting someone else to hold them while you chop away. Always poo at work. Not only will you save money on toilet paper, but you'll also be getting paid for it. Weight watchers. Avoid that devilish temptation to nibble at a chocolate bar in the cupboard or fridge by not buying the f**king thing in the first place, you fat bastard. Save on booze by drinking cold tea instead of whisky. The morning after, you can create the effects of a hangover by drinking a thimble full of washing up liquid and banging your head repeatedly on the wall. Recreate the fun of a visit to a public swimming pool in your home by filling the bath with cold water, adding two bottles of bleach, then urinating into it, before jumping in. Don't buy expensive 'ribbed' condoms, just buy an ordinary one and slip a handful of frozen peas inside it before you put it on. Thicken up runny low-fat yoghurt by stirring in a spoonful of lard. Anorexics. When your knees become fatter than your legs, start eating cakes again. An empty aluminium cigar tube filled with angry wasps makes an inexpensive vibrator. Olympic athletes. Disguise the fact that you've taken steroids by running a bit slower. Smokers. Save on matches and lighters, by simply lighting your next fag from the butt of your last one. Vegetarians coming to dinner? Simply serve them a nice bit of steak or veal. Since they're always going on about how tofu, Quorn, meat substitute etc 'tastes exactly like the real thing', they won't know the difference. Invited by vegetarians for dinner? Point out that since you'd no doubt be made aware of their special dietary requirements, tell them about yours, and ask for a nice steak. Give comics that 'Pulp Fiction' feel by reading the last frames of cartoons first, and then read the rest in random order. High blood pressure sufferers. Simply cut yourself and bleed for a while, thus reducing the pressure in your veins. Heavy smokers. Don't throw away those filters from the end of your cigarettes. Save them up and within a few years you'll have enough to insulate your roof. Nissan Micra drivers. Attach a lighted sparkler to the roof of your car before starting a long journey. You drive the things like dodgems anyway, so it may as well look like one. A mouse trap placed on top on of your alarm clock will prevent you from rolling over and going back to sleep. Avoid bickering and petty arguments by immediately punching anyone with whom you disagree. Fool next door into thinking you have more stairs than them by banging your feet twice on each stair. At supermarket checkouts a Toblerone box makes a handy 'Next customer Please' sign for dyslexic shoppers. Girls. Don't worry about a nice dress for that important first date. All he's interested in is seeing you starkers. Putting just the right amount of gin in your goldfish bowl makes the fishes' eyes bulge and cause them to swim in an amusing manner. A next door neighbour's car aerial, carefully folded, makes an ideal coat hanger in an emergency. AVOID parking tickets by leaving your windscreen wipers turned to 'fast wipe' whenever you leave your car parked illegally. HOUSEWIVES. I find the best way to get two bottles of washing-up liquid for the price of one is by putting one in your shopping trolley and the other in your coat pocket. DON'T INVITE DRUG ADDICTS round for a meal on boxing day. They may find the offer of cold turkey embarrassing or offensive.
-
> Lessons to be learnt > > > Military History > > > > This is from Col. D.G. Swinford, USMC, Ret. HISTORY BUFF > > > > > > 1. The first German serviceman killed in WW II was killed by > the > Japanese (China, 1937), the first American serviceman killed was killed > by the Russians (Finland 1940), the highest ranking American killed was > Lt. Gen. Lesley McNair, killed by the US Army Air Corps. . . So much > for allies. > > > > 2. The youngest US serviceman was 12 year old Calvin Graham, > USN. > He was wounded and given a Dishonorable Discharge for lying about his > age. > > (His benefits were later restored by act of Congress) > > > > 3. At the time of Pearl Harbor the top US Navy command was > called > CINCUS (pronounced "sink us"), the shoulder patch of the US Army's 45th > Infantry division was the Swastika, and Hitler's private train was named > "Amerika." All three were soon changed for PR purposes. > > > > 4. More US servicemen died in the Air Corps than the Marine > Corps. > > While completing the required 30 missions your chance of being > killed was 71%. > > > > 5. Generally speaking there was no such thing as an average > fighter pilot. You were either an ace or a target. For instance > Japanese ace Hiroyoshi Nishizawa shot down over 80 planes. He died > while a passenger on a cargo plane. > > > > 6. It was a common practice on fighter planes to load every 5th > round with a tracer round to aid in aiming. This was a mistake. > Tracers > had different ballistics so (at long range) if your tracers were > hitting > the target 80% of your rounds were missing. Worse yet tracers > instantly > told your enemy he was under fire and from which direction. Worst of > all was the practice of loading a string of tracers at the end of the > belt to tell you that you were out of ammo. This was definitely not > something you wanted to tell the enemy. Units that stopped using > tracers saw their success rate nearly double and their loss rate go > down. > > > > 7. When allied armies reached the Rhine the first thing men did > was pee in it. This was pretty universal from the lowest private to > Winston Churchill (who made a big show of it) and Gen. Patton (who had > himself photographed in the act). > > > > 8. German Me-264 bombers were capable of bombing New York City > but it wasn't worth the effort. > > > > 9. German submarine U-120 was sunk by a malfunctioning toilet. > > > > 10. Among the first "Germans" captured at Normandy were several > Koreans. They had been forced to fight for the Japanese Army until > they > were captured by the Russians and forced to fight for the Russian Army > until they were captured by the Germans and forced to fight for the > German Army until they were captured by the US Army. > > > > THE BEST FOR LAST.... > > > > 11. Following a massive naval bombardment 35,000 US and > Canadian > troops stormed ashore at Kiska, in the Aleutian Islands. 21 troops > were > killed in the firefight. It would have been even worse if there had > been any Japanese on the island.
-
A bloke from Canberra told me about that. What still puzzles me is why they stole the plate instead of just making a fake one and putting that on their car. Surely it isn't to hard to make a plate which fools the camera? PS apparently that van had been making a real nuisance of itself (revenue raising, not safety inforcing) so it serves them right.
-
Building "Cowboy Up", a Cheetah Kit
Bigglesworth replied to Bigglesworth's topic in Morgan Aeroworks
I have spent a long weekend of work on the plane, but I can't write updates since I left my camera at the workshop :;)1:. Don't worry, I will get it tomorrow, and be prepared for more stories. Thanks to all who write in. It is good to know that people read what I write. And if myshed2 wants any specific build information, feel free to post your questions. More words and pixels tomorrow. (actually I might work on the plane tomorrow night, maybe Wednesday) -
>Question: How do you tell the difference between a New Zealand Police > Officer, An Australian Police Officer and an American Police Officer? > > Answer: Pose the following question: > "You're walking down a deserted street with your wife and two small > children. Suddenly, a dangerous looking man with a huge knife comes > around the corner, locks eyes with you, screams obscenities, raises the > knife, and charges. You are carrying a Glock .40, and you are an expert > shot. You have mere seconds before he reaches you and your family. > What do you do?" > > NZ POLICE OFFICER'S answer: > > Well, that's not enough information to answer the question! > > Does the man look poor or oppressed? > > Have I ever done anything to him that would inspire him to attack? > > Could we run away? > > What does my wife think? > > What about the kids? > > Could I possibly swing the gun like a club and knock the knife out of > his hand? > > What does the law say about this situation? > > Does the Glock have appropriate safety built into it, am I using it in > an OSH approved fashion? > > Why am I carrying a loaded gun anyway, and what kind of message does > this send to society and to my children? > > Is it possible he'd be happy with just killing me? > > Does he definitely want to kill me, or would he be content just to > wound me? > > If I were to grab his knees and hold on, could my family get away while > he was stabbing me? > > Should I call 1-1-1, would they just send me a taxi? > > Why is this street so deserted? We need to raise taxes, have a paint > and weed day and make this a happier, healthier street that would > discourage such behaviour > > If I raise my gun and he turns and runs away, Do I get blamed when he > falls over running away, knocks his head and kills himself? > > Will the NZ taxpayer foot the bill for his ACC claim if I injure him? > > If I shoot him, and lose the court case, does he have the opportunity > to sue me, cost me my job, my credibility and I will lose my family > home? > > Am I being culturally sensitive to the attacker if I shoot him, will I > be offending his mana if I wound or kill him? > > Will I have to defend myself in court as a racist if I shoot him? > > > > AUSTRALIAN POLICE OFFICER'S answer: > > > BANG! > > > > AMERICAN OFFICER'S answer: > > BANG! BANG! BANG! BANG! BANG! BANG! BANG! BANG! BANG! BANG! > BANG! BANG! > > Click....(sounds of reloading) > > BANG! BANG! BANG! BANG! BANG! BANG! BANG! BANG! BANG! BANG! > BANG! BANG! > > Click. > > Daughter: "Nice grouping, Dad! Were those the Winchester Silver Tips?"