IBob
-
Posts
3,055 -
Joined
-
Last visited
-
Days Won
26
Content Type
Profiles
Forums
Gallery
Downloads
Blogs
Events
Store
Aircraft
Resources
Tutorials
Articles
Classifieds
Movies
Books
Community Map
Quizzes
Videos Directory
Everything posted by IBob
-
Needs to be bulky enough..and/or with a lanyard to avoid losing it in a tank.......(
-

Another Lockheed 12 crash in USA
IBob replied to pmccarthy's topic in Aircraft Incidents and Accidents
Saw another clip of that........tail wheel not locked. -
Hm. Reminiscent of the Barber Snark....
-
I used thinners: maybe not ideal? And really sticking my neck out here: A local spray shop told me they used to paint aluminium panelled icecream vans. They would wipe down beforehand with a meths/water mix (which is pretty much what is in window cleaning solution).
-
Yep, you put your finger on just one of the challenges there, especially as a first time builder of a kit you're not yet familiar with. If you are intent on coating or treating all surfaces, I would look at spray priming: at least with that you can do batches of any size as it suits you, so you can stay on top of what's what. And you're not dealing with baths of noxious chemicals., which I'm not sure how you maintain during a build that will take months and probably years.
-
Found it. It's called the PaintBuddy Roller.
-
You really need something that rolls on a very narrow strip, or you'll end up with it over whole areas where it's not required, and your can of black stuff will go nowhere. Also that roller will take a whole load of wetting, using still more black stuff. And will dry out, requiring a new roller and yet more black stuff.
-
Personal message is the little envelope on the left of the screen. Click that and write your msg. Send it to Kyle Communications.
-
Nononono! There is a narrow roller where you load the paint in the handle and it has a cap to prevent drying out. Ping Mark here at Kyle Communications, he'll be able to tell you what they are called and where to get them.
-
Correction: Savannah kit assembly is all pop rivets. However the main spars and cockpit side walls come solid riveted from the factory.
-
Christin, I did not use it except on the rudder. But I did not have the rollers, and brushing it is hopeless, as you push large amounts of it through all the rivet holes. I also thought it would constantly dry out on rollers, but it seems this is not so if they are capped. I guess because it is water based, not spirit Another builder was spray priming, so I went that way But if I was going again, I would get the rollers and use the black stuff. Whatever you do or use, you do need to treat both surfaces. The reason is that moisture and contaminants can sit in those places where metal meets metal, so you need to protect both pieces of metal. Facthunter, the Savannah is all pop rivets, but some very few are countersunk, and don't seem to give any trouble. For the most part they are used for things like locating nut plates: once the screw or bolt is into the nut plate and tightened, the rivets are doing nothing.
-
That's very kind, Blueadventures. I don't know about faultless in my case. But I got so much from this site, Mark Kyle and others, during my build, I did my best to add to that. And I did take a lot of pics.
-
Ahem.........brave person!!! 8 years ago I was asking similar questions........the thread is still there in the Savannah section, title That Black Stuff.
-
You're a brave man Christin: paint systems has to be one of the most controversial topics........everyone knows best, if only what they knew best would line up! You don't do much countersinking on a Savannah, I don't know about the Ventura. But the one tool I wish I'd had was proper self-centering countersink bits.
-
I guess a principal consideration re priming is whether the aircraft will be in a corrosive environment.
-
Hi Christin..........the start of a special journey, then? When I built my Savannah, I did not use the black stuff, I primed everything. But it's a fair bit of extra work, you need the facilities and it holds up production: with the black stuff you can prep as many or as few parts as you like, whenever you like. With other coatings you pretty much have to do them in larger batches. I did not know much about the black stuff, and thought what I was doing would be a major improvement. Frankly, I now doubt that. If I were building again, I would use the black stuff, since there are enough hours in the build without adding to them unnecessarily. Other builders here have come up with a good roller system for applying it, and I would say that is essential. Surfaces need to be cleaned. It needs to go on both surfaces of any joins and laps. And it needs to be allowed to dry before assembly. Enjoy your build!
-
https://www.stuff.co.nz/travel/350307701/watch-plane-lands-runway-moments-after-jet-takes-india Someone at ATC needs a thorough kicking.............(
-
Assuming the top of the nose leg is flush and square (we have seen one that wasn't) and that SF327 is bolted down tight to it (with Loctite applied to the bolts) it should not be possible for for SM003 to move sideways. Once it does, you will get the damage shown (also the noises you report). So I would suggest that is the problem: that for some reason when SF327 in bolted down, it leaves a gap, allowing SM003 to shift sideways. Check the top of the noseleg is square and flush?
-
Mine rattles sometimes if taxiing, but I wouldn't describe it as slamming. On takeoff the usual thing is to get the weight off the nosewheel as soon as possible, but without premature rotation.
-
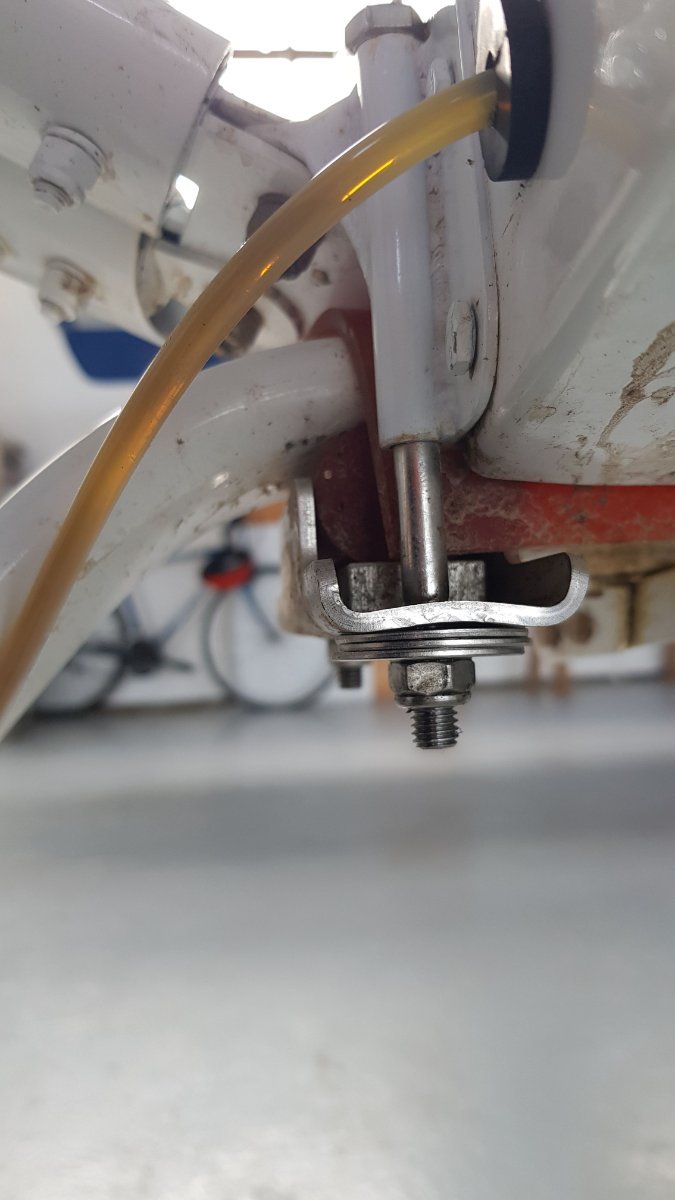
Skippy, that bottom plate has raised edges , to hold in place the bottom rubber under the UC. So a flat plate wouldn't do it. I think the source of the problem is the holes in the plate, they are slotted in the fore and aft direction, so weakening the plate and allowing it to dish up, as you can see in the pic. I guess they are slotted to allow for variations in the bolt positions, but I think the slotting is excessive. And it could have been done only for the rear bolt, which does not take the braking load. As it is I'm confident that the washers will prevent the bolts pulling through....not very elegant, but I want to be flying rather than tinkering. Oh, and I'll be less heavy footed with the brakes in future.......) Facthunter, the brakes come with the kit, and I suspect are made inhouse. The boys with the really fat wheels put bigger brakes on, and sometimes add a wire stay from firewall back to the lower UC to prevent the UC folding back under.
-
Facthunter, this is the main UC. It is clamped between hard rubber (lurethane?) over and under it. That is the red stuff in the pic. But hard braking or the like causes the wheels to pull back, and all that load is taken by the front mounting bolts.
-
The rollers are not (normally) loose, Facthunter. They have some rudimentary cage. And nothing stops the crud getting in, but it is in a relatively sheltered spot.
-
The main undercarriage is held in place by a steel plates underneath, secured by SS bolts to front and rear of the leg. I recently saw pics from a heavy landing where the UC had folded back under the fuselage. The steel plates have slotted holes, and the front bolts were intact but had pulled entirely through the plates. On examining my steel plates, I found they are now dished upwards, probably due to over heavy braking. A factory build on the airfield has 3 penny washers under the plate to prevent this, so it is not a unique problem, and I have now added washers to mine.

-
The nose leg is held down by a bungy. In that position (noseleg fully down) the bearing and it's associated washers are taking the downward thrust of the leg. Once sufficient load comes on the noseleg it telescopes upward and there is no load at all on the bearing. So all the bearing does is provide smooth rotation of the noseleg when taxiing and flying (since the nosewheel is linked to the rudder pedals for steering). There is little feel to the Savannah rudder pedals when flying, and the rudder is not fully self-centering, probably due to the friction of the bungy. I would guess the bearing was added to avoid further turning friction in the noseleg.
-
Nope, that's a new one. My only suggestion would be to check that you have the components stacked in the right order, as per Ch16 P8/11.