
rmorton
-
Posts
290 -
Joined
-
Last visited
Content Type
Profiles
Forums
Gallery
Downloads
Blogs
Events
Store
Aircraft
Resources
Tutorials
Articles
Classifieds
Movies
Books
Community Map
Quizzes
Videos Directory
Posts posted by rmorton
-
-
It is a strange approach as far as the cleaning was concerned. I wonder if the idea of heating the paint is to make a touch dry film on both sides so that you can handle them for assembly and then when assembled the two partly dry surfaces are still able to fuse together?I think we can agree that the object of priming mating surfaces is to minimise corrosion. And to that end, we are wanting the most effective coating.It seems odd to me that the video:1. Makes no mention of cleaning/degreasing the metal before painting:
Quite simply, the stuff won't stick properly unless the metal is clean.
2. Suggests rapid drying of the primer with a heat gun:
a) These are etch primers, which implies that the primer is etching the surface of the metal to improve adhesion. Does rapid heat drying allow proper etching?
b) Hardening of coatings can be more complicated than just 'drying them out'. That is, the coating may be undergoing chemical/structural changes. Has the maker of this video checked with the manufacturers of the various products he lists, to ensure that rapid heat drying does not compromise the coating?
3. Suggests the parts can be assembled almost immediately:
You may be able to get away with this if there is no movement of the parts during assembly. But since the coating will still be relatively soft and uncured, any movement will almost certainly damage the coating. And quite a lot of assembly involves wriggling or sliding things to fit.
-
Any news on delivery? Grey is good as an undercoat as you can see when you have covered it properly with the whiteThe white etch primer might be a little more in weight, but it surely lookes highly professionel.I'm intending to use grey etch primer, after I finally was able to find an affordable source in germany. -
Thanks I think I know now, we considered doing the half way house licence but it seems to give you all the extra costs of PPL with non of the advantages of ULM. I would just like to see a stricter training method for ULM and a relaxing of the MTOW to say the 600kg, if your plane can take it.You need a ppl licence.But You cannot take off from a private field like an ultra Light, and also lsa are certified aircraft.Regarding paint Weight it seems to be between 7 and 10 kg for a sav
As for paint weight I have just had a go at spraying and have made all the usual mistakes so I think I will either not do any painting of the unseen areas or find a way to Aldine.
-
As a non Australian, why is it so limited, I would have thought there was loads of space for everyone?
-
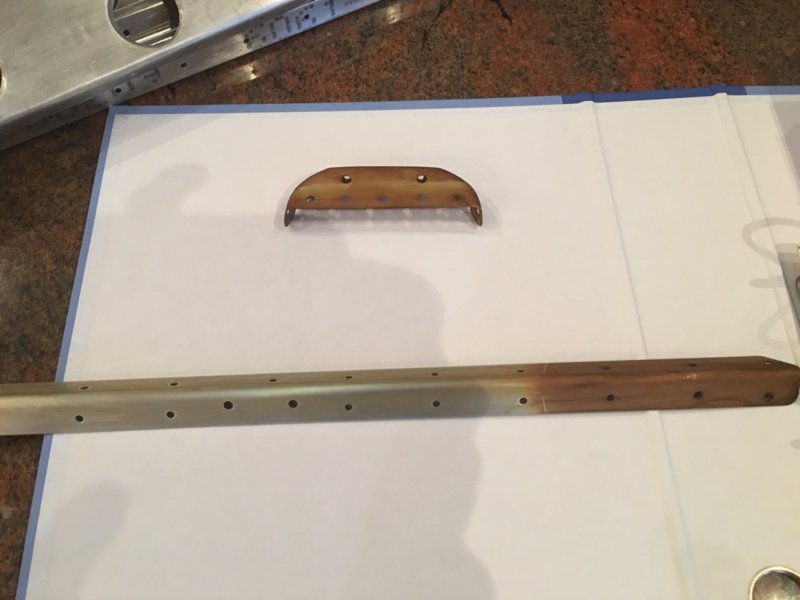
Phew thats a relief, having tried to shove a rivet in it looked anything but flat so decided to countersink just enough. I haven't got as far as you so couldn't tell if the fuselage ones needed them.My manual shows the centre rivets on the brackets on the rudder as flat, and yes they are countersunk. That will be to provide clearance for the pivot.Photo 841 shows the brackets on the fuse, and there is no need of flat rivets there, as the pivot hole is further out.Todays job for me is to prat about spray painting and see how I get on. I did some last night with a model makers airbrush on the smaller parts which worked ok but the paint was good thick and has a rough finish. The real worry is the time I spend preparing. cleaning off the stencilling with acetone, cleaning off the the grease and then surface treatment of whichever method takes my fancy. Cant wait to get riveting !
-
More questions, in photo 841 showing the lower rudder bracket, what difference / why does the middle rivet need to be a flat head? Did you counter sink the hole?And right at the end of this lot, I should have fitted the extended baggage area... -
Thanks IBOB, that is a fantastic resources for when I finally get started. what primer did you use ? I am doing the rudder and have a Stewarts systems water based one for now, but I think that a two pack epoxy will be better for the fuselage. I am just a bit worried about mixing them. Thanks for the photos and notes!Then on to fitting the other rear fuselage bits and pieces...and retrofitting the extended baggage, which is simple enough, but I really, really should have assembled and clekoed the whole lot before any riveting. -
Dan's Savannah has a very good build log here:
Contruction Kit 3 ICP Savannah S : Construction & Assemblage
There are some very useful pictures and as we are all now fluent in French the forum thread is also interesting.
-
 1
1
-
-
For a polished aluminium finish I have seen this:It seems that to keep the mirror finish you need to spend around 4 hours every 6 months.CArbon and cowl made of carbon are a good solution to save weight, thansk to let me know how it progess.For sure everybody would like to have a MTOW of 600 kg in france but you know this categoty already exist CS--LSA, but it is not the same rules...
Stewart Systems. EverShield Protective Finish
but can't seem to buy it anywhere.
What type of licence do you need for the CS-LSA in France? It would be so much better for all if we could harmonise across the world...
-
I will try to follow up here with most of my pictures and comments/ questions. Here is the first attempt. I have sorted out the fin and rudder parts so far and started to prep them for assembly. I have filed off the tags from the cutting process with a fine steel file. where there is a sharp edge to holes of edges I have ruled then down with scotchbrite. A rag and cellulose thinner gets rid of the grease and lettering, followed by a rub down all over with Aluprep and scotch brite. once dry I have had a go at dipping in Alodine but with mixed results. If the part is dunked in the stuff for a couple of minutes it turns it a deep golden brown, or if you paint ever the part keeping it wet for the same amount of time then it seems to just dull the surface. I am not convinced that this is even worth doing but I would be interested to know if the Ali is protected all the same?

-
So far (which isn't very far) I have removed the tags from the edge of each part with a file then a rub down with scotch bride has been enough to do the rest. There were one or two of the larger circular cuts that needed a demurring tool.
-
Bonsoir Dan
j'ai commencer un conversation avec toi. Entre temp, voir le group "Savannah Owners Club" sure Facebook et fait une recherche "flap", il y a un lien pour un video et un design, mais pas beaucoup de dimension.
-
 1
1
-
-
Many thanks for providing this opportunity and for all the hard work and time you have invested. As a new flyer and builder this type of site is a god send and very much appreciated.
-
2
-
-
Bonjour,
welcome you should be able to contact Mark either on here or on the Facebook Savannah page. I can read and speak French but writing is not my strong point ;) But happy to help in anyway I can.
-
1
-
1
-
-
There are some lovely pictures there and I love the aluminium finish, my doubt is the amount of polishing to achieve and maintain that.Hi Richard,To save weight, the fastest and cheapest is to use an e-props propeller instead of a duc swirl or flash (if you do not have already a propeller)Helices E-PROPS : DURANDAL 100 pour Rotax 912S 914
Mine is à 100 M, as i remember the weight is under 3 kg and the saving is around 4 kg
Without painting, i know a savannah s under 290 kg with parachute
This one : Construction de mon Savannah S
You can follow the construction with many pictures
Regarding your proposal "Carbon fibre engine cowl, wing tips, tail and fin tips." it is a good way, if somebody would like to creat this parts, i already know few guys interested to buy thisese carbon components
The weight of that prop is incredible, I will certainly put that on my list.
I am really interested in moulding carbon and other composites and my first thought when I saw the cowl was to make a mould from it and have a go. I will certainly let you know if I succeed.
If only the Euro zone would agree to up the limit to MTOW of 600kg for ULMs life would be sooo much easier!
-
Has anyone here tried to save weight? Here in France the MTOW is very tight at 472.5KG (I think). I am tempted to just bolt everything together as per the book and see what it comes out as but if there is an opportunity to save weight I would like to know. So Far I can think of the following:
Carbon fibre engine cowl, wing tips, tail and fin tips.
Berringer wheels (way too expensive at this stage though.
Don't paint it but use a wonder product after polishing the Ali - not keen on this and will probably paint the lot
Go for an all in one Efis type thing and minimum instruments - maybe later when I save up my pocket money again.
Battery
I am assuming that those figures above are for extended range fuel tanks ?
-
I am constantly worrying about the weight issue. I was advised by ICP that Yellow is a NO, as it needs too many layers to get good coverage. My other concern is that there are very few places to save weight, although a carbon fibre cowl and wing tips are one opportunity there doesn't seem to much other option.
-
Thanks Ibob, I see what you mean about the threads, they are very confusing. Will leave this one to die and keep the coming home one for the questions. Can a moderator merge them?
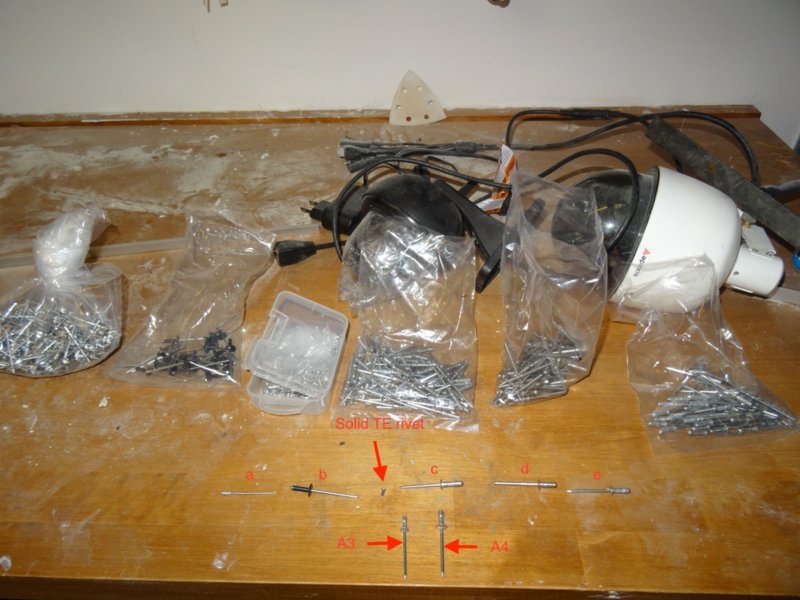
You are also right that the majority of rivets are the A4(3.1mm) and A5(3.8mm) (I have wrongly marked them up in the picture) there are a smaller bag of A3(2.5mm) marked as "a" in the photo.
"b" is a 3.2mm flat head,
"c" no idea,
"d" flat head A5(3.8mm),
"e" no idea
-
that's not bad at all!!
-
So I have read the instructions and it says there are 3 rivet sizes, but in the box there are significantly more! the picture shows what I got in the kit, can anyone hazard a guess at what a,b,c,d,e are? c and d, I think are the A5's but they are very slightly different. For the fin assembly I need the A5 and flat head rivets for the rudder hinge brackets. Answers on a postcard...
-
How much did they cost? did you get the full brake set too?i went to the wheel workshop and they helped me,, it needed some serious lube!,, in the end i changed my wheels to french quality Beringer wheels.[ATTACH=full]48045[/ATTACH] -
Thanks RickYou reckon it's hard to seat the bead? Lube and air pressure does that easy.What will bust your guts is trying to get it off. And if you take it to some ham fisted tyre shop bloke to break the bead you will get your rim back in pieces.As Mark said, the condor and air track tyres fit and remove easier.
Cheers
Rick
I was hoping that this would be the hardest bit! I will try proper tire lube and the press we have at work
-
Woo Berringer are VERY nice indeed, however I can't afford them yet. I can see that with plenty of soap and force you could get one side on, but I can't see how the other half would pop out with just the pressure of the inner tube.
-
Thanks Skee, I think I need some soap
.jpg.6da351a940021be8907e53e84c506e9c.jpg)
SAvannah kit 2 comming home tomorrow :)
in Savannah
Posted
Well Aluprep is an acid degreasant make it shiny type of thing and so far if you wear gloves and rinse everything well it doesn't seem to be too harmful. The next phase, Alodine is a rather nasty and poisonous liquid. In small quantities it is ok but the amount you need to treat all the ali parts is just out of the question. Not only is it poisonous it is very difficult to get rid of. I am trying to find out how and where I can bin the stuff safely. So long as you dont breath it in, eat it, get it on your skin or soft tissues, it is ok to use. The big advantage is the corrosion protection it gives for little or no weight gain. Paint is the other alternative but you will of course add weight. I am going to see what the cost of the local alodine bath will be and then I will try the following:
totally enclosed inaccessible areas (fin, rudder, flaps, elevator etc I will alodine
Inaccessible but inspectable clean and paint with primer only
External surfaces primer and paint