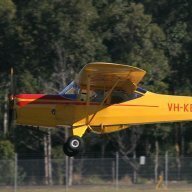
David Isaac Posted October 17, 2011 Posted October 17, 2011 Watch out for future details on this true STOL aircraft, locally designed and built by Ole Hartmann at Hangar 13 Taree Airport NSW, just 3 hours drive North of Sydney. This is a spectacular STOL performer in High Wing Tail wheel configuration and all aluminum construction. The design utilises an Alaskan Bush pilot tail wheel and knee action gas strut main undercarriage that handles real STOL operations. The Hornet is available in Kit, Factory assist, or Factory built certified form for RA Aus registration or also in VH experimental 4 seat configuration. A brand new Hornet has just been completed by forum member Scotty and is under going test flying as we speak. Watch out for a flight test review due soon. There will be a Hornet flyin at Gloucester Airport NSW on November 4 and 5. Check out the factory http://www.aircraftkits.com.au For interest sake I have no commercial interest in AAK, I just love the aircraft, it is on my wish list.
Scotty 1 Posted October 17, 2011 Posted October 17, 2011 You'll do anything to get a ride won't you? Cheers Scotty
David Isaac Posted October 17, 2011 Author Posted October 17, 2011 You'll do anything to get a ride won't you?Cheers Scotty Ha ha ha ... Noooohh you have got it wrong, I don't want a ride ... I want a drive ... LOL
Scotty 1 Posted October 17, 2011 Posted October 17, 2011 Just to correct David, who is still learning to count, that would be the 5th and 6th at Gloucester. I will have my new Hornet there and I reckon if we ask Ole nicely he might do a few demo flights. Here is a copy of the invite to Gloucester Be a part of the Gloucester Aero Club Annual Fly-In and Bonfire, 5-6th November Spring is upon us, and so is the Gloucester Aero Club Fly-In. A famous Aussie said once that “life wasn’t meant to be easy”, how right he was. Aviation is in turmoil, fuel prices are up and there’s a GFC Mk whatever this week in the stock market. We can suggest the ideal antidote. Leave the ASIC at home and come on over to our friendly annual Fly-In and bonfire. It’s a relaxed weekend in a lovely part of NSW and a great opportunity to get together with a load of people who share your passion in Aviation, as well as introducing it to a few of the locals. Whether you fly an RAA aircraft, a Helicopter or an A380, you’re welcome. Why not bring a young person who is training or has the beginnings of an interest in Aviation? We’ll have a great mix of aircraft and a visit from Aerobatic champion Paul Bennet with his MaxxG Aerobatics Pitts Special, along with a fabulous model Helicopter display. The plan is for arrivals from 9 am Saturday morning, lunch and dinner will be available on Saturday as well as a breakfast on Sunday morning before you head home. Our clubhouse has showers and toilets so you can camp with us, or there are motels in town if you’d prefer-we’ll have a shuttle bus running to and from Gloucester. There’ll be a nominal charge for landing, camping and meals and a chance to contribute to our chosen charity, the Westpac Rescue Helicopter. Saturday night we’ll be around the bonfire where the stories get bigger every year. Please RSVP by 26th October if you intend to come so we can get catering sorted. It’s been a wonderful, relaxed event the last 3 years and with your participation it’ll be even better this year. Come and join us!! RSVP 26 October to Bob Francis (02)4988 6082 [email protected] Andy Edwards 0416 240949 [email protected] Find us on Facebook and at www.gloucesteraeroclub.org.au Cheers Scotty 1
David Isaac Posted October 17, 2011 Author Posted October 17, 2011 Better get some build photos up on this quality site Scotty ...
Scotty 1 Posted October 17, 2011 Posted October 17, 2011 [ATTACH]759.vB[/ATTACH] [ATTACH]760.vB[/ATTACH] [ATTACH]761.vB[/ATTACH] [ATTACH]762.vB[/ATTACH] [ATTACH]763.vB[/ATTACH] Try these Cheers Scotty
David Isaac Posted October 17, 2011 Author Posted October 17, 2011 Great, you can give us daily installments if you like ... oh and don't forget the running commentary and then I promise I will write up a great flight review (whoops, was that a little biased) ... LOL
Scotty 1 Posted October 17, 2011 Posted October 17, 2011 David you know how to put the pressure on a bloke. It started when I wanted an Australian built and designed plane. My theory is based around backup and support. If you need parts or advice it's here and not on the other side of the world. Bonus is Taree is just down the road from me. I consider myself a low hour pilot with a lot to learn and a few mistakes to make so I wanted a plane built strong. I first looked at the Hornets a few years ago and what impressed me was they were built to work and last in the bush and on some of the large stations. All sorts of work and in some pretty harsh environments. They should be able to handle some of my not so perfect landings. When I went back at the end of last year Ole had made some changes not the least the main landing gear. This is now a true suspension with about 9'' of travel and rebound dampering. Not so many bounces now lol. Although it doesn't look it, this suspension being chrome molly is 1kg lighter than the old spring undercarriage. Another big change is the wing. Ole has developed this new wing to get away from the drag of the slatted wing he used to use for the low speed handling. It was trialed on his Bushman and then scaled down to suit the Hornet. So far in the test flying it is proving itself. Ole can get off in about 50mtrs and approach at 45knots and land in about 40mtrs. Can't wait till he trys it with flaps. With 30mm of washout over the length of the wing the stall should just be a mush instead of a snap like the old slatted wing. As I have fitted flaps and ailerons to mine the roll rate won't be as good as flaperons but that suits me and Ole is sure if I do wish to throw it around it will do it. The ailerons arn't small. The cruise speed is going to be down a bit because of the extra drag of the 850x6 tyres I have fitted but we are still looking at 80+ and besides I still like the idea of being able to drop into the neighbours paddock for a cuppa. Mine is Hornet No29 and only the 4th one going into recreational flying, the rest are work planes and I have built it in the factory and seen it grow from a flat sheet of metal to what it is today. [ATTACH]766.vB[/ATTACH] [ATTACH]767.vB[/ATTACH] Anyone that knows me will know that me doing this much on a computer thingoh has given me a brain pain (thanks David) so how about you all ask some questions now.Plenty more pics if thats what you want. Cheers Scotty 1
Wayne T Mathews Posted October 17, 2011 Posted October 17, 2011 David you know how to put the pressure on a bloke.It started when I wanted an Australian built and designed plane.... ....Anyone that knows me will know that me doing this much on a computer thingoh has given me a brain pain (thanks David) so how about you all ask some questions now.Plenty more pics if thats what you want. Cheers Scotty Yee haa,,, No questions from me at this time Scotty, just a statement... What a great yarn... I'm sorry it gives you a brain pain tapping it out on the compute. But tough, I wanna read/hear more. So keep up the great work, and I'm really lookin' for some sippin' whiskey now, 'cause I'm looking forward to listening to you around the campfire in Gloucster, and sippin' whiskey's been known to loosen a tongue or two... 1
David Isaac Posted October 17, 2011 Author Posted October 17, 2011 Damn good post Scotty, for a bloke on a computer thingo ... LOL. looking forward to the yarns at Camp David at Gloucester.
Scotty 1 Posted October 18, 2011 Posted October 18, 2011 Well if I don't keep waffleing on I won't get an invite to Camp David and I gota find out what those 2 get up to.....and report back:tongue: It all starts with a tig welded chrome molly frame that encases the cockpit. Another safety feature in my books. Stainless steel firewall at the front. The wings are bolted to the chroms molly via the main and trailing spar at the top of the frame and supported via the twin struts at the bottom. The main landing gear is bolted and braced to the bottom of this frame. The engine mount is bolted to the front of the frame via 5 points. The idea is that all the main loads from the wings, landing gear and engine are carried through the chrome molly frame before it gets to any ally. That in my books ad to the strenght and the safety comes from having the frame around the pilot and she who must be obeyed. The frames that go in under the floor of the cockpit to support the seats and under the cargo area carry the controls and when the floors go in all the controls expect the rudder pedals are enclosed with no way of dropping a pen or such and having it lock the controls. Naturally there are inspection covers to get to all the places you need, but that might take some time before things wear out as most pivot points are rose joints and not just bolts. [ATTACH]768.vB[/ATTACH] [ATTACH]769.vB[/ATTACH] [ATTACH]770.vB[/ATTACH] [ATTACH]771.vB[/ATTACH] [ATTACH]772.vB[/ATTACH] Anywho, thats me for tonight and remember blokes my sippin's rum Cheers Scotty 1
David Isaac Posted October 18, 2011 Author Posted October 18, 2011 Keep these coming Scotty ... Hmmm ... how does Appleton Estate 12 year old Jamaican Rum sound. Nice on the rocks, nice anyway. I'll bring a bottle ... but after any flying right ...
cazza Posted October 18, 2011 Posted October 18, 2011 Great Photos Scotty. Now put them in a powerpoint presentation, bring it and your Hornet to Natfly and do a session on "Experiences in Kit Building". Please. Cazza 1
David Isaac Posted October 18, 2011 Author Posted October 18, 2011 Great Photos Scotty. Now put them in a powerpoint presentation, bring it and your Hornet to Natfly and do a session on "Experiences in Kit Building". Please.Cazza Scotty, I'll do the power point presentation for you all you need to do is put all your photos on a stick or CD for me ... XXX ... LOL
dazza 38 Posted October 18, 2011 Posted October 18, 2011 I am realy enjoying your build Story Scotty.Thank you
Guest DWB Posted October 18, 2011 Posted October 18, 2011 I am realy enjoying your build Story Scotty.Thank you Me too
Scotty 1 Posted October 19, 2011 Posted October 19, 2011 Note to Ole: We will need to extend the door width on my Hornet as I no longer think my head will fit through the existing opening. Thanks for your kind words folks. Big kiss right back at ya Camp David. lol The fuselage is a semi-monocoque design and attaches to the rear of the main frame via longerons and stringers all locked together with frames and webb braceing. Any one who has built a steel shed will know how the frames will wobble all over the place until you start screwing sheets onto it. If your scared of heights like me, putting the roof sheets on while the whole thing under you wobbles all over the place is quite a job. But I was supprised with how sturdy the fuselage was before the skins went on. Just on the webbs. Another bend in the folder and you make the webb strong in tension and compression. No extra weight but given 4 webbs at one point twice as strong. Another new thing learnt. At the tail there are 2 bulkheads to mount the 2 spars of the vertical stabilizor. The frame is clamped to the bench and checked for square before the side skins are attached. Once their on there is no way this frame is moving. Roll the frame over and the bottom skin is then attached. The two rounded bottom corners are rolled in and attached. The rounded corners of this fuse add that much extra strenght to the whole structure. The tail that holds the vertical and horizontal stabilizor is double skinned with doubler plates on the outside and extra diagonals inside. The mounting points for the tail wheel are chrome molly and bolted to the frame. Inside all painted and then fit the top skin and corners. [ATTACH]773.vB[/ATTACH] [ATTACH]774.vB[/ATTACH] [ATTACH]775.vB[/ATTACH] [ATTACH]776.vB[/ATTACH] [ATTACH]777.vB[/ATTACH] Now that didn't take long:rolleyes: Cheers Scotty 1
Scotty 1 Posted October 26, 2011 Posted October 26, 2011 Been busy for a few days but back at this compute thing now so I'll try and catch up. This is an email I received from Ole today. Hi Adrian, Yes for normal altitude and weather / temp operation the 912S does the job Ok at 600 kg Mtow. Any more kgs or high temps. and its labouring hard. Scotties data/ Hornet STOL (yellow) Stall clean 34 ktn Stall flap 30 ktn. Stall comes very announced with smoth buffeting and a slight roll to the right and nose drop. Release stick pressure and it will fly out it self. Approach clean: 50 – 60 ktn as required. Half flap : 45-50ktn. Full flap: 40ktn with short flair window and full stop in 40 m. Take off : nil wind 24 degrees , take off flap, grass, 50-70m max Mtow. Take off clean, same as above , 90m max MTOW. Best climb: at max Mtow 800ft/m @ 55ktn Cruise climb: 500ft/min @ 70ktn. Cruise speed: @ 5400rpm – 85ktn. / 12ktn faster than the slated wing version in same configuration airframe. Cruise @ 4900rpm – 70ktn. Manoeuvring speeds clean: 50- 80ktn in smoth air, rough air manouvering 50-70ktn. Flap extention speeds: 55ktn Max flap speed extended 60 ktn. Very stable and docile .... Cheers Ole Ole, I have been following with interest the final tests on the forum of the aircraft I saw near completion during my recent visit. I knew you were expecting a marked increase in cruise TAS with the changes to the wing and flaps. Do you have any preliminary estimates and also notwithstanding your preference for the 914 engine have you found the 912 satisfactory in this aircraft. Regards Cheers Scotty 1
David Isaac Posted October 26, 2011 Author Posted October 26, 2011 Mate, Those are very impressive MTOW numbers.
Scotty 1 Posted October 26, 2011 Posted October 26, 2011 Ok time to fit some sides to the main cockpit. The panels are cut oversize to start with. David would know old mate "looking in". One of life's gentlemen. Not a big job? Well you clamp the panel in position then mark around all the frames on the inside, take the panel back off and measure and mark where all the rivet holes go then double check all is OK before you start drilling. The sheet is drilled on the bench. Re-clamp the panel back in place and check it all lines up before you start drilling the frame. Drilling through the panel and locking in place every 4th hole with a cleco you make sure it lays smoothly over the frame as you go. Not too many holes to drill in these skins for the rivets considering the 16 odd thousand rivets in the whole build! Now that is all pegged in place with the clecos and it fits the way it is suppose to you can mark around the panel for the final trim to fit and overlaps etc. Take the panel back to the bench and trim to the finnished size. Now you can start de-burring. Every edge, corner and hole has got to be de-burred on both sides. The frame and the skin. This is important not for looks or so you don't scratch yourself but to the strength of the whole build. You must make sure all components are rivetted or bolted together without being held appart by burrs or swarf. There are some fancy tools for doing this, and in some tight spots too but a cordless drill is your main choice of weapon if you can get to it. When you have that all done it is time to clean the sheet and frame with metho (keeping David Isaac away from the bottle if you want any left) so it can be undercoated. No two pieces go together without being painted. Now you can peg the skin back in place, every 4th hole with a cleco. Thanking your God for air tools you can now start riveting the skin in place. One side done, start all over again on the other side. You must also remember where another skin is to fit under or over the skin you are fitting not to rivet but just leave the clecos holding it till you fit the next skin. That is the process for the whole build. Components on then off maybe more than once, drill, de-burr, paint, refitt and then and only then can you rivet. [ATTACH=full]785[/ATTACH][ATTACH=full]786[/ATTACH][ATTACH=full]787[/ATTACH][ATTACH=full]788[/ATTACH][ATTACH=full]789[/ATTACH] More to come but for now. Cheers Scotty 1
Scotty 1 Posted October 26, 2011 Posted October 26, 2011 Mate,Those are very impressive MTOW numbers. Just like me David, slow and steady but built to do the job. ;):p:cool: Cheers Scotty
Scotty 1 Posted October 26, 2011 Posted October 26, 2011 Just a little clip I shot the other day while we were trying to re-arrange Ole's hanger to fit everything in. Put some music to it to get Wayne and David in the mood for some sippin' at Gloucester. For some reason you need to play in full screen mode to get the music. Cheers Scotty 2
willatodd Posted October 26, 2011 Posted October 26, 2011 i diddnt go full screen and still got the music maybe my comment on youtube was a bit premature!!!!!
Scotty 1 Posted October 26, 2011 Posted October 26, 2011 i diddnt go full screen and still got the music maybe my comment on youtube was a bit premature!!!!! Us Kempsey boys just hear that music everywhere.;) Cheers Scotty
dazza 38 Posted October 26, 2011 Posted October 26, 2011 Good stuff Scotty, Ole may have to build a bigger hangar.
Recommended Posts
Create an account or sign in to comment
You need to be a member in order to leave a comment
Create an account
Sign up for a new account in our community. It's easy!
Register a new accountSign in
Already have an account? Sign in here.
Sign In Now