Bigglesworth Posted August 6, 2007 Author Share Posted August 6, 2007 So I've got some serious thinking to do and lots of ideas to explore. I might be criticised for saying this, but regardless, how close could I get a Cheetah to a 182? Mal The Cheetah is very flexible so how about...... Make it wider and higher (maybe start with the Sierra, more power to overcome more drag) Put a leather interior in (easy, I'm hopeing to make mine fur lined:)) Put sound proof material on the firewall (I'm going to) and around the front of the fuse. Get rid of that horrible Microair hot-mike intercom/radio and put something quiet in. And maybe X11 headsets. A new propeller should fix vibrations. Put an Enigma glass system in. (I don't like glass or I would do this) I don't know how you could fit an autopilot to it but I assume it is possible. There, what else do you want? Oh, and to make it like a Cessna, put a fuel leak in to simulate the higher fuel useage, and regularly throw some money out the window to simulate maintenance and overhauls which have to be professionally done:clown:. Link to comment Share on other sites More sharing options...
Guest Flyer40 Posted August 6, 2007 Share Posted August 6, 2007 Put a leather interior in (easy, I'm hopeing to make mine fur lined:)) Ha ha. Pimp my plane! Leopard skin dash, fury dice...... No seriously, the things you have mentioned are exactly what I'm considering. My wife and I aren't large or heavy so we could probably trade some payload for creature comforts. Have you seen the Velo racing style seats that Jon Johanson sells for the RV's? Been wondering if I could adapt something like that, or maybe even a go-kart seat to improve the comfort on long trips. Link to comment Share on other sites More sharing options...
Bigglesworth Posted August 6, 2007 Author Share Posted August 6, 2007 Sparring with the spars Now if I told you that it took me almost all of the day to drill 2 holes, and that there are thousands of holes to be drilled, you could do a quick calculation and say it will take me years to build this plane. However, notwithstanding that I would be telling you the truth, you would be (hopefully) way out. The 2 hole I am talking about are the 2 king pins of the wing spars. They hold the spars to the fuselage and as such are sort of very important. Setting the spars up was a job which had me practically tearing my hair out. The only thing stopping me was that I had thought in advance and protected my hair by wearing a hat;). It didn't help that I didn't understand the instructions properly and for some reason thought that I had to have the tips higher than they should be. So I started off by getting the plane outside (had to wait until the shop closed on the Saturday, customers can be a nuisance). Got the plane level, then got the spars rough in position and clamped them to a piece of wood at the tips. Then held them together with a couple of G-clamps next to where the bolts go. In the instructions it says to put a 6mm packer under the spars, and that will make them end up in the right position. I put the packer there but because of Mistake (see above sentence), the ends ended too low. So I tried lifting them up. But that meant they were only held by the clamps, and since the clamps were over both spars, I'd get one 'right', then have to loosen the clamps off for the other and all would go astray. And when I got the spars right, the fuse would be out of level. Sort of like a dog chasing its tail. And when the dog finally caught its tail (I got all set up) it looked wrong.:confused: So when trouble comes, annoy Garry. (BTW, it speaks well of the company that every time I wanted urgent information, I got through to someone who could help me straight away;)) So between me and him, and him taking a measuring tape to the demonstrator, we worked out that it should have 165mm dihedral. Thats 165mm difference between the root and tip measured on the bottom of the spar. Simple when you know. So I took down the setup I had (spilled half the water out of the levels), put the packers back, set the tips up with the clamps loose, set the other wing up to level with the first, then got checked the fuse was still level. All sits properly. Tightened the clamps, double checked everything and was ready to drill. If these holes were wrong, it meant a major stuff up. Therefore the pre-operation ceremony involved a short prayer, and for good measure, I had Mark Knopfler's Shangri La album playing. Nothing could go wrong now. Holes drilled All that fuss for 2 3/8 holes. But she looks like a plane now (surprise surprise);) Link to comment Share on other sites More sharing options...
Bigglesworth Posted August 6, 2007 Author Share Posted August 6, 2007 Ha ha. Pimp my plane! Leopard skin dash, fury dice......No seriously, the things you have mentioned are exactly what I'm considering. My wife and I aren't large or heavy so we could probably trade some payload for creature comforts. Have you seen the Velo racing style seats that Jon Johanson sells for the RV's? Been wondering if I could adapt something like that, or maybe even a go-kart seat to improve the comfort on long trips. The seats look good, but the problem with seats is that they raise you up and then you need to raise up the top. Also at the moment the bend of your leg fits over the spar, with seats they may need to be raised above the spar which would be another 150mm at the back. Your best bet is probably to make/have made custom upholstery with extra packing in the right place, but still the the same basic shape. Maybe only raise you about 50mm which isn't too bad. Especially if you aren't tall. On the other hand, possibly you could cut off the front of the seat to fit up to the spar, and just put something thin over the spar. Also, racing seats are designed to fit snug. Good for corners, bad for hot days. But something could be done, let me know if you have any more ideas, as I might want to copy them. It could always be done later. :) Link to comment Share on other sites More sharing options...
Bigglesworth Posted August 6, 2007 Author Share Posted August 6, 2007 Ribbed for extra............um...........lift. While I had the spars on, I set up the root rib so I could mark out where the drag spar wants to meet the fuse. The ribs are a leading edge half and a matching trailing edge. They are positioned on each side of the spar and pop-rivetted together through the spar. I had already cleaned them up on the bench grinder sanding disc (and made a h**l of a mess in the workshop) so they were ready to work with. The position of the ribs isn't very critical, you can line them up square with the bottom of the spar, or parrallel to the fuse, or to the centreline of the spar. Or you can be like me and not be able to see any of these references while it was in position and just put it somewhere where it looks alright. As long as the bottom and top are flush with the spar. They need to be trimmed around the spar rivets, but this is just a couple of well positioned holes in each. Mounted the trailing edge rib and clecoed it on. Sat the trailing edge angle on to see where it lines up with and found it was too high. (it is meant to line up with the bottom of the fuse) The other side was too high as well so I thought "b***ger it, if it wants to sit there, who am I to say otherwise". So I lined mine up with the centre of the bottom longeron; 12.5mm higher at the back. But I figure that I'm lightweight and a smaller angle of incidence will suit me. I clamped both ribs into the position I wanted them, and then marked where they intersected with the seat angle; the drag spar sits on the seat angle. (Actually I might put the drag spar higher in the wing and put a packer on the seat angle, that way I can always drop it if I want to). Once these were marked, it was back to the bench. The other rib positions are already marked out, but since every plane is different, I remarked them, they were out by about 15mm at the worst. Actually, I had cut my spars shorter by 7mm which wouldn't help. The reason for this is that I rivetted the spars at 25mm centres starting at 25mm. Them I had to put a 50mm doubler plate at the end. Which meant the rivet was just on the edge, so I cut the spar shorter to make the holes line up. Shorter wings suit me better anyway.:) Once the ribs were marked, I put the trailing edge in first, lined them up, cut them over the rivets, and drilled the rivet holes. Then I marked where they were, took them off and lined the leading edge up with the marks and drilled them to the existing holes in the spar. Before rivetting off, I checked that all ribs sat flush with the spar, and actually had to take a few mil off most of them. Then pop rivetted them all off, and now it looks like a wing. The other side soon followed suit. Its easy once you know how:big_grin:. Another thing. The spars sit under the bend in your leg; it might be a good idea to have the spars in when the pedals are positioned, you sit a bit differently then. Link to comment Share on other sites More sharing options...
Bigglesworth Posted August 6, 2007 Author Share Posted August 6, 2007 A weekend's work So the last two posts were the bulk of what I got done last weekend. I was held up a bit this weekend with my boss's birthday on Friday night, then a mate's 21st on Saturday night, which also affected me on Sunday, and Sunday morning my younger sister needed help studying for her trial exams. But I also had time to test the fuel tank for the nth time and it still leaks, not much this time but I am out of vinyl ester resin, more should get here this week. The shop in Canberra had to get it from Sydney then I have to arrange someone to pick it up in Canberra. If only building a plane was building. That fuel tank is a story of its own. It comes in 2 halves which need to be joined. Two layers of chop strand over the join to hold it together and seal it. Sounds easy. First the tank doesn't want to stay in position, but that's not too bad. Then I was too mean on the resin and the glass stayed porous in places. So I kept marking out holes and patching them until I got sick of it. So I put another layer of resin over the glass, now it still has some pin holes but at least I can see where they are. And a patch of chop strand will fix them up (I hope). So far all the holes have been in the join, so it is all my fault, as usual.:black_eye: I also got the engine mount on. When I first tried to fit it, it was that far out that I thought I must have stuffed up big time. But my work was correct to 2mm so it wasn't that. Rang Garry, and he said just pull it into shape. Apparently there is only so much he can make in the jig, and the last couple of welds pull it all over the place. So I drilled the holes in the mount, lined them up where they should sit, drilled the holes in the mount pins, put the bolts in (forced the bolts in) and tightened them up. It looks good enough, but the question is; will the motor fit on it? :;)4: Can't tell until I get rich enough to buy one. So that was my weekend. Hope yours was just as good. Now I probably won't spend much time on Cowboy Up over the week, so I will have time to respond to comments and questions. Post me what you think...... Link to comment Share on other sites More sharing options...
Guest danda Posted August 8, 2007 Share Posted August 8, 2007 First of all as you know I own the first Super Diamond and to date I have found no corrosion what so ever and I have had a very close look. I have found that the preparation for the paint wasn't all that flash and I would advise you to do this I didn't build this little plane however If i had the money I would upgrade to the cheetah with the big jab motor and I would have no problem doing it because I believe that Garry makes a good product also he is a top block to boot. my only problem is that I am going to have to sell the little Diamond because my flying time will be so limited because I am in need of some extensive back surgery meaning my flying days are all but over. Don Link to comment Share on other sites More sharing options...
slartibartfast Posted August 8, 2007 Share Posted August 8, 2007 That is very bad news Don. I hope you get what you need to get well and airborne again. Keep up the good work Bigglesworth. Enjoying following your progress. I will be back in Taree for the weekend and will post some progress reports then. Ross Link to comment Share on other sites More sharing options...
Bigglesworth Posted August 8, 2007 Author Share Posted August 8, 2007 First of all as you know I own the first Super Diamond and to date I have found no corrosion what so ever and I have had a very close look. I have found that the preparation for the paint wasn't all that flash and I would advise you to do this I didn't build this little plane however If i had the money I would upgrade to the cheetah with the big jab motor and I would have no problem doing it because I believe that Garry makes a good product also he is a top block to boot.my only problem is that I am going to have to sell the little Diamond because my flying time will be so limited because I am in need of some extensive back surgery meaning my flying days are all but over. Don Thanks heaps for writing that in Don, it solves my problem nicely. I'm sorry to hear about your troubles and I hope all goes well, plus a speedy recovery. Link to comment Share on other sites More sharing options...
Bigglesworth Posted August 8, 2007 Author Share Posted August 8, 2007 This spar is a bit of a drag I had a bit of time on Tuesday evening, so I put one drag spar in. The trailing edges of the ribs were up and down about 15mm, so I clamped them to a straight edge, (question: how hard do you think it is to find a 3+ metre straight edge). Then I straightened out the main spar and put nails either side to hold it in place (the D box will hold it later) and I roughly set up the wash out. [ATTACH]3231.vB[/ATTACH] Then I put the drag spar on top of the wing to mark it out. The original idea was to line the drag spar up with the aileron mount for a bit of extra support, but now the drag spar is kept about 1/2 inch away from the aileron mount. After all, both the spar and the mount are strong enough, and if they are together, the spar has to be at the edge of the rib, which will weaken the join. Also it would be a lot more complicated to position. So I marked out the position for the ends of the drag spar, sat it on top of the wing, and marked its lateral position. Its horizontal position was more fun. I measured off the bench to the marks on ribs 1 and 7 (last) where the holes should be, then I found the difference, divided it by 7...........etc. So I marked all the ribs purely on measurement. Then I cut out the holes with a 25mm hole saw (no room for moving the rib into position), I was confident of getting the positions right (don't know why:;)4:) But it must have been blessed, all the holes lined up perfectly, the spar slotted in nicely. And, when I took the clamps off, the trailing edge sat there in line. [ATTACH]3232.vB[/ATTACH] Of course, nothing goes that right. Where the drag spar comes out of the root rib was too high, this will mean an extra packer under it. I already had allowed one to leave room for adjustment, but now it will/might need 2. Then I started work on the drag strut (brace). It is made up of the cut off part of the drag spar. The plans show it at a pretty steep angle, but when I saw Garry's, it was a bit shallower which made sense to me. So, since there was enough material, I put the brace in at 45 degrees. The ends of the strut are bolted to the spar, and to the drag spar (and the bit of steel tube inside the drag spar at the end for extra strength). To get the bolt in, the tube ends are flattened and bent. This is harder than it sounds since the aluminium cracks if it is flattened too much. I cut the first bend off. [ATTACH]3233.vB[/ATTACH] I used a leather hammer to make these ends, since it gave the best results without damaging the pipe. I still went over the whole tube with 600 wet and dry to get rid of any scratches or hammer marks. But that's as much as I had time for, I didn't even get it bolted in. I got the slot cut in the 2nd rib for the strut, but that was easy. So there is plenty more work still awaiting me this weekend. Bring it on:). [ATTACH]3234.vB[/ATTACH] Link to comment Share on other sites More sharing options...
Guest disperse Posted August 8, 2007 Share Posted August 8, 2007 looking very very GOOD Biggles;) and a huge thanks for the thread , have been a reg reader Troy Link to comment Share on other sites More sharing options...
Guest danda Posted August 8, 2007 Share Posted August 8, 2007 Thank you all for you comments, I tell you this if there is any possibility of getting my rather robust frame back into the air Ill be there. Don Link to comment Share on other sites More sharing options...
myshed2 Posted August 10, 2007 Share Posted August 10, 2007 Really interesteing threads BW. Am preparing to build a Cheetah in the near future (taildragger) and your posts are inspirational. I can't imagine the hours that it will save following someone elses trials and tribulations. Keep the photos coming, there cant be too many. Regards, Dave Link to comment Share on other sites More sharing options...
Thruster87 Posted August 11, 2007 Share Posted August 11, 2007 Looking at the pic of the tube ends you flattened they don't seem to be chamfered. The stress cracking can be minimized using a press rather then hammering as this work hardens the alloy tube and making sure you chamfer the inside and outside of the tube.Also would be wise to dye penetrant check these ends. Keep it coming Cheers Link to comment Share on other sites More sharing options...
Guest disperse Posted August 11, 2007 Share Posted August 11, 2007 they don't seem to be chaffered Ok i give up .... what is chaffered ?? Link to comment Share on other sites More sharing options...
slartibartfast Posted August 12, 2007 Share Posted August 12, 2007 Chaffer is to banter, engage in good-natured ribbing, or to haggle. I think he meant chamfer : cham·fer (chăm'fər) tr.v., -fered, -fer·ing, -fers. To cut off the edge or corner of; bevel. To cut a groove in; flute. n. A flat surface made by cutting off the edge or corner of a block of wood or other material. A furrow or groove, as in a column. Link to comment Share on other sites More sharing options...
Bigglesworth Posted August 12, 2007 Author Share Posted August 12, 2007 Looking at the pic of the tube ends you flattened they don't seem to be chaffered. The stress cracking can be minimized using a press rather then hammering as this work hardens the alloy tube and making sure you chaffer the inside and outside of the tube.Also would be wise to dye penetrant check these ends. Keep it coming Cheers Good spotting.;) I hadn't chamfered it, yet. I would have spotted it later and then had to file it back until I could smooth out both sides, lucky I cut that bit off. Actually before I put the strut in, I smoothed it out with 600 wet and dry. I will admit that I didn't pay much attention to the ends since they are on the other side of the force. In my experience (not aircraft experience but close) cracks will start at the bolt and progress towards the end, not the other way. I'm glad you pointed that out, it means I have an effective quality control system in place. Also, I tried flattening the tube with various methods including in a vice, but that tended to flatten the outside edges which led to cracking. A press would need to have a small, curved head and dolly I think. Too hard to find. Link to comment Share on other sites More sharing options...
Guest Decca Posted August 12, 2007 Share Posted August 12, 2007 Well I'll be chaffered! I wouldn't usually cut in on someones rivetting kit building story but I want to wish Don a speedy recovery, and I just know you'll be back in the air soon Don. PS I've had to put the Cheetah on my list of favourites too Ross, Bigglesworth & Don. Regards, Decca. Link to comment Share on other sites More sharing options...
Thruster87 Posted August 12, 2007 Share Posted August 12, 2007 The bloody spell checker failed!!!!!!! cause in no way was it my fault Cheers Link to comment Share on other sites More sharing options...
Guest disperse Posted August 12, 2007 Share Posted August 12, 2007 wasn 't trying to be clever , just didn't know what you ment Link to comment Share on other sites More sharing options...
Bigglesworth Posted August 13, 2007 Author Share Posted August 13, 2007 I have spent a long weekend of work on the plane, but I can't write updates since I left my camera at the workshop :;)1:. Don't worry, I will get it tomorrow, and be prepared for more stories. Thanks to all who write in. It is good to know that people read what I write. And if myshed2 wants any specific build information, feel free to post your questions. More words and pixels tomorrow. (actually I might work on the plane tomorrow night, maybe Wednesday) Link to comment Share on other sites More sharing options...
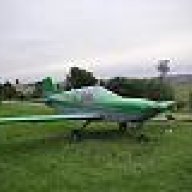
slartibartfast Posted August 14, 2007 Share Posted August 14, 2007 BW has given me permission to post my own updates here so we don't bore you with another Cheetah building thread. Besides that, I don't intend to provide as much detail. Busy enough already. So here's a few pics of where we're at hardware wise. [ATTACH]3272.vB[/ATTACH] The engine is in. [ATTACH]3273.vB[/ATTACH] Undercarriage under. In the background is what it is supposed to look like. [ATTACH]3274.vB[/ATTACH] Wings are now ribbed (for my pleasure) and leading edges on (since the shot). On the left bench is the wing for the all metal Cheetah Sierra that Garry is building. Note the sexy new winglets. [ATTACH]3275.vB[/ATTACH] Me preparing said sexy new winglets for molding. These are going to be included on my baby (tentative name="WindCheetah" - comments?). They should reduce wing tip vortex drag considerably, and are very cool even if they don't. There are so many collaborative changes in mine that Garry has deemed it the first Cheetah Mk II. [ATTACH]3276.vB[/ATTACH] Here's a shot of Cheetah Mk I just to show its attitude. Pure aviation testosterone. Except for the rugs. Ross Link to comment Share on other sites More sharing options...
Guest disperse Posted August 14, 2007 Share Posted August 14, 2007 im going taree as soon as the sierra is rolling........i seriously think this is the plane i will be getting ;) (soon as i get over the PUKE'S) and learn to fly Link to comment Share on other sites More sharing options...
Bigglesworth Posted August 15, 2007 Author Share Posted August 15, 2007 Ok, so who's winning? You may have a motor, but I have a tail, cargo bay, floor and a fair bit more (just wait for today's installments) Wings you are just ahead of me, but maybe not for long. We'll see. Thanks for posting anyway. It is good to know what the competition is up to. What else make it the Mark 2? Winglets (I like them) raised turtle deck (not for me thanks). Anything else I will get jealous of? PS You made the same mistake as me, and Garry in his prototype: Look where the front cargo door will be fitted. You will have to trim that gusset on the front side. Just like all of us Link to comment Share on other sites More sharing options...
Bigglesworth Posted August 15, 2007 Author Share Posted August 15, 2007 On a wing and a prayer. So the next step was to finish fitting the drag strut by the simple expedient of drilling a hole and putting a bolt in.;) Actually the bolt also had to go through the drag spar, and had to be in the right spot. The spar has to be spaced right so it has the right amount of overhang to be able to fix it to the fuse. And of course another 10mm because it looked like one of those thing susceptible to the disease of shrinking while you while you work with it;). So I had that in. Then I had to set the ribs up at right angles (they were at all sorts of angles, none of them at the 'right' :confused: angle) And then I marked where they sat on the spar. Then I took the drag spar out. Ever tried to pull a rod out of 7 tightly fitting holes in ribs which insist on jamming? Well I can tell you it is not easy. So it was out. Then I got a piece of 60 grit paper and scratched my nice spar. This flies in the face of what the rest of construction is, but the fibreglass has to be made to bind somehow. I was very careful when doing it to only score along the tube, across leads to mild cases of death, cureable only by resurrection:black_eye:. While I was getting into this scratching thing, I also scratched up the ribs (and then I started scratching all over as you do when there is fibreglass dust around:laugh:) Actually I forgot the ribs the first time, put the spar in, then had to take it out again, now wasn't that fun?:;)4: Anyway, so spar is in, everything is scratched, cd player will be alright for the 2 hours I will have fibreglass on my hands (Dire Straits can alway go around a few times), Ready to start glassing. First, I cut a stack of 1x2 inch pieces of chop strand. These are glassed at a right angle between the tube and the rib. 3 per layer (actually it should be 3.14, but budget cuts, you know :;)1:) So mix up resin, start work. I soon realised that a neat job was impossible and let it get everywhere, I cleaned it up later when it was still not fully hard. So. 2 layers of glass, both sides of the rib, 7 ribs, leaning close to the job to see what I was doing,,,,,, I get high on building my aeroplane:keen:. While I had the resin out, I also mixed up some cotton floss (strong paste) and gummed up the drag strut bolts. Now they will never come loose (and what did they say about the Titanic? I will add 'if God is helping me' and that will make all the difference) So, now the same thing to the other wing. Sounds simple, hey?:) Actually, it was almost just as hard, there is always some new problems, but nothing worth writing about. Anyway, that was the easy part as I later found out.... On a side line, the steel inserts had traces of rust in them. So I soaked them in Lanox (lanolin based anti-corrosive), then to keep it in, I put a rubber plug in the end. Just that morning my boss had got some plugs he mis-ordered and wanted to get rid of. And they look professional too. Link to comment Share on other sites More sharing options...
Recommended Posts
Create an account or sign in to comment
You need to be a member in order to leave a comment
Create an account
Sign up for a new account in our community. It's easy!
Register a new accountSign in
Already have an account? Sign in here.
Sign In Now