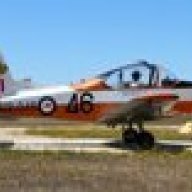
Matt Posted January 19, 2009 Share Posted January 19, 2009 After 3 weeks across the pond in Tassie for Christmas and New Year (another trip report I need to write), MCT was scheduled for a week R&R in Yarrawonga for a bit of a makeover. Somehow the weather gods have been shining on us for the last couple of months and all planned flying days and activities have been met with great weather, so the day after the long haul back from Tassie, we're loaded up again for the relatively short hop up to Yarrawonga....well short for me that is, unfortunately our plan to have another aircraft available to ferry us back didn't work out so Kaz had to drive for 3 hours while I got the luxury (?) of the Parrot. After the first lonely flight in months, I arrive at Yarrawonga just after Kaz (I left over 2 hours later) and we hand over our pride and joy to Bill and the guys at Douglas Aviation in Yarrawonga. Armed with many photos, reference material etc. we outlined what we'd like to achieve within an agreed budget...which was a fraction of that required for a full strip and repaint. With the "to do" list complete, we headed into Yarrawonga for a late lunch then hit the road for the trip back home. The days went by with a few phone calls back and forth to check and verify some details, confirm everything was progressing to plan etc. Before we knew it the week had passed and it was time to return to Yarrawonga for the unveiling and to pick up our "new" aeroplane. Thankfully we'd managed to arrange a ferry aircraft this time...in fact 2. Friends Phil (C175) and Chris & Suzi (RV-10) had thought a trip to Yarrawonga for lunch was a great idea...the question was who was going to fly with who...that RV-10 sure is a nice aeroplane! In the end I chose to have a "heritage" flight with Phil in the 175 while Kaz got to ride in modern speed and luxury in the RV-10. An uneventful flight and landing ensued and was made a tad quicker with the aid of a 15kt tailwind. We headed over to the Douglas hangar and found our pride and joy looking a whole lot different than we left her! The paintwork had been completed and looked great. All that was left to do was to replace all the military markings with vinyl transfers...and that's where the fun started. Now any reasonable person would assume that the markings on either side of an aircraft (particularly a military aircraft) would be identical in size, shape, font etc. Well that's where our poor painting friends (and more specifically the poor guy creating the vinyl transfers) came unstuck...the list of discrepancies was long and included: the large 46 on either side of the fuselage being different sizes and slightly different fonts, the kangaroos in the roundels being different sizes on the fuselage to the wing, the red-white-blue stripes on the tail being different sizes on each size, the size and font of the A19-46 serial number being different on either size of the fuselage and on it went. Now all of this wouldn't have been an issue had we completely stripped and repainted or had both the white and orange on the fuselage painted. As it happened, the orange paint on the fuselage was/is in reasonably good condition but the white on the fuselage was well worn and faded. The easy thing to do was mask the orange and sand back and repaint the white area...so far so good. The issue with the markings comes where most/all the military markings sit above and below the white/orange line and with all the markings in the white being sanded and painted over, the new markings would have to be placed over the remaining markings on the orange...and that's where we came unstuck. After more tracing, measuring, phone calls and trips to the poor fella making the transfers, they were all completed and applied...and the result looks great! Anyway, after all that, here's how she came up...the first pic is a "before", the others are all "after"...and no, there's no Photoshop or other wizardry involved. Before... And after... Link to comment Share on other sites More sharing options...
slartibartfast Posted January 19, 2009 Share Posted January 19, 2009 That looks fantastic Matt! I bet you're both happy campers now. I look forward to seeing all 3 of you at Echuca. Link to comment Share on other sites More sharing options...
Matt Posted January 19, 2009 Author Share Posted January 19, 2009 Thanks Slarti and yep we're both very happy. Look forward to seeing you at Echuca as well...how's the Cheetah repair going, back in the air yet? Link to comment Share on other sites More sharing options...
slartibartfast Posted January 19, 2009 Share Posted January 19, 2009 Absobloodylutely. Going better than new. Link to comment Share on other sites More sharing options...
djpacro Posted January 19, 2009 Share Posted January 19, 2009 It looks neat now, frustrating to have all those minor problems. Link to comment Share on other sites More sharing options...
Ultralights Posted January 19, 2009 Share Posted January 19, 2009 sounds like nothing has changed with the RAAF and RAN painters, even today, the hornets, hawks and the RAN choppers are all different markings, funnily enough, it was only just recently i discovered there are no qualified painters in the paint shops at Nowra and Williamtown, and after working some overtime on repainting a seahawk recently, all the markings are measured and masked up by eye and tape measure only. basically there is a location drawing in the manual, no real accurate way of measuring, and you basically look at where the roundel should be, and get the masking tape out and mask out a circle. thats it. it no more detailed than the decal location pics on glue together models. Link to comment Share on other sites More sharing options...
davec Posted January 19, 2009 Share Posted January 19, 2009 Guys, whats happening at Echuca? r they having a airshow? Dave Link to comment Share on other sites More sharing options...
Guest Brett Campany Posted January 19, 2009 Share Posted January 19, 2009 Very nice indeed!! Wish I could join you guys over there! Link to comment Share on other sites More sharing options...
Student Pilot Posted January 19, 2009 Share Posted January 19, 2009 Only a week, didn't want to linger longer? Link to comment Share on other sites More sharing options...
markendee Posted January 19, 2009 Share Posted January 19, 2009 What a pearler. Link to comment Share on other sites More sharing options...
slartibartfast Posted January 19, 2009 Share Posted January 19, 2009 Guys, whats happening at Echuca? r they having a airshow?Dave All the info here Davec. You're close - you'd better come along. Link to comment Share on other sites More sharing options...
Mazda Posted January 22, 2009 Share Posted January 22, 2009 It looks great Matt. Are you going to Wangaratta for the 50th anniversary 6 - 8 March? Link to comment Share on other sites More sharing options...
Matt Posted January 27, 2009 Author Share Posted January 27, 2009 Hey Maz, thanks for the comments and we'll definitely be in Wangaratta. Look forward to finally meeting you there...assuming you're going??? Link to comment Share on other sites More sharing options...
Mazda Posted January 27, 2009 Share Posted January 27, 2009 Hi Matt, I'd planned to go to Yarrawonga but I have to go to a wedding in Sydney that Saturday. I haven't ruled out Sunday though, I'm just trying to think of a feasible way to do it. Link to comment Share on other sites More sharing options...
Recommended Posts
Create an account or sign in to comment
You need to be a member in order to leave a comment
Create an account
Sign up for a new account in our community. It's easy!
Register a new accountSign in
Already have an account? Sign in here.
Sign In Now