Head in the clouds
-
Posts
1,842 -
Joined
-
Last visited
-
Days Won
42
Content Type
Profiles
Forums
Gallery
Downloads
Blogs
Events
Store
Aircraft
Resources
Tutorials
Articles
Classifieds
Movies
Books
Community Map
Quizzes
Videos Directory
Everything posted by Head in the clouds
-
Vx, Vy, and turnbacks
Head in the clouds replied to Ada Elle's topic in Student Pilot & Further Learning
Ada Elle, flying isn't a perfect world. If you were flying a jet in nil wind conditions your 'flying by the numbers' formula might have some relevance but the reality of flying a very light aircraft in varying wind conditions completely negates any use of Vx, Vy or anything else. In the real world you fly these small aircraft according to your experience in the differing conditions on each day. Your airspeed indicator has a delay that prevents you being able to fly the 'perfect scenario' in any case. If you spend your time chasing the ASI you'll not be looking outside, nor will you be taking best advantage of lift and sink, and wind gradients as they affect you. And - you'd need a sensitive variometer rather than just an RoC indicator to tell you when to fly faster in sink and slower in lift - if you really want to nail this one you would benefit from going gliding ... Get to know the aircraft you fly and you'll make much better height/distance gains than you ever will by trying to fly the numbers. -
Vx, Vy, and turnbacks
Head in the clouds replied to Ada Elle's topic in Student Pilot & Further Learning
I think the OP and a couple of others might like the lengthy and informative thread we had on the EFATO subject last year - EFATO Reference Thread -
Practice enough and you'll never fear crosswinds. When I/we were instructing quite a high proportion of our time was spent teaching the student to run up and down the airstrip on one wheel. We didn't let a student solo until they could quickly change from one wheel to the other without deviating from track and in moderate conditions. To conduct this exercise and be completely comfortable with it means that you have developed the ability to fly/operate with crossed controls and adjust the amount of each to maintain directional control of the aircraft for extended periods of time, not just a quick jab on the rudder to kick it straight on touchdown. Once you can do that you are quickly able to recognise when you're running out of control authority, so you can determine when a crosswind is above your, or the aircraft's, capability. With practice a good flyer can usually exceed the numbers provided in the POH by a significant amount, and if the crosswind is so strong that you can't, you can usually land diagonally across the strip, as others mentioned. There's much more to it than just running along the runway at stable speed and power and switching from one wheel to the other. Each time you change wheels gyroscopic precession provides a bit of influence which de-stabilises the exercise just enough to make you have to adjust for it, and the GP acts in a different direction as you change from left to right, compared with right to left. Any power change also affects things by changing the torque reaction and also by increasing/decreasing the control authority of the tailfeathers. Conducting the exercise at slower or faster speeds provides differences too (the amount of aileron drag for instance) and doing it tail-up or tail-down is another variant because it brings P factor into play. Until the student is fully conversant with being able to do this exercise in all its variants and understand why the different factors affect the plane in the various different ways, IMHO they're not ready to start playing with crosswinds. Once they have reached that stage then they usually find crosswinds to be a walk in the park. It's also good to know what other tricks you might have up your sleeve to pull out in the event that things get unexpectedly untidy. At Kooralbyn the (East/West) runway goes through a cutting about halfway down, and has high mountains on the northern side. A northerly wind can produce some very exciting moments at the cutting and is a good opportunity to learn the benefits of a quick burst of power, how it provides instant rudder authority, how the torque is very beneficial in one direction and can be quite inconvenient the other way, how lowering the tail to benefit from P factor can save the day. Even the deliberate use of gyroscopic precession to provide a very powerful yaw input - is everyone aware that giving the engine a rev and then lowering or raising the tail will make the plane yaw strongly to one side or the other? You need to know instinctively which way it acts or you may be bringing yourself undone inadvertently. And the wonders of differential brakes, should you happen to have them. Dazza was one of our Kooralbyn students and hence his remark, he took to unco-ordinated controlling like a duck does to water. This form of cross-control training used to be commonplace in quite a few of the schools in Qld that I knew of in the 1980s but doesn't appear to be the norm anymore. As I've seen it since there are three reasons why most students don't seem to receive this type of training anymore. The first is that during all of my BFRs in recent years I haven't come across an instructor that can, or is willing, to do, or even try, it. The second reason is that it means that planes spend extended time making noise on the airstrip while running up and down and many airstrips are either too busy or have noise sensitivity issues, so instructional flights are required to get up and go away to the training areas. A third reason is that students themselves often resent time spent on the ground and want to get flying rather than training for ground management, and instructors are probably a bit too ready to appease them.
-
DooMaw - building a STOL
Head in the clouds replied to Head in the clouds's topic in Aircraft Building and Design Discussion
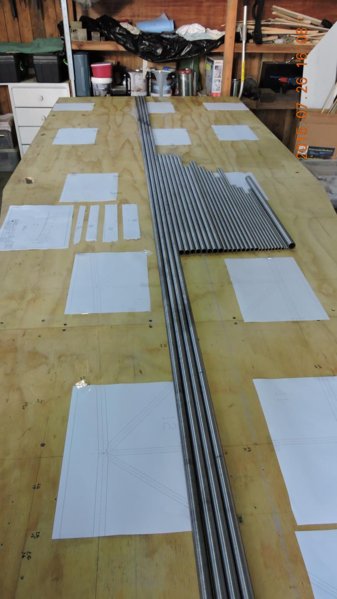
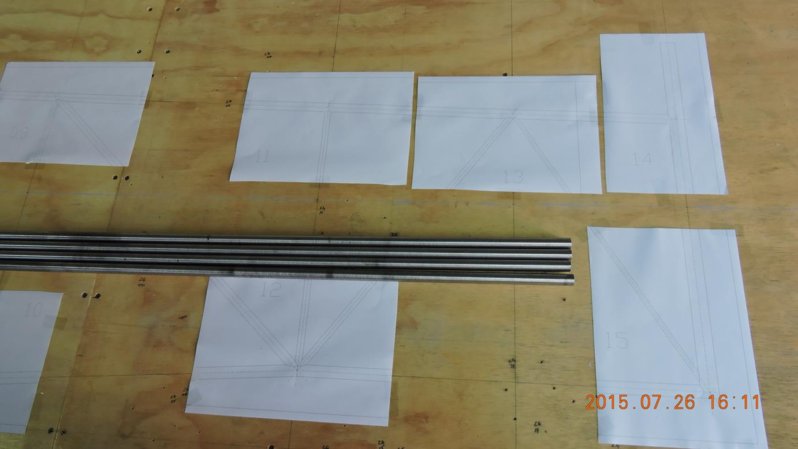
Not much interesting stuff to report on but plenty of hours have been put in to get nearer to the next stage. With the time spent on CAD and creating the templates described above (13hrs), correcting them to reduce the fit-up time later, cutting them out and then cutting the tubes to length (8hrs), descaling the tubes in the lathe, and descaling the larger tubes (spar and strut carry-throughs) by hand, then washing, masking and painting them and begin the wrap template stencilling (14hrs) has made for a busy week with another 35hrs on the project on top of normal work. So the total hours on the project so far are 245hrs. The pictures show the tubes during preparation - Not too far off until I have the stencilling finished and the notching done, then I can start to jig the two fuselage sides together.
-
Kickstart the Bugatti "Blue Dream"
Head in the clouds replied to Head in the clouds's topic in AUS/NZ General Discussion
High power engine test and a ground run to 60kts has been conducted without any problems. There's an onboard video posted on their project page, it's worth a look. The twin Hayabusa engines sound the part. It can't be too long now before the first test flight -
DooMaw - building a STOL
Head in the clouds replied to Head in the clouds's topic in Aircraft Building and Design Discussion
I expect it could be done by CNC TIG but I don't think the production volume would justify the set-up costs. I haven't seen one in action and the ones shown on Youtube don't seem to have a provision for adding filler material, they seem to just meld the edges together. I'd imagine there'd have to be some that do add filler though, probably from a reel a bit like a MIG machine I guess. You can bring the completed fuselage back to the N (normalised) condition by having it heat treated but of course it requires a large oven and special care due to the thin material. As far as I know it's not generally done even on earlier steel tube production airframes like the Taylorcraft, Piper Cubs/Pacers or the Austers. They were all welded using OA (oxy/acetylene) process and the technique there is to bathe the HAZ (heat affected zone - the edge of the weld which shows the colour) with the flame after completing the weld, and slowly moving the flame further away to provide a degree of stress relief to the weld. The TIG process allows a good operator to complete the weld with a lot less heat than the OA process and so the stress relief is less important. Naturally not all welds go as well as you might like so if one does end up having been heated more than you're comfortable with you can go back and locally stress relieve it later with a propane torch. When doing that you just heat it gently and evenly around the area until the blue colour disappears and is replaced with a straw colour, the same as used for letting back (tempering) heat-treatable steel (which CRMO is) after hardening it. Some folks have thought this would leave it annealed (in its softest state) but that's not so, it's still harder than the N condition (as the tubing is supplied - hence the 4130N designation for CRMO tubing) and the N condition is harder than the fully annealed condition. The really important thing when welding CRMO is to avoid there being any drafts in the workshop because the moving air cools the welded area too quickly and that can leave it brittle and more prone to cracking in service. My shop/garage has slatted walls so when it's windy I have to place shields around the area I'm working on. My welder isn't a branded one, it has a stupid name "Super-200P" and was sold on ebay by a mob who called themselves Proweld industries and they promptly disappeared after selling a dozen or so of them. There are lots of similar ones on ebay, they have different cases and the switches and knobs in different places but they all have the same or similar electronics inside. They are so generic that mine even has some of the knobs labelled wrong which caused me quite some confusion at first, my "AC Balance" knob actually controls the Pulse Duty ratio ... and the "Clean Width" is actually the AC Balance, I eventually worked that out because most machines have either Clean Width or AC Balance controls but not both. It was a bit of a learning curve because the previous TIGs I've used were transformer types not inverters, so didn't have any of the fancy features. These are really cheap, mine was about $800 delivered but if anyone considers buying one of these it's worth checking what features it does have (or doesn't). Mine claimed to have AC Frequency control but it doesn't, and that would be useful for fine welds on Aly. Mine also has a knob for initial slope but it doesn't do anything and the manual says it doesn't have it. The problem with all this is that the people selling them generally know nothing about them or about welding, they just buy and sell them. This one also does stick welding and plasma cutting up to 16mm plate but I don't use those features although it does come with all the necessary accessories to do so. -------------------------------- In gaps in real work I've been preparing the next stage of the build, printed the wrap templates for all the members that go between the two sides of the fuselage front and will form the cabin. There are a lot more members than at first meets the eye, more than 50 members which is nearly as many as the total I've done so far in building the front and aft sides, here's the Marking Plan -
-
The main reason for washout, whether geometric or by using different airfoil shapes/thicknesses at the root and tip is to ensure that the root of the wing stalls before the tip. If the tips stall first, inevitably one tip will stall before the other resulting in a wing-drop and potential spin entry, so for safety we really need to have the tips still flying when the stall starts to propagate from the root. In general however, geometric washout (rigging the angle of incidence lower at the tip than at the root) is only required for tapered wings where the airfoil shape (or thickness ratio) hasn't been designed to make the tips stall later than the root. In general the tips will stall first on a simple tapered wing with the same foil and thickness ratio because the shorter chord at the tip means it is operating at a lower Reynolds number than the root. Again, in general parallel chord wings, like those on the Drifter, will stall progressively from the wing root toward the tip without any washout. This would appear to be a good reason to not use washout on a parallel chord wing when considering that wings with washout might be considered to be less efficient since the outer portion of the wing is not producing as much lift as the inboard section, meaning that the inboard section has to be flying at a higher angle of attack, and hence less efficiently than it would otherwise. However that's not the case, the most efficient wing will have a bell-shaped (or elliptical) lift distribution and providing the wing with any form of washout helps us toward achieving that. That higher efficiency is primarily because having the tip producing less lift results in a much reduced tip vortex, and consequently much less induced drag since the tip vortices are a significant proportion of the total drag. In short, getting rid of washout on your parallel chord wing might not cause a major hazard in terms of wing-drop in the stall (although it could, you'd need to test it extensively to be sure) but it is likely to reduce the efficiency of the wing by increasing its total induced drag. A lot depends on what you're trying to achieve. If you want a better cruise speed you could rig it with about 2-3 degrees of washout to achieve something like the elliptical lift distribution and reduce your tip vortices. Then you could also reflex the ailerons slightly (I'm assuming full-span ailerons like the Drifter). That would give you a very noticeable cruise speed increase at the same power setting. The cost would be a greatly increased take-off distance. If you want a short take-off improvement you could do the opposite, get rid of the washout and rig the ailerons lower (drooped), but you'll lose cruise speed and risk a wing-drop while trying to land slowly and that could hurt ... I see you've posted while I was writing this, and that you have flaperons, in which case you will find it hard to do much better than add a reflex position for the flaperon, and leave some washout in the wing for reduced drag and stability in the stall.
-
Fatal Helicopter Accident WA Pilbara
Head in the clouds replied to Rotorwork's topic in Aircraft Incidents and Accidents
Not a strange question at all, however yours is a rather strange answer and suggests that you're denigrating light helicopters without knowing enough about them. It's not correct to think that "light helicopters are somehow different, when compared with heavier helicopters, than say, LSAs are when compared with GA aircraft", because the comparison is a very good one. The only noticeable difference that could be described as 'more difficult' when flying a light, very light or ultralight helicopter, compared with a medium-heavy, for example, is the much lower rotor inertia in event of a power failure. That means that you need to react by lowering the collective quicker, just as you need to react quicker in an LSA fixed-wing than in a GA - and neither of those differences are sufficiently difficult to warrant calling the machines, whether helicopter or LSA, 'nasty'. In my career I flew helicopters from medium-heavy (twin engined Bell 222), medium (Bell Longranger), medium-light (Bell Jetranger, Hughes/MD/Kawasaki 500 series/Squirrel etc), Light (Bell47, KH4, R44, R22, Rotorway Exec) Ultralight (Mini 500 and a couple of homebuilts). Contrary to what most people would expect, the heavier helicopters are far more sensitive to fly and from a handling viewpoint are more likely to have you in trouble than the lightest ones. The big Bells have a parallelogram suspended floating mast system to isolate the cabin from the vibration of the heavy teetering rotor system. The vibration without it would be intolerable, and is so extreme that hydraulic assisted controls are essential to make it flyable for any period of time. A hydraulic failure requires landing immediately. That same teetering system presents a real hazard to operations at higher speeds too, as mast bumping with the potential breakage/loss of the mast is a real danger when manoeuvring, specifically when rolling left with an anticlockwise system. As the helicopter gets smaller the hydraulics become less critical, B47 is unpleasant to fly un-assisted for any length of time but it can be done if necessary to complete a critical task, and the R44 didn't originally have any hydraulics. In the R44 the vibration transmitted into the cyclic control column was quite significant though, and unpleasant, so the first 'solution' provided by the Robinson factory was to hang a leather bag full of lead shot on the top of the control column. After a while the vibration turned some of the lead shot to powder and soon after that the leather bag started to come apart spilling the shot through the cabin. The factory eventually recognised the need for a less agricultural fix and developed the hydraulic system in use today. Moving to the ultralight helicopter, they are an absolute delight to fly. When a pilot first gets endorsed on helicopters that are larger than the one they trained on,* they are invariably astounded to discover just how sensitive the Jetranger is, particularly in roll, and most have quite some difficulty holding them steady enough in the hover to be able to land. Conversely ultralight helicopters are very stable and easy to hover. In USA there is/was no requirement for a licence to fly any aircraft under 254lb empty weight and many ultralight helicopters fit into that, consequently there are a number of people there who have flown their homebuilt 'copters without any formal training - you wouldn't want to try that even with something as small as an R22. *unlike fixed-wing, you have to have a separate endorsement for each type of helicopter you fly and these days most people train on R22 and go to the Jetranger after a while. So much for the basic handling - the smaller the helicopter, the less likely you are to come unstuck, and the bigger machines have more quirks - that's why it's pilots with more experience that fly the bigger machines. That only leaves the flight regime itself, and in that regard there's little difference between them either, and where there is a difference once again the lighter the helicopter the less 'nasty' it is. If you operate behind the so-called 'dead man's curve' (height/speed graph) you're likely to get hurt or killed if you have a power failure, and in that case it doesn't matter what size the helicopter is. Small helicopters are much more forgiving than large ones if you get into vortex-ring state (aka settling with power), the lower total inertia of the small helicopter allows you to get out of it quickly and with minimal height loss. Similar with tail-rotor vortex ring, and dynamic rollover is a problem with the larger helicopters equipped with oleo suspension, not with the ultralight helicopters with relatively rigid skids. The lower total inertia of the ultralight helicopter also reduces its vulnerability to mast-bumping when manoeuvring unless you are very aggressive on the cyclic. Retreating blade stall and compressibility are similar for all types regardless of size. So - what's so "nasty" about the "these light helos" Birdseye? -
Judging the flare
Head in the clouds replied to Nightmare's topic in Student Pilot & Further Learning
On late final approach, at about 20-30ft off the ground are you remembering to transfer your gaze from the aiming point to the far end of the runway? Once you're looking down the runway you will judge your height far better. Then it's a matter of allowing the plane to fly slower and slower (because the power is off) while keeping it close to the ground and not doing anything to actually land, just keep holding it off as it tries to settle, eventually the stick will be well back and the plane so slow it can't keep in the air anymore so it will land. Avoid jiggling the stick around too much, most people try to correct every minute movement of the aircraft during the round-out, don't worry about the small movements, just correct the large ones - my students used to find it easier to forget about any deliberate kind of 'flare' and just think of it as a round-out, in other words trying to prevent the aircraft from landing, rather than you doing anything specific to land it - just hold it off the ground as it slows down and it will land itself. -
Fatal Helicopter Accident WA Pilbara
Head in the clouds replied to Rotorwork's topic in Aircraft Incidents and Accidents
While it doesn't actually say anything at all, this is a very authoritative statement that suggests you know something that others don't. I assume you do know a lot about helicopters in general, so what are you actually saying about light helicopters? What do you mean when you say they're 'nasty things? What parts of the flight envelope can they be taken into that's any different from any other helicopter? Would you say that light helicopters are somehow different, when compared with heavier helicopters, than say, LSAs are when compared with GA aircraft? -
DooMaw - building a STOL
Head in the clouds replied to Head in the clouds's topic in Aircraft Building and Design Discussion
Hmmm - at that price I'll just stick with the wrap templates, there's probably only about 20hrs total in templating and cutting the notches by hand with a 1mm disc and shaped 6mm grinding disc in a pair of angle grinders. That doesn't justify a AU$4K materials cost price increase unfortunately. I'm pretty sure I came across a different mob that were quoting about US$1500 and buying the tubing direct from US would save about that amount compared with buying it here, even allowing for the freight. I'll see if I can find the link again. Yes, nice - it's a technique called 'walking the cup' and produces very consistent welds. It works well when butt welding two tubes well prepped with a chamfer to their edges, or for a fillet weld, or for a lap joint. You can even use it to produce a fillet down the middle of a flat sheet by clamping a guide to the sheet. The point being that you need one or two edges as a guide to walk the cup along. For those who don't TIG, the cup is the ceramic cup that acts as a nozzle for the Argon shielding gas. What is actually happening to produce such a regular weld is that as you swing the torch from side to side you are producing a zig-zig ladder in effect, and stepping the cup up the ladder as you progress. You just have to match the dipping of the filler rod with each swing of the torch. It takes a bit of practice but isn't as difficult as it might at first appear. I managed a reasonable weld the first time I tried it on a test piece but haven't had a need to use it on a real job yet. The hardest part is feeding the filler rod along in your hand as it gets used up, and I guess even harder would be changing for a new rod on very long welds like that one shown in the video. Progress on DooMaw since the last update - Wednesday and Thursday I got 7.5 hrs in after work all spent notching and fitting up the tubes for both sides of the aft fuselage. I spent an hour and a half on Friday evening and got one side of one side tacked, a bit slow as I had some dramas with the welder which I later discovered was power brownouts in the area, electronic welders don't appreciate that very much! On Saturday I tacked the first side of the second side, labelled and removed all the wood-blocks, tacked the second sides of both sides and fully welded out the first side. Today I welded out the second side, so as Mark predicted the aft sides are done by this weekend. As I suspected the very thin tubes were quite demanding but with the welder turned right down and the pulse function disabled, and using the foot pedal to modulate it off and on as you might with a MIG, I was able to make quite reasonable welds though a bit tiring on the ankles. Unfortunately being a cheapie welder it doesn't go to really low settings like a Miller does and at the lowest setting the background current when using the pulse function is just way too high for very thin material. No complaints though, it got the job done and one day I'll invest in a Miller. A few pictures show the aft fuselage tubes in the jig during tacking, one frame tacked and the second in the jig, the portable welding trolley that I set-up a couple of weeks ago, the jig blocks removed for welding out the frames, some of the welds on the thin tubing, the last one shows the tiny 1/4" (6.4mm) tube right at the rear - That's another 25hrs in the project log making a total of 210hrs so far. Next I was going to join the rear sides to the front sides but I've changed my mind, for easier manhandling and rotating it all for welding the internals of the clusters, I'm going to jig and join the two front sides with all the front cross-members and vertical and horizontal bracings. That will produce a very rigid cabin assembly and it will be much easier to join the aft fuselage into it once it's fully welded out. So as spare time allows, it's back to the CAD work again, produce more wrap templates, cut more tubes, sand off the mill scale, paint them with primer, mark them for notching, notch them, make a wood-block jig for the fuselage sides, laser level them to be sure they're level and square, fit up the cross-members and diagonals ... rinse and repeat.
-
Fatal Aircraft Accident Deniliquin NSW
Head in the clouds replied to Rotorwork's topic in Aircraft Incidents and Accidents
It's a really easy trap to fall into when flying ground-related airwork. Extreme bank angles happen for several reasons, it can be wind drifting you over the target while manoeuvring or the mob moving under you, the tendency is to increase your bank angle to be able to keep your eye on the target. While you're watching the mob instead of the horizon, the high bank angle results in the nose dropping, by the time you look up and notice you think you have to reef back and consequently stall. Correct recovery if as for a spiral dive - roll level before raising the nose. Trying to communicate with ground crew by hand signals etc (i.e. without radios) is another trap that can have similar results. Both of these scenarios are part of LL/mustering curricula. The real issue is that there's rarely any need to fly low when mustering except when yarding cattle without ground support, and that's helicopter territory. That's why there's a mustering training course and endorsement ... -
Fatal Aircraft Accident Deniliquin NSW
Head in the clouds replied to Rotorwork's topic in Aircraft Incidents and Accidents
The first time that happens an inexperienced mustering pilot might try that but it's very unlikely you'll contain them. The next time he/she will pull back a long way and let them settle before a second more gentle try. If they break again you pack up for the day and go and fix some fences or troughs instead. Muster a couple of other distant paddocks before giving that one another try. So much depends on the station, previous handling of the stock, treatment in the yards, whether the stock get walked back out again or the the gates are just opened and they're left to it. I used to work one station just near Broome, the stock were known as commando cattle, they knew every trick and it was rare to get any in the yards at all, anything you got was usually roped from bull-catchers and all were sent straight off to the meatworks. Animal fatality rate was very high - 50% wasn't unusual. By contrast another station not that far away had a cocky who used to get you to sweep way back for a couple of hours (this was in 100,000 acre paddocks) and start mobs moving, bring them together into one, but very loose, then drop him off the helicopter on the tail about 6-7 miles from the yards. He'd then send me off to do other work for the day and the next time I'd see him I'd fly afternoon smoko to the yards by which time he'd yarded the lot - sometimes 5,000 head - doing little more than walking quietly along behind, well back out of sight of any beast, tapping two sticks together. When I'd get there they'd be quiet and watered ready for drafting. That fella could've even taught Temple Grandin a thing or two I reckon, shame he was such a mongrel in every other way. -
My 2c worth - when sitting around the chat table in the clubroom I've sometimes had to bite my tongue when hearing some of the quite fantastic things some of our fellow flyers come out with. They might be a small minority but their complete lack of understanding of some basic principles astounds me. One of my favourites came from a long-time flyer who not long afterward gained his instructor certificate - "a stall happens when you run out of wind" ... I knew of a couple of fellas who owned an HP LSA and travelled a long way to do their BFR with an old mate who taught in a LP machine because he would expect them to be unfamiliar with the plane and go easier on them. They never saw their BFR as a great opportunity to learn more, it was just an imposition that had to be dealt with every so often. Although there is a choice of local schools with very competent instructors, others get half a dozen people together and bring a distant instructor to put them all through in a single day, or more like a half a day. They openly admit that they did it to limit the real time the instructor would have to spend with each of them, he would just rattle through them a hundred bucks a pop, rubber stamp in hand. In RAA I've never heard of anyone actually failing a BFR, does anyone else know of someone who did? The nearest I came to hearing of one was that an instructor recommended the pilot take some extra training. They still passed him and he didn't take the extra training, in fact he was so offended he made a point of finding a different instructor for the next BFR - that was when I met this fella. When he told me the story - his comment was that he hoped the 'new instructor' wasn't so finnicky ... On a different note though, I mentioned in another thread that I don't believe our crash rate per flight operation has actually increased, in fact I think it has probably decreased. Years ago we used to have lots of crashes but it was rare that anyone got hurt, let alone killed. I think that was because the airframes were stronger and they flew very much slower. I think it's worth considering that our current high fatality rate might have as much to do with the planes people are flying, as with our actual competency. For the record, and having trained for Pilot Certificate, PPL and CPL licences I do consider that the training for PPL is a lot more comprehensive than for the RAA PC. A couple of the RAA instructors that I have flown with (admittedly a few years ago) demonstrated quite an absence of knowledge of some of the basics, and were more than little timid in teaching/demonstrating emergency procedures. One was so much so that he wouldn't fly, or allow a student to fly, at less than a high cruise speed on final approach, he was so afraid of stalling. But - back to the planes we fly ... are most people aware that all certificated planes (GA types, that many of us don't fly) have to have kindly flying characteristics? They have to comply with certain design requirements which remove any nasty biting tendencies they may otherwise have had. The types that we fly don't have to go through those hoops and consequently many of our planes do have some quite nasty characteristics which make them more dangerous if handled even slightly inappropriately, in some cases. And - they are low-inertia machines, meaning that they lose airspeed more rapidly than their GA counterparts, so these situations develop more quickly, requiring us to be significantly more skilled than GA flyers need to be. Further - our planes aren't required to provide us with any forms of occupant protection except seatbelts (yes, seatbelts, not even harnesses). GA types have to be able to demonstrate quite a lot of features that give the occupants the best chance of emerging unscathed from a crash that would leave many of us unrecognisable in a similar LSA crash. Food for thought. I'm not saying that all LSA/Experimental types don't have built-in crashworthiness. Some have been designed with it in mind, so before rushing out and buying the prettiest plane on the line it's probably worth giving some serious consideration to that type's occupant survival crash history. To their very great credit Jabirus seem to be excellent in that regard and there are others, I've seen a very bent AAK Hornet which didn't show any sign of deformation in the crew quarters. And then there are other types that scrunch up like tin-foil in minor bingles. There will always be crashes but if we are serious about reducing the fatality rate rather than just the crash rate then I think it would be worth developing a database about crashed airframes with a view to providing each type with an occupant protection rating.
-
Fatal Aircraft Accident Deniliquin NSW
Head in the clouds replied to Rotorwork's topic in Aircraft Incidents and Accidents
Hi Kaz. Nice yarn, I bet you were a popular lass on the rails ... Erm - I didn't say you couldn't muster wild cattle with a plane. I know you can, I flew a Super Cub as well as the choppers when I was in the Kimberley. What I said was "The only low level mustering that takes place is when yarding up wild scrub cattle and that's done with choppers, you wouldn't stand a chance of containing them with a plane" - and you confirm that in your description, that the plane might well get them out of the river bed onto the flat but then hand them over to buggies, bikes and/or horses to get them to the yard. To save money on one rather forgettable muster in the East Kimberley, the rather inexperienced cocky asked me to use the Cub rather than the Robbie because the Cub was about 1/3 the hourly cost. Most of the cattle on that lease had only seen a yard once before and must've vowed never to re-visit the experience, so it was always going to be a challenge. They set up the portable yards pre-dawn and I started sweeping about ten miles upwind - for those not of the land, cattle are easier to move downwind because they can't smell or hear anything unusual ahead, and you can keep the aircraft further back, out of sight preferably, because the sound carries further to the mob. They set up a mile of hessian wings (long lengths of hessian in a V shape that are supposed to funnel the cattle into the yard) and put themselves, the buggies and bikes into hiding a couple of hundred yards or so ahead of the yard gates. The mob was particularly recalcitrant that day and took much longer than usual to move up by which time the 'backpacker stockmen' (another so-called money-saver on stations run on a shoestring) had decided to boil the billy, have lunch and a snooze. Eventually the lead bullocks broke out of the bush a mile or so ahead of the rest and probably three miles ahead of the tail. They took one look at the green-hands, charged right through them scattering them to all four points, ran a lap of the yards and out again and never stopped. They were last seen still running with the rest of the mob dutifully following ... a total of six head for that day, all roped by the contract bull-catchers.
-
Fatal Aircraft Accident Deniliquin NSW
Head in the clouds replied to Rotorwork's topic in Aircraft Incidents and Accidents
This is a popular misconception - mustering is a gentle exercise, if you're pulling Gs you don't know what you're doing, and neither do you know anything about the animals you're supposedly working. This fella was an experienced sheep farmer so if he was actually working a flock he'd have been loitering some considerable distance behind them and quite high. The only low level mustering that takes place is when yarding up wild scrub cattle and that's done with choppers, you wouldn't stand a chance of containing them with a plane. -
DooMaw - building a STOL
Head in the clouds replied to Head in the clouds's topic in Aircraft Building and Design Discussion
Looks like a good bit of gear Oscar. If I hadn't gone to the extent of producing the wrap templates I'd probably be taking you up on your kind offer but with the shape laid out in spray paint it just takes a couple of minutes to cope each tube end and a couple more to fit them up a bit better. In the longer term, if the aircraft lives up to expectation and I was ever to consider producing a kit then probably any manual method is just too tedious but I reckon the way to go would be to get the tubing notched like this - I hope so Mark. I should have both sides tacked together by the end of Saturday all things being equal but then there's a day or more to weld out each side and that part gets really tricky as the tubing gets smaller and thinner toward the tail. The rearmost pair of diagonals are only 1/4" (6.35mm) outside diameter and 0.035" (0.9mm) wall thickness, so it's easy to blow that thin stuff away altogether with too hot an arc, let alone just blowing holes in it ... can't afford to lose concentration for even a second on that stuff. -
DooMaw - building a STOL
Head in the clouds replied to Head in the clouds's topic in Aircraft Building and Design Discussion
Slow 'real work' days on Monday and Tuesday gave me time to cut, drill and screw the woodblocks onto the table, positioned along the lines on the paper templates. Then marked and bent the longerons by heating with a propane torch. And used the wrap templates and spray-paint to mark all the tube ends ready for notching - Total hours on the project to this stage is 185hrs
-
DooMaw - building a STOL
Head in the clouds replied to Head in the clouds's topic in Aircraft Building and Design Discussion
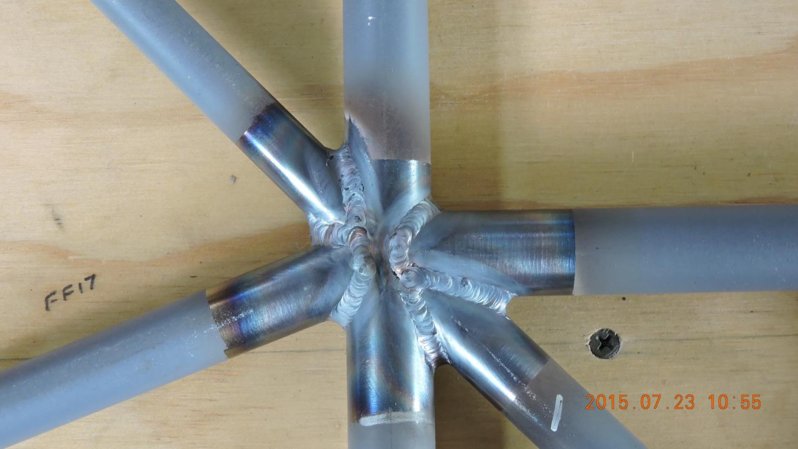
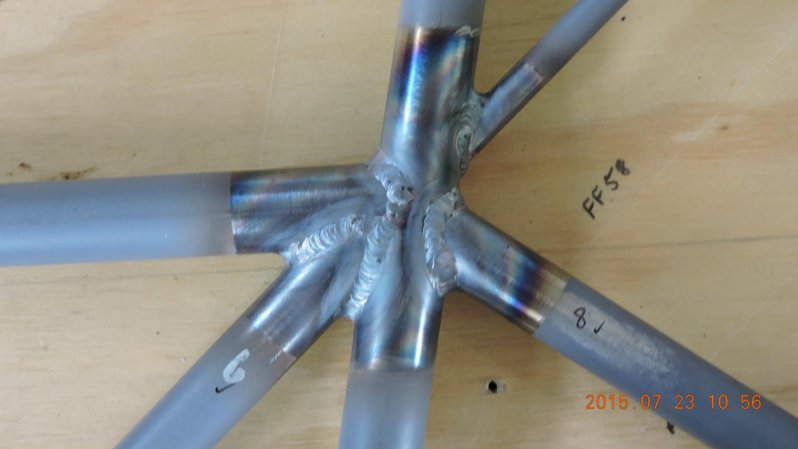
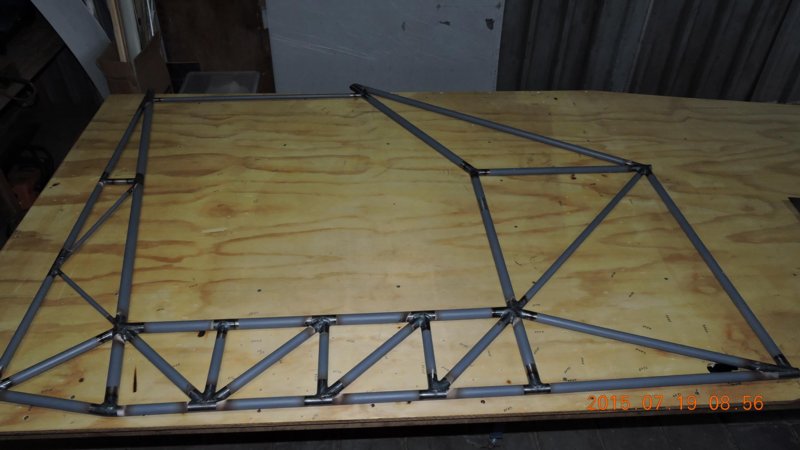
Last Monday/Tuesday I completed the welding of the second fuselage side and really enjoyed doing it. The welds are getting neater and brighter as I get more practiced again. Once I had the sides done I had to go back to the early part of the next stage so it was all a bit deja vu. Back to the CAD work and produce a dimensioned set-out for the aft fuselage sides, produce full-size templates of all the member junctions, transfer the full-size set-out to the project bench, attach the cluster templates ready for fitting the wood blocking that will hold the tubes in position, produce the CAD wrap templates for the tube member ends, cut the tube members to length and de-scale them in the lathe ready for painting. Then I cut the wood strips up for the blocking. I did have an interesting moment while de-scaling the lengthy longeron members. Necessarily I had a long overhang at both ends and they decided to resonate and had the lathe jumping around the shop floor so I hung a bit of rope over each end with a couple of pounds of lead attached to act as a damper, worked a treat. A bit of graphite dust where the rope was rubbing made sure it didn't get hot from friction and catch alight ... Pics show welds still getting better and the preparation for the aft fuselage sides -
-
DooMaw - building a STOL
Head in the clouds replied to Head in the clouds's topic in Aircraft Building and Design Discussion
Thanks Oscar, kind words indeed. Yes, welding sequence is critical and before that, the sequence of the tacking. Since it's very difficult (read impossible) to keep the frame clamped flat to the bench during the welding out (because you can't get all around the joint without re-positioning the frame frequently) it's important that the tacks hold it mostly flat as the welds are completed, and keeping a weather ear out for the 'ting' of a stressed tack letting go and re-tacking it as necessary. You're right, I should have a chat with Dafydd, he's a very learned and helpful man, if a little taciturn on occasion when dealing with we 'unqualified non-engineers'. Nonetheless he was very helpful in revealing the intricacies of his Airflow Kit mods in the "Do vortex generators really work" thread. Actually, I'm not particularly a fan of VGs and don't have any plan to use them initially, if at all*. I mentioned that I would be incorporating some of Dafydd's methodology and that part is the inboard features, the stall strip and wing fences to act as a power-off stall-limiting device and the consequential vortices that keep the yaw under control. Outboard Dafydd's method uses a drooped leading edge with VGs whereas I will have fixed slots instead. (* - One objection I have to VGs is how much harder it is to clean that part of the wing, and the consequent corrosion that could develop around each of them. I may, however give in and use them but only directly in front of the ailerons where they may help to ensure that part of the wing is the very last to stall, especially if they can be shown to keep that part unstalled even if full aileron is employed when the rest of the wing is stalled. That would ensure that wing-drop will not occur at any stage of a (progressive) stall, and permit use of aileron (though I don't approve personally, I use rudder) to keep the wings level in the stall - all part of fool-proofing the design as much as possible). The fixed slots will give me flow attachment to a higher alpha than VGs ever could and provide a CL Max of around 1.75 (and over 2.1 with slotted flaps deployed as well), also way higher than VGs alone can offer. Using the slot shape described in NACA Report 407 (Weick & Wenzinger) I can avoid the complications of a movable Handley Page style of slat and still have minimal extra drag in the cruise. The only drawback being the extra limitation on Va due to the high CL Max that might be achieved when encountering gusts. That simply means a combination of slightly beefier spars and a lower Va imposed when flying light. ( Those who don't know about Va could read the Manoeuvring speed thread, one explanation is in post #34). -
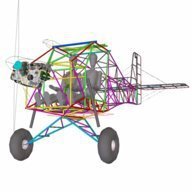
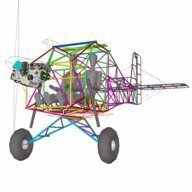
Completely restored thruster T83 FOR SALE
Head in the clouds replied to nickbunfield's topic in Thruster
Yup, but that's US dollars. So 11,649 x 100/73 = AU$15,957. Add an MZ 202 being the cheapest suitable engine, at US$6000 plus a US$1000 airscrew and freight the lot at say US$2000 (9,000 x 100/73 = AU$12,329) which makes a total of AU$28,286 ... plus AU$2,828 GST = AU$31,114. That's over 30 grand for a very basic pod and boom aircraft. Maybe gives some idea why the "$10,000 aircraft" is no more than a pipe-dream. On the other hand you can't buy a decent sports car for anything like as little as 30 grand and even if you spent 50 grand on an aging Porsche or Ferrari, in my mind the little plane has more to offer. Needs a second seat to attract as many girls but ... I'm surprised no-one from the northern States has bought the T83 yet. Everything's worth more in the north so someone could buy it, have fun flying it up and using it for a while and sell at a profit. It would sell for $15k in Darwin, the Kimberley or probably mid/north Qld too, I would think. -
DooMaw - building a STOL
Head in the clouds replied to Head in the clouds's topic in Aircraft Building and Design Discussion
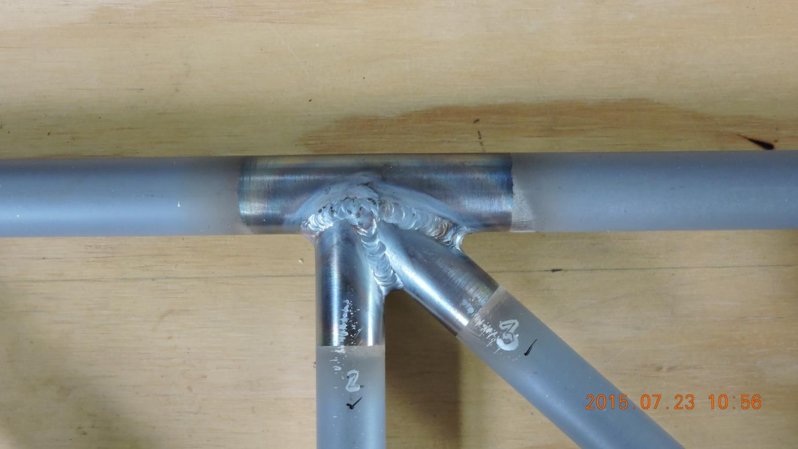
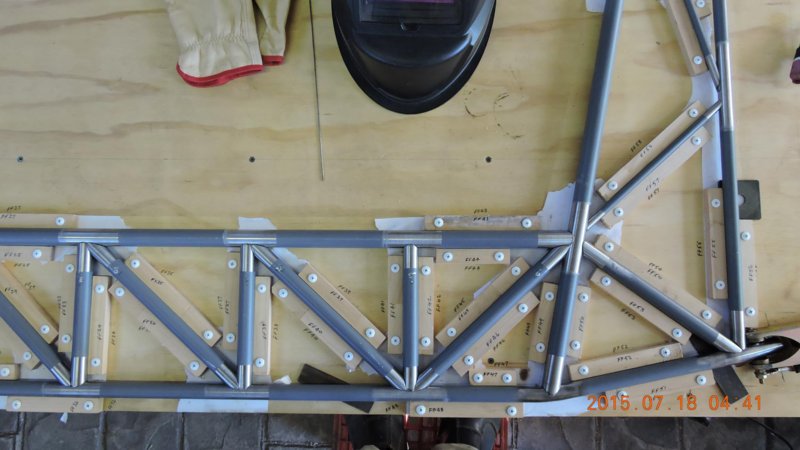
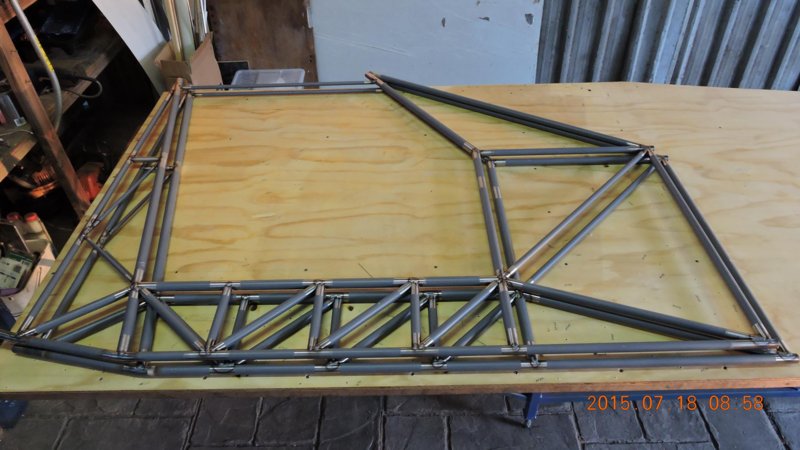
As I mentioned earlier, after I used it a bit I didn't like the arrangement of having the welder under the project bench so a couple of weeks ago I retrieved an old wheeled cabinet from my storage, refurbished and painted it and turned it into a dedicated welding trolley. Now I can move it around the shop easily and have good access for changing the welder settings, a rack of sealed tubes for the different filler rods, the cupboards below contain all the torch accessories and from a surplus shaded pole motor I also made a dedicated small wheel grinder for dressing the tungsten electrodes. During last weekend 17-19th July I tacked the first forward fuselage side together, removed it from the jig and on Saturday fitted up all the parts for the second side, tacked that one, labelled and removed all the jig blocks and tacked the other side of both frames. On the Sunday I completed the welding of one of the sides. The welds were quite pleasing, and still improving - Total hours to that stage were 149hrs.
-
Completely restored thruster T83 FOR SALE
Head in the clouds replied to nickbunfield's topic in Thruster
Dead right there would be, but when you take into account that the cheapest engine that would power it would be something like the MZ201 which has a belt reduction and 45hp and costs US$4800 plus freight plus GST = AU$7600 - where are you going to find someone to make themselves and their dealers sufficient profit to build you an airframe for it for the remaining $2400 (less GST of course). So you have a budget of AU$2200 to build an airframe and the coverings, wheels, hardware etc, and freight it, and make a living doing it ... the materials alone come to around AU$6000 plus freight from overseas, plus GST ... Your comparison with a $70K trike is apples and oranges, last time I saw a $70K trike it had a $25K powerplant and two seats rather than one. A more realistic figure for retailing a new T83 type aircraft these days would be $25-30K plus tax, and given the public reaction to that kind of price for that kind of aircraft explains why no-one's making them anymore. All of which supports the contention that this particular aircraft at that price is an absolute bargain and exceptionally cheap flying for the lucky new owner. But even at that knock-down price I don't see a queue of folks jostling to slap their dollars on the table. Why is that? Whenever there's a thread about a cheap aircraft everyone wants one, then when something like this comes along no-one snaps it up. What is it that doesn't instantly appeal? Not macho enough? Not fast enough? I've got quite a bit of time in Thrusters and they're great fun. -
DooMaw - building a STOL
Head in the clouds replied to Head in the clouds's topic in Aircraft Building and Design Discussion
Powdercoating is great but not suited to building a one-off over a period of time as I am with this one. If it was a production run it would be a different matter. There are two problems - first that sandblasting of thin walled tubing can be a showstopper if you don't do it yourself using low air pressure and working slowly. Garnet or even glass bead blasting can be very aggressive so if you send it away to be done you might end up with a destroyed airframe. Home garnet or bead blasting isn't safe (or legal in most States) unless you have a proper booth and respiration equipment, and who wants silicosis anyway? Soda blasting isn't aggressive enough to provide sufficient keying to the surface. Then the second part of the problem is the time it takes to complete a one-off build if you have to fit it around 'real work'. This project has already taken 9 months since the steel arrived here and by the time I weld the last cleat on and could get it powdercoated it would be a bucket of rust here on the Gold Coast. With sweat off your hands in the summer, the constant salt-laden south easterly trade winds and the damp winters you simply have to manage the rust protection as you progress through the build. Hence my process of painting the majority of the steel as I go and then the welded areas as they get done. I can always clean off some primer to add a cleat or whatever and re-prime that area afterwards. In addition to that I have every part covered with plastic sheets and tarps whenever they're not being worked on and especially at night. There's more than just the corrosion prevention consideration, keeping the areas that are to be welded bright and clean makes a huge difference to the quality of the welds too, so there is a lot of incentive to be particular about this. We're getting close to catching up to the present time with these log excerpts now - the next stage was to manually abrade and paint the landing gear legs. I hadn't de-scaled the tubing for them in the lathe so that was a job that cost a fair bit of skin off the fingers, back-ache and some muttered obscenities. It seems a lot longer ago but just two weeks ago I finished wrap templating and notching the ends of all the tubing for both of the forward fuselage sides. Once they were notched they were too tight a fit so I then had to adjust them slightly to fit them up in the wood-block jig which I had set up in January. That's when I discovered the unsupported edges of the ply had warped a fair bit and had to add some timber bracing underneath which pulled it back straight again. By that stage I had spent 135 hours on the project (apart from 2 years of spare time designing it) but included in that is the time to make the bench and little dropsaw and setting up the welder. Pics of the painted gear legs, keyed axle bolts and the first side of the forward fuselage in the jig waiting to be tacked -
-
DooMaw - building a STOL
Head in the clouds replied to Head in the clouds's topic in Aircraft Building and Design Discussion
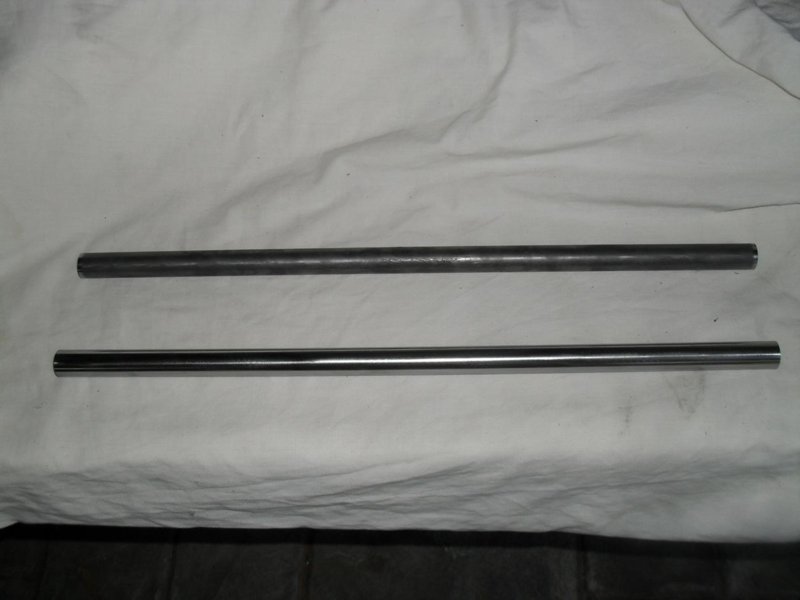
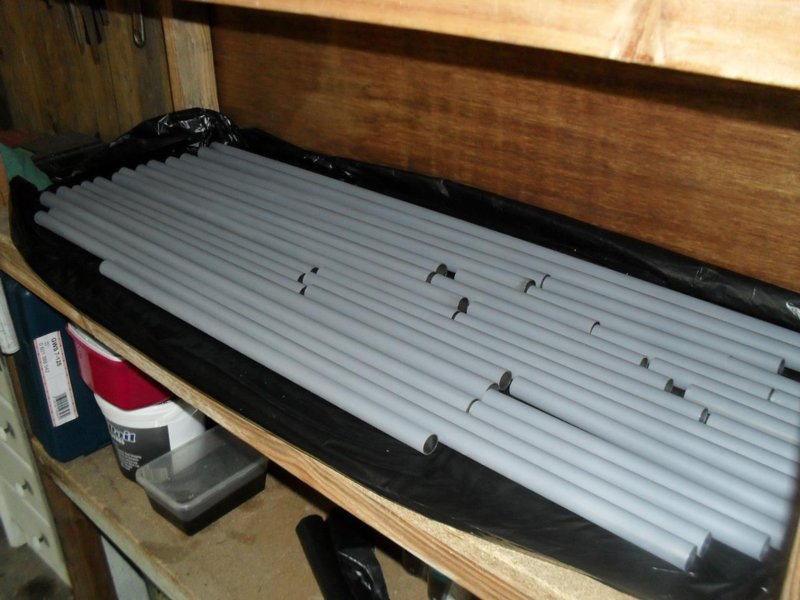
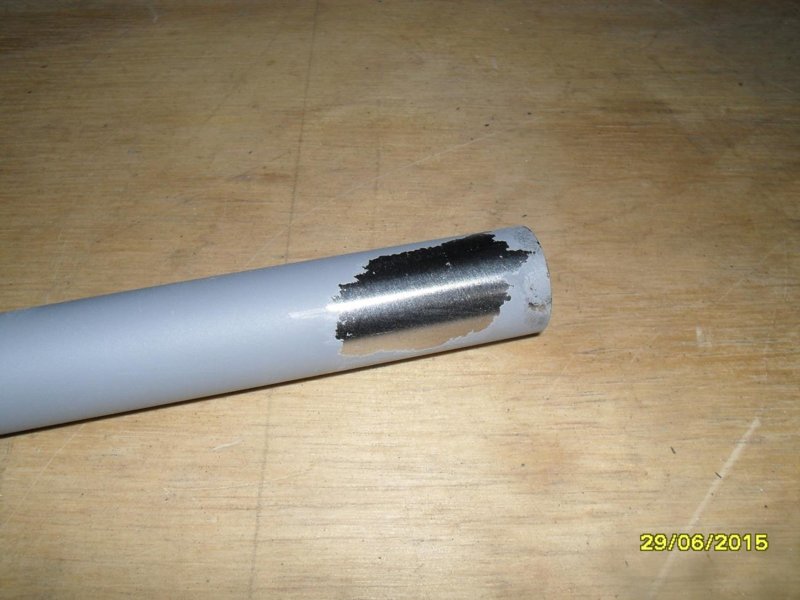
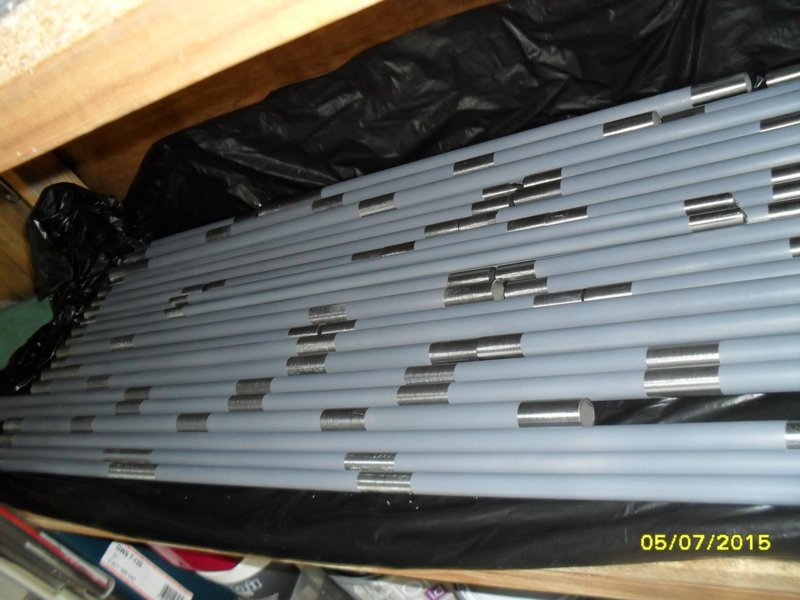
I've built three steel fuselage aircraft before and always had the same problem, rust coming through the frame paintwork after a while. Admittedly it has been because of poor preparation for the painting and using the wrong paint, on one occasion the dope applied to the fabric ate into the paint ... and in other areas the paint hadn't adhered well and could be scraped off easily. Part of the reason for the poor preparation is that it's a real PITA abrading the airframe once it's all welded together, getting into the all the nooks and crannies is a real problem. Additionally cleaning all the mill scale off the areas to be welded is quite difficult, so this time I decided to take a different approach and get the scale cleaned off all of the steel tubes before they were notched for welding, and then get a coat of primer on it to prevent it rusting. I could easily enough clean the paint off the areas that will be welded when I was ready for that, re-prime them after welding and eventually apply a two part epoxy topcoat. At the suggestion of a friend on another forum I put the tubes in the lathe, spun them fast and wrapped sandpaper around them. It ripped the scale of beautifully. Then I went to finer and finer sandpaper (to 180 grit) and finished them off on a wire-wheel in the bench grinder. Painted them with the suggested Zinc Phosphate primer and was ready for the next stage - so I thought. I didn't get back to them for a week but even having cured for that long I found I could easily scrape the primer off with my fingernail. I use the same primer in aspects of my work and it adheres tremendously well to mild steel so I reckoned it was most likely the chromium in the chromoly that was making it so hard to get paint to stick well. I arranged a visit with the paint company's chemist to see if he could shed some light on what was going wrong. It turned out the preparation was 'too good' meaning that the fine git and wire-wheel had left the surface too smooth and therefore without sufficient keying and also he suggested that a self-etching primer would be better. Etching primer is usually only used for non-ferrous metals like aluminium, zinc, brass, copper and stainless steel, and it's used on stainless because of the chromium so it's a reasonable assumption that some of the problems I have had have been due to the chromium in the chromoly. So - the tubes went back in the lathe to sand all the initial primer off and were then masked to avoid having to clean off the areas to be welded, and then painted again with etch primer. Much better adhesion this time. Pictures show the descaling of the tubing, painting, easily removed first primer, PVC tube 'bath' for washing the tubes in thinner prior to painting and the second round of primer -


.JPG.0ac591cfa19b7cb657c14bf7ef35bd7a.JPG)
.JPG.5f9366cc7783f11d39b84f7de3bf8965.JPG)

.jpg.364b13f3c36db34398b8615f0ad3bebf.jpg)

.JPG.f06ff5036e74b7776c685e42758e9b6c.JPG)
.JPG.52166177cfac7b8edce30272b0d0711b.JPG)
.JPG.dd62e01c0e4dd2adb6cb76193ff8c3e7.JPG)
.JPG.d6c4f8dcdead19a253d4c1401b75c3d6.JPG)
.JPG.dc61383856a5bcfca08805885584206b.JPG)
.JPG.ce88b96be3cb272ebd52f5fb91078588.JPG)
.JPG.586e5f5152fd66acdfad930529a268cb.JPG)
.JPG.5d4bed47d219980f631e39118e04dc59.JPG)

.JPG.417cb9d25b65e51fa1ff3337c9f86f37.JPG)