Head in the clouds
-
Posts
1,842 -
Joined
-
Last visited
-
Days Won
42
Content Type
Profiles
Forums
Gallery
Downloads
Blogs
Events
Store
Aircraft
Resources
Tutorials
Articles
Classifieds
Movies
Books
Community Map
Quizzes
Videos Directory
Everything posted by Head in the clouds
-
So what? The subject is about the quickest and easiest way to re-size photos, not about 'a lot of other tricks ...' And I think you'd be very hard pressed to find an quicker or easier photo re-sizer than OME's suggestion. To re-size them using Picassa you have to upload the large file and then Picassa re-sizes it. That's not at all efficient for those who have slow connections or limited data contracts. As you said "then you have to upload it to the internet! waiting, waiting, waiting and more clicks! who's got time for that?" By re-sizing them first, then uploading them, you use a lot less of your data allowance and upload it a lot quicker. So there's less of the waiting, waiting waiting ...
-
Absolutely brilliant OME, thank you! As part of my work I re-size a fair few pictures daily and without doubt this is the best and quickest simple re-sizer I've come across, streets ahead of Picassa, using Paint, Photoshop or emailing them to yourself. I'll be using this for most of my re-sizing from now on. Just highlight, right click re-size, done, couldn't be easier. If you ever need a similar thing but a lot more sophisticated, for batch re-sizing to selected folders, batch re-naming and lots of other features, you might like to have a look at Fotosizer - the basic version with limited extras is also free.
-
DooMaw - building a STOL
Head in the clouds replied to Head in the clouds's topic in Aircraft Building and Design Discussion
Congratulations to you both Mark, that's truly fantastic! Bloody hard to do but easier than getting weight out of an airframe. Until recently I've always been very fortunate in not being overweight but my job has been more sedentary recently and consequently I progressively lost sight of my feet ... I lamented that I had put on 10kg in six months and I just couldn't get rid of it again, even with plenty of exercise, and I didn't feel good either. My brother suggested I carry a backpack around for a full day with 10kg in it, just to give me some incentive. It worked, I've lost 9kg of it during the last 9 months. All power to you for getting the rest off I didn't know what the intended EW of a 701 is but the one I weighed was 325kg, so we're in the same ballpark. I'll be quite happy if mine comes out around the 270kg mark but it may be a bit more or less. As I said I haven't any numbers for the wings yet and in any case I'm not building it to a target weight but to as light as possible without any compromises on ruggedness. Thanks for the encouragement. I'm avoiding having any specific future intentions for it at this stage. It certainly wouldn't be a plans-only thing but a partial kit and plans for the rest of it is a possibility. I'm not likely to want to spend my whole time building the kits so it'd depend on finding people who might be interested in joining a business model along the lines that Jabiru developed. Theirs is a clever concept, where lots of people produce the parts in their own workshops and sell them to Jabiru who complete the assembly. At least, I understand that's how they do it. It means they limit their capital outlay and make their suppliers responsible for QA and production efficiency, and no problems with employees, wages, insurances, workplaces ... -
DooMaw - building a STOL
Head in the clouds replied to Head in the clouds's topic in Aircraft Building and Design Discussion
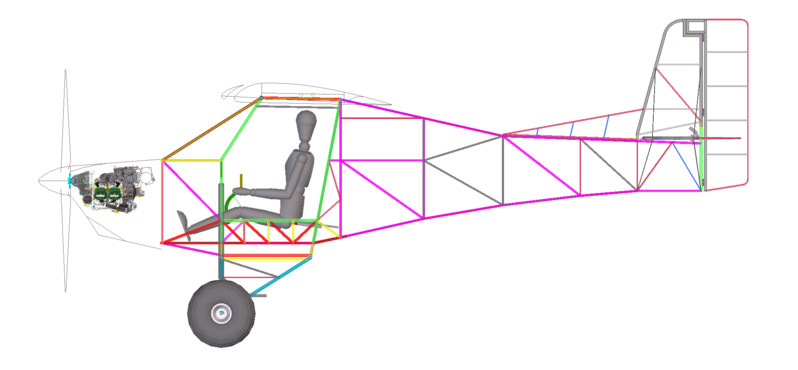
Hi Mark. The old weight debate ... it's a tough one for any designer, there are many considerations. A 750kg MTOW is an increase of 150kg or 25% and of course that means that many people start thinking they can load an extra 150kg on the plane whereas actually it's less than half that. Considering that the 600kg MTOW plane has a useful payload in the region of 250kg the plane:payload ratio is 7:5 so a 750kg MTOW plane would have a payload of 5/12x750=312kg which in a practical sense is only a 62kg increase in useful load. Given that it's a larger plane and now carrying more gear you can bet your last dollar folks will want an increase in fuel capacity since your miles/lt will likely reduce a bit so if we allow an extra 12kg for fuel your pax and baggage increase will only go up by 50kg. So what happened to the other 100kg? More structure of course, to carry the extra weight because the real extra weight is the full 150kg ... the old law of diminishing returns kicking in. OK, some will point out that as planes get larger they have an increase in payload percentage rather than a decrease - perfectly true of course but that is gained by changes in the technology used in the structure, Boeings aren't built the same way our sportplanes are, for example. At the other end of the scale consider the performance of RC models vs our sportplanes. Does that mean I wouldn't design for the 750kg? At this stage yes it does mean that because of the massive increase of cost that a 750kg plane will have when compared with a 600kg plane. Only a tiny increase surely ... or only a 25% increase in cost I hear some more realistic folks say ... or is it? Anyone want to take a guess why our current 600kg planes cost more than twice as much as the original 450kg planes cost? An early Lightwing, allowing for inflation only cost around $50K in today's money because at that weight it could perform well with a Rotax 582, they're still available brand new at 40% the price of a 912 ... that's part of why we're now paying well over $100k median price for a basic LSA. But wait ... will the 750kg plane fly happily enough with a 912? Well it would but folks being folks they'll see it as a bit sluggish compared to a 600kg plane so they'll want more power - the new 915iS will do nicely thanks, so add yet another $12k for the engine price increase (hell the powerplant now costs nearly as much as the entire new 450kg Lightwing). And don't forget we just lost another 15kg payload for the bigger/heavier engine ... uh oh we're down to a total payload increase of only 35kg for this 750kg plane that now costs 50% more than the 600kg plane - bloody thieving designers and manufacturers! OK, a bit of a sardonic take on it perhaps, but not too far from the truth regrettably. The thing is that going to 750kg is very far from just a matter of approving the weight increase. DooMaw would lift the extra weight with ease and would require little more than a slight beef-up of the main spar to retain its plus/minus 6g capability, and it would still do it within the 45kt stall requirement (at 600kg it'll stall at around 32kt) but it would no longer be a STOL. Instead it would be using its STOL features (lift enhancers, if you will) to be able to operate within the regulations but that's not what the aircraft is about. You'd end up with a plane with a small performance envelope since it would be flying overloaded, it'd take off much faster than intended and would have low cruise speed. The best answer would be to design a different plane for the increased weight category. If one was determined to take this one to the 750kg category and still make it perform well it would need more wing area and that could only be achieved with an increase in span (if chord was increased it would need a longer fuselage, then taller gear to retain the angle of incidence on the ground). A span increase would have to be a greater increase than it might at first appear because if the parallel chord wing was just lengthened it would hit the ground when they're folded, so the tips would have to taper in the fashion of Cessna 172 wings. Not impossible but that span/bending moment increase would mean much heavier spars and struts. The fuselage wouldn't need any significant changes, it's already very solidly built to cope with the heavy landings and rough terrain. So - is all lost? No, it isn't! We all know that weight is the enemy where aviation is concerned and especially so where STOL is the goal. I've shown above that a 150kg weight increase doesn't give you anything like a 150kg payload increase, it's more like 35kg given the extra fuel and heavier engine. Weight advantages aren't gained at all easily. So - we have to look at other ways to gain that extra 35kg. If we can do it in the 600kg category we can save a heap in costs compared with a 750kg plane, and that has to be a plus. Simply put, we need a stronger and lighter airframe than what you're flying now. I don't know for sure whether DooMaw has that but I'd wager it probably is at least 50kg empty weight lighter than a 701. I can't say for sure because I haven't completed the wing design yet nor have I estimated their weight. I do know that the fuselage, HS, fin, rudder and landing gear are all CRMO steel and the total weight of all of them is only 64kg plus welding filler and cleats, say 66kg, and the similar parts of the structure of sheet-metal planes I have been involved with have been over 100kg, so at this stage we're very comfortably ahead. -
DooMaw - building a STOL
Head in the clouds replied to Head in the clouds's topic in Aircraft Building and Design Discussion
Thanks Soleair. I couldn't bring myself to leave the car outside, I've only just changed it over for a newer one after I left the last one outside for three months and it turned to a bucket of rust. The Gold Coast is terrible for rust-as-you-watch. You're quite right about the (12mm) plywood top warping. I thought it would be OK as I had earlier added outriggers to the wider end of the bench and the narrow end only overhangs the frame by 150mm each side, I thought that would be OK and I wanted a clear edge for clamping. However when I got back to the project mid last month I found all the edges wavy by as much as 20mm! Previously the benchtop had been flat to within one millimetre. Before I put the front fuselage sides into their jig I added timber rails at the end of the outriggers under the edges of the wide end and that pulled it all back level again, I'll do the same at the narrow end when I need it flat for joining the two fuselage sides with the cross-members. Yours is a nice solid looking bench - and great plane build pics following that, Minimax is looking good! When I got back on the project in mid June (last month) I had decided to get a much smaller TIG torch. I'd put it off before because I'd been chasing one here for some while and could source various parts of it but not the whole kit so I just ordered the lot from China and when it arrived was good timing as I had some spare time again to get back to the welding, so I used it to weld out the other gear leg which I had tacked in February. It was a vast improvement and the gas lens and flexible head made welding a joy. I also discovered 2% Lanthanated tungsten electrodes which I found I could run right down to 1mm diameter and they still handle the HF start nicely and coped well enough with the heat when you have to give it a high burst for tricky spots deep in the throat of a cluster. I was really pleased to change away from thoriated tungsten as I've recently lost a friend to cancer of the esophagus and associated parts and it's likely it was a result of long term grinding of the tips of thoriated tungsten. He was a many-year welder for the RAAF. Thoriated tungsten is sufficiently radioactive to carry warnings about the risks of their use and particularly the dust from grinding them. I followed that with making the bosses that carry the axles, got a friend with a larger lathe than mine to broach the keyway into them and mill a matching key-way into the axle bolts (the key stops the axle rotating under braking loads) and set up a simple jig for installing the axle bosses at the right angles and welded them in. Then I needed to make the cleats to weld to the sides of the axle boss which will pick up the bottom of the oleo strut so I modelled them in CAD, created a drawing of them full-size, printed the drawing and cut it out to use as a template. Held the paper templates to some sheet CRMO with magnets and a squirt of spray-paint produced shapes to cut out. Soon I'll need to get on and model all the rest of the cleats for the project and produce the CNC files so I can get them laser cut, it's pretty tedious doing them with an angle grinder and floor drill -
-
DooMaw - building a STOL
Head in the clouds replied to Head in the clouds's topic in Aircraft Building and Design Discussion
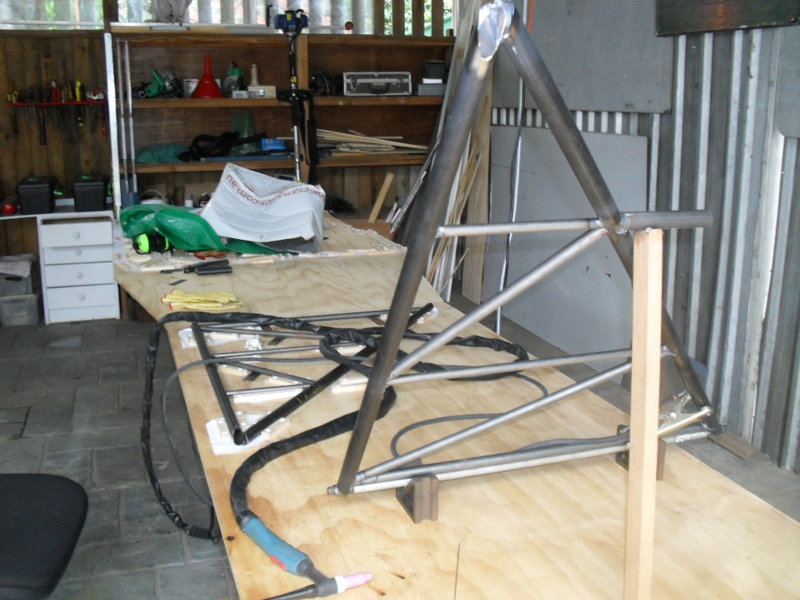
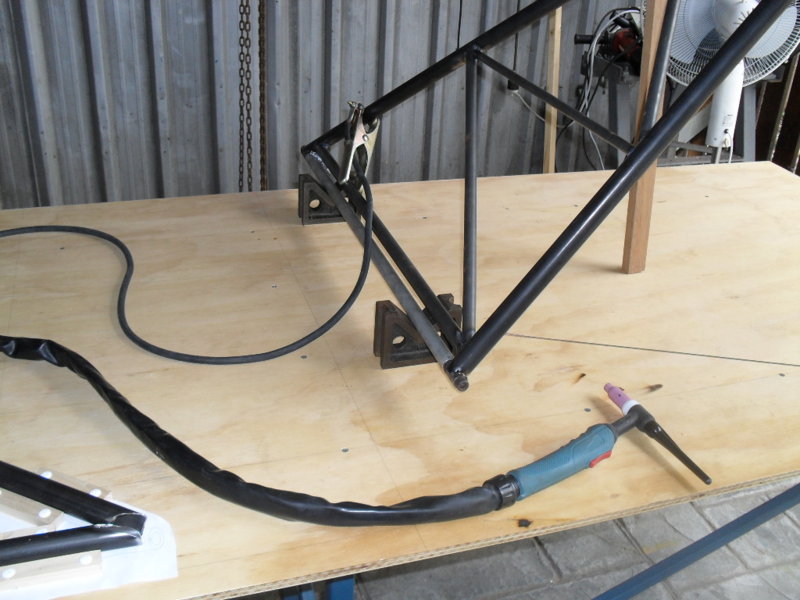
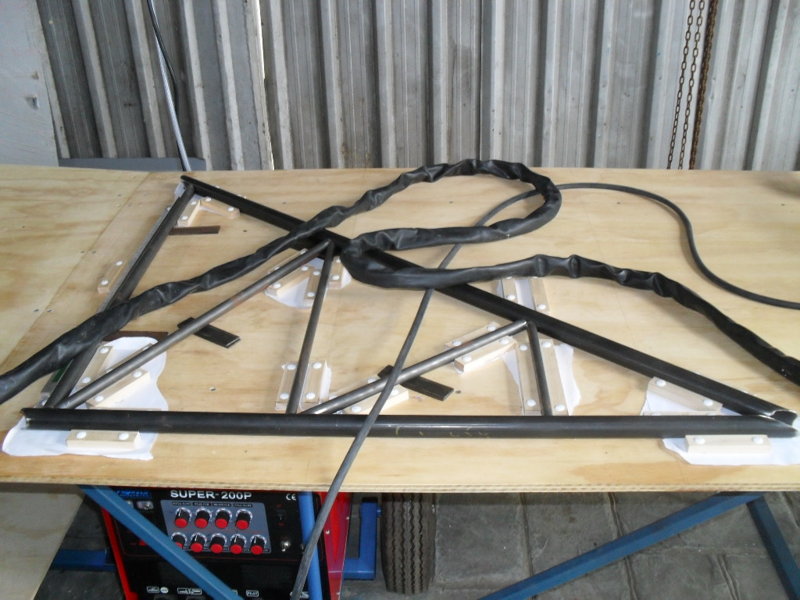
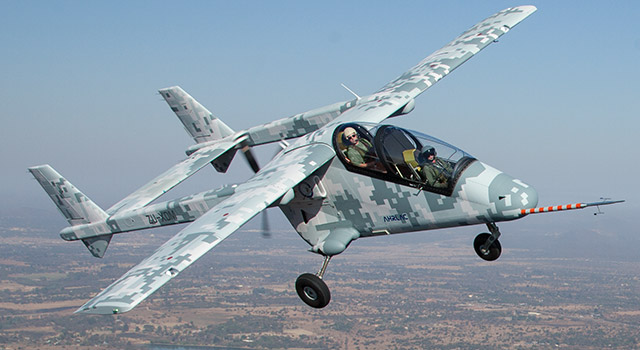
Tacking up the gear legs in the blocking jig, then label (in case I want to build another at some stage) and remove the blocking from the bench and weld out the first leg. Using simple stands to avoid too much out-of-position welding, and aluminium foil to make argon dams to keep the weld well immersed in inert gas. Once I got that far I had an enforced break of four months. Too much real work getting in the way and then holidays overseas, some of that spent in South Africa visiting and then travelling with another forum member and his wife, a fascinating couple. Before he retired he flew 747s for SAA and then went on to flying support missions for various militaries around southern Africa, he had some hair-raising tales to tell ... His grandson is now an aeronautical engineer employed on the development of the AHRLAC (Advanced High Performance Reconnaisance Light Aircraft) and we were able to have a very privileged personal tour of the build/test facility. Unfortunately I wasn't allowed to take any photos because they had it stripped down for inspection after the first round of flight tests but I was able to see and learn some very clever construction methods they have developed. For those who don't know of the AHRLAC it's a multi-role aircraft being developed in Pretoria by a private syndicate. It has a modular pod system that can convert it in minutes from its main role as a high performance reconnaissance aircraft to a personal transport or a fighter or a ground-attack configuration, or medivac and many etceteras. It has extremely rugged landing gear and can operate from a ploughed field with ease, a stock pic below, and here is a link to https://www.youtube.com/watch?v=gqyrftQUKkg, a Youtube search will produce some interesting vids of the early flight testing.
-
DooMaw - building a STOL
Head in the clouds replied to Head in the clouds's topic in Aircraft Building and Design Discussion
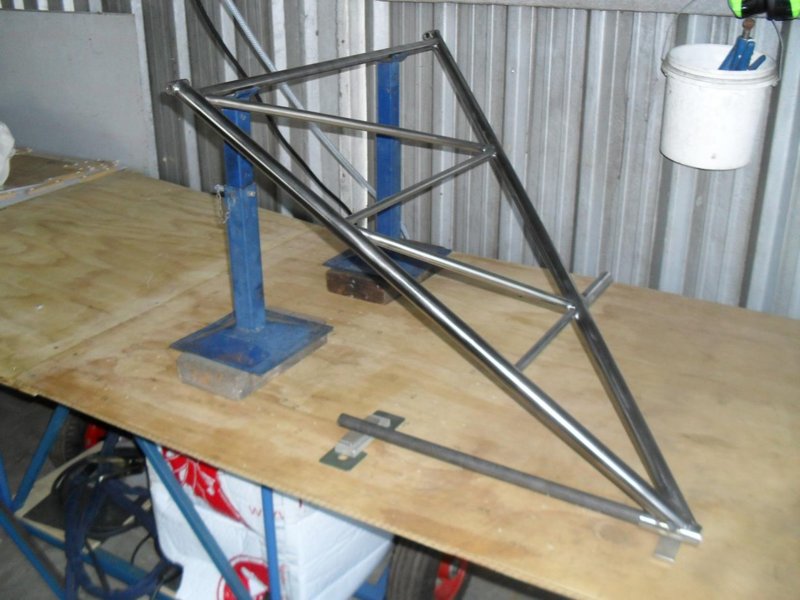
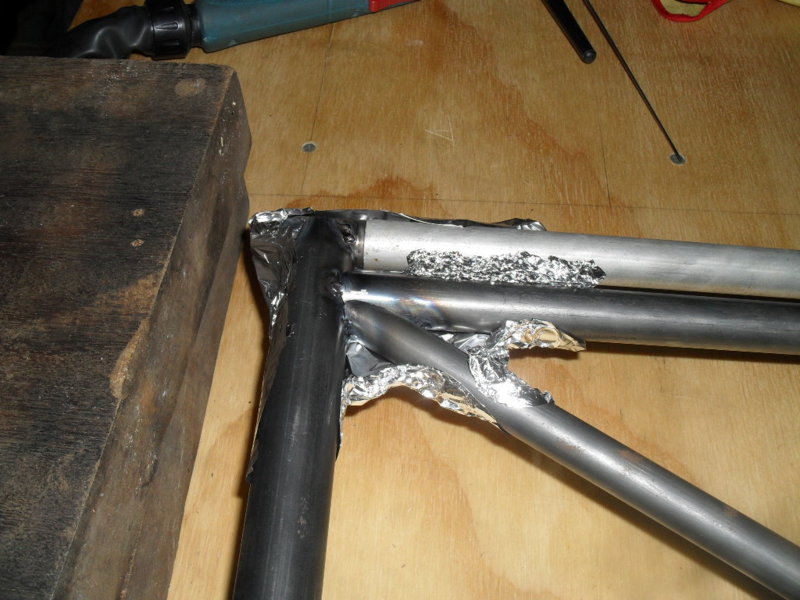
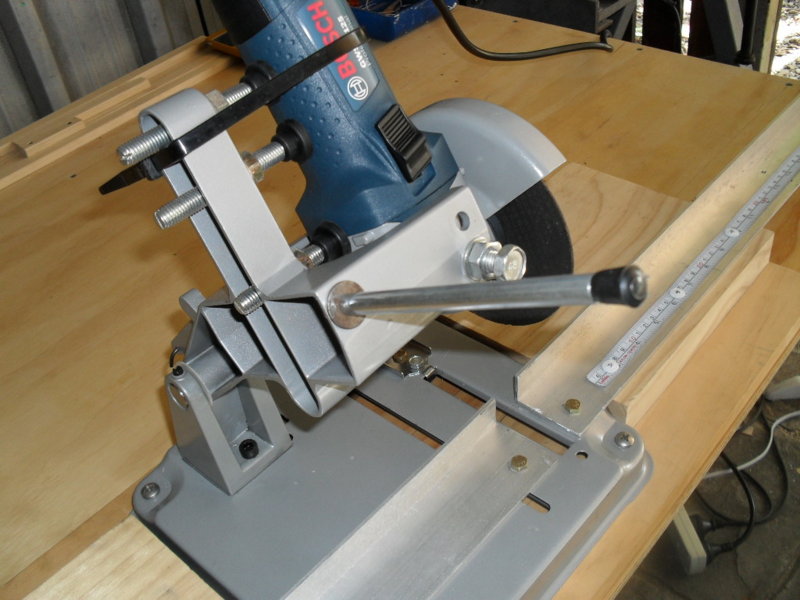
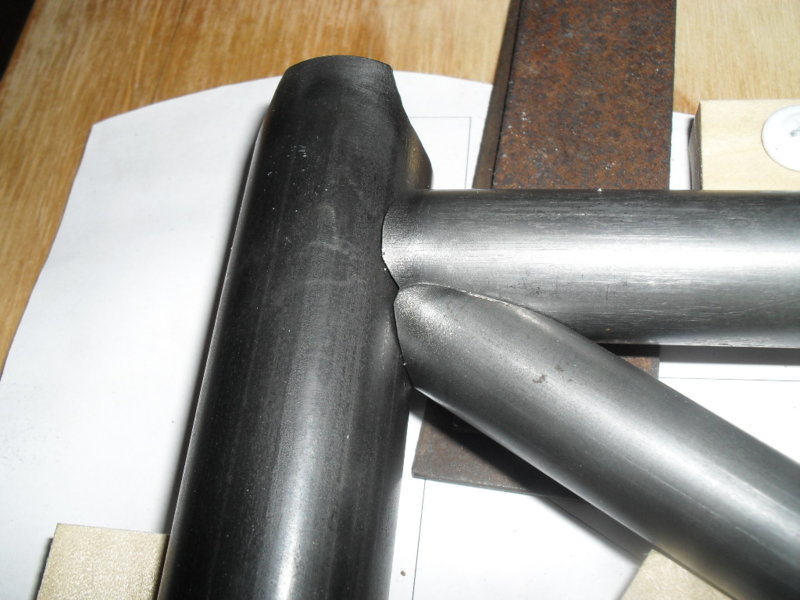
On and off during February I rebuilt the little grinder attachment by re-working the hinge arrangement to much closer tolerances and equipped it with a new dedicated 5" grinder, mounted it all on blocks of wood with rails to feed the material in square and an exit rail with attached measure and stops for cutting repetitive lengths. All a bit fiddly to do but the end result is well worth it, making it a breeze to accurately cut the material to length before notching. I installed the welder under the bench so that it would be always with the work and also out of the way. That was a mistake which I later changed, but is how it was for a while. Before diving into welding the landing gear legs I ran a few practice lines and was a bit disappointed how much I'd forgotten so it took a fair few practice pieces before I was happy enough to start work on the real thing. The next thing was to exactly position the main members in the landing gear jig (post#7, second last pic) and to do that I needed to have the bosses installed. The bosses being the pieces at the top of each of the main gear members which the bolts will go through to attach the legs to the fuselage. Naturally those bosses need to be in exact alignment with each other to allow the legs to hinge up and down without binding. I've had trouble with keeping them aligned in similar situations before, if they're not very firmly held in place they tend to get pulled around during the welding. Consequently this time I machined up the bosses and made a spacer bar to go between them temporarily - the ends of which I bored and tapped so that I could bolt the bosses to them until the welding is completed. It worked well and they were still well aligned after the legs were fully welded out.
-
DooMaw - building a STOL
Head in the clouds replied to Head in the clouds's topic in Aircraft Building and Design Discussion
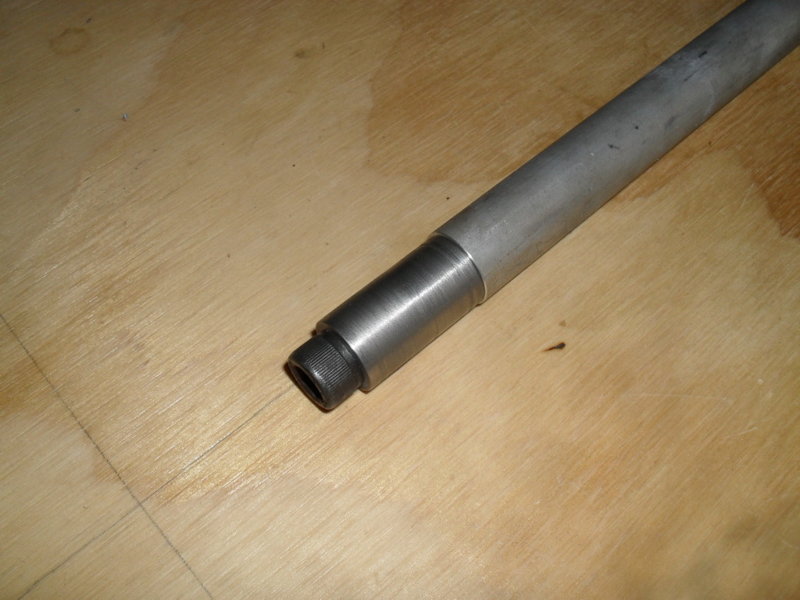
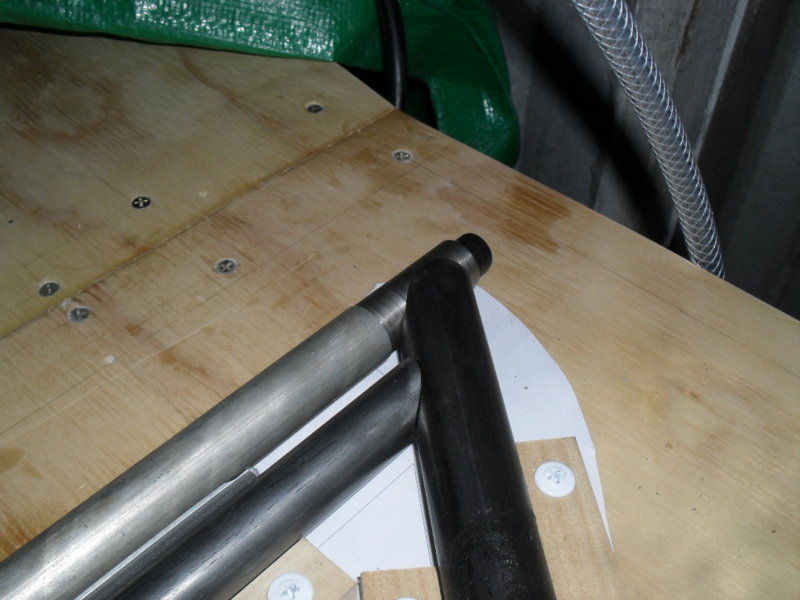
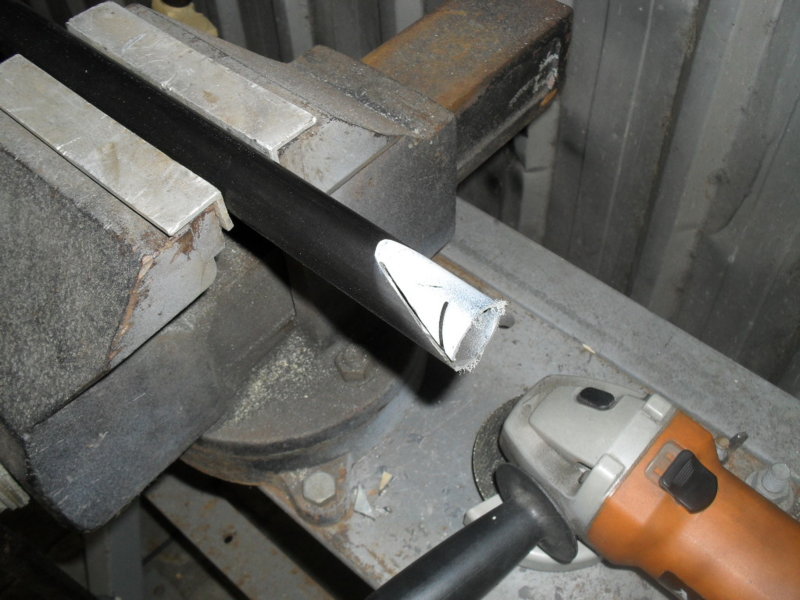
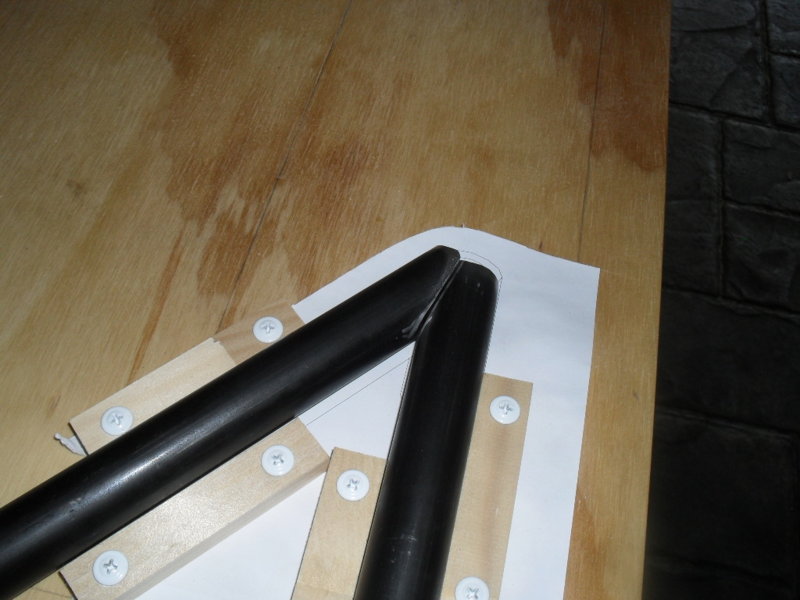
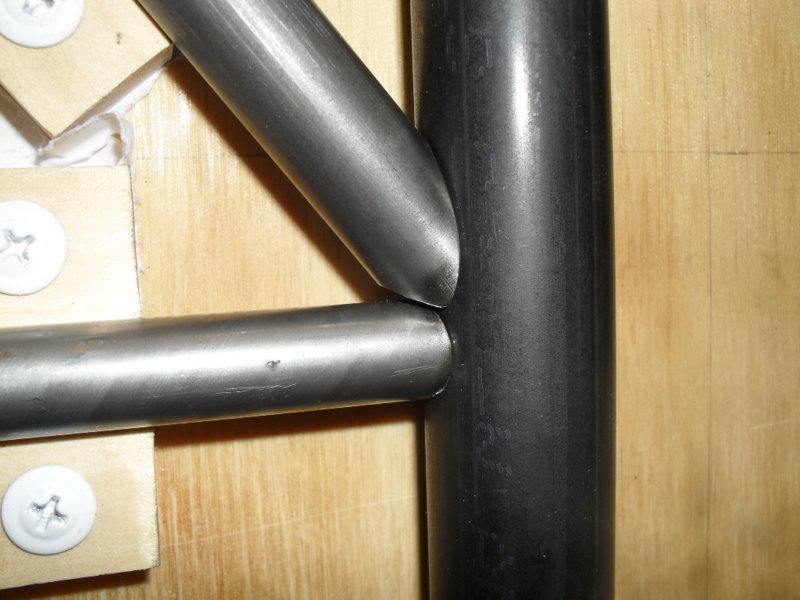
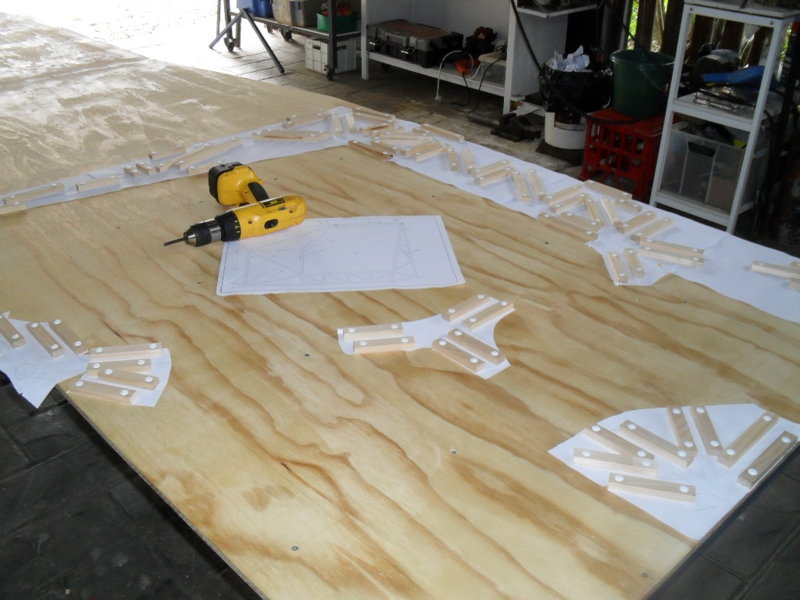
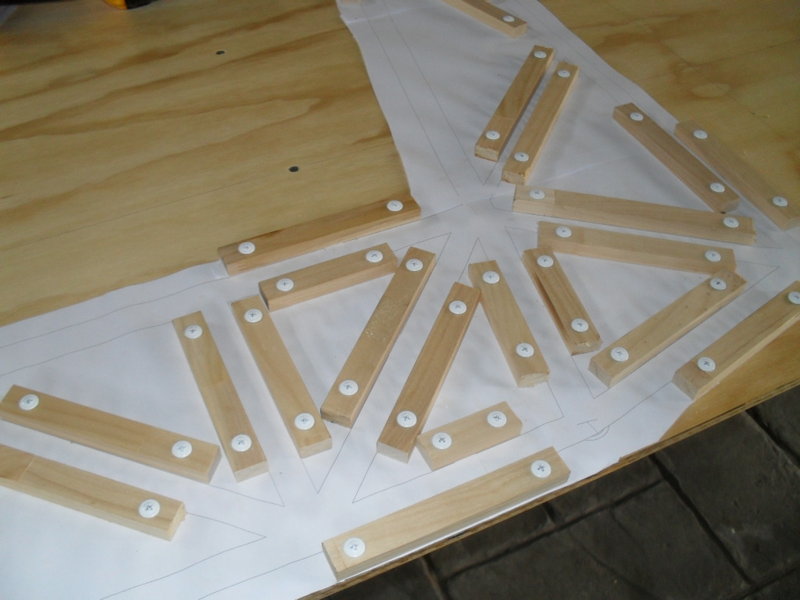
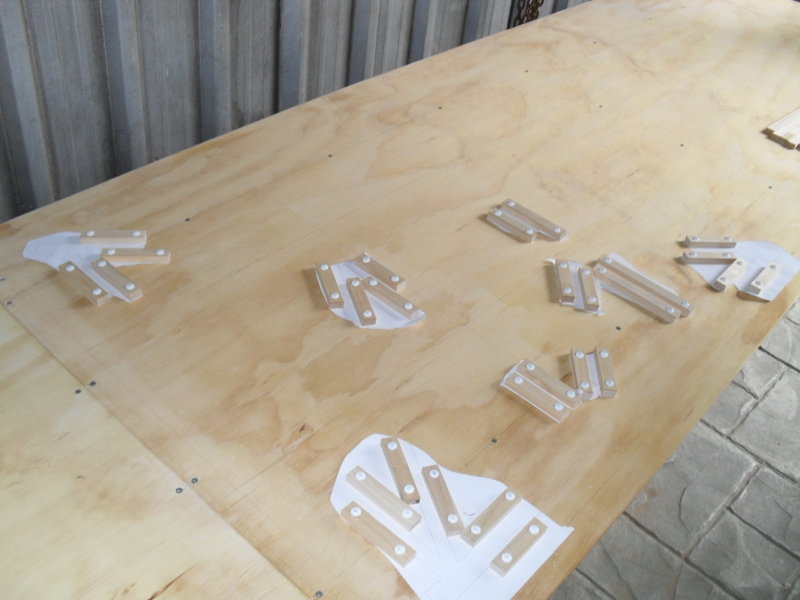
Next was to print and cut out the paper wrap templates for the gear legs. I started with the gear legs as they are thicker walled tubing and would be more forgiving while I got up to speed with TIG welding again - it had been a while. I opened up the appropriate plastic tubes that I had sealed the tubing into and then cut pieces of steel tubing to length for all the parts for the gear legs, then put the rest back and taped up their covers. Have to be very rust conscious here ... I held each piece of tubing central in a vice and wrapped each end of it with its wrap template, held in place with a rubber band, and gave it a squirt of auto paint to mark out the notches. It was a very quick process and easy to judge the indexing alignment of each end by eye just by keeping the split in the template at the top (Pics 1-3 below). Four of the tubes were too short to be able to hold them in their centre and still have enough room to wrap the template on each end without moving the tube so I made an indexing line along the tube by scraping a sharp blade along it while holding it in the vice. I used an old electric planer blade which was easy to hold horizontal while running it along the tubing so it made a line that was true and didn't spiral around the tube. Once the notches were marked and the paint dry I cut the bulk away with a thin cutting disc in a 4" grinder and shaped up the curves to the paint line with a 1/4" thick disc dressed to a rounded edge with a diamond wheel dresser. As long as I didn't try and grind too aggressively the paint stood up to the heat well and provided a good reference for accurate notching (Pic 4). I laid the parts in the jig and they fitted perfectly which was very satisfying (Pics 5-8). I did have one small problem though. I had a software glitch that prevented me notching a tube end for more than one other interfering tube so where a longeron/chord, and two web members all came together the wrap template only showed the notch for the longeron and not the other web member, so I had to cut them by eye. Three turned out fine but one had a gap of about 1/16" so I had to remake that one (Pics 9 & 10). Later I sorted out the software glitch so it won't be a problem again. The second last pic shows the completed members for the port gear leg in the jig and starboard leg stacked above. I visited the welding supplies place nearby and re-established my Argon supply for the welding, tracked down the filler rods I need (ER70S-2 1.6mm dia), and I ordered online what looked like a nifty little device that mounts a small angle grinder, turning it into a mini drop-saw to make it quicker and easier to lop my tubing lengths. The drop-saw attachment arrived a few days later and predictably it was among the worst of Chinese crap but was a starting point for making something useful ... (Pic 12)
-
DooMaw - building a STOL
Head in the clouds replied to Head in the clouds's topic in Aircraft Building and Design Discussion
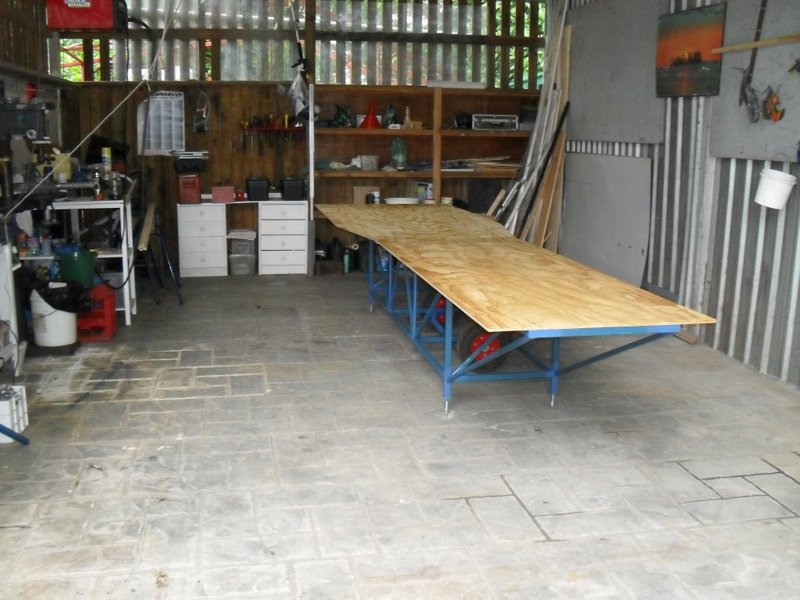
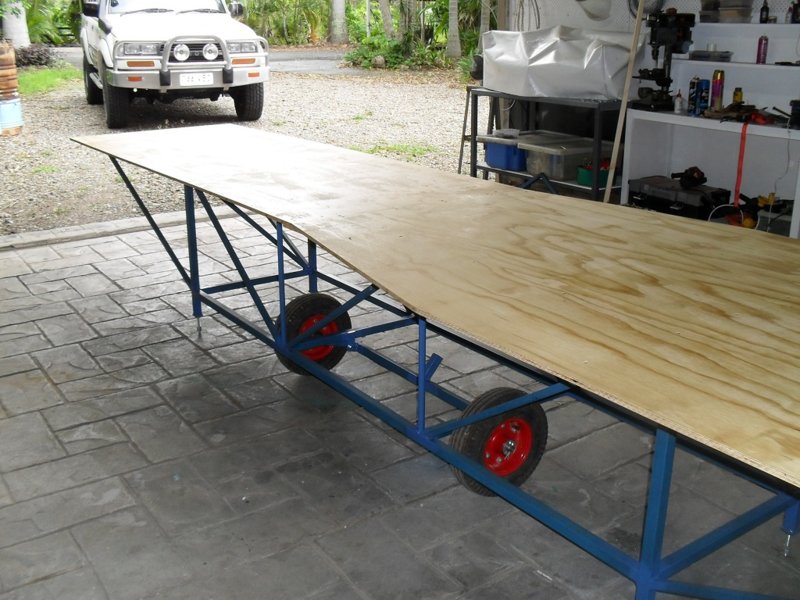
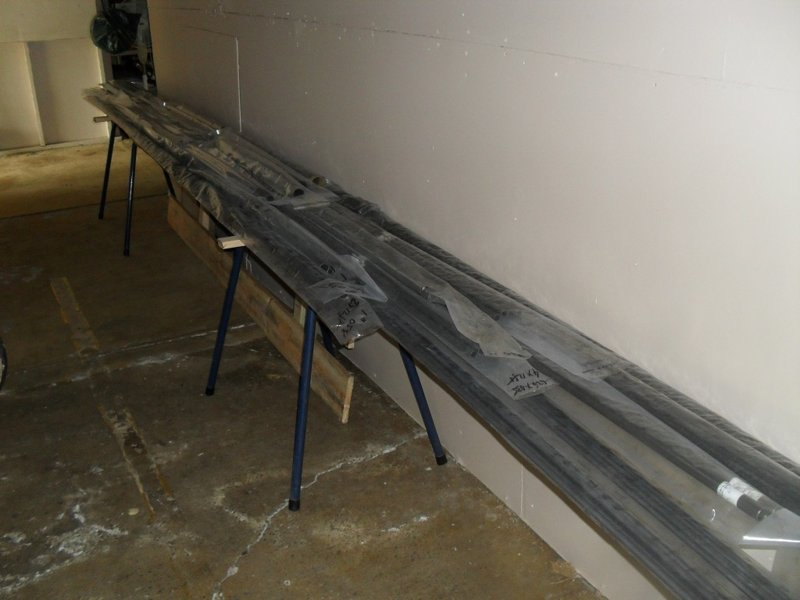
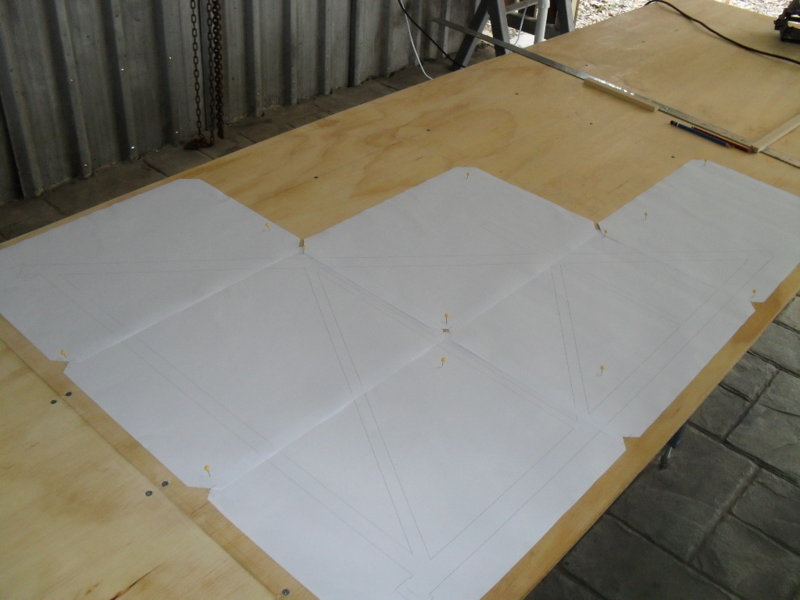
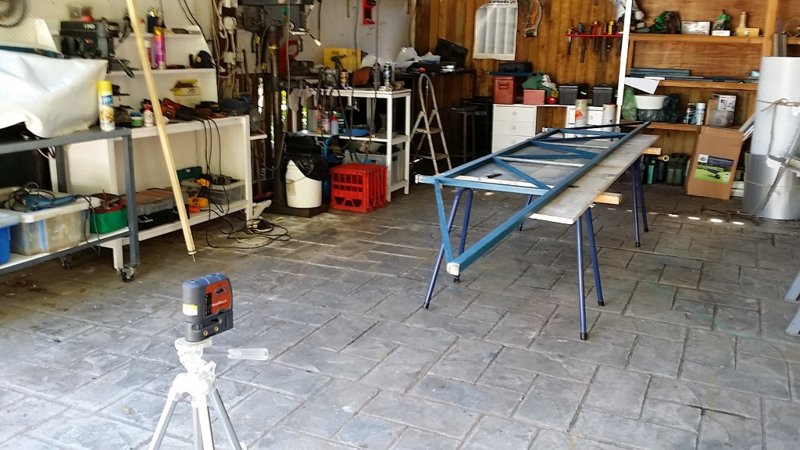
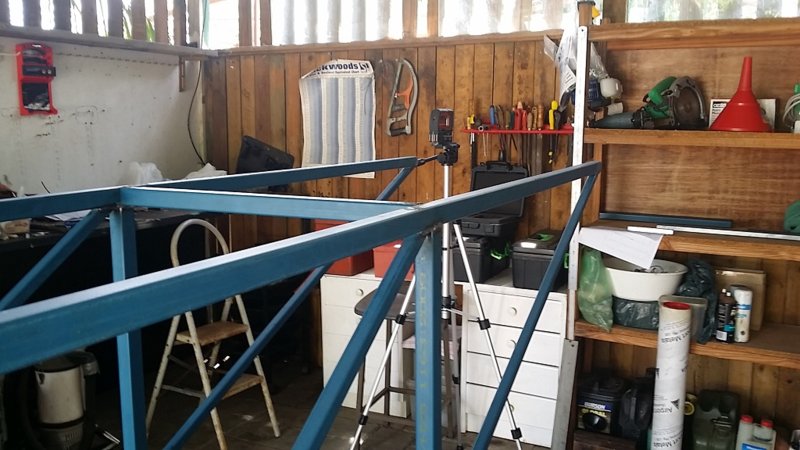
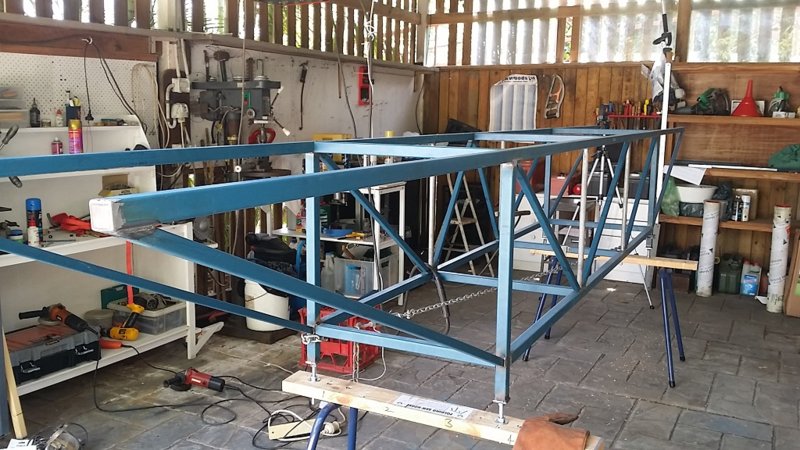
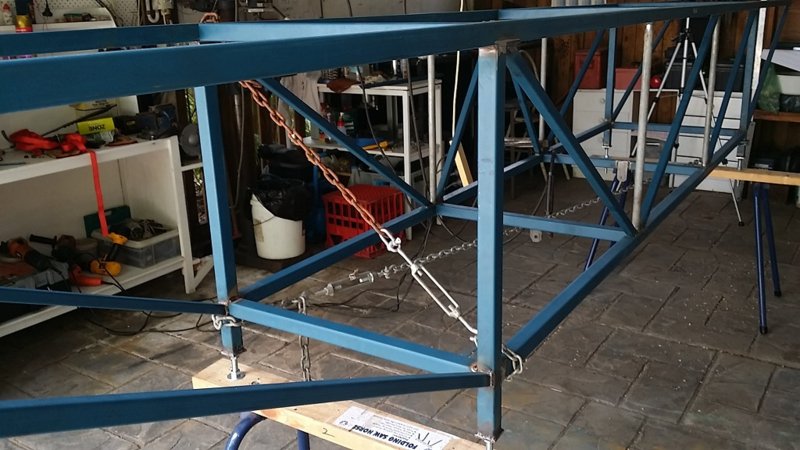
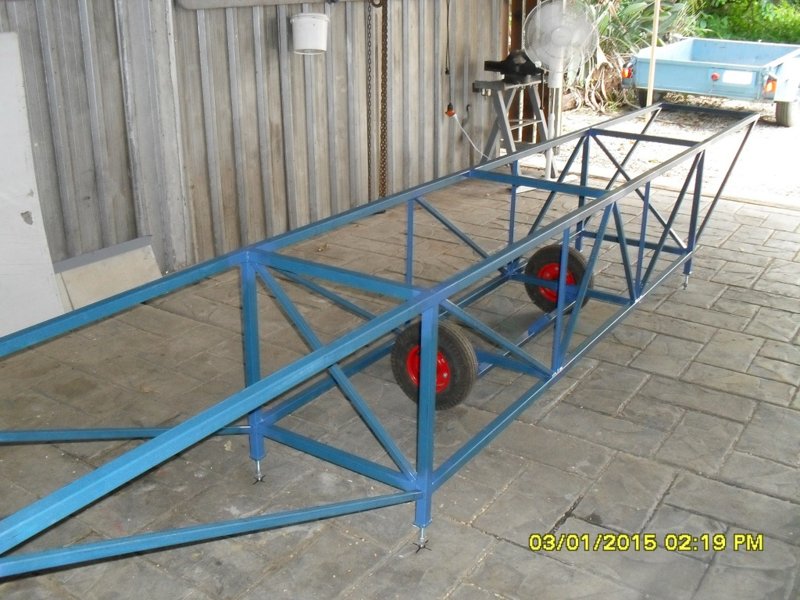
Next I added the bench tops and cut them to shape for the fuselage whether on it's side or upright - the wider end has four outriggers added to the steel structure to support the timber overhang. The CRMO tubing all arrived in one tightly wrapped package so I had to cut it open to check the contents against the delivery note. To prevent any rust getting hold of it before I cut it all up I resealed all the different sizes in individual plastic sleeves and stored them under the house. Then it was back to CAD work and produce some printed drawings for the forward fuselage section and main landing gear legs so that I could lay them out on a grid on the bench and install wooden blocking to hold all the members in position for tack welding. More pics show - Adding the bench-tops The CRMO tubing in plastic sleeves Printed drawings laid out for positioning the blocking The blocking added and paper stripped away.
-
DooMaw - building a STOL
Head in the clouds replied to Head in the clouds's topic in Aircraft Building and Design Discussion
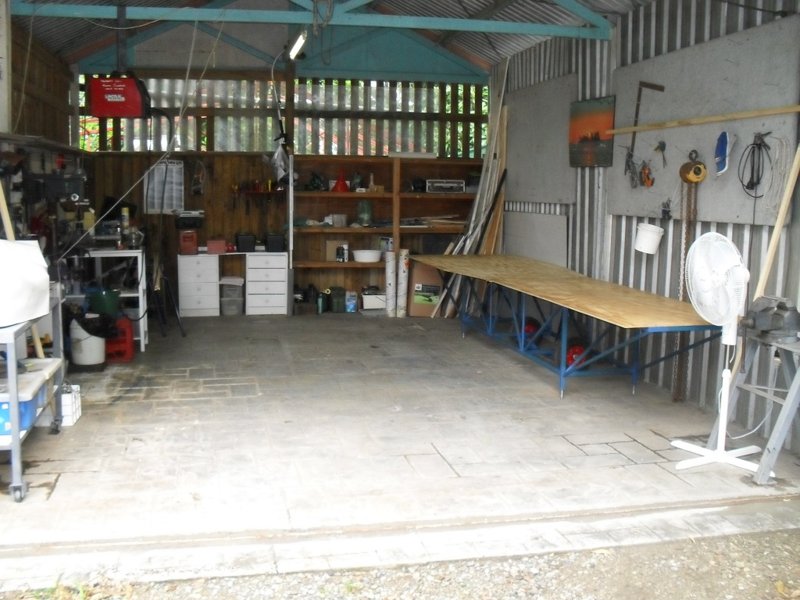
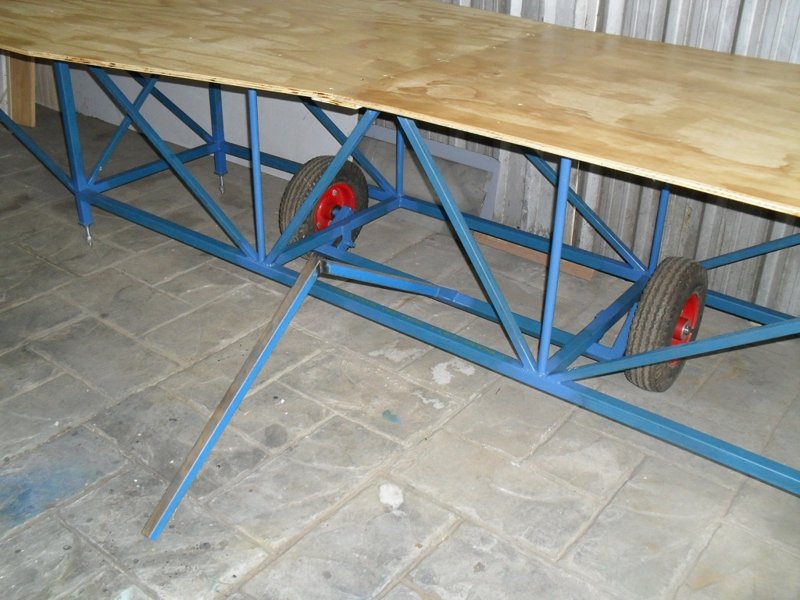
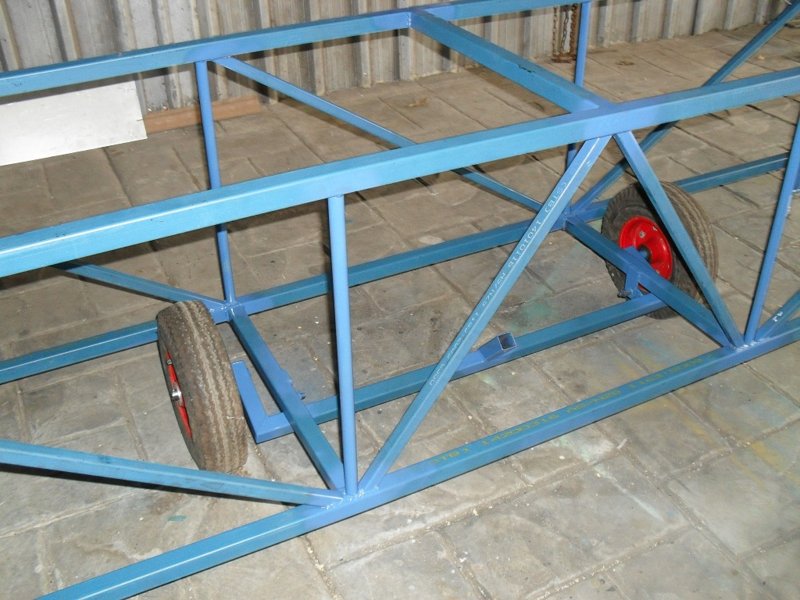
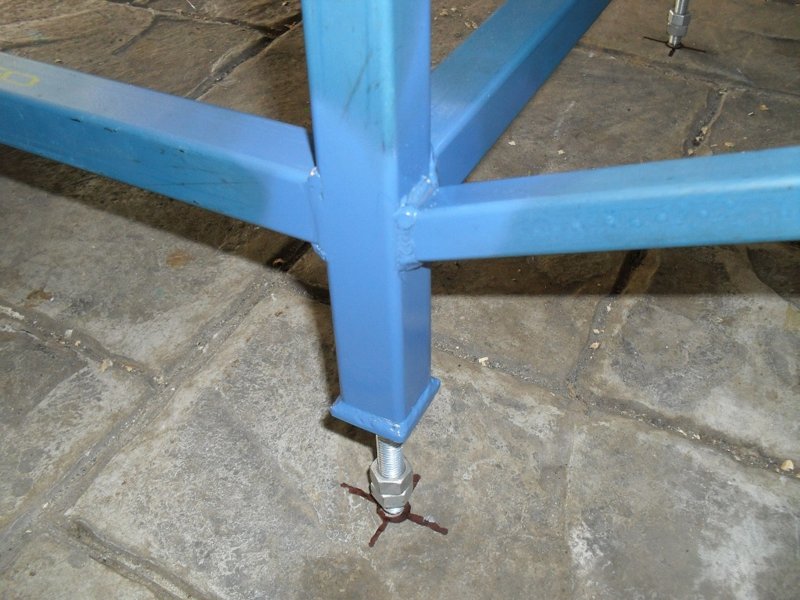
Thanks for showing your interest fellas, it makes it worth the time taken to put fingers to keyboard - and if the whole exercise perhaps encourages someone to build their own plane I would be really pleased. I almost forgot to mention another of the primary design considerations - crashworthiness. Like a lot of others, I'm absolutely appalled at the fatality rate in our sport in recent years and consequently have given crashworthiness a lot of thought. In my mind there are two main conclusions. A higher proportion of crashes result in fatalities these days, when compared with the proportion of yesteryear because the planes fly (and crash) much faster these days, and in general the modern airframes provide less occupant protection than the earlier ones did. In the 1980s we used to mainly fly in groups, we kept our planes in trailers and took them to various airfields and paddocks, assembled them and flew all weekend, camping in tents or the trailers overnight. We had lots of crashes, so I don't think the number of crashes per number of flights has increased these days, it's probably reduced. We regularly had to help someone retrieve a damaged plane and load it piece-meal into their trailer. The difference appears to be that those crashes happened at slow speed in strong tubular steel or aluminium airframes so we rarely had an injury, let alone a fatality. These days the crashes happen at high speed in airframes that collapse structurally and offer little or no occupant protection, so they frequently involve fatalities. With the above in mind, and in any case wanting a tough structure for a rugged bushplane, I am building DooMaw with a welded chromoly tubular steel cage fuselage since they are demonstrably stronger in an impact than other types. Given that a bushplane does tend to get regular use close to the edges of the envelope and is therefore more likely to be involved in a mishap, I have also incorporated as many as possible of the other crashworthiness features I have come across, some of them were pointed out in discussions we had a while ago on this site. The intention is to give the occupants as good a chance of survival, and preferably without injury, as if they were involved in a car crash at similar speeds. After all, we don't expect to be injured or killed in a car these days, except in a very major crash, so DooMaw has been designed from the beginning with crashworthiness as a primary consideration. Bill Whitney kindly provided me with some very helpful documentation which came from the FAR23 certification of the Whitney Boomerang. I've kept all the flail clearances at least as large as were then demonstrated to be necessary, as determined in actual impact with crash test dummies. There is also a large amount of stroke (empty space) available under the seats without any hard structure for the occupants' spines to hit, that space will be filled with memory foam to provide additional shock protection and progressive deceleration. The steel fuselage floor structure under the seats is double layered by having the gear mounting truss below the tubular fuselage floor structure, and the forward part of the lower gear structure forms an angle up to the bottom edge of the firewall helping to prevent the firewall digging in and causing a sudden stop in event of a bad arrival. The engine mounting structure continues that angle forward, further improving the 'bounce off and skip along', rather than 'dig in' situation. The overhead structure between the spar attachment points has crossed bracing rather than a single diagonal brace, helping to prevent the rear spar attach point on one side intruding into the cabin space in event of impact by the wings, going between trees for example, avoiding what has been a fatal flaw in some Cub crashes. And the very nature of the landing gear provides excellent progressive deceleration, having long-travel pneumatic oleo struts and low pressure, large diameter tundra tyres. Moving away from crashworthiness and onto the general design aspects - I'm using the BD4/Tailwind style of square windshield/firewall front end purely for simplicity in construction and jigging, and it certainly doesn't seem to disadvantage the performance or handling of those particular designs. That shape also provides more foot and leg-room which has allowed me to reduce the overall fuselage width to just 36"/915mm and the extra shoulder room that will be needed as a result will be provided by bubble doors which enhance downward visibility, an advantage for a plane designed for ground-related activities. Onto the actual build – last year we moved home to a nice old elevated Queenslander half-way between the Gold Coast and Brisbane, with a bit more space than I had previously, and there's plenty of room for storage under the house. There's also parking for two cars under there and my wife's car just fits but unfortunately mine is too high and so has to live in the garage/shed in the garden which I'd hoped to use exclusively for building the plane. Consequently I needed to be able to pull the car out to work on the plane and that meant building a mobile project bench which would be perfectly flat each time it was in position for working on the build. So the bench became the next design challenge and the first part of the build. The bench was straightforward but I found I couldn't work in the shop to build it after midday. It was a very hot summer and the sun would stream in the open front door and rapidly took the internal temperature over 40C, so I had to build a roll-up awning first. That made all the difference and it stops any rain blowing in too. That was in January this year, the pictures below should tell the story, they show - New home The shed awning CAD model of the bench Bench under construction using self-levelling laser and chains with turnbuckles to keep it all straight Addition of the wheels and lever-lift for moving it about Adjustable feet to take account of the uneven floor By placing it on the same marks each time the bench is flat and level to within 1mm over the whole surface
-
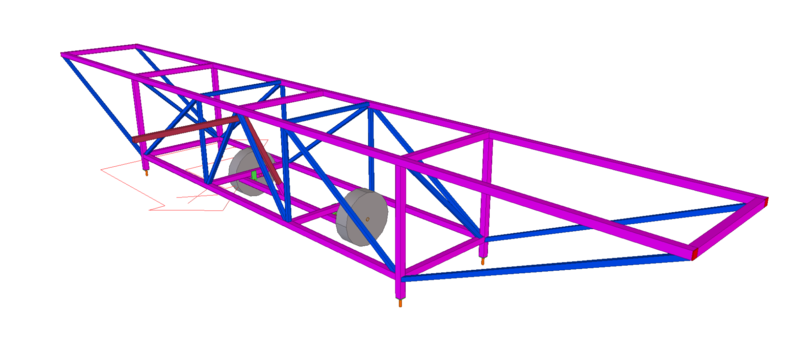
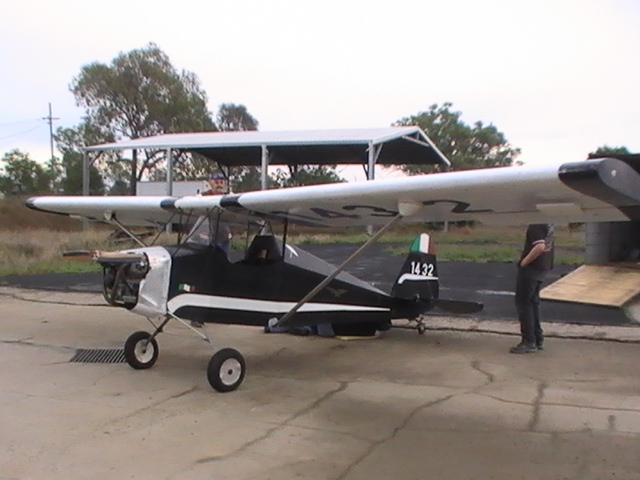
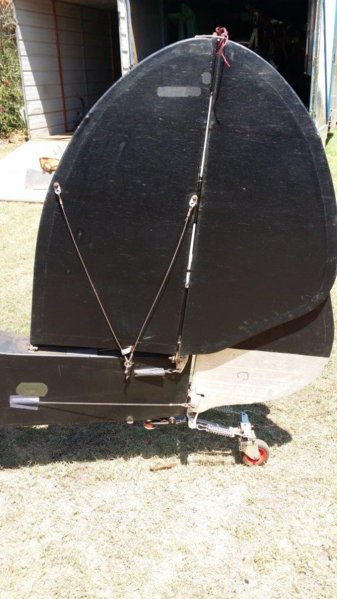
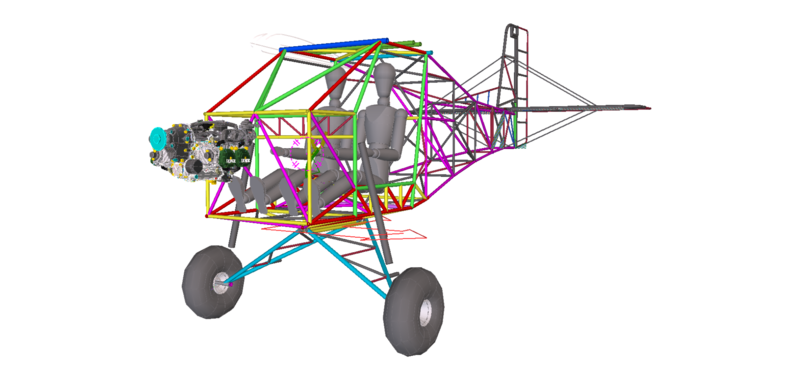
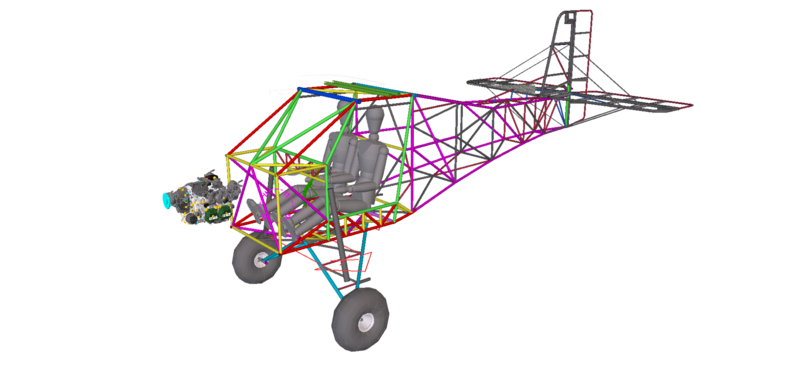
I've had a few people show interest in the plane I'm currently building and they asked me to post a discussion about the build. I've called it the DooMaw, on the basis that it's intended to be quite versatile and allow me to 'Do More' than just use it for transport from airport to airport. In fact it's intended to be mainly used on unimproved surfaces around the bush and the coast – a huntin', fishin', explorin' kind of thing. The design was influenced by the obvious capabilities of the Just Aircraft Highlander SuperSTOL, but with a few additions. I was very impressed with the reported docile handling of the Seabird Seeker which resulted from the 'Airflow kit' developed by Dafydd Llewellyn – there's a discussion about it on the do vortex generators really work thread, so I plan to incorporate some of that cleverness too. The shortage of affordable hangarage is an increasing problem too, so DooMaw will have quick-folding wings. The best wing-fold I've ever come across was on a small parasol aircraft that forum member M61A1 had for sale about a year ago. It was called the 'The Mistress' and at little more than a pull of a button at the wingtip, the wings fold aft and rotate about the rear spar and strut, resulting in the wings folding flat against the fuselage sides, like a bird's wings, while still being supported by the struts – a truly ingenious arrangement, so I have incorporated that into the design as well. The design parameters then - STOL performance with heavily damped, sturdy long-travel landing gear and tundra tyres for 'smack-down' landing capability. Staged stall control via the principles of the Llewellyn Airflow Kit for dependable low flight speed handling characteristics. Less than 2 minute wing-folding (the horizontal stabiliser folds up against the fin/rudder also) with auto-connect/disconnect control linkages. This will make it easier to get shared hangarage because DooMaw can fit into a hangar next to another fully rigged plane. Alternatively half a dozen of them could fit into a hangar that would normally only fit one rigged plane, or it can be kept in a trailer and towed to and from the flying field. Below is the video of the SuperSTOL performing the 'smack-down landing', for those who may not have seen it. Below are some pictures showing 'The Mistress' and its ingenious folding wings – note that the wings are on the plane in the trailer, folded flat against the fuselage sides. I was fortunate to have a very experienced aeronautical engineer assist me with the member sizing for the structure and then I 3D modelled it in CAD so that I could produce CNC cutting templates later. Below are some images of the CAD model of the DooMaw. I started the build about six months ago, worked a month or so on it and then was delayed for four months by life's necessities and only recently got back to it. In the next few days I'll post excerpts from the build log to bring this thread up to date with the construction so far.
- 297 replies
-
- 16
-

-

-
Maitland Incident?
Head in the clouds replied to Roundsounds's topic in Aircraft Incidents and Accidents
That has to be one of the dumbest bits of flying I've seen in a while. I'm all for STOL operations and I reckon the SuperSTOL is one of the best of them so far, but do their owners think the plane is so good it'll defy the laws of physics? If people are going to fly STOLs they need to learn what the plane can't do. That was nothing like a controlled 'Smackdown landing', it was more of a 'let's stop in the air and see if it will mush down even if I use ailerons to try and prevent the wing-drop'. And - at an airshow too, that's great for the public perception of recreational flying isn't it? -
I don't recall Thruster making any sails as multi-coloured as that. It could also be a Kestrel ... but I'll put my dollar on a Bantam.
-
Looks like a Thruster ... or a Bantam
-
Dick Smith - Hero, I think not
Head in the clouds replied to Aldo's topic in AUS/NZ General Discussion
It's about time someone laid the blame where it's due, rather than at Dick's door ... IMHO John Anderson had to be the most hopeless of all Ministers for Aviation in the last 40 or so years. There's quite an interesting read/listen from the ABC Sunday profile of 2005 when Dick was interviewed by Monica Attard soon after the Airspace Reform debacle. It also has some background about Dick that I wasn't aware of, and which probably explains some of his 'differentness' that some folks find challenging. I was wrong about him having given away a million dollars by the way, in 2005 the figure that he and Pip had given away was 15 million, and also all of the profits from DS Foods, amounting to another 3 million or so. -
The best 'Is the Master Off?' trick I was taught during my comm training, and which saved my skin on a couple of occasions, was to never turn off the beacon except while cranking the engine. Then make a policy of always turning around for a look at the aircraft while walking away from it after 'parking'. That quick inspection is used for a few things - check tie-downs, exhaust & pitot covers etc, blade ties (in the case of a helicopter) ... and while you're doing that you'd be bound to notice the beacon flashing away if the Master was still on. HAPPY BIRTHDAY PHIL PERRY!!!!
-
Dick Smith - Hero, I think not
Head in the clouds replied to Aldo's topic in AUS/NZ General Discussion
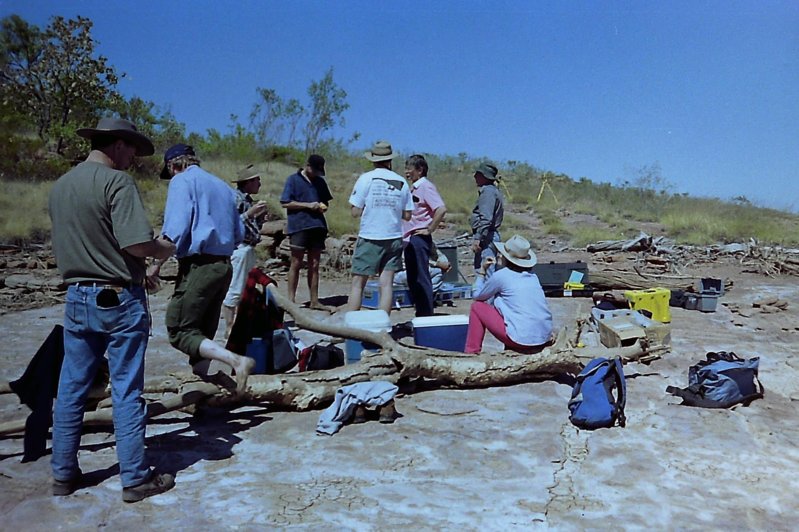
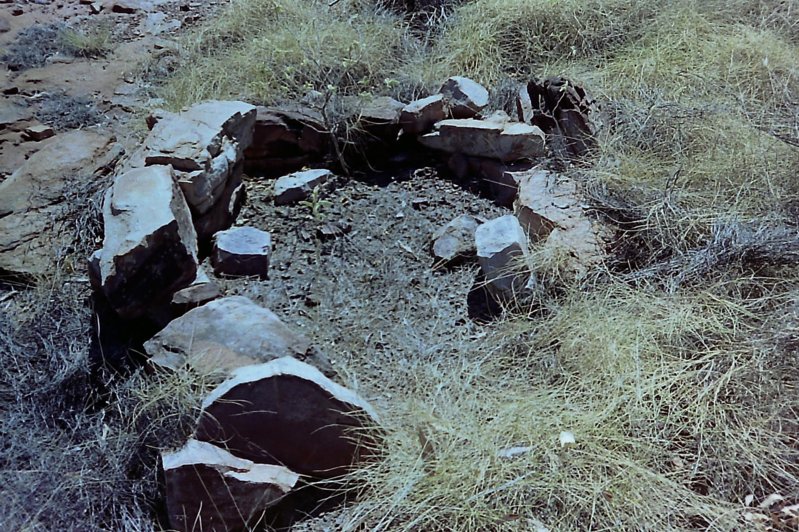
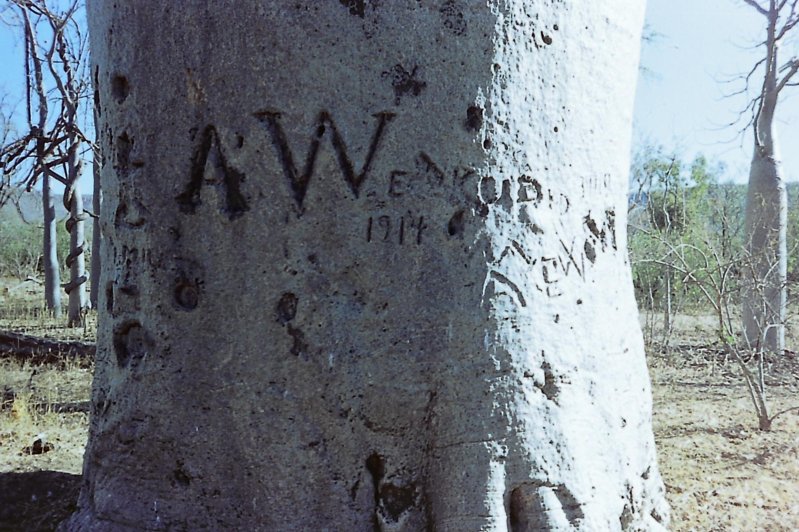
For anyone who might be interested in my trip down memory lane, I dug out a few scanned photos that I took during the Beagle Anchors Expedition, in order the photos show - Day 1, unloading Nigel Scullion's workboat to set it up for towing a non-magnetic dinghy containing the GP radar and magnetometer survey equipment. This was quite dangerous work as the crocs in this part of the river, which is effectively the estuary of one of the largest rivers in Australia, are very large and exceptionally aggressive. Working close to the water's edge required having a couple of other people standing on vigilant watch with pistol and rifle just in case. On day two Dick and a couple of others of us conducted an aerial survey along the banks of the Victoria River. Dick was looking for something he'd researched but didn't say what, he just directed the flight. After a couple of hours he gave up and we were about to return when he told us what he was hoping to surprise us with, it was a large Boab tree which had initials carved into it quite high up, the site of the burial of a/the ship's carpenter. As soon as he mentioned it I knew where it was as I'd come across it by chance some years earlier during a break while mustering on Bradshaw Station. I learned something very interesting that day. We'd all assumed that when the tree was carved the inscription would have been quite close to the ground and as the tree grew the inscription ended up in its present high position. Apparently that's not how it works, a tree grows out of the top only, so a mark on a tree always stays at the same position relative to the ground, so they must have built quite a substantial scaffold to carve the man's 'headstone'. The carving would have got wider of course, as the tree increased in girth. Much later, around the beginning of the Great War, others also carved the tree, the date 1914 can be seen in the third picture. By the third day we still hadn't found anything of significance on the towed array. The fourth picture shows a group think-a-thon during which the historians laid out what was known about the 1839 landing in the area, much of which came from the published and private works of the botanist Joseph Banks. Gladly he was also an exceptional artist and drew everything very accurately. Our big break-through came when someone suggested examining the skylines in Bank's images to try and find exactly where he had been when he drew each of them. That way we could use the descriptions to verify the whereabouts of the various features of the Beagle campsite and determine whether we were searching in the right place for the anchors. Using that method we quite quickly located the main camp, fireplace and quite a number of artifacts, then a large stone table which had become overgrown but was obviously the food preparation area. Two of us then used the remaining information from Banks' writings to work out exactly where they must have dug the well, we flew to the supposed site and found a deep depression edged with a thick tar-like substance, exactly as Banks described (last two photos). Armed with that information, descriptions from the ship's log and Banks' images showed exactly where the Beagle had been anchored (Whirlpool Reach is twelve miles long and two wide, so previously we had been looking for the proverbial needle ...) and the next day the survey started to produce results. By the end of the expedition the magnetometer had located two long items in a slight V shape with a large lump at the end of each buried some 30m into the mud below 10-15m of turgid brown water teeming with crocs and sharks. We concluded it could be the anchors and chains but the difficulty and expense of retrieving them was far greater than the value of having them. And it was always possible that they weren't the anchors at all ...
- 116 replies
-
- 12
-
-
-
Dick Smith - Hero, I think not
Head in the clouds replied to Aldo's topic in AUS/NZ General Discussion
During Dick's Australian Geographic years I had the privilege to be a part of one of his expeditions. It was written up in Australian Geographic Issue #38. We went in search of the lost anchors of the Beagle. In 1839, during the Beagle's voyage with botanist Joseph Banks (the voyage which followed the one carrying Charles Darwin), Captain Lort John Stokes anchored in the lower reaches of the Victoria River to re-supply with fresh water. They had significant difficulties finding a fresh water supply and were forced to spend around two weeks ashore and dig a sizable well to fill their barrels. The place where they anchored has now come to be known as Whirlpool Reach as it is affected by large (10m) tides which rip in and out at up to 7kts and develop treacherous and powerful whirlpools when at full flood. While at anchor, and utilising two bow anchors at most times, the Beagle was frequently spun around her own chains and they often became entangled which required pulling the anchors and re-setting them, sometimes up to four times a day. Stokes was concerned that they often had difficulty retrieving the anchors as the bottom was quite 'sticky'. During the latter part of their stay they encountered the smaller neap tides and re-setting the anchors wasn't needed as they weren't being spun around so much now that the waters were calmer. However, when they were ready to leave they found it impossible to break the anchors free, they had had enough time to sink deep into the ooze and were stuck solid. They attempted to break them out by hauling the chain tight at low tide and waiting for the tide to come in. The anchors were so fast that the bow of the vessel was dragged down to such an extent that Stokes feared the vessel might break her keel, so he ordered the anchors to be cut loose. Dick has had a keen eye for expeditions to retrieve Australian historical treasures ever since his successful 1978 expedition to find the Kookaburra. Along with the lives of pilot and mechanic Anderson and Hitchcock, it was lost in the Tanami desert while searching for Kingsford-Smith during the 'Coffee-Royal' affair in 1929. The 'Anchors of the Beagle' expedition was suggested to Dick via Australian Geographic magazine by people from Darwin's maritime museum, and editor Howard Whelan put the wheels in motion. Accommodation for all of us was arranged at the Bullo River Station homestead, home of the celebrated author Sara Henderson. I was hired to provide the helicopter services as Dick didn't have the time to bring his Jetranger all the way to the north of the NT - he flew up in his Citation instead. There were several quite well known people on the adventure including Nigel Scullion (now Senator for NT), the owner of Darwin's Bare-foot Marine who conducted the Sonar/GP Radar survey. It was mildly intimidating flying Dick around in my Jetranger since he'd only recently returned from his North Pole expedition in his, and that followed his Round the World first-in-a-helicopter not long prior. Nonetheless he was very generous with his comments - especially so considering that we had some very challenging operations to conduct. Landing on tiny peaks with uneven surfaces or deep in gorges with minimal blade clearances, and the helicopter wasn't fitted with dual controls so he was entirely at my mercy, not an enviable situation for any experienced pilot. I found Dick to be an all-round 'nice guy' and very generous with his time, among other things he gave me a lot of helpful input into methods to improve my business. As far as his aviation side is concerned - and this was several years after his sojourn into the regulatory side - whenever Dick arrives at an airport he goes and visits any open hangars to have a chat about the state of aviation play in general, and that way keeps his finger on the pulse and is consequently probably more knowledgeable than anyone else in Australia about the way all levels of people in aviation feel about all aspects of it. I don't know of any other individual or body of people, regulatory or otherwise, who bother to do that. From my viewpoint Dick is one of the few Australians who has always fought to improve the lot of other Australians, whether it be actually accepting the challenge to Chair the CAA when his constant criticism of DoA/DCA provoked others into inviting him to 'put up or shut up' or his 'buy Australian' campaigns, his outspoken views about foreign ownership, immigration, conservation, research or his philanthropy - he has given over a million dollars to worthy Australians. Sadly he's been heavily criticised for his occasional unpopular remarks, very much as a result of the tall poppy syndrome I would suggest, to the extent where he has become noticeably embittered and I don't blame him. He kept Dick Smith Foods running for a long while after it ceased to be profitable, solely, I have been led to understand, to keep Australians employed. Anecdotally I heard that the last straw was when he heard that people had said they wouldn't buy his goods "because he's rich enough already" ... Just about to post this and saw Litespeed's comment. Welcome back Phil, haven't heard from you in a long while!- 116 replies
-
- 17
-
-
-

-
How to get the press off our backs...
Head in the clouds replied to Old Koreelah's topic in AUS/NZ General Discussion
Oh, so true. Nice link OK. In my ultralight instructing and later commercial heli days we often took the Press and TV cameramen/journos flying and always got wonderful write-ups and publicity. It was a breeze to get the likes of Four Corners and the Today Show on side as they're usually starved for good material. From your link I love the writer's last few words - In eight unforgettable days we had covered more than 2,000 miles, flown over seven states and visited – by land and/or air – nine of America’s most spectacular national parks. Webster would continue north to Seattle, but my own journey was over. Watching the AirCam disappear into the sky without me, I felt bereft – as if my wings had been clipped. The question I’ve been asked most often since the trip was, “Weren’t you scared?” It may sound strange, but I never was. For most of the flight, my prevailing emotion was sheer wonder. And now that it was over, I felt I had truly fulfilled the most vital test of travel. I’d made it back home – and was seeing the landscape around me with new eyes. -
Sorry to hear that Andy - on all counts. You're not alone, I have a number of friends in tech fields who have been finding it tough of late. Best wishes for quickly finding a suitable position.
-
Strange how the censor bot knocked out a word in your post but it came through on email ... anyway, 1946 isn't cheapracer because on other sites cheapracer is our very own bexrbetter ... On HBA (homebuiltairplanes USA site) bexrbetter and 1946 have had the odd difference of opinion about how to go about doing business in China but I must admit to being quite impressed with 1946's Company's PSRUs which they test extensively and they look well designed and strongly built.
-
Unfinished project 4 sale on face book.
Head in the clouds replied to keith.b's topic in AUS/NZ General Discussion
Actually the Teenie Two is very well regarded by those who have flown and/or owned them, there are a couple on the RAA 19 register. It looks like a lot of the hard work has been completed on this one, it could be a bargain for someone wanting a head-start on a project. It's clear that all the internal components as well as the rivet holes have been treated with Zinc Chromate which is hard to get nowadays and so I doubt there would be any significant corrosion, most likely none at all even if it has been stored in the open, unless subject to constant salt spray on the coast. That zinc chromate is streets ahead of the less noxious primers that are readily available and generally used these days. Couple of pics below scrounged from the net, of flying examples -
-
It's Arthur Amour's Stollite but I don't know where ...
-
Nice example Happy, but I don't think Bernoulli had a hand in that one. It's another example of Coanda effect but also combined with Magnus effect. The Magnus effect is used to make the fanwing type of aircraft fly. The first full scale fanwing/spinning wing aircraft flew in the 1930s IIRC (Google/Youtube it). There have been some quite sophisticated RC scale fanwing projects, a search on Youtube brings up some of them. Here is a video showing how a successful model Magnus effect fanwing was built -
-
The subject of the possibilities for using Coanda effect in various ways to improve lift and/or achieve flight in less conventional ways than simple fixed or rotary wing craft, comes up regularly on aircraft design forums. I came across this nice practical demonstration of the effect -