danny_galaga
-
Posts
1,948 -
Joined
-
Last visited
-
Days Won
20
Content Type
Profiles
Forums
Gallery
Downloads
Blogs
Events
Store
Aircraft
Resources
Tutorials
Articles
Classifieds
Movies
Books
Community Map
Quizzes
Videos Directory
Everything posted by danny_galaga
-
 I wonder if the tacho wire is running along the aerial coaxial cable or something and it's picking up energy? Seems more like the radio is fine, and the tacho needs investigating 🤔
 -
Is yours working alright at the moment though? I was only going to replace mine because I thought it was dying. Even my mechanic was happy about the improvement when I replaced the starter battery.
-
No thanks 😄
-
Well, central anyway. I grew up in Darwin and I don't think I ever saw a scorpion. A BILLION cockroaches though. I don't miss those 😄
-
Well, my MGL seems to have come good! The only thing that has changed is that the starter battery was going downhill fast, so after the last flight (where it only just started, even after charging it for 30 minutes) I put a new one in. Could it be my radio is a bit sensitive to the extra, and constant current draw of my dicky battery? Thoughts Kyle? In any case, should I ever have to replace the radio, Trig is getting such a good rap I would be silly not to go in that direction. I'm thinking if I mount it under the seat, I could make the aerial coaxial cable about 1.5 metres shorter, which can't hurt 🙂
-
Trig TY91 is about $2800 in Australia. From memory, my MGL was about $1200 USD
-
If you are using a currently available model of radio, what is it, and are you happy with it? I have an MGL. It seems to have gone downhill fast. I have time off next two weeks so I can have a really good at the wiring, aerial etc. but the radio started off well, and the plane only has about 6 hours total flight time, so I feel it probably is the radio. When I told an avionics guy what brand, he asked how much I paid. When I told him it was free, he said that's about the right price 😄. My guy helping with the test flying and another guy at the hangar didn't think much of MGL either. The other guy actually threw his away 😲 They are very happy with Trig TY91, so that's on my radar. My only concern there is it's one of those 'head unit and base unit ' jobbies, which will make installation in my case a bit of a bother, depending on whether I can just join them.into one unit or not...
-
Voltage Regulator Failed
danny_galaga replied to skippydiesel's topic in Instruments, Radios and Electronics
A full 30 minutes 😲 Here's a post of mine on a different forum. 2004. Notice the link in the first post? https://forum.arcadecontrols.com/index.php/topic,20073.0.html#msg161529 -
Voltage Regulator Failed
danny_galaga replied to skippydiesel's topic in Instruments, Radios and Electronics
Many of us have asked this. Not going to happen. You've got 15 minutes and then all your mistakes are locked in forever 😄 -
Voltage Regulator Failed
danny_galaga replied to skippydiesel's topic in Instruments, Radios and Electronics
Well I haven't added an earth to mine. I guess it could be earthing through that foil covered fibreglass heat shield I guess 😊 -
Voltage Regulator Failed
danny_galaga replied to skippydiesel's topic in Instruments, Radios and Electronics
Yeah, I figure since the Carmo is made for aircraft it's fully above ground electrically. The Ducati one obviously is for motorbikes which use the frame for negative ground. -
Voltage Regulator Failed
danny_galaga replied to skippydiesel's topic in Instruments, Radios and Electronics
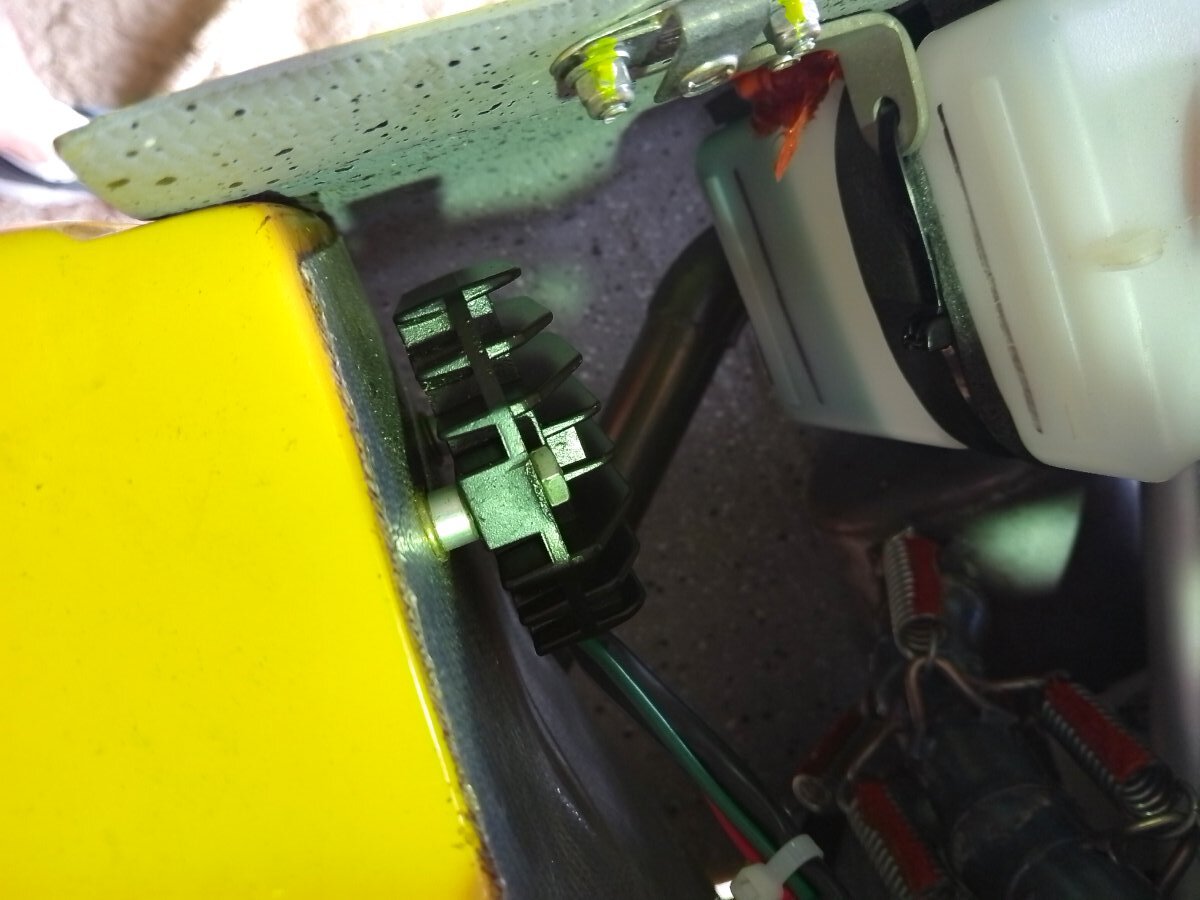
My installation benefitted from being a clean install. Plenty of air movement around the device, but the air that's there isn't going to be very cool. That's the kit position and I didn't want to waste time doing something different. Anyway, my hope was that even it's a bit warm there, it's supposed to run cooler than the original anyway. So far the longest flight has been roughly 80 minutes
-
Voltage Regulator Failed
danny_galaga replied to skippydiesel's topic in Instruments, Radios and Electronics
You do have to be wary. Plugging in a new one into something that caused the old one to fail is an expensive diagnosis 😄 -
Voltage Regulator Failed
danny_galaga replied to skippydiesel's topic in Instruments, Radios and Electronics
You only need a ball park figure to get an idea if it's working or not. Battery at rest voltage is about 12.4V. If you see more than that when the engine is running, it's charging. It should if course be significantly more. We used to see so much variation when I was an auto electrician we drew a line at about 13.2v . Between that and about 14.4v is fine. I don't know that you'll easily test it off the plane. A dedicated workshop might have a suitable AC output to hook it up to. For you, your best source is the running engine 🙂 -
Voltage Regulator Failed
danny_galaga replied to skippydiesel's topic in Instruments, Radios and Electronics
If you do underwoods test, you'll know your charging system is working. If it's working, that is how you test your regulator 🙂 -
Voltage Regulator Failed
danny_galaga replied to skippydiesel's topic in Instruments, Radios and Electronics
Just for sh*ts and giggles, I'm going to temporarily install the capacitor on my set up. I have an MGL radio, which is not highly regarded around the hangar, and since it seems to be getting worse without anything else seemingly changing, I suspect it's a bit dodgy. But it can't hurt to put that capacitor in the circuit and see if the radio improves. Ill report back on the results. Could be a week or two. -
Voltage Regulator Failed
danny_galaga replied to skippydiesel's topic in Instruments, Radios and Electronics
The battery is already doing that. If not, the capacitor would be internal otherwise your whole system is relying on the installer dong that correctly- for instance if people are leaving them off because the Carmo doesn't need it, then B & C would be getting a bad rap. I feel either they are playing it safe by recommending you use one (if it's not needed it won't make any difference) or else maybe their design makes the same amount of noise as the Ducati 🤷♂️ -
Voltage Regulator Failed
danny_galaga replied to skippydiesel's topic in Instruments, Radios and Electronics
I used to be an auto electrician 😉 -
Voltage Regulator Failed
danny_galaga replied to skippydiesel's topic in Instruments, Radios and Electronics
Right you are. I think we talked about this before. My point is I don't think there is a need for a switch mode system, particularly since we've had this type of 'alternator' from before there was such a thing. With these low current alternators, the output amperage isn't that great. 22 amps total output for instance compared to about 5 to 10 amps for a rotor field. Totally doable with the same hardware, whether that was relays or now with transistors -
Voltage Regulator Failed
danny_galaga replied to skippydiesel's topic in Instruments, Radios and Electronics
I can't remember if I bought my Carmo from the Aussie distributor or not. I guess I did. Maybe different manager now? I didn't have any dramas, but that was several years ago Incidentally, my Carmo runs at a solid 14.3V -
Voltage Regulator Failed
danny_galaga replied to skippydiesel's topic in Instruments, Radios and Electronics
Except maybe at the very lowest rpm, the alternator will be putting out more than 14V. Not sure of exact figures but I would guess easily over 20V if no load. I think on a 3 phase car alternator it's over 50V. In the olden days (say 40 or so years ago) the regulator consisted of a relay. Below a certain voltage it was closed and above a certain voltage it would open. In this way it would vary it's rate of vibration, depending on the load, which had the effect of varying the voltage. Of course now it's done with a transistor. Same principle though. -
Voltage Regulator Failed
danny_galaga replied to skippydiesel's topic in Instruments, Radios and Electronics
Sorta. A switch mode power supply ramps up the frequency several thousand hertz before then converting that to the required voltage. There isn't a need here. You aren't converting a voltage, just regulating it. -
Voltage Regulator Failed
danny_galaga replied to skippydiesel's topic in Instruments, Radios and Electronics
In any case, max 22 amps for a few minutes. Well below the 60 amp peak mentioned before 😇 -
Voltage Regulator Failed
danny_galaga replied to skippydiesel's topic in Instruments, Radios and Electronics
The battery will only be able to draw the maximum 22 amps I think. That's theoretically, as presumably there are other loads on. Radio, lights etc. it will only the draw heavily for a few minutes after starting, since it will be charging up. The current draw between the battery and alternator is governed purely by the difference in voltage between the two. If there's nothing wrong with the battery it will charge up and the batteries voltage increases. If you have an ammeter you should see the amps drop down pretty quickly after a start. Longer if the battery was flat -
Voltage Regulator Failed
danny_galaga replied to skippydiesel's topic in Instruments, Radios and Electronics
I would think so, if you mean that were you to install the Carmo, you won't need it anymore. But it can't hurt to leave it, if that's easier for you. My plane only has about 3 hours flying time now, but all good so far. Radio did have some sort of problem, but that was occuring whether the engine was running or not.