IBob
-
Posts
3,085 -
Joined
-
Last visited
-
Days Won
26
Content Type
Profiles
Forums
Gallery
Downloads
Blogs
Events
Store
Aircraft
Resources
Tutorials
Articles
Classifieds
Movies
Books
Community Map
Quizzes
Videos Directory
Everything posted by IBob
-

Different fuel tank emptying rates in J430
IBob replied to RooviatorJ's topic in Aircraft General Discussion
Tank flow conflicts are unlikely to be a factor at normal fuel feed rates. -
Different fuel tank emptying rates in J430
IBob replied to RooviatorJ's topic in Aircraft General Discussion
Hi Rooviator, I suggest you also check for fuel line undulations, and filler cap seals. -
Different fuel tank emptying rates in J430
IBob replied to RooviatorJ's topic in Aircraft General Discussion
MKennard, where two pipes are siamesed together, the flows collide. And depending on the dynamics of that, sometimes one flow beats the other one out, so the stable state is not flows combining, but one or the other 'winning' and excluding the other. I would expect that effect to be far less, if at all, at low velocities. So it may be that draining the tanks as you describe is not what will happen at slower flow rates. -
Mark, another option would be this, also makes for a more natural pull to full flaps, so we shortasses aren't trying to press the lever into our gonads:

-
Different fuel tank emptying rates in J430
IBob replied to RooviatorJ's topic in Aircraft General Discussion
I did some work on my Savannah to get more even fuel flows. Two things stood out: 1. The individual tank vents may deliver different pressures to the tanks in flight. The Savannah vents are rislan pipes sticking out under the wing, and normally cut at a 45deg angle. I was able to adjust these by altering the angle of the cut. A very small difference in pressure will make a big difference. Cessna get round this by having just one vent, then cross-porting the upper tanks. Were I to build again, I would look at doing this. 2. Undulations in the fuel lines from the tanks. These can capture air at the high points, greatly impeding fuel flow. And this will change, giving varying results depending on the changing amount of trapped air. I went to some lengths to straighten my lines. Note: I suggest you also check the filler cap seals: if they do not seal properly, then any pressure from the vent system will be lost, resulting in uneven tank pressure and fuel feed. And finally, I am told by experienced pilots that most aircraft have some degree of uneven fuel feed. -
Help Wanted (with metal fuel line plumbing)
IBob replied to skippydiesel's topic in Aircraft General Discussion
And just to round out that conversation on fuel vents (as applied to the simple systems many of us fly.) The received wisdom seems to be that a small positive pressure in the tanks is desirable. But Consider (also) this: Your fuel tank is, say 500 wide x 500 long. You fit a forward facing vent, and it raises the pressure in flight by 7kPa (1PSI). The size of the vent doesn't matter, a smaller one will just take longer to get there. The result is that the top and bottom of your tank are now bugging out due to an increased pressure over each of the top and bottom surfaces of 177Kg (390lb). My tanks sit flush to the upper wing skin: after my short and far too interesting flight with fully forward facing vents, I looked up there, half expecting to see the skins bugged out and a few rivets missing......( -
Help Wanted (with metal fuel line plumbing)
IBob replied to skippydiesel's topic in Aircraft General Discussion
Marty, yes, ICP run the return line back to high on an inboard tank. Note also that the later Savannahs have also a vent line from the top of the receiver to high on the other inboard tank. This is because the unvented receiver has no reliable way of getting rid of air, and a bubble there could give false low fuel indications. With that overall arrangement, I would think you can return fuel either to a wing tank or to the receiver, without any problems. The only remaining consideration (if returning to the receiver) is how to entirely isolate the fuel supply if necessary. One option is to put an isolating valve on the return line, but I choose not to do that, as the return plays such an important part in avoiding vapour lock EFATO. On balance, I chose to follow the recipe, and return to a wing tank. -
Help Wanted (with metal fuel line plumbing)
IBob replied to skippydiesel's topic in Aircraft General Discussion
Consider this: If your tank is, say, 250mm deep (and full) then the pressure at the tank outlet due to the weight of the fuel is approx 2kPa (0.3PSI) So an increase of just 2kPa (0.3PSI) due to a forward facing vent doubles the pressure of the fuel coming out. So even a very small difference in how separate tank vents are positioned and facing can result in large differences in fuel pressure at the outfeed. And as the tanks empty, that small pressure difference will result in increasing difference in flow. We have seen a 4-tank setup, all with separate forward facing vents, where it was not possible to isolate the inboard tanks. And after about an hour of flight, the fuel levels in those tanks were all over the place. -
Help Wanted (with metal fuel line plumbing)
IBob replied to skippydiesel's topic in Aircraft General Discussion
If I could neatly and easily do it, I would cross-vent my tanks like the Cessna setup. But it needs to be done from a high point in the tanks. -
Help Wanted (with metal fuel line plumbing)
IBob replied to skippydiesel's topic in Aircraft General Discussion
Skippy, re your 'marked fuel deliver preference for the Right Wing tank.' A couple of things from my own experience of chasing uneven fuel feed (albeit in a high winged aircraft). 1. Different tank pressures will cause different rates of feed, and this can be caused by having separate tank vents that are not receiving identical airflow. Cessna get round this by having just one main tank vent (situated behind the strut to avoid damage but also perhaps to reduce pressurisation) then cross porting the upper tanks. In my own aircraft I was able to reduce uneven feed by altering the angle on the end of the vents. 2. Any undulations in lines may capture air in the undulations, with fuel having to make it's way past the air. In a worst case of multiple undulations, the effects of this are cumulative. And unevenness will vary, depending on whether a line is flooded or contains some or a lot of air. My L tanks fuel lines run across the back upper cockpit to my selectors on the RH wall (where i can see them). They are hoses, had slight undulations, and I saw a marked change once i got rid of those. Having said that, I have never achieved equal flow, and I am told by experienced pilots that most aircraft have some unevenness of delivery when both are selected. I should also add that I once tried forward facing tank vents, but abandoned that after one short flight where I had massive cross-feeding. I was also not happy with the degree of pressurisation from this, and what it may be doing to the wing tanks and wing structure. -
I'd say that about covers it, Skippy. I tried to listen to it, but the guy has such a pedestrian and meandering delivery, I'd had it after half an hour. It seems he's trying to wander through every possible hole in the swiss cheese he encountered.
-
Radiator placement - help needed please!
IBob replied to Marty_d's topic in Aircraft Building and Design Discussion
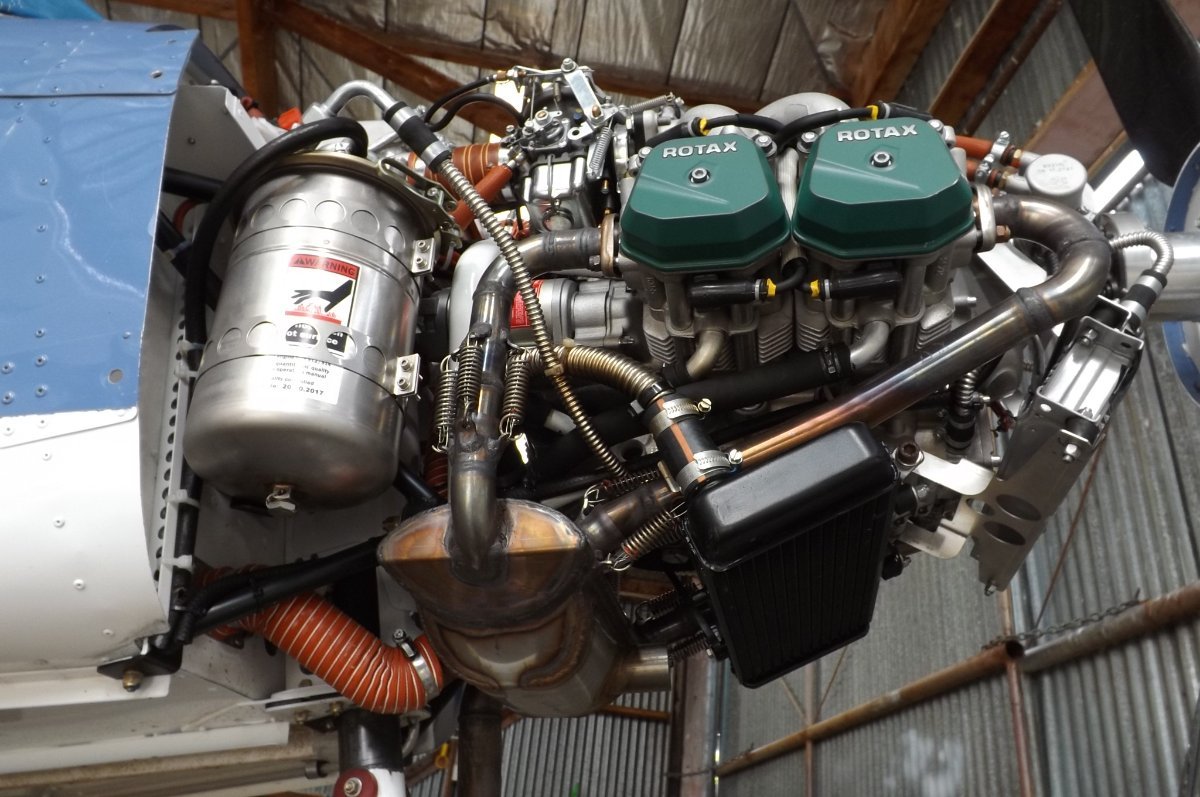
Skippy, I didn't design it. I just followed the instructions, though the al. heat shields were my own add-on. Note, though, the SS corrugated tube supplied, which allows the plumbing to be formed into tight swept bends, makes for a compact result. Makes some folks nervous, but I think it an excellent innovation. The one on the LH side goes round the engine rear and up to the back of the coolant header, and you form it in place.
-
Radiator placement - help needed please!
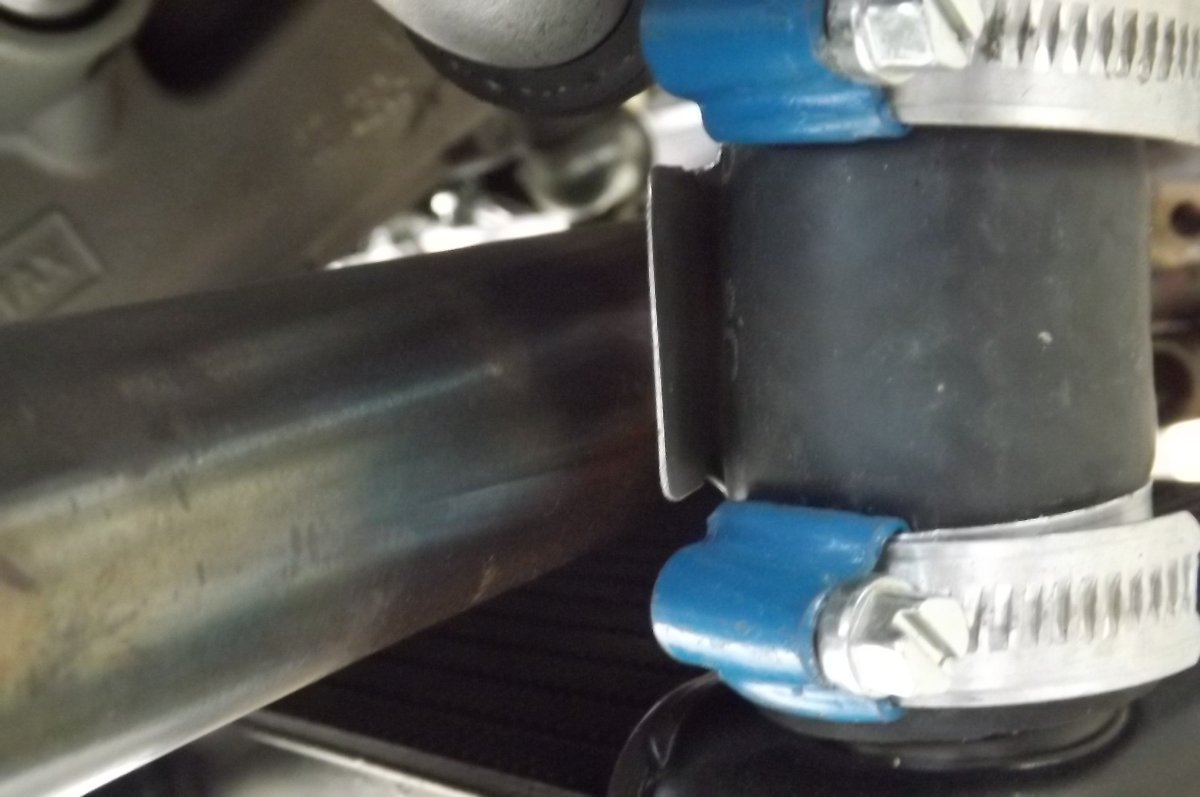
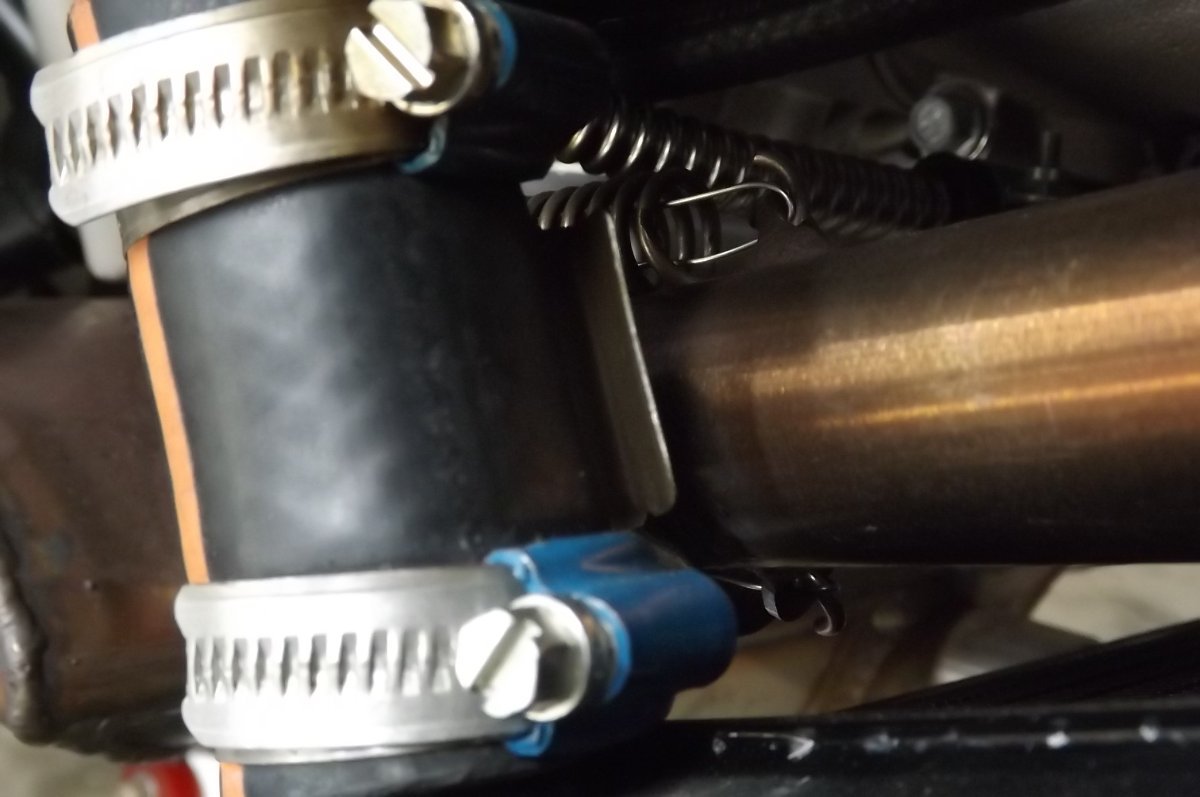
IBob replied to Marty_d's topic in Aircraft Building and Design Discussion
Marty, my coolant radiator hoses pass quite close to the exhausts. I made little aluminium heat shields, which stand off maybe 6mm from the hoses, allowing air to pass both sides, to block and dissipate radiant heat. They are held in place by the hose clips. Seems to work......
-
I have only experience with 912: The oil temp indicator and CHT indicators come from 1 wire sensors that rely on the engine to be grounded (0V) to complete the circuit. The RPM indicator is 2 wire, one side to ground (0V). For start I would suspect a grounding problem. Either that or a problem with the +12V to those instruments. Is the engine properly grounded to 0V of the battery? Is the 0V to those instruments properly grounded to 0V of the battery. Is the 12V to those instruments reliably connected to 12V of the battery. You will have to find a way to meter these things while the instruments are failing.
-
Wiring diagram? Also name instruments as your pics are not clear.
-
Help Wanted (with metal fuel line plumbing)
IBob replied to skippydiesel's topic in Aircraft General Discussion
I've said my bit, Nev. Sorry you seem to take it personally. -
Help Wanted (with metal fuel line plumbing)
IBob replied to skippydiesel's topic in Aircraft General Discussion
The problem with lagging the fuel lines is that if they nevertheless become heat soaked, the only way to cool them is by running fuel through. Blast tubes of cold air only work once you're running, and if you are heat soaked, the problem is already there. It seems to me that most engines......most things.....contain compromises. Rotax certainly have those compromises, and in the case of the risk of vapour lock, I think they found a simple neat solution (albeit easier to build in than to retrofit). -
Help Wanted (with metal fuel line plumbing)
IBob replied to skippydiesel's topic in Aircraft General Discussion
Why is using fuel to remove heat hardly a good way to do things? -
Help Wanted (with metal fuel line plumbing)
IBob replied to skippydiesel's topic in Aircraft General Discussion
Cannot now recall, Marty, but that sounds about right: whatever fits at both ends. -
Help Wanted (with metal fuel line plumbing)
IBob replied to skippydiesel's topic in Aircraft General Discussion
Skippy, I've been close to having a quick brown myself.......but more normally when flying.........😬 -
Help Wanted (with metal fuel line plumbing)
IBob replied to skippydiesel's topic in Aircraft General Discussion
All good points, and I wouldn't suggest it is without it's drawbacks. Fortunately on the Savannah there are sight glasses on the inboard tanks (which is where the standard return goes to, RH). And I can report this, on several occasions: Prepare to start cold engine: Turn on aux fuel pump, which runs at steady rate, watch fuel pressure rise > 2PSI. Turn off aux fuel pump, watch pressure fall (return line is clear). Start engine etc and fly. Land, taxi stop engine. Prepare to restart warm/hot 5/10/15/20mins later: Turn on aux fuel pump, which runs very rapidly for 5-10secs, then runs at steady rate and fuel pressure finally rises. Presumably expelling vapour via the fuel return (and carbs): vapour will pass through the return orifice much faster than liquid fuel, hence the rapid pump activity to start with, then the steady pump rate once all vapour is gone. I have had this on a number of occasions, and I think it a very good feature in this type of aircraft. I would still not take off immediately, but I would say it goes a long way towards avoiding EFATO due to vapour lock. -
Help Wanted (with metal fuel line plumbing)
IBob replied to skippydiesel's topic in Aircraft General Discussion
How so, Nev? -
Help Wanted (with metal fuel line plumbing)
IBob replied to skippydiesel's topic in Aircraft General Discussion
Marty, same size as the fuel return line orifice. I think we decided that is 0.35mm or thereabouts. -
Help Wanted (with metal fuel line plumbing)
IBob replied to skippydiesel's topic in Aircraft General Discussion
Thanks Skippy. I have a Facet Cube and no external bypass to that, so the Cube must allow free flow when not running: at a guess (and it is only a guess) perhaps when powered off the internals park themselves so as to allow free flow? A minor detail with reference to your above diagram: ICP run the fuel pressure gauge via a small orifice, same as the return line. Presumably to limit the amount of fuel dumped in the cockpit if the gauge or plumbing spring a leak(?) -
Help Wanted (with metal fuel line plumbing)
IBob replied to skippydiesel's topic in Aircraft General Discussion
A sketch/diagram would probably help the conversation here. I don't understand how non-return valves would enable each tank to be emptied , with no risk of air. And I don't know what sort of non return valve allows free flow in the forward direction without a throttling effect: in water reticulation, that would be some sort of swing valve, which relies (in small part) on gravity and must be installed right side up. Is there another sort of valve, more suitable for aircraft use?