dan tonner Posted September 9, 2016 Share Posted September 9, 2016 Greetings all; I have about 1 cm clearance between the forward corners of my exhaust silencer (muffler) and the bottom cowling. I wrapped the silencer ends with a couple of layers of exhaust pipe heat wrap (held in place with safety wire) and applied two layers of reflective/adhesive heat shield to the inside area of my lower cowling. This was still not sufficient to prevent a spot of scorching of the paint work on the outside of the cowling. Has anyone else encountered this issue and- if yes - how did you handle it? I am considering cutting a couple of circular holes right through the fiberglass cowling to permit some airflow in these areas as well as providing a little more clearance between the silencer and cowl. Response? Canada Dan Link to comment Share on other sites More sharing options...
Blueadventures Posted September 9, 2016 Share Posted September 9, 2016 Greetings all;I have about 1 cm clearance between the forward corners of my exhaust silencer (muffler) and the bottom cowling. I wrapped the silencer ends with a couple of layers of exhaust pipe heat wrap (held in place with safety wire) and applied two layers of reflective/adhesive heat shield to the inside area of my lower cowling. This was still not sufficient to prevent a spot of scorching of the paint work on the outside of the cowling. Has anyone else encountered this issue and- if yes - how did you handle it? I am considering cutting a couple of circular holes right through the fiberglass cowling to permit some airflow in these areas as well as providing a little more clearance between the silencer and cowl. Response? Canada Dan Check your wrap instructions as some brands specifically warn about not applying layers and also about keeping the overlaps to a minimum, so as not to have a double thickness layer. Not knowing the brand you fitted my comments may not be relevant. You may have to place the additional heat shield onto the cowl material. Cheers Mike Link to comment Share on other sites More sharing options...
rick morawski Posted September 9, 2016 Share Posted September 9, 2016 Greetings all;I have about 1 cm clearance between the forward corners of my exhaust silencer (muffler) and the bottom cowling. I wrapped the silencer ends with a couple of layers of exhaust pipe heat wrap (held in place with safety wire) and applied two layers of reflective/adhesive heat shield to the inside area of my lower cowling. This was still not sufficient to prevent a spot of scorching of the paint work on the outside of the cowling. Has anyone else encountered this issue and- if yes - how did you handle it? I am considering cutting a couple of circular holes right through the fiberglass cowling to permit some airflow in these areas as well as providing a little more clearance between the silencer and cowl. Response? Canada Dan Hi Dan I think just about every Sav has had a problem with cowling proximity to the exhaust. Most just cut the cowl to give enough clearance, some re-glass the clearance hole with a bulge. Cheers Rick Link to comment Share on other sites More sharing options...
microman Posted September 9, 2016 Share Posted September 9, 2016 We had exactly the same problem when building our Alpi - solved it by cutting holes as suggested and put wire grills in the holes. Looks ok and provides better cooling! Link to comment Share on other sites More sharing options...
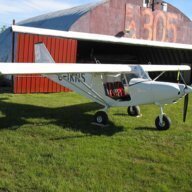
Kyle Communications Posted September 9, 2016 Share Posted September 9, 2016 I cut holes in my cowl for the muffler ends. It works well and looks fine too. The pic on the scales is when I first built her the others are where I had to repaint the cowl after taking a mold from it to make another lower cowl and I wrecked the paint work getting it out of the mold Link to comment Share on other sites More sharing options...
Kyle Communications Posted September 9, 2016 Share Posted September 9, 2016 The hole is on both sides of the cowl Link to comment Share on other sites More sharing options...
IBob Posted September 10, 2016 Share Posted September 10, 2016 I cut holes in my cowl for the muffler ends. It works well and looks fine too. The pic on the scales is when I first built her the others are where I had to repaint the cowl after taking a mold from it to make another lower cowl and I wrecked the paint work getting it out of the mold[ATTACH=full]45662[/ATTACH] [ATTACH=full]45663[/ATTACH] [ATTACH=full]45664[/ATTACH] [ATTACH=full]45665[/ATTACH] [ATTACH=full]45666[/ATTACH] Hi Mark. Any particular reasons you have your antenna mounted down there? I noticed it before, and had meant to ask... Am riveting up my rear fuselage: you may be interested to know that the manual works a whole lot better (so far) for this section, I guess having been recently re-written. Though there is still the requirement to keep the brain engaged and the vision looking ahead: mainly with regard to the bits they said not to rivet just yet, but this now looks like last chance, so I guess I'm meant to go ahead. Link to comment Share on other sites More sharing options...
Kyle Communications Posted September 10, 2016 Share Posted September 10, 2016 Hi Bob Well as my name probably suggests I have been involved running my own service and sales radio communications business for more than 30 years. Although I sold it off not long ago but the major part of my working life has been involved with radio. For our type of aircraft it is the best position for it to be in. It really doesnt take too much education to understand why. WE can only fly up to 9500 ft so we want to talk to others either flying up to that level or down to the ground. The radiation pattern of the antenna is far better from under the aircraft to do this for us. For other flying in flight levels it doesnt really matter where it is because they are so high but generally most of us fly around 5000 ft most times so it makes more sense in the way radio works to have it underneath. I hear stations from up to 200nm away all the time...this can be a pain though...just too many stations talking especially when I am on 126.7 which is sort of most of the country. But anyway I hop that clears it up for you. Some may argue about it but mother nature makes the rules Mark 1 Link to comment Share on other sites More sharing options...
IBob Posted September 10, 2016 Share Posted September 10, 2016 Hi BobWell as my name probably suggests I have been involved running my own service and sales radio communications business for more than 30 years. Although I sold it off not long ago but the major part of my working life has been involved with radio. For our type of aircraft it is the best position for it to be in. It really doesnt take too much education to understand why. WE can only fly up to 9500 ft so we want to talk to others either flying up to that level or down to the ground. The radiation pattern of the antenna is far better from under the aircraft to do this for us. For other flying in flight levels it doesnt really matter where it is because they are so high but generally most of us fly around 5000 ft most times so it makes more sense in the way radio works to have it underneath. I hear stations from up to 200nm away all the time...this can be a pain though...just too many stations talking especially when I am on 126.7 which is sort of most of the country. But anyway I hop that clears it up for you. Some may argue about it but mother nature makes the rules Mark Thanks for that, Mark. I figured it was something along those lines...I guess it's just a bit less usual...why I asked. Link to comment Share on other sites More sharing options...
spitfire Posted September 11, 2016 Share Posted September 11, 2016 Greetings all;I have about 1 cm clearance between the forward corners of my exhaust silencer (muffler) and the bottom cowling. I wrapped the silencer ends with a couple of layers of exhaust pipe heat wrap (held in place with safety wire) and applied two layers of reflective/adhesive heat shield to the inside area of my lower cowling. This was still not sufficient to prevent a spot of scorching of the paint work on the outside of the cowling. Has anyone else encountered this issue and- if yes - how did you handle it? I am considering cutting a couple of circular holes right through the fiberglass cowling to permit some airflow in these areas as well as providing a little more clearance between the silencer and cowl. Response? Canada Dan Hi Canada Dan I have a Skyranger with a similar issue, we cured it with a short length of aluminium angle bent to make the lower cowl bow downwards slightly more than standard. The angle was riveted on the inside of the cowl, which also added some stiffness. Hope this helps Michael. Link to comment Share on other sites More sharing options...
dan tonner Posted September 12, 2016 Author Share Posted September 12, 2016 Thank you Blueadventures, Rick, Microman, Mark and Spitfire (and IBob - I was wondering why Mark's antenna was down there too!) It appears a couple of strategic cowling openings may be the simplest cure for my woes. Spitfire: I'd like to see a picture of the aluminum angle you installed - I'm not clear how bowing the lower cowl downwards gives extra clearance at the sides where the problem resides. Whichever way I proceed, I'll post the results when I'm finished. While I am at it, I'll also post a listing of the changes I've made to my Savannah - most of which are direct copies of the changes you've made to your various machines and generously shared on this wonderful site. My airplane is now flying and I am learning to fly it under the direction of my good friend and certified flight instructor here on the east coast of the Great White North. The airplane is a dream to fly: straight and level is just that - with the trim set dead center; she jumps off the ground and climbs at 60 MPH; stall is a non event with power off and level, and produces an easily rectified nose drop with power on. She'll run the whole runway with the front gear airborn if you wanted to. Most of all, she's got positive balance - the plane self-correctsfor gusts and currents in hands-off flight. My 80 HP Rotax is a sweetheart. All this being said, I enjoy working on the airplane as much as flying the airplane. I began assembling the kit in June of 2012 and had it ready to fly in July of 2014 (about 1300 hours of actual build time). Two major setbacks - one in August of 2014 and a second in August of 2015 -(just after she was airborn for the second time) were discouraging but far from defeating. Bottom Line: very rewarding - I'd do it again in a heartbeat (except the setbacks - I'd take a pass on those.) Many thanks to you one and all - including so many contributors not named above. I'll get some pictures up once I figure out how small they have to be. All the best, fly safely, Dan Tonner 1 Link to comment Share on other sites More sharing options...
IBob Posted September 12, 2016 Share Posted September 12, 2016 Thank you Blueadventures, Rick, Microman, Mark and Spitfire (and IBob - I was wondering why Mark's antenna was down there too!)It appears a couple of strategic cowling openings may be the simplest cure for my woes. Spitfire: I'd like to see a picture of the aluminum angle you installed - I'm not clear how bowing the lower cowl downwards gives extra clearance at the sides where the problem resides. Whichever way I proceed, I'll post the results when I'm finished. While I am at it, I'll also post a listing of the changes I've made to my Savannah - most of which are direct copies of the changes you've made to your various machines and generously shared on this wonderful site. My airplane is now flying and I am learning to fly it under the direction of my good friend and certified flight instructor here on the east coast of the Great White North. The airplane is a dream to fly: straight and level is just that - with the trim set dead center; she jumps off the ground and climbs at 60 MPH; stall is a non event with power off and level, and produces an easily rectified nose drop with power on. She'll run the whole runway with the front gear airborn if you wanted to. Most of all, she's got positive balance - the plane self-correctsfor gusts and currents in hands-off flight. My 80 HP Rotax is a sweetheart. All this being said, I enjoy working on the airplane as much as flying the airplane. I began assembling the kit in June of 2012 and had it ready to fly in July of 2014 (about 1300 hours of actual build time). Two major setbacks - one in August of 2014 and a second in August of 2015 -(just after she was airborn for the second time) were discouraging but far from defeating. Bottom Line: very rewarding - I'd do it again in a heartbeat (except the setbacks - I'd take a pass on those.) Many thanks to you one and all - including so many contributors not named above. I'll get some pictures up once I figure out how small they have to be. All the best, fly safely, Dan Tonner Hi Dan, read your post here (in New Zealand) while prepsoling the last bits for assembly of my S rear fuselage. It's really good to read such positive comments and experiences. I'm very interested to know what changes and additions you have made to your aircraft, and how those have worked out for you: I am close to the point of making decisions on some of that. Thanks and go well. Bob Link to comment Share on other sites More sharing options...
zodiacpilot Posted September 13, 2016 Share Posted September 13, 2016 Hi DanI think just about every Sav has had a problem with cowling proximity to the exhaust. Most just cut the cowl to give enough clearance, some re-glass the clearance hole with a bulge. Cheers Rick Remo Hi DanI think just about every Sav has had a problem with cowling proximity to the exhaust. Most just cut the cowl to give enough clearance, some re-glass the clearance hole with a bulge. Cheers Rick Greetings all;I have about 1 cm clearance between the forward corners of my exhaust silencer (muffler) and the bottom cowling. I wrapped the silencer ends with a couple of layers of exhaust pipe heat wrap (held in place with safety wire) and applied two layers of reflective/adhesive heat shield to the inside area of my lower cowling. This was still not sufficient to prevent a spot of scorching of the paint work on the outside of the cowling. Has anyone else encountered this issue and- if yes - how did you handle it? I am considering cutting a couple of circular holes right through the fiberglass cowling to permit some airflow in these areas as well as providing a little more clearance between the silencer and cowl. Response? Canada Dan Greetings all;I have about 1 cm clearance between the forward corners of my exhaust silencer (muffler) and the bottom cowling. I wrapped the silencer ends with a couple of layers of exhaust pipe heat wrap (held in place with safety wire) and applied two layers of reflective/adhesive heat shield to the inside area of my lower cowling. This was still not sufficient to prevent a spot of scorching of the paint work on the outside of the cowling. Has anyone else encountered this issue and- if yes - how did you handle it? I am considering cutting a couple of circular holes right through the fiberglass cowling to permit some airflow in these areas as well as providing a little more clearance between the silencer and cowl. Response? Canada Dan Any reason against doing away with the silencer?, would sound mean! Just sayin' Link to comment Share on other sites More sharing options...
spitfire Posted September 13, 2016 Share Posted September 13, 2016 Greetings all;I have about 1 cm clearance between the forward corners of my exhaust silencer (muffler) and the bottom cowling. I wrapped the silencer ends with a couple of layers of exhaust pipe heat wrap (held in place with safety wire) and applied two layers of reflective/adhesive heat shield to the inside area of my lower cowling. This was still not sufficient to prevent a spot of scorching of the paint work on the outside of the cowling. Has anyone else encountered this issue and- if yes - how did you handle it? I am considering cutting a couple of circular holes right through the fiberglass cowling to permit some airflow in these areas as well as providing a little more clearance between the silencer and cowl. Response? Canada Dan Hi Dan Sorry I am afraid I may have misled you, we had a clearance issue below the engine and altering the curve of the lower cowl with alum angle was how we cured it. Glad you are having a good run with the Sav, we have a couple at Penfield, they seem like nice aircraft. Regards Mike Link to comment Share on other sites More sharing options...
dan tonner Posted October 2, 2016 Author Share Posted October 2, 2016 I cut holes in my cowl for the muffler ends. It works well and looks fine too. The pic on the scales is when I first built her the others are where I had to repaint the cowl after taking a mold from it to make another lower cowl and I wrecked the paint work getting it out of the mold[ATTACH=full]45662[/ATTACH] [ATTACH=full]45663[/ATTACH] [ATTACH=full]45664[/ATTACH] [ATTACH=full]45665[/ATTACH] [ATTACH=full]45666[/ATTACH] Thanks for the advice and pictures Mark. The links below show one more "MOD" that was done to my plane based upon your reply to my thread. As with your cowl, the openings were added to both sides and have done the trick. All the best, fly safely, Canada Dan Dropbox - 2016 10 (3).JPG Dropbox - 2016 10 (2).JPG Link to comment Share on other sites More sharing options...
Kyle Communications Posted October 2, 2016 Share Posted October 2, 2016 No problems Dan. My radiator was touching the cowl also the radiator can crack if you just have the 2 front top brackets. If you use the std hoses they put a lot of pressure on the radiator and it will crack it and leak. I stopped this by fitting the rubber mounts to the bottom of the radiator and using 2 small bits of angle alu back up to the ring mount and held it to the ring mount with P clips. This takes the pressure off the radiator. I also got rid of the original hard piping at the radiator top fitting and used a molded silicone hose and used a alu pipe swaged to go past the exhaust pipe. I think I did post some pics of it on my blog. The silicone pipe is blue in colour. I will see if I can find the pics and post them Link to comment Share on other sites More sharing options...
Kyle Communications Posted October 2, 2016 Share Posted October 2, 2016 Another NEW Savannah XL on its way post number 950. You can see the silicone pipe and alu pipe it goes to my Thermobob. Also the bottom pic where I marked the exhaust pipe you can see the 2 alu straps going to the ring mount and connected to the rubber mounts on the bottom radiator screw mounts Link to comment Share on other sites More sharing options...
Kyle Communications Posted October 2, 2016 Share Posted October 2, 2016 In the middle picture you can see where one of the mounts had actually broken as well. This shows how much movement there is on the radiator as well. Keep an eye on it Link to comment Share on other sites More sharing options...
Recommended Posts
Create an account or sign in to comment
You need to be a member in order to leave a comment
Create an account
Sign up for a new account in our community. It's easy!
Register a new accountSign in
Already have an account? Sign in here.
Sign In Now