MajorTom Posted September 19, 2017 Author Share Posted September 19, 2017 I shifted my elec fuel pump to under the seats between the fuel sump and where the alu fuel tube comes out under the floor. Yes, Mark. That is exactly the position, I had in mind. I assume the pump works fine there. Any problems? Not sure I would use the lithium battery with the rotax generator. Some do and some dont. There is a brand Shorai that make them for motorcyles that seem to work ok. I would put a battery that light forward of the original as the tail of the S is heavier this is why the S has the 8kg battery supplied behind the pilot seat where the 8kg battery in a XL is down the back as the rear end is a lot lighter Thanks. This is good to know. I was always wondering, about you changing the battery position in your XL. If the S-Model don't needs the extra weight aft, the the firewall would be a good position. I don't realy know, if the battery and other electronic stuff, like the RDAC would be in healthy climate under the cowling. What do you think? Better put stuff like that on the cabin side of the firewall, even when the other side offers much easier access? Link to comment Share on other sites More sharing options...
Kyle Communications Posted September 19, 2017 Share Posted September 19, 2017 Mine works fine there and I also have a filter there a throw away type I change every 12 months..it was discussed on a thread here somewhere Pictures attached I put my RDAC on the side of the fuselage inside on the pax side so it was close where the wires came through the firewall. I folded a small bracket for it and mounted it on the bracket. Picture attached of the bracket I made When I first flew my XL I had the battery per the manual which is the same as the S but they still had the position holes in the rear and the same framing fits. Mine was quite nose heavy and I couldnt keep the nosewheel off the ground easily. I spoke to Tony Garret in the USA and he had his in the rear. His manual said to put it in the rear so I changed mine to the rear and wow what a difference. I think there is area in my blog about the difference and how pleased I was with it. Link to comment Share on other sites More sharing options...
MajorTom Posted September 19, 2017 Author Share Posted September 19, 2017 I like the idea with the bracked! Very nice. The balance problem you had, was not fully clear to me. I was reading it but could not get all traight. Now is better. Thanks. Link to comment Share on other sites More sharing options...
Kyle Communications Posted September 19, 2017 Share Posted September 19, 2017 The rear of the fuselage in the S version has a lot more inside it so it is stronger which means it is heavier behind the CG so you battery needs to be more forward to balance the aircraft. The XL like I have is much lighter built in the back so is lighter and this means the plane is more heavier on the front so the CG is more forward. I put my battery down the back to counterbalance this. Link to comment Share on other sites More sharing options...
MajorTom Posted September 19, 2017 Author Share Posted September 19, 2017 Yes, this difference XL - S was not clear to me. I sometimes heard sometimes otherwise. Thanks again Mark! I gues will try to go for a battery on the inner side of the firewall, to keep the cable lenght short. I need to do all I can to built the bird lightweight, because we have a MTOW of 472,5 kg in germany. So 5kg in battery and 500g in cable is real good saving. Link to comment Share on other sites More sharing options...
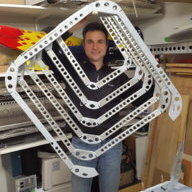
MajorTom Posted September 20, 2017 Author Share Posted September 20, 2017 I don't know if you that same saying down under but: "I could bite my own ass" Look what i did! Do you see the mistake? Link to comment Share on other sites More sharing options...
rmorton Posted September 20, 2017 Share Posted September 20, 2017 A lot more than I have done? ;) Link to comment Share on other sites More sharing options...
MajorTom Posted September 20, 2017 Author Share Posted September 20, 2017 Very funny, Richard. But good you are back. I almost feared, something bad did happen to you! 1 Link to comment Share on other sites More sharing options...
IBob Posted September 20, 2017 Share Posted September 20, 2017 I don't know if you that same saying down under but: "I could bite my own ass"Look what i did! Do you see the mistake? [ATTACH]51931[/ATTACH] Um. SL26 & 27 extrusions are transposed. Then the (bottom of the) engine mount should be sitting outside them, not between SL26/27 and the bottom skin. Yes, we all become expert at removing rivets...( 2 Link to comment Share on other sites More sharing options...
IBob Posted September 21, 2017 Share Posted September 21, 2017 I don't know if you that same saying down under but: "I could bite my own ass"Look what i did! Do you see the mistake? [ATTACH]51931[/ATTACH] And we have the saying "I could kick myself". But I much prefer your version... Link to comment Share on other sites More sharing options...
MajorTom Posted September 21, 2017 Author Share Posted September 21, 2017 I am not sure, I realy have to drill out the rivets. The bird passed the inspection like it is. I would humbly redo this section, but one problem are the 4 bolts betwen engine mount, extrusions and firewall. Theyre holes would not fit in the new (3mm deeper) position. Also drilling out so many important rivets along SL26 / 27 and thereby enlarging the holes might be critical. Considering all, it might be better to leave it like it is. So I asked ICP, if things can stay like they are. Link to comment Share on other sites More sharing options...
IBob Posted September 21, 2017 Share Posted September 21, 2017 I really hope ICP give you the nod, MT. And if they don't...well, anything on these birds can be fixed...) Link to comment Share on other sites More sharing options...
MajorTom Posted September 21, 2017 Author Share Posted September 21, 2017 Yes, thanks Bob. You are right. One thing I like so much about all-aluminium birds is there allday use qualities. Link to comment Share on other sites More sharing options...
bexrbetter Posted September 21, 2017 Share Posted September 21, 2017 Also drilling out so many important rivets along SL26 / 27 and thereby enlarging the holes might be critical. . Rivets have the large bonus of already have a center hole to start your drill on. I have dilled out thousands as I changed my design, and previous history. I do not get oversized or damaged holes as long as the drill is kept straight to the rivet. Think about it, your drill bit is centered and not bigger than the hole. Make sure you have good support on the rear side, a socket on a bar is good if this area. If you're overly concerned about it, then pin punch your rivet stem out first, the drill flies through then. You do have a 20% hole enlargement allowance also in case you make a mistake. Link to comment Share on other sites More sharing options...
Kyle Communications Posted September 21, 2017 Share Posted September 21, 2017 I got the rivet removal drilling tool from aircraft spruce for the thousands of rivets I am taking out of Mabel...it is really fantastic. No oversize hole now when drilling them out Link to comment Share on other sites More sharing options...
Kyle Communications Posted September 21, 2017 Share Posted September 21, 2017 RIVET REMOVAL TOOL from Aircraft Spruce Link to comment Share on other sites More sharing options...
MajorTom Posted September 22, 2017 Author Share Posted September 22, 2017 Hey Guys, it is not about removing rivets. The big issue would be the 4 holes I drilled at the 2 lower points of the engine mount. So I rather wait for ICP to answer, befor I jump to action. Link to comment Share on other sites More sharing options...
Kyle Communications Posted September 22, 2017 Share Posted September 22, 2017 Just refit the mount where it is supposed to go. The frame will have enough movement to accomodate the slightly new position. Just loosen all the bolts off on the mount and do the bottom ones up until its flush then retighten the others then the bottom. Link to comment Share on other sites More sharing options...
Kyle Communications Posted September 22, 2017 Share Posted September 22, 2017 You will probably need to open the holes up on the mount though. I would open the holes or elengate the holes the 2.7mm you need on the steel part of the mount where it attaches to the firewall. If you need to elongate any holes do it on the mount not anywhere on the firewall. This way you can just use a washer over the bolt or nut head Link to comment Share on other sites More sharing options...
MajorTom Posted September 22, 2017 Author Share Posted September 22, 2017 Thanks Mark. Your advise is highly appreciated. Link to comment Share on other sites More sharing options...
MajorTom Posted October 19, 2017 Author Share Posted October 19, 2017 Not to much progress over the last weeks. "90% finished - 90% to go" But my the fuselage was in a paint shop. I was lucky to find a retiered professional who was amazed to paint an airplane. The empty space on the work bench was used to finish the wing tanks. And did the first wheels in my live. I had to replace one tube, that I ruined during intallation. Also recieved the rest of the kit including the rotax. Link to comment Share on other sites More sharing options...
rmorton Posted October 19, 2017 Share Posted October 19, 2017 Not to much progress over the last weeks. "90% finished - 90% to go"But my the fuselage was in a paint shop. I was lucky to find a retiered professional who was amazed to paint an airplane. The empty space on the work bench was used to finish the wing tanks. And did the first wheels in my live. I had to replace one tube, that I ruined during intallation. Also recieved the rest of the kit including the rotax. [ATTACH]52254[/ATTACH] [ATTACH]52255[/ATTACH] [ATTACH]52256[/ATTACH] [ATTACH]52257[/ATTACH] [ATTACH]52258[/ATTACH] [ATTACH]52259[/ATTACH] [ATTACH]52260[/ATTACH] [ATTACH]52261[/ATTACH] [ATTACH]52262[/ATTACH] Such amazing progress and best part is you have chosen the same colours and I want (unless I change my mind) Can you let me in on how to put the tires on the wheels mine won't go on even with unreasonable force. Would also like to know the procedure your man used to prepare and paint the fuselage? Great progress you will be airborne before the winter at this rate, well done Link to comment Share on other sites More sharing options...
MajorTom Posted October 20, 2017 Author Share Posted October 20, 2017 airborne before the winter at this rate, well done No way Richard....remember: 90% ready - meens 90% left ... but I hope to start flight test in spring About the wheels: I had absolutly no clue how to do it and could not find the right answers on youtube e.g. but then I remembered the EAA video collection. look at this: http://www.eaavideo.org/detail/video/1967222618001/wheels-and-tires?autoStart=true&q=wheel But I must admit, during the first wheel, I damaged the tube. Clamped it betwen the rims... Also read what Kyle Kom. wrote about 90deg. tubes and get some. Paint: - some rubbing with scotch brite pads - silicon remover - Sikkens 2K EP primer with much thinner (fast type) to keep it thin and light - then wet-in-wet Sikkens VOC plus .... its a paint not for cars but for trucks and other business machinery lookes good so far and seem light weight Link to comment Share on other sites More sharing options...
MajorTom Posted November 7, 2017 Author Share Posted November 7, 2017 Been busy lately... Bringing and recieving parts from the paintjob friend. Also slowly getting the bird on its wheels. Link to comment Share on other sites More sharing options...
Kyle Communications Posted November 7, 2017 Share Posted November 7, 2017 Looking great Tom Link to comment Share on other sites More sharing options...
Recommended Posts
Create an account or sign in to comment
You need to be a member in order to leave a comment
Create an account
Sign up for a new account in our community. It's easy!
Register a new accountSign in
Already have an account? Sign in here.
Sign In Now