perrynz Posted June 30, 2017 Share Posted June 30, 2017 Also I could not find parts SF 275 and 276 in the manual. Thanks Kyle, esp. the last photo is great.And thanks Bob for the hint about the back seat panel. I had it just clecoed in. The manual, which was real good in chap. 14 is back to this mind twisting itAlien and forced a bunch of bad language out of my mouth... also drilled 20 rivets out at varius places. Had to lay the fuselage on one side to get this big part in. And not even from behind it worked without drilling some rivets out or using brute force. ( I drilled ) Also I could not find parts SF 275 and 276 in the manual. But there place in the bird is not to hard to find. [ATTACH]50892[/ATTACH] [ATTACH]50893[/ATTACH] [ATTACH]50894[/ATTACH] [ATTACH]50895[/ATTACH] [ATTACH]50896[/ATTACH] [ATTACH]50897[/ATTACH] MT: These two items don't seem to get much of a mention in the manual which is surprising, as they are a major structural part. From memory, you should see them in the parts book. They attach below and behind the rear panel of the cockpit, each side. They connect the meaty seatbelt angles to the fuselage sides. Link to comment Share on other sites More sharing options...
MajorTom Posted July 1, 2017 Author Share Posted July 1, 2017 I had to remove the firewall once again. Two of the stiffners needed 2 mm shortening. Otherwise the firewall would be bent. So this time, I fully assembled the firewall on both sides before puting it in. I think his realy is the best way. Just to make sure.... SF240 and SF241 go betwen sidewall and firewall??? I'm running out of black clecos. Can I put some rivets in the firewall? Where not to rivet? 2 Link to comment Share on other sites More sharing options...
perrynz Posted July 1, 2017 Share Posted July 1, 2017 It's probably easier to build the firewall up on the bench first. That way you will also have a bunch of cleco's spare. I found that some parts required a little trimming so that they don't interfere with other parts. For instance, you don't want the end of the angles (on the sides) to be tight into the radius of the firewall tabs. Just take your time and inspect as you go. As long as you don't trim too close to the rivet holes, you should be fine. General rule of thumb is to maintain 2.5 times the rivet hole diameter as the minimum edge distance. Link to comment Share on other sites More sharing options...
MajorTom Posted July 2, 2017 Author Share Posted July 2, 2017 It's probably easier to build the firewall up on the bench first. That way you will also have a bunch of cleco's spare. Yes, I did as advised. It worked good, no problems. But I used only clecos so far. I found that some parts required a little trimming so that they don't interfere with other parts. For instance, you don't want the end of the angles (on the sides) to be tight into the radius of the firewall tabs. Yes, that was a problem in my built to. At first I was wondering why the firewall would bent at 1/3 height. Then I saw the angles you mentioned. So I removed the firewall completly and clecoed the hole firewall inside and outside on the bench. Next step is riveting something on or around the firewall, but I'm afraid of riviting pieces and drilling out one chapter later. For instance there are SF240 and SF241 The manual doesn't show wherer exactly to put them. Do they go betwen sidewall and firewall??? I searched Kyle's blog over and over to get hints on what comes betwen sidewalls and firewall. But I'm not sure. Link to comment Share on other sites More sharing options...
perrynz Posted July 3, 2017 Share Posted July 3, 2017 Hi MT. You are allowed to look ahead in the construction manual so that you have an idea what you can rivet now, or wait. Also, the parts manual is very helpful to suss out how parts go together. I looked up the parts SF240/241. They hold the cowling in place, and attach on the OUTSIDE of the lower and upper skin. There is nothing that is sandwiched between the firewall and lower skin. Getting back to the firewall, I riveted pretty much all of the parts that attach onto it prior to fitting it. It is a lot easier to do that. Have a look at the parts that attach to the firewall also, so that they don't extend out from the edge. Some parts on mine needed a little trimming so they didn't touch the lower skin. With it on the bench you can also trial fit the NLG to make sure you get a good sliding fit of the leg. If you desperately want to rivet the firewall to the airframe at this time, I suggest you temporarily fit the upper skin and instrument panel, (instrument panel makes the correct shape) in order to find the correct position of the firewall. I say this because the firewall needs to pick up the holes in the upper skin. Just work through everything methodically. Sounds like you are doing fine. Cheers. Perry Link to comment Share on other sites More sharing options...
MajorTom Posted July 3, 2017 Author Share Posted July 3, 2017 Thanks. Belive me, I read the manual and use the forum search funktion, before I ask stupid questions. It would surely help to have a Savannah owner nearby and have a peak from time to time. All worked out real good. Climbed the attic to get the engine mount. Nice crafted piece! If you desperately want to rivet the firewall to the airframe at this time, I suggest you temporarily fit the upper skin and instrument panel, (instrument panel makes the correct shape) in order to find the correct position of the firewall. I say this because the firewall needs to pick up the holes in the upper skin. Will do. The upper skin needs to be clecoed in anyway before installing the cabin frame. Seems you absolutly cannot follow the sequence of chapters in the manual. Link to comment Share on other sites More sharing options...
perrynz Posted July 3, 2017 Share Posted July 3, 2017 Hey MT. There's no stupid questions. I'm sure every builder has scratched their head trying to find info in the manual. Everything seems to be in there, just sometimes not in a logical place. I'm still working through it also. Link to comment Share on other sites More sharing options...
MajorTom Posted July 3, 2017 Author Share Posted July 3, 2017 The manual realy s...s There is such an easy solution. I'm also wondering why ICP is not hosting an own forum or owners-site. Well BobIf you had read all of our posts on all the sav threads and even on my blog I am pretty sure I said the same thing. All the advice was to sit down and read the manual and UNDERSTAND the manual BEFORE you actually build anything. I can tell you putting in the cabin frame and the motor mount in my manual was the same. If you did it as per the manual index you would have had holes you couldnt line up. This didnt happen as I had read the manual quite a few times but I still had trouble with some parts. Everyone spews about the manual and I offered Tom the dealer at the time if he got ICP to give me a S kit I would redo all the manual in correct english and sequence...but alas it didnt happen so everyone still struggles with a sub standard manual 1 Link to comment Share on other sites More sharing options...
Kyle Communications Posted July 3, 2017 Share Posted July 3, 2017 wow thats a old post :) Link to comment Share on other sites More sharing options...
Kyle Communications Posted July 3, 2017 Share Posted July 3, 2017 Most of the savannahs here have the bottom cowl fitted to the outside of the aircraft not the inside like ICP does. It is so much easier to remove and replace then and aerodynamically ever so slightly better. The actory ones are fitted to the inside of course and a few guys here have done it to the inside but the majority of builders I have seen are fitted to the outside Those 2 brackets Perry spoke about actually you put them on the inside when you do it with the outside fitting cowl Link to comment Share on other sites More sharing options...
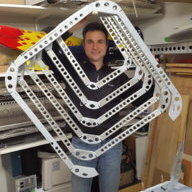
MajorTom Posted July 4, 2017 Author Share Posted July 4, 2017 I'm very curious if this goes in nicely. The opening lookes trapezoidal but the bracket is square. Link to comment Share on other sites More sharing options...
eightyknots Posted July 5, 2017 Share Posted July 5, 2017 I'm very curious if this goes in nicely. The opening lookes trapezoidal but the bracket is square.[ATTACH]51054[/ATTACH] MJ: Are you planning to fit the cowl outside, Aussie-style, or inside Italian-style? Link to comment Share on other sites More sharing options...
MajorTom Posted July 5, 2017 Author Share Posted July 5, 2017 italien style cowling... I don't want to upset my inspector... he is going to list even a A5 rivet where it should be A4 in the plans... no joking!!! Won the first round on the wressling match... Link to comment Share on other sites More sharing options...
MajorTom Posted July 5, 2017 Author Share Posted July 5, 2017 I did a lot of reading in your post lately trying to fill the gap the manual leaves... Now I know, why I was so confused about what goes in betwen sidewalls and firewall. It is all because this cowling inside / outside thing. I had this picture https://www.recreationalflying.com/attachments/img_1018_1-jpg.14169/ in mind and was searching a part that is not there on my built. The black part in the middle of this picture https://www.recreationalflying.com/attachments/img_1029_1-jpg.14171/ When to install it? My guess is to do it together with the engine mount. So the to be drilled holes in the extruded angulars would be exactly and no tension. Is there a best pactice sequence for assembling the cabin frame, engine mount and stuff around? ( Please don't waste you time writing much. If you can please just say 1. 2. 3. ) Thank you!!! The pictures are from Kyle. Hope he don't minds. Link to comment Share on other sites More sharing options...
Kyle Communications Posted July 5, 2017 Share Posted July 5, 2017 The firewall has to pull up against those 2 brackets on either side. There is the hole to drill into it. The bracket I think was drilled and also the extrusion so just fit it I think from memory. I just looked through my pictures and couldnt find anything. The main issue to make sure you fit the engine mount to the firewall and use the engine mount to drill the holes through the firewall. THEN when you fit the cabin frame front legs you will need to put pressure on them to make them line up with the engine mount frame. DO NOT fit the cabin frame first if you drill the holes using it you will not be able to fit the engine mount. JUst drill the holes for the front brackets via the hole in the firewall and then fit the engine mount and then pull up all the bolts everything should square up nicely. There will be some tension on those bolts but because they are pulled up hard it is no issue at all Link to comment Share on other sites More sharing options...
MajorTom Posted July 5, 2017 Author Share Posted July 5, 2017 O.K. lets see if I understand. 1. bring engine mount in place 2. drill firewall 3. install brackets 4. loosly install upper fuselage skin 5. bolt cabin frame to engine mount Link to comment Share on other sites More sharing options...
perrynz Posted July 5, 2017 Share Posted July 5, 2017 Hey MT. Before you "match" drill the two holes in the front of the cabin frame (the steel structure) through the firewall, you must FIRST fit the cabin frame very accurately. You will need the instrument panel pinned in place, but not necessarily the upper skin. The cabin frame is fitted using the supplied jigs that position the forward wing mount. Those two fwd holes will be the final task in fitting this structure, using the engine mount as a guide, as Kyle Communications mentioned. As a precautionary note, my manual (and probably yours too) states that there is a 5mm tolerance in the diagonal measurement when setting up the cabin frame. That tolerance seems awfully large to me. There is a possibility that the measurement should read 0.5mm. Either way though, the more accurate you drill that diagonal measurement into the frame, the straighter the wings will be when attached to your fuselage. Kyle Communications has some good pictures of how he measured the diagonal, by using nails accurately clamped to the fwd wing mount holes, which are used as a datum for sitting one end of your ruler of tape measure onto. 2 Link to comment Share on other sites More sharing options...
Kyle Communications Posted July 5, 2017 Share Posted July 5, 2017 Perry looks like they still havent changed the manual. Even in my XL manual from 6 years ago it stated 5mm which is outrageous...5mm there would mean 5 inches at the wing tip!!!!. I took a lot of time to make sure mine was spot on as shown in my blog and it flew spot on with not one bit of trim required. You will see a lot of savannahs with a trim tab on their aileron this is because most did not take the extra time to make sure the cabin frame was true for the wing mounting. Just make sure you drill the firewall top mounts using the engine mount frame not the cabin frame front mount. I know a few that did do it and it was big dramas for them 1 1 Link to comment Share on other sites More sharing options...
Blueadventures Posted July 6, 2017 Share Posted July 6, 2017 Perry looks like they still havent changed the manual. Even in my XL manual from 6 years ago it stated 5mm which is outrageous...5mm there would mean 5 inches at the wing tip!!!!. I took a lot of time to make sure mine was spot on as shown in my blog and it flew spot on with not one bit of trim required. You will see a lot of savannahs with a trim tab on their aileron this is because most did not take the extra time to make sure the cabin frame was true for the wing mounting.Just make sure you drill the firewall top mounts using the engine mount frame not the cabin frame front mount. I know a few that did do it and it was big dramas for them Agree absolutely Mark. It was mentioned at Monto fly in years back. I tooknotice as had I built a Sav kit I would be aiming for 0.5mm (1/2 mm) maximum, target would be zero. There are many who don't like looking down the wing rivet line as I then shows the wing sweep. Cheers 1 Link to comment Share on other sites More sharing options...
MajorTom Posted July 6, 2017 Author Share Posted July 6, 2017 Thank You all. I will take my time. There is no second chance, if I spoil this one. It is very kind of you, to help a first time builder from the opposit side of the world. Link to comment Share on other sites More sharing options...
rmorton Posted July 10, 2017 Share Posted July 10, 2017 Just a heads up for those that have recent Savannahs with the new flush fitting filler caps, there is an update that you will receive in the post to revise the vent tube. The kit has two new caps, keys (more keys) and a number of flex tubes and screws to take the vent tube out of the wing skin. Very impressed with the service . Link to comment Share on other sites More sharing options...
MajorTom Posted July 11, 2017 Author Share Posted July 11, 2017 Hey Richard I've not recieved anything yet. What is the problem with the caps? And by the way, you gonne love this one. Link to comment Share on other sites More sharing options...
MajorTom Posted July 14, 2017 Author Share Posted July 14, 2017 Yesterday I recieved my tank cap update. Nice, but I don't see much difference. Also I put the flap mixer in, while the bird was laying on its side. Problems occured when trying to install the torque tube. It is the the new straight desingn without the dogleg. The tube seems slightly to long. And its not in 90 deg. angle to the seat longeron. There is a gap with gradient. I don't believe force is a solution. Link to comment Share on other sites More sharing options...
Kyle Communications Posted July 14, 2017 Share Posted July 14, 2017 You have twin sticks tom...do you have adjustable seats? Link to comment Share on other sites More sharing options...
MajorTom Posted July 14, 2017 Author Share Posted July 14, 2017 Hey Kyle, yes I have double steering and electric flaps. When I ordered, I did not know about adjustable seats. But I would not have ordered them, I think. I'm thinking about putting some epoxi (thick with microballons and some fibrepowder) under the pieces that hold the tube. so the angle would fit perfect. Link to comment Share on other sites More sharing options...
Recommended Posts
Create an account or sign in to comment
You need to be a member in order to leave a comment
Create an account
Sign up for a new account in our community. It's easy!
Register a new accountSign in
Already have an account? Sign in here.
Sign In Now