perrynz
-
Posts
61 -
Joined
-
Last visited
Content Type
Profiles
Forums
Gallery
Downloads
Blogs
Events
Store
Aircraft
Resources
Tutorials
Articles
Classifieds
Movies
Books
Community Map
Quizzes
Everything posted by perrynz
-
Hi Pat. Just to add my two cents worth, as others have mentioned, the hex headed bolts and nuts need to be swapped out with the correct AN hardware. The bolts that are fitted in your plane appear to be stainless steel, and are unlikely to meet the same tensile and shear strength as AN bolts and nuts. Additionally, the threads on aircraft bolts are formed by a rolling process (not cutting) and are therefore much stronger in tension applications. Looks like a great project ahead of you. Cheers. Perry
-

WANTED: Bantam B22J exhaust muffler and rear pipe to fit the Jabiru 2200 engine
perrynz posted a classified in Aircraft Parts
 Wanting to purchase an exhaust muffler and rear pipe for a Jabiru 2200 powered Bantam B22J. (Or can someone post detailed photos of the exhaust installation up through the wing) I’m based in NZ, so ideally local.
 -
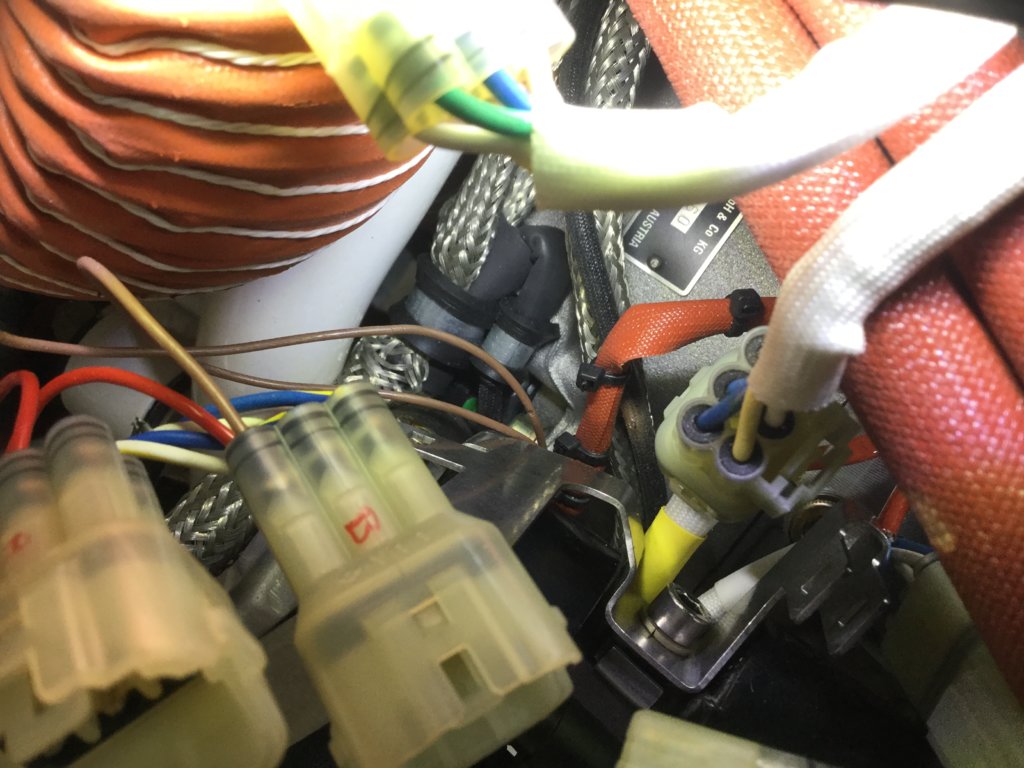
Hi GDM. I had similar if not identical problem. I posted the following 21 June 2019: Hi Friarpuk. I had on-going ignition problems with my 912 after about 20hrs from new. When carrying out the pre take-off ignition checks, I would regularly experience RPM drops of 400 to 1000RPM, even to the point that the engine would basically quit but then spring back to life again. I tested and suspected lots of things. Checked earth connections. Changed all of the spark plugs etc etc. Eventually, in order to isolate a CDI unit failure/problem, I swapped the CDI unit (6 pin) plugs around. (The ones that come out of each CDI) This immediately fixed the problem, but I didn’t know why. (proved it wasn’t a CDI fault anyhow) Alas, after probably another 20hrs the problem reoccurred. Long story short, after pulling most of my hair out, and thinking life without an aeroplane would be much simpler, I stumbled on THE fault. One of the two brown wires (that go to the ignition switches) had been fretting itself on the bracket that holds the CDI units. When I swapped the 6 pin plugs over, it had temporarily re-routed the wire so it sat off that bracket, and the engine ran perfectly for a while. I could see an area of slight discolouration on the suspect wire, and double checked my suspicion with a multi meter. Sure enough, there was bare wire earthing itself onto the bracket. Effectively, each time the wire touched the bracket due to vibration, it had the same effect as switching off one of the ignitions. Anyway Friarpuk, it may not be your engine’s problem, but it’s worth a look. Here’s a pic. If you follow the brown wire down and enlarge the pic, you can see the fretted area. Cheers. Perry

-
Have you checked that the full flaps position is within specs Bob?
-
Try a 20kg sandbag in the boot. Should give you some indication.
-
Yes, I have the seats all the way back. That would likely be the difference.
-
Gidday Bob. My trim is set up pretty similar to yours, although my cruise setting on the bar graph is closer to 2/10 when flying solo. I do find that when two up, my trim requires close to full nose down in cruise. My thoughts are that holding a little rear stick for landing (read that: for relatively short duration) is preferable to holding ANY trim in cruise. Haven’t seen you down in our strip for a while Bob. Cheers. Perry
-
Hi Steve. Had a look at my wiring. My 50amp fuse has only 2 wires. As Bob says, the one with the ring to the battery side of the solenoid, and the one with the spade connector to “bat” on the regulator. On that particular connection there is also a wire that connects to the +ve on the capacitor. (I fitted a new spade connector with both wires crimped into it) So, my guess would be that the white coloured connector in your picture goes directly to the capacitor.
-
Steve. In addition to my previous comments, here are a couple of pics of the parking brake arrangement in the Savannah S. The yellow lever (LH lower side of instrument panel) operates two “in line” hydraulic ball valves. They are simply a hydraulic lock which, after applying the brake pedals and rotating the yellow lever down, the pressure in the lines is locked in place, and hence parks the brakes. Off the top of my head, I can’t recall if this was an ICP supplied item, or sourced via the (then) Australasian agent. Perry
- 12 replies
-
- 2
-

-

-
- savannah
- savannah s
- (and 1 more)
-
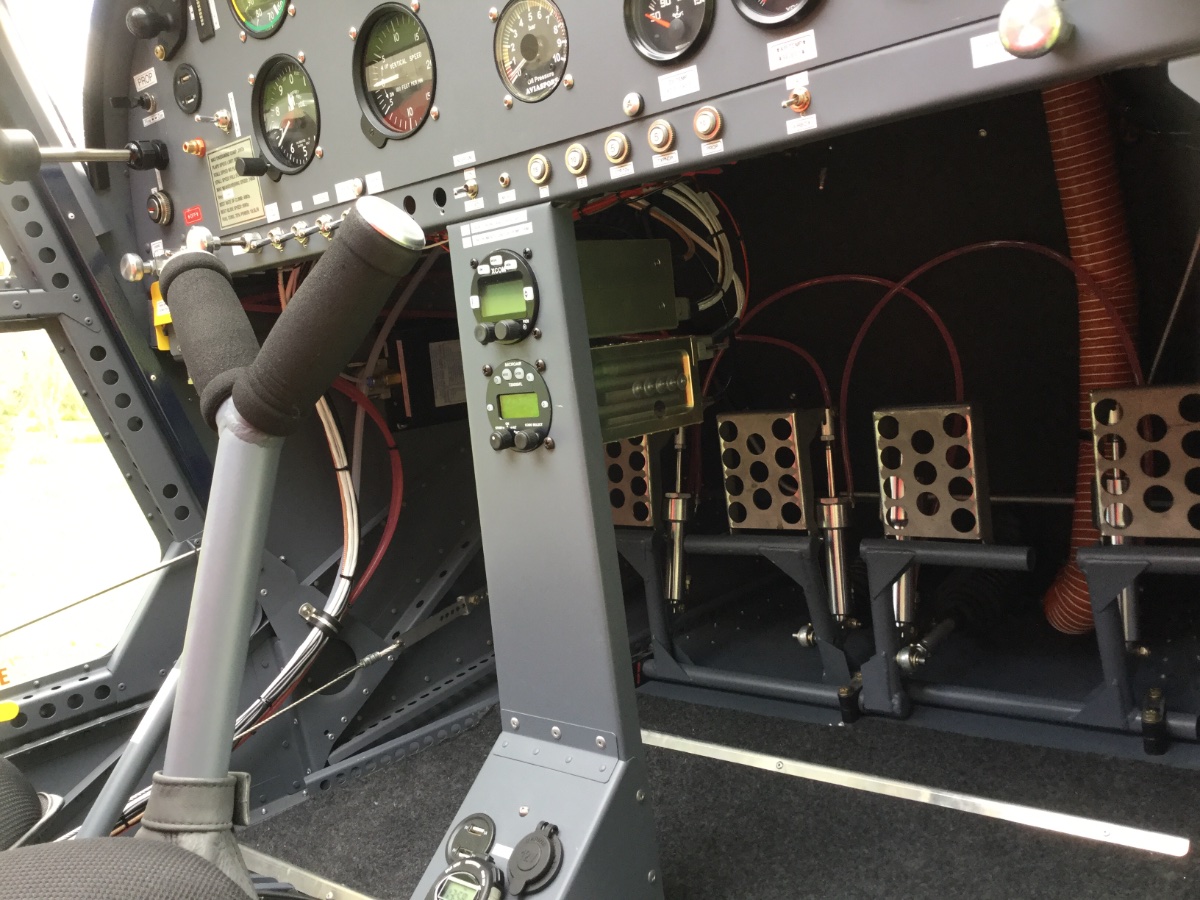
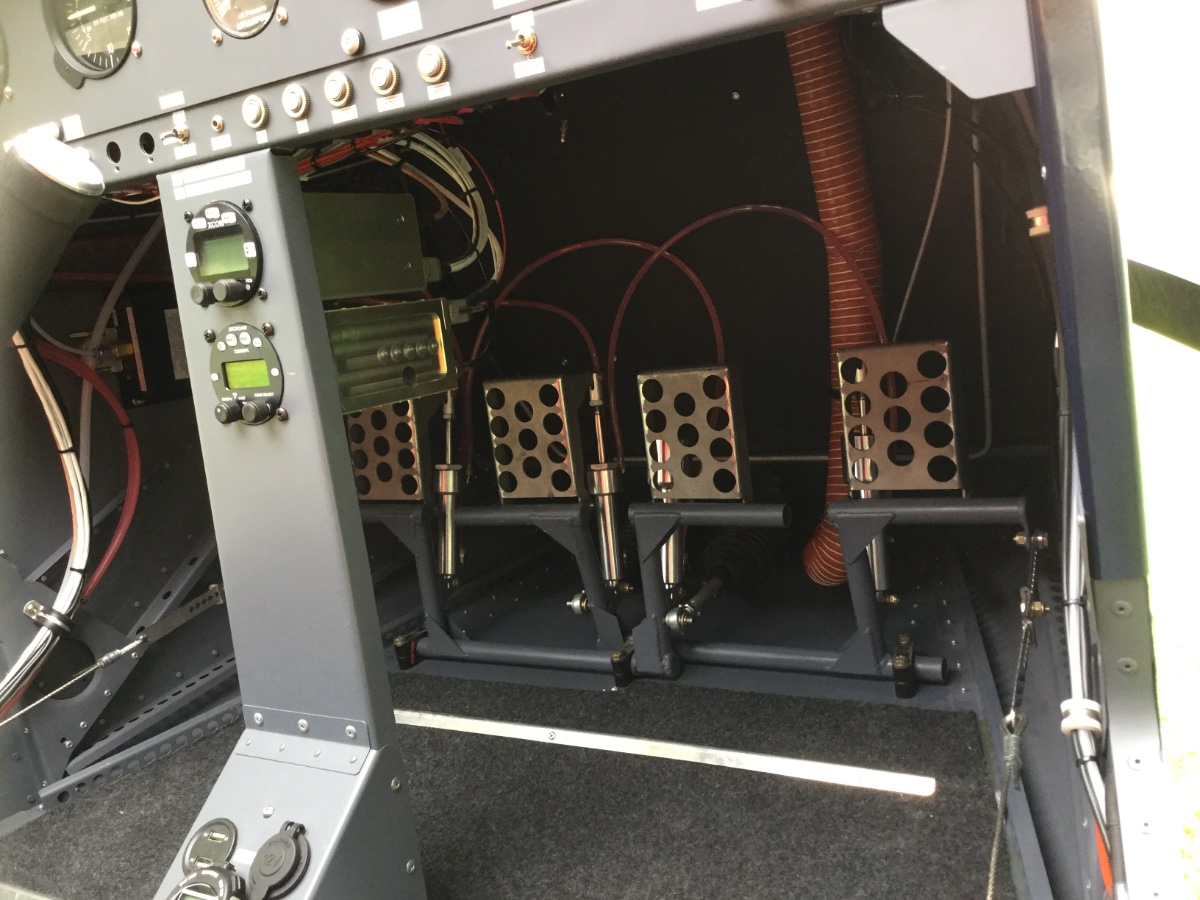
Hi Steve. Here’s a couple of pics of the dual brake set up. I have since removed the passenger side brakes as the factory supplied cylinders/reservoirs leaked, and therefore continually had a pool of fluid sitting on the top. Essentially the second pair is “piggy backed” off the first pair. You need to route/secure the lines so that when the pedals are fully forward, there is nil (or little) chance of hooking your feet in them. Cheers. Perry
-
Vented fuel caps with forward facing inlet tubes
perrynz replied to NT5224's topic in Aircraft Building and Design Discussion
IBob. Does the return fuel to your RH inboard tank feature in the above? -
Hey Spacesailer. You seem to be missing the point. Plans can change hands no problem, with or without a part-built aircraft, as long as there is only one finished aircraft built from that particular set of plans. A manufacturer won’t charge you for a change of plans ownership. How could they? All they are interested in is that they sell each set of plans for one aircraft build. That’s fair enough, as they spent the time and money designing it. Regarding Hummel, the set of plans that I had were certainly serial numbered. Cheers. Perry
-
Spot on Walrus.
-
I wouldn’t foresee any problem, as long as it’s only one aircraft per plan set.
-
Plan sets are generally serial numbered, and notated one aircraft only to be built from each set. Additionally there is often a requirement to register a transfer of plans with the manufacturer. Some manufacturers also won’t sell “off the shelf” parts for an aeroplane unless the purchaser is the registered plans owner. Hope this may help. Cheers. Perry
-
Certainly domestic at the moment.
-
Hi Mark. You are a busy man. One aspect to consider will be the routing of the carb heating tube. It’s quite a tight fit in the OEM set up, in fact I had to flatten mine a little to fit it down between the air box and engine. I’m sure you will work it out. As an aside, I have just removed the throttle arrangement that I made utilising rods, but the difference was that my rods were actuated from the LH and RH sides of the OEM throttle torque tube mounted on the firewall, then directly onto the carb levers. I found that with any movement of my engine, it would upset my carb synchronisation. As a test, if you push and pull sideways on your prop, you will see quite a lot of movement of the engine. With my (now obsolete) arrangement, when the engine moved, one throttle increased rpm whilst the other decreased, which made for rough running. Your design will address the carb imbalance issue that I had. You may see a little throttle “hunting” with your system when you have your friction lock on, but depending on how smooth your new prop is, I may turn out to be a non-issue. Cheers for sharing. Perry
-
question Rotax 912 Carburettors
perrynz replied to skippydiesel's topic in Aircraft General Discussion
Hi Skippy. Your 20yr old floats aren’t affected by the SB, as it kicks in from 2012. Perry -
question Rotax 912 Carburettors
perrynz replied to skippydiesel's topic in Aircraft General Discussion
Hi Paul. My googling and reading between the lines, there seems to be a link between using fuel with alcohol (ethanol) in it, (which is probably most mogas to be fair) and that fuel breaking down the resin coating. That’s definitely not conclusive and is only from what I have read. The carbs that Rotax use on the 9..’s are manufactured by Bing, and by no means are all floats failing. A very similar Bing carb is used on BMW (older) motorcycles and the same floats are used in them. Reading through some of the BMW vintage bike blog sites indicates that people have experienced similar issues there too. One would think that a hollow brass or plastic float, as seen on most motorcycles, would have done the job nicely. I now carry a spare set of floats in my aircraft just in case, and very quick to replace. Perry -
question Rotax 912 Carburettors
perrynz replied to skippydiesel's topic in Aircraft General Discussion
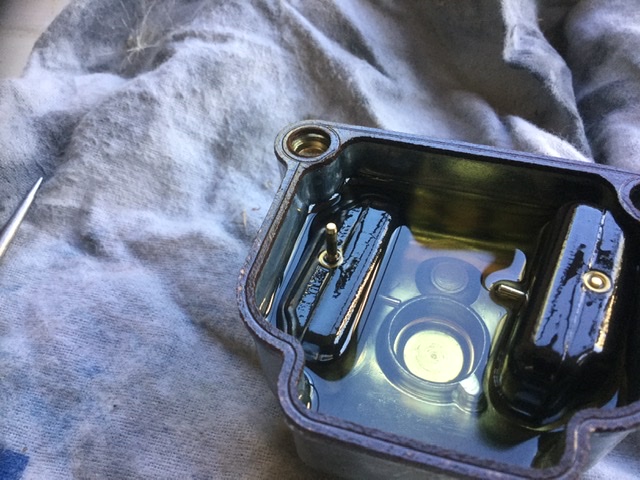
I have recent first hand experience of Rotax 912 carb float problems on my first flight post Covid-19 lockdown. After half an hour of flight, my engine progressively started running roughly. The engine vibration was enough that it caused me to seriously consider an outlanding, and the pucker factor increased exponentially. After landing back at home base, my checks included prop bolt torque, engine mount bolts, etc. All good. I slept on it then recalled that there was an historic (but still current and applicable) service bulletin regarding the carb floats. After removing each float bowl, the cause of my rough running engine was staring back at me. On the RH carb, one of the two floats had sunk. After spending an eye watering $220 for one pair of floats, all fixed. As mentioned, the pair of floats have to weigh less than 7.0grams. My sunk float by itself weighed 6.9grams. (New floats weigh about 3.2grams each, dry) Essentially, one “good” float alone doesn’t have enough buoyancy to shut off the needle valve hence, fuel keeps being supplied. The floats are not a hollow structure (as I was expecting) but rather a solid “block” of some sort of foam/resin. Unfortunately, some of them absorb fuel and become heavy, and subsequently sink. Using a magnifying glass, the surface of my sunk float looked like a kitchen sponge, whilst the good float was smooth on the surface. There have been about 9 different part numbers for the floats since 2012, so this issue is not sorted. Very expensive items for what they are too. My engine has only 125hrs/22months from new. In the pic below, you can clearly see that the RH “good” float sits about at the top of the locating pin. My sunk float (LH) had slid down until it sat on the bottom of the float bowl. As it turns out, IAW the service bulletin, the floats are supposed to be weighed frequently. (25hrs from memory) As an aside, if you have a 912, the inspection procedure is very quick and easy. Not so quick in a 914, as the bowl removal is much more complicated. Perry
-
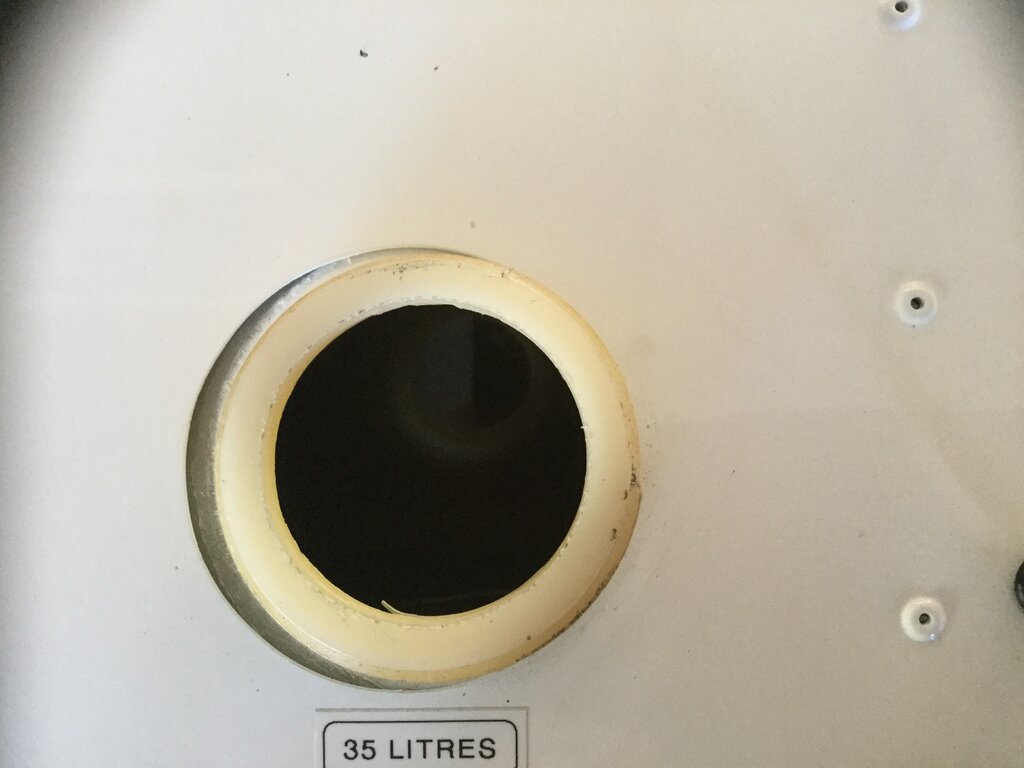
All four of my tank “filler necks” have moved outboard also. The outboard tanks have never had fuel in them during flight.
-
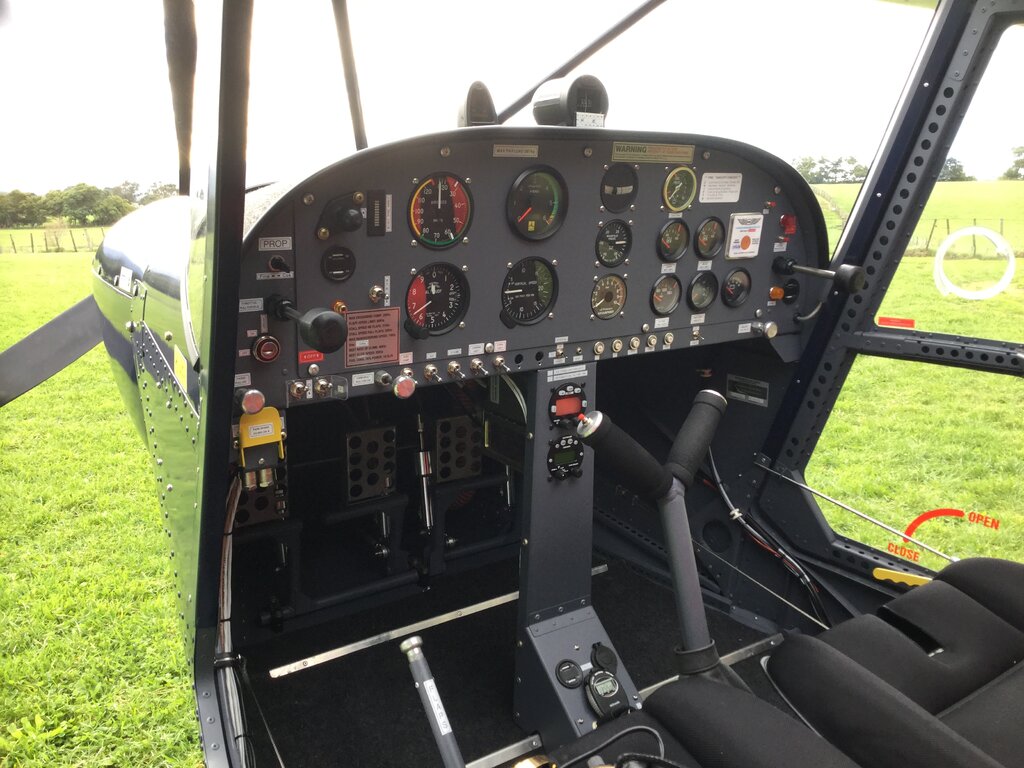
Hi Mark. The AoA gauge is a Bendix King KLR 10.
-
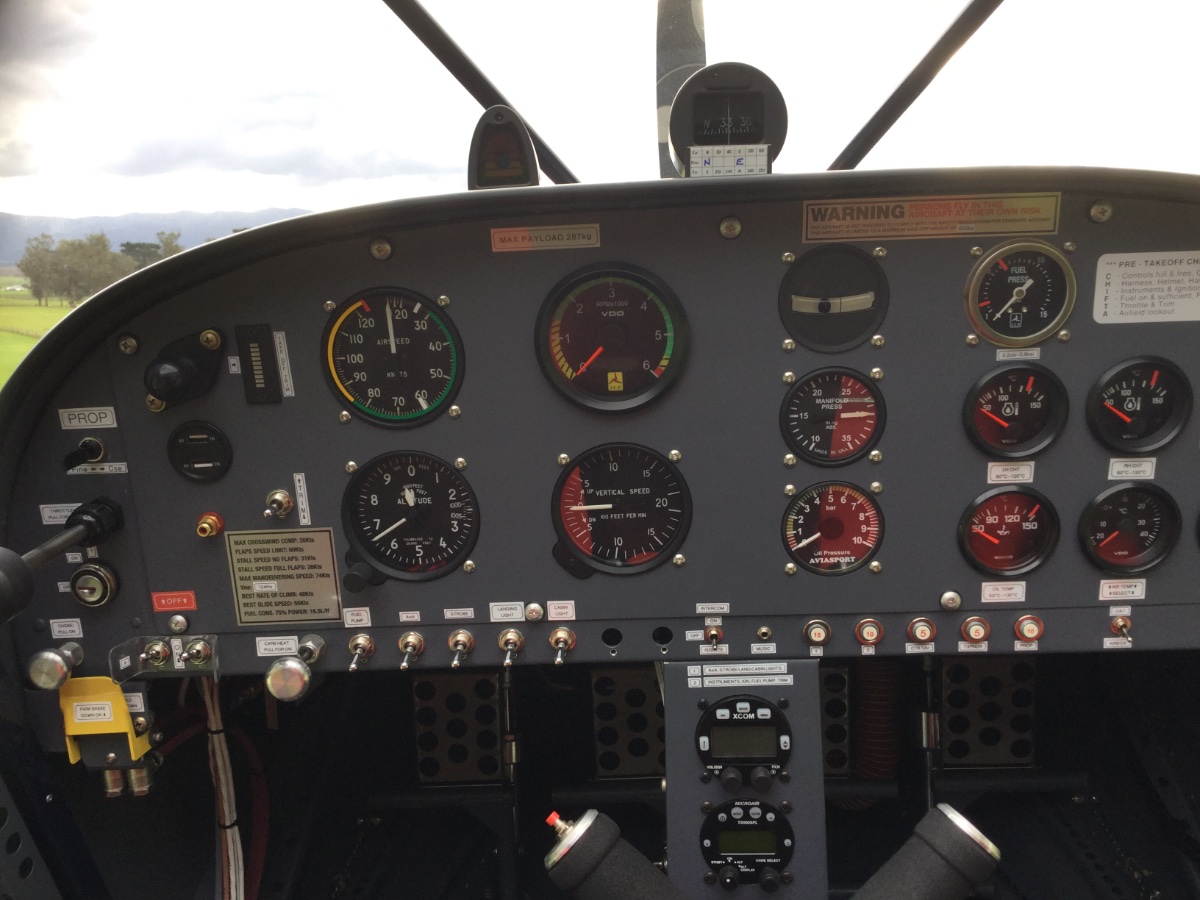
Here’s my Savannah S panel. The instruments I tend to focus on are the VSI (I find it great for fine tuning my hands off trim flight), and the AoA (Angle of Attack/lift reserve) The AoA gauge sits in my peripheral vision and is absolutely amazing. It takes into account the total aircraft weight in determining how close to the stall speed I am at. (There can be considerable difference in the stalling speed between that of a lightly loaded aircraft, and one that is flying at its MTOW) For a STOL type aircraft, it provides peace of mind when flying very slowly and also talks to me through my headset when close to the stall, all without needing to look at the ASI, therefore allowing me to keep my eyes focussed outside the cockpit on landing and takeoff.
-
What about this one. Clue: it’s not international.
-
I had a no-charge problem on two different aircraft. (both Rotax 912) In the first instance I found that the two yellow wires on the connector that plugs into the regulator/rectifier (wires labelled “G”) had backed out of the plug slightly, to the point where the spade connectors on those two wires were not actually connecting. After discovering that, and then pushing the spade connectors in, problem fixed. The second time time was on my latest build. In that instance, I found that the recommended mounting of the regulator/rectifier was not giving a good earth. The fix was to make up a separate earthing wire connected to a good earthing point and bingo. Two simple checks before you dig too deeply. Cheers. Perry