flyvulcan Posted October 26, 2011 Posted October 26, 2011 For around 3 years, my team of 3 co-builders and I have been plugging away at my Komet 2 seat twin jet project in Adelaide. I figure I may as well share some of the fun of building/development with my fellow enthusiasts so to see what my project is about, take a look at the following link http://www.homebuiltairplanes.com/forums/member-project-logs/6342-komet.html . I hope you find my project interesting. Cheers, Dave 3
Bandit12 Posted October 26, 2011 Posted October 26, 2011 Very nice! Where did you manage to source those engines from?
Galpin Posted October 26, 2011 Posted October 26, 2011 Very nice! Where did you manage to source those engines from? This is truly amazing. Congratulations on your tenacity and ability to undertake such a project as this. I will be watching for updates and hoping to learn much from you,
johnm Posted October 26, 2011 Posted October 26, 2011 Good one flyfulcan - very unique Great to hear about engine and aircatft sats when you get some ............................... time ? The design looks like it's going to 'whistle !' when on the ove in the air JM
flyvulcan Posted October 27, 2011 Author Posted October 27, 2011 Hi everyone, Thanks for your encouragement. When I brought my project home in August from my co-builders workshop where we had put in around 200 hours work over 2.5 weeks, working on the fuselage, I just had to sit it in my driveway to admire it. I was hoping to mount the tailplane for the photo session, but I was leaving to return O/S the next day and didn't have time to do this so I had to take the photos without the tailplane being mounted. I played with one of the fuselage photos on Photoshop to come up with the canopy arrangement (on my avatar) and I have to admit to regularly bringing up this photo to admire the sleek lines of the aircraft. It really does look fast just sitting there. I picture it with the nosegear retracted and with the wheel pants on, with its' small wing and I just can't wait to get this baby in the air! The engines I will be using are the JetBeetle H150R which have 150lbf thrust each. You can read about them at their website www.jetbeetle.com . I hope to be the agent for these engines in Oz and with a 70/90/150 lbf range, there may be something there for other peoples projects (picture a twin jet Drifter...). The H150R really chews the gas but my aircraft is aimed at going flying for 20-30 minutes and land with a big smile on your face. It is not a practical aircraft to go anywhere in but that said, I intend to have a molded tank that can be strapped to the rear seat and be quick connected to the fuselage tank to give an additional 50% extra fuel for ferry purposes. If the aircraft is climbed straight to FL180 (pilot on cannular oxy), then it should have a range of 250+ miles so I will be able to take it to the fly-ins, just without a passenger. It is intended to be a pure VFR fun aircraft to fly. It will be fitted with a Dynon D10A EFIS. In my dreams, it will be finished mid-2012. Reality may be somewhat different. If the thing actually works, I have the molds for everything and may consider putting out kits if there is enough interest. I expect the kits would run to about $40,000 with engines being around $27000 plus radio/instruments, so maybe $75000 all up for your own twin-jet. That doesn't sound too bad when stacked up against a more expensive Jabiru... Time will tell... I have to get my Komet going first and test it thoroughly. Cheers to everyone. Dave 1
flyvulcan Posted October 27, 2011 Author Posted October 27, 2011 Sorry, forgot the stats. Here they are (estimated): Length: close to 20' (yet to be accurately determined - nosecone yet to be fabricated) Span: 18'9" Wing area: 40 sqft Empty weight: 440 lbs (installed weight for the 2 engines - 60 lbs) Fuel weight (Max normal - not incl. ferry tank) - 175 lbs Max front seat pilot weight: 250 lbs Max take-off weight: 1000 lbs Vne: 230kias (hope to expand this to 250kias) Max achievable speed S&L: Vne Stall: Clean - 80kias; Full flap - 59kias Nosegear retractable; Main gear fixed and faired G limits: +4/-1.5 @ mtow; +6/-2 @ 750 lbs Again, time will tell for these figures... You can see that the rear seat passenger weight will be dependent on how much of a porker is sitting in the front seat. At 200 lbs weight, I can fit my missus in the back but not a drinking buddy. Physically, a drinking buddy would fit as there is oodles of headroom and legroom in the back, but the pilot will be at the front. There will be dual controls but very basic instrumentation in the back seat. Weight is critical. Cheers, Dave
Litespeed Posted October 27, 2011 Posted October 27, 2011 Hey Dave, looking great. I will happily donate my body as drinking buddy and ballast for the rear seat- I weigh only 170lbs with a 6pack consumed. I would even lose some pounds if needed. Phil 1
flyvulcan Posted October 27, 2011 Author Posted October 27, 2011 Thanks Phil but you would probably need to down a keg to work up the courage to come flying with me!! 1
flyvulcan Posted November 15, 2011 Author Posted November 15, 2011 I have made up a small photo album on this website so people can get an idea about my project without having to leave the site. I'm teeing up another build session soon so I hope to make some good headway later around Christmas. Cheers, Dave
flyvulcan Posted July 22, 2012 Author Posted July 22, 2012 A Youtube video has just been uploaded that shows my intended engines. Check this out: I have also been doing a lot of shopping lately in anticipation of some concerted building over the next few months. I now have a Dynon D10a EFIS, a 5 point aerobatic harness, an Infinity stick grip, a Ray Allen electric elevator trim system, a pitot static system, rudder pedals and I also have a large order in place for hardware, brake master cylinders, brake lines/fittings, rudder cable and fittings etc.. I also have some MF-12 wheelpants from Aircraft Spruce to fit. I have photoshopped the canopy and wheelpants onto my fuselage so I can envision what the final fuselage will look like. Here's how it will look: I feel that it will end up an attractive aircraft, but I am biased!! I'll keep you updated with progress after the upcoming build sessions. Cheers, Dave 2
Kyle Communications Posted July 22, 2012 Posted July 22, 2012 You need to get him to do more on a turbo fan version. There are a lot of guys now building the turbofan using the single stage compressor engines. You get much higher thrust for a much smaller engine core hence far more fuel efficiency for similar thrust. The single stage engines are horrendously thirsty on fuel and you can't really make them any better. Mark
Gnarly Gnu Posted July 22, 2012 Posted July 22, 2012 Good stuff Dave; sweet sound a turbine spooling down (or up)! Agree with Mark, turbofans are vastly more efficient if anyone is making small ones? 1
flyvulcan Posted July 22, 2012 Author Posted July 22, 2012 He's working on a turbofan at the moment. It will be a similar base engine but with a second spool and fan. Thrust will be up and SFC down, as expected. I have been waiting for this development from him for a while now but he had to get the production H150R out the door before he could move on to the next project. Believe me, as soon as he has the turbofan available, it will go on my Komet!!
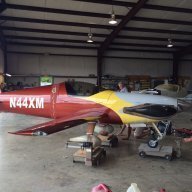
flyvulcan Posted October 26, 2013 Author Posted October 26, 2013 After quite a break from posting progress shots, here is a photo of some work we did on the Komet last week. It now has a nosecone. We also almost completed the fuselage fuel tank. We now have only the canopy frames and rollover structure to complete to have pretty much all the structural work complete. System fitout will start very soon. Cheers, Dave
flyvulcan Posted October 26, 2013 Author Posted October 26, 2013 And a shot from another angle showing the seat back of both the front and rear seats. It is a very streamlined aircraft!
flyvulcan Posted October 26, 2013 Author Posted October 26, 2013 The wing is finished with flaps and ailerons mounted (not shown on this photo) and is ready to be prepped for painting. Span is 18' 10" and wing area is 40sqft. Very small! When you stand in the centre section, you feel like you can touch the wing tips! 1 1
flyvulcan Posted October 26, 2013 Author Posted October 26, 2013 The tailplane (from an RV8) has been mounted. It just needs its fibreglass tips to be installed to be complete. Disregard the front cowling shown on the attached photo. It is only being used to form the basis for the front canopy frame and is not representative of the forward fuselage profile. 1
flyvulcan Posted February 13, 2014 Author Posted February 13, 2014 There's been more progress in the last few weeks. The rear canopy frame is pretty well done and the forward canopy frame is under construction. We also finished the fuselage fuel tank which now completes the structural modification associated with the 15" stretch that was made to the fuselage. The above pic shows the new canopy bow that is between the front and rear cockpits, along with the rear canopy frame taped in place for the trip home on a trailer. Sorry about the orientation of the above photo but I cannot get it up the right way. It is a shot looking down the front seat into the front cockpit. The two vertical frames against the fuselage sides above the seat base are what remains of the original firewall bulkhead from the original Lightning Bug kit. These will be removed totally at the next build sessions. Cheers, Dave 1
Deskpilot Posted February 14, 2014 Posted February 14, 2014 Good to see your progress Dave. Have you tried to fit the wing into the fuselage yet. No! go on, I know you're dying to and we're dying to see it.
flyvulcan Posted February 14, 2014 Author Posted February 14, 2014 Hi Doug, I have not yet slotted the wing in to see it all together. I am definitely hanging out to do that but I seem to finish my build sessions only the night before I head back to the desert and I don't have time to slot the wing in. I really want a photo of it with the tailplane on and the wings in, but alas, that photo shoot will probably have to happen when I am back next time. I'll probably host a workshop visit at that time and if I do, expect an invitation. Cheers, Dave
flyvulcan Posted February 15, 2014 Author Posted February 15, 2014 And a couple more shots, just for interest... Firstly a side profile And next, looking down into the rear cockpit. The two metal brackets in the foot wells are mounts for the fuel transfer pumps (main and standby/emergency pumps to transfer fuel from the main fuselage tank to the header tank). These pumps will hide behind panels that will be footrests for the rear passenger. The rear cockpit will have a stick but no rudders. The view will be fantastic from both cockpits. I'm in touch with a local canopy maker who will be making up some tinted canopies for me over the next few months. The rear cockpit is huge but the front cockpit is somewhat challenging to fit in instrument panels, throttles, stick etc... It is going to be a real test of ergonomics to find the right layout for everything in the front cockpit... I have an all-in-one Dynon D10A EFIS but will have a standby 2.1/4" ASI, plus engine indication system. Flaps are electrically operated via a 3 button switch (up/takeoff/landing) that will be mounted immediately forward of the throttle quadrant on the left side. So for a go-around, I can advance the thrust levers and lead with my finger to press the flap selector to the takeoff position. Too easy. My stick grip is an Infinity Stick Grip so I have all trim, radio, PTT etc. functions on the stick.
Deskpilot Posted February 16, 2014 Posted February 16, 2014 I bags first pax privileges Dave. I think I can squeeze into the slick fuselage.
flyvulcan Posted July 4, 2014 Author Posted July 4, 2014 And a couple more progress shots. The canopy frames have been completed and I was given a throwaway canopy by local canopy maker Ian Linke to trial fit onto my rear canopy frame. I trimmed it up and installed it and it fitted nicely, as you can see in the attached photos. Ian will be able to use the mold from this canopy to make me a nice new tinted one. We have also mocked up the front canopy and hopefully, both canopies will be done for me in a few months (no rush at this point). 4
Recommended Posts
Create an account or sign in to comment
You need to be a member in order to leave a comment
Create an account
Sign up for a new account in our community. It's easy!
Register a new accountSign in
Already have an account? Sign in here.
Sign In Now