
IBob
-
Posts
3,085 -
Joined
-
Last visited
-
Days Won
26
Content Type
Profiles
Forums
Gallery
Downloads
Blogs
Events
Store
Aircraft
Resources
Tutorials
Articles
Classifieds
Movies
Books
Community Map
Quizzes
Videos Directory
Everything posted by IBob
-
Gotit........thanks.
-
That's good input, Skippy. I will be installing ADSB in the coming months, was looking at making up my own harness, I have the correct crimp tool but the crimp pins/sockets seem to be hen's teeth. You're saying you got the crimp plug kits from Dynon? Or are you saying you just bought the appropriate length harness from Dynon (the harnesses for their gear do seem to be reasonably priced, and available in various lengths).
-
 https://www.stuff.co.nz/travel/news/127354766/bitter-rivals-airbus-and-boeing-team-up-to-call-for-delay-of-5g-rollout-in-us
 -
Need advice and opinions on this... slow airspeed
IBob replied to NT5224's topic in AUS/NZ General Discussion
I would be looking at this as two entirely separate questions (albeit quite possibly connected): 1. Either your airspeed is indicating accurately, or it isn't. That can be checked at various speeds and at a safe height, allowing for some delay in the GPS etc. 2. Either your aircraft is correctly rigged, or it isn't. For my aircraft there are various measurements and also a metal template for setting up the flaperons. It would also be extremely useful to know what if any parts of the control system the LAME touched. It occurs to me that if he just tweaked down an aileron to match the other one, then you too now have flaperons! It seems very unlikely, but I had a car which nobody could get to run straight down the road, because they just kept tweaking one side or the other rather than centering both sides. So I guess anything is possible...... Most interested to know what you find...........) -
Good idea! I didn't get round to it because the connector is firmly in place and sits well clear. but it's untidy: I shall rectify it.
-
Hi Blueadventures, yes it does but it doesn't stay there. I do need to tidy that up!
-
yep, definitely walking on the wild side, FlyBoy. I've been known to ride a bicycle without a helmet too!!!!!!!!!!!!
-
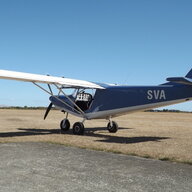
Hi Skippy, I'm pretty sure mine.....supplied already fitted to the Savannah wiring loom...are exactly what you said: ordinary spade connectors (just not the soft brass ones the DIY outlets sell). The top of the temp sensor is a disk on a short stem, much like the head of a tack. And the connector is pushed on from the side. I would think any auto electrician would be able to supply them. See bottom right of this pic, with brown wire attached. I am guessing that the top face of the 'tack' is dished or recessed, and the two dark cuts you can see on these particular spades are where the spade is sprung down into this recess, to prevent it working loose. Whatever you are able to purchase may require simple doctoring....a dimple or some such...to achieve the same effect.

-
Does FlightRadar24 show all the heavies?
IBob replied to Marty_d's topic in AUS/NZ General Discussion
I was in Pensacola a couple of years ago, where a Hercules was making odd orbits at altitude. I was told the thing was fitted with a large cannon and a gunnery crew. Odd to be out on that beautiful Gulf beach, with people circling above practising how to kill other people.........( -
Does FlightRadar24 show all the heavies?
IBob replied to Marty_d's topic in AUS/NZ General Discussion
Drifting threadwise here (as we do) I recently had a lengthy but fruitless exchange with FR over their use of the term 'Calibrated Height' which is what they claim to display. The only references I have been able to find online to 'calibrated height' imply that it is a corrected value: the actual height. But what FR displays appears to be raw transponder data, not corrected for barometric pressure. Anyone got anything to add to that? -
True enough. But very few warnings systems are entirely foolproof. So I believe the emphasis needs to be on understanding the system. And the number of forced landings due to poor pilot fuel management would seem to bear that out. I think most here would agree that tanks should always be physically dipped before flight. After that, in the case of the Savannah, there are sight glasses for the inboard wing tanks, which inevitably slosh around some, but still provide the pilot with a reasonable indication of tank contents. I would go so far as to say that I think the Savannah has a very well thought out fuel system.
-
Hi Ivark, the newer Savannahs have a vent pipe, from the top of the receiver tank up to the top of the LH wing tank. This allows any air in the receiver tank to vent. The older Savannahs do not have this vent pipe, so if you get some air in the receiver tank (perhaps from momentary unporting of the wing tanks), it can become trapped there, and you may get false low fuel indications. Typically this happens as you gain altitude, because the trapped air bubble increases in size as the air pressure is reduced. I have flown in a VG that did this. This may be the reason for your warning light coming on. If there is an air bubble in your receiver tank, you may be able to see it with a bright light. ................................................................................................................................................................................... The low level switch is a simple reed switch, operated by a floating magnet in the tank: when the level falls, the magnet closes the switch. It is possible for this switch to fail. I do not know if this would cause the intermittent fault that you describe.
-
kgwilson I picked up that habit from my Savannah instructor. I am not sure how much it proves, as it is my understanding that the ignition modules tend to fail by degrees, the first indication being failure when cold. But I do it anyway, at 3000RPM, where I see a drop of maybe 200RPM. ---------------------------------------------------------------------------------------------------------------- As an aside to that: I used to see a quite uneven drop when doing this, with distinctly rough running on one ignition module. However, this cleared up while I was chasing a minor radio issue, as follows: I had started at the plugs and leads, could tell nothing much from the plugs: we have a reasonably long taxi in from the strip, and my plugs have always looked kinda terrible after this, but the engine is new, starts and runs like clockwork etc, so I've come to accept that's how the plugs look after a long taxi. I took them out, looked at them, put them back, checking the leads and caps in the process. What I did notice while doing this was a certain amount of rubbing where the leads for the lower plugs pass down between the cylinders. These leads sit inside a heatproof sleeve, but there is nothing to prevent this sitting against the heads, so I cut a couple of square rubber guides from large grommets, centered the leads through these. I also cut the cable ties off these leads, then fitted new ones with the leads centered in this manner. None of this improved my radio issue, but since then I get equally smooth running on each mag during my pre-shutdown 3000RPM mag check.
-
Or register your ownership with Rotax, and get regular news, updates, and notifications etc from them.
-
Lots of folk here do the same, Skippy, so you're in good company! It'd be interesting to run a survey. And we could print 50 and 100hr t-shirts and stand at opposite ends of the bar.........)
-
Lovely to see the punters wandering all over the paddock, and not a single individual minced up! That must have been when they were still delivering Common Sense with the milk every morning............)
- 1 reply
-
- 2
-

-
It's surprising (to me) how many elect to change the 912 oil at 50hrs. I assume that Rotax built in some margin when nominating the 100hr change. This isn't intended as a criticism.......clearly it is for every operator to decide what suits them....but I am just curious.
-
However, as recent events around the Covid vaccination have shown, there are entire segments of humanity living in alternative worlds where the logic of this world does not apply.............
-
I have also read that manufacturers may change their oil formulations without notice, but that Shell have agreed to consult with Rotax before doing that with Aeroshell Sport Plus 4. It seems to me that cost of oil is a very small part of the cost of operating a 912. Given that we depend on the engine to keep us in the air, I don't know why anyone would consider moving away from the Rotax recommended oils, unless for some reason they are unobtainable.
-
Why not just use Aeroshell Sport Plus 4 as Rotax recommends? Here is a list of recommended oils: https://legacy.rotaxowner.com/si_tb_info/serviceinfo/si-912-016.pdf
-
Hi JG. I converted my Savannah underwing breathers to forward facing ones, much like the one in your pic, but using a very small 90deg bend from a garden irrigation system. On the first outing, with just the inner tanks valved on, I experienced a huge amount of crossfeed, one tank level going down at a rate, the other tank level going up, so turned back after only a few minutes. On landing I found fuel stains on the wing top from the tank that was going up: the tank caps were screwed tight as usual, but the additional pressure in the system had caused that tank to bleed pressure at a minor imperfection (a slight dip) in the lip of that tank. As a result of that experience, and after some thought, I reverted to the standard underwing setup for three reasons: 1. I had no wish to experience that degree of crossfeed again. 2. I was concerned that the additional tank pressure could 'bug out' the tanks, with the possibility of damage to the wing structure. (Note that the pressure has nothing to do with the size of the aperture. Note also that very small pressures can generate huge forces over large areas, so for instance a controlled atmosphere coolstore for apples, which seals hermetically and is tested with a domestic vacuum cleaner, can be imploded if the vacuum cleaner is left on for too long. And a pressure of 1PSI in a Sav tank may generate something like 500lb of 'bug' between it's top and bottom surface.) 3. Cessna, who have been messing with this much longer than most of us, position their forward facing breather behind the strut attachment, not directly in the airflow. The main problem with the basic Savannah setup is that the plastic underwing pipes do not sit straight, and can also rotate. My intention now is to mount solid aluminium pipes down through through the wing,, with flexible pipes from the top of these to the caps. At the underwing I will cut these pipes at an angle into wind, which should give a small positive pressure. And the pipes will be held in some way to prevent rotation.
- 1 reply
-
- 2
-
-

-
Hi Marty. 1. ICP advocate the use of Loctite 577 at the fuel tank fittings. I used this also on my manifold fittings etc. 2. ICP provide nicely made worm drive hose clamps. I needed some extras but was unable to source anything of the same quality locally.. If there is a better option, as outline by Skippy above, I would definitely go for that. 3. The fuel manifold and fuel taps we are sourcing from China (it may be possible to get them locally, but you pay a premium). They are one size down from the domestic ball valves used for isolating taps and WC cisterns etc. I use Ali Express, first search for 'air manifold' and locate the required manifold block: they come with various numbers of ports, are normally used as workshop air line splitters. This allows you to check the thread size, you can now go hunting for ball valves of that thread size. The down side is that delivery will be slow and sometimes they stuff up the orders. 4. ICP supply the 5 way fuel splitter for the Savannah. It is very simple, a block of aluminium with 5 threaded ports. 3 of the ports take standard barbed hose fittings: these are the fuel coming in, and the fuel going out to the two carbs. The other two ports have a very small orifice, they go to the fuel pressure gauge and the fuel return (this latter is crucial to avoid vapour lock, especially if taking off with the engine still warm after a recent shutdown). I don't know if anyone supplies this part. It would not be hard to make if you can ascertain the orifice size: suggest you ask Mark.
-
Kurt, you're not talking gibberish at all. I believe Mark has his fuel return plumbed back into his fuel selector valve block. Seems to me it would work fine, let's see if Mark has anything to add to that> Eightynots, the air bubble in the receiver tank problems dates back to the older Savannahs, which had no vent pipe from the receiver. The problem was that once you got air in there, it had nowhere to go. The manual now calls for a breather pipe from the top of the receiver tank to a point high in the L inboard tank. This effectively addresses the problem.
-
Hi Kurt, really interesting to read of your control mods and see your progress! I'm most interested in your Arduino work: I do a bit myself. Credit where it's due: my fuel valve setup is a direct copy of Mark Kyle's setup on his original XL, and I referenced his build thread here a great deal during my own build. Also, and as Mark mentions, I fitted a flashing LED instead of the bulb supplied for the low fuel indication. I then fitted a second one in parallel on the pilot's side (the standard indicator goes on the RH side of the panel). The flashing LEDs were sourced from RS, the fuel manifold and valves we source from China, though you may have more economical sources where you are. Keep the pics coming: it's great to see another aircraft coming together.
-
Yep, a couple of things struck me. The first was that, while Juan Browne is an excellent and knowledgeable commentator, in this case he was commenting on something that he clearly has little practical experience of. The second was the amount of time they spent stacking that aircraft: a full 30seconds and it may have gone on longer without the stall, the way they were mucking around. During which time the aircraft is burning off height and flying on beyond the spot. Given that the thing has handles and steps, it should be easily possible to stack and leave in half that time.


