Kyle Communications
-
Posts
6,672 -
Joined
-
Last visited
-
Days Won
101
Content Type
Profiles
Forums
Gallery
Downloads
Blogs
Events
Store
Aircraft
Resources
Tutorials
Articles
Classifieds
Movies
Books
Community Map
Quizzes
Videos Directory
Everything posted by Kyle Communications
-

My Savannah S model rebuild Blog
Kyle Communications replied to Kyle Communications's topic in Savannah
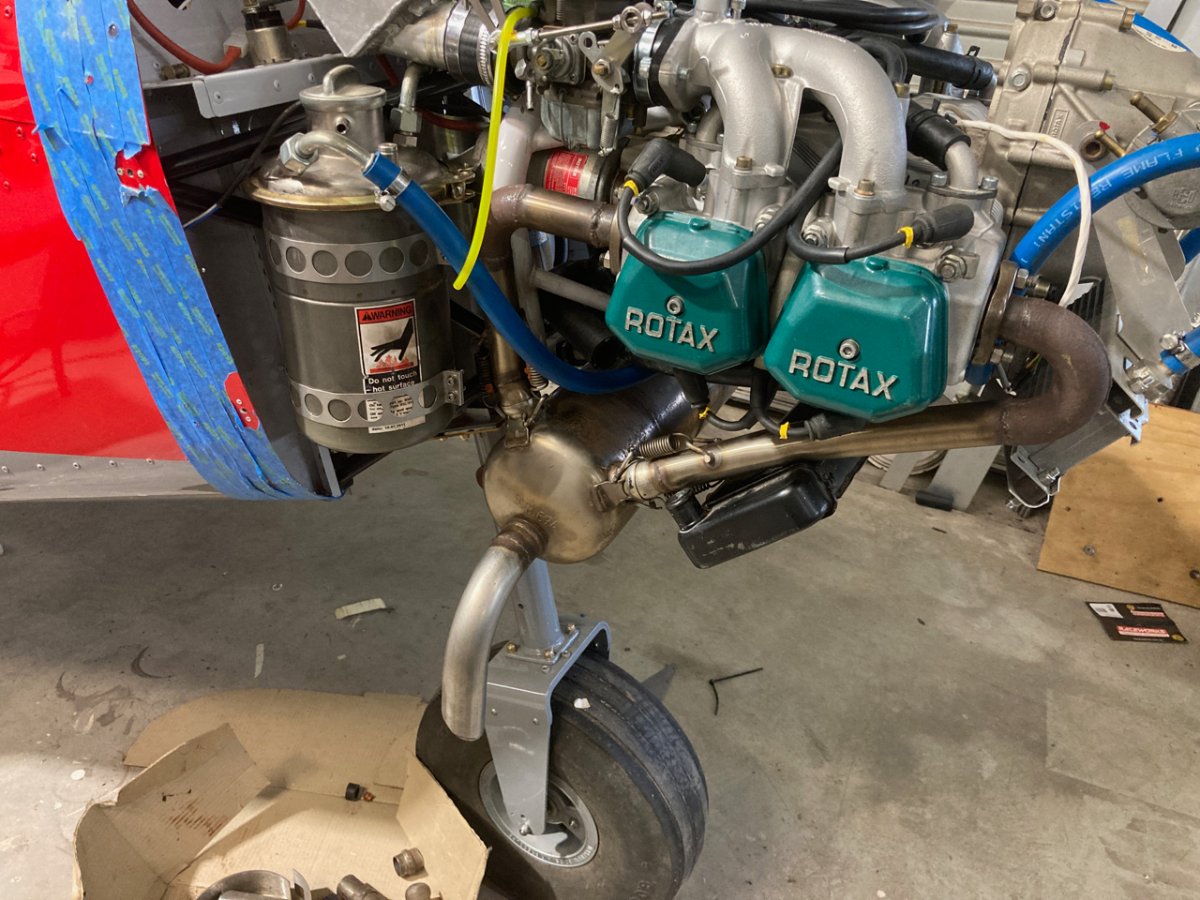
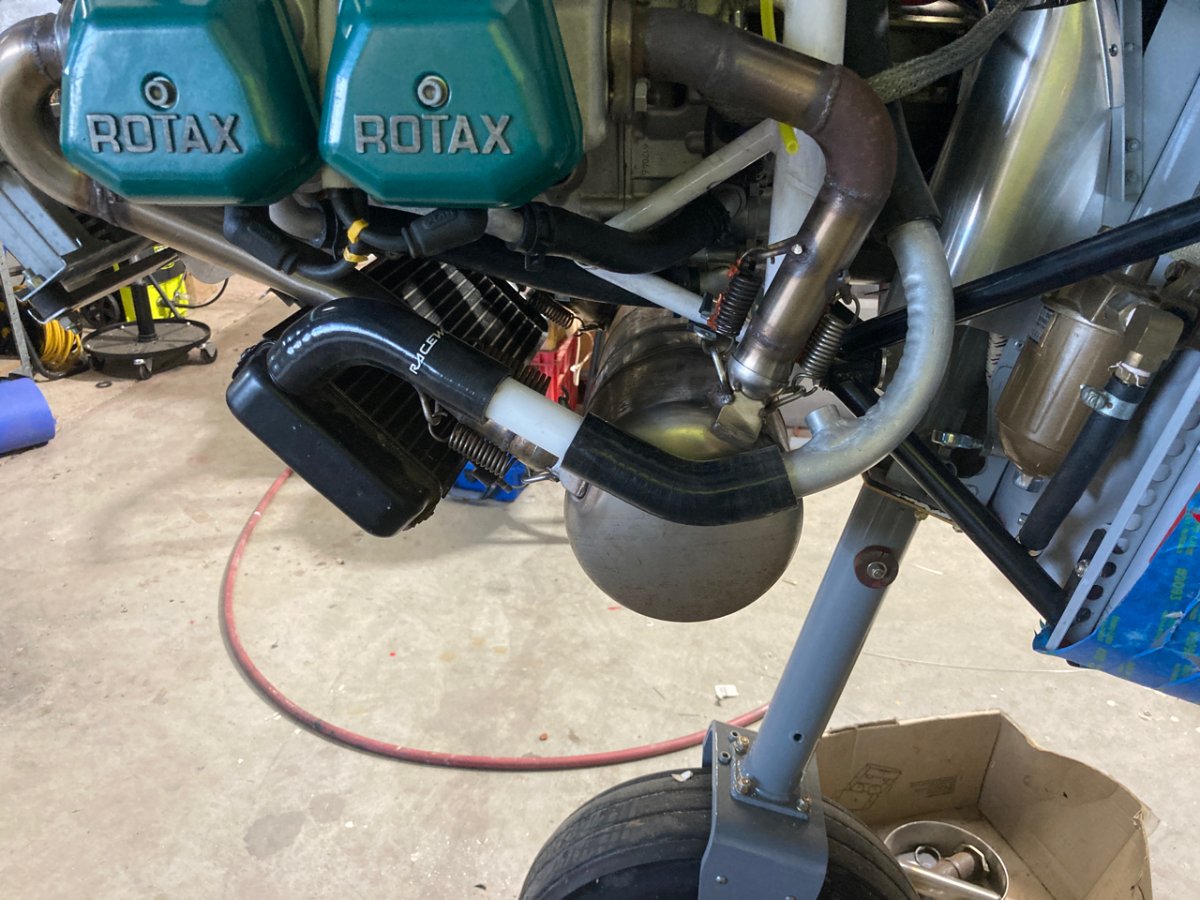
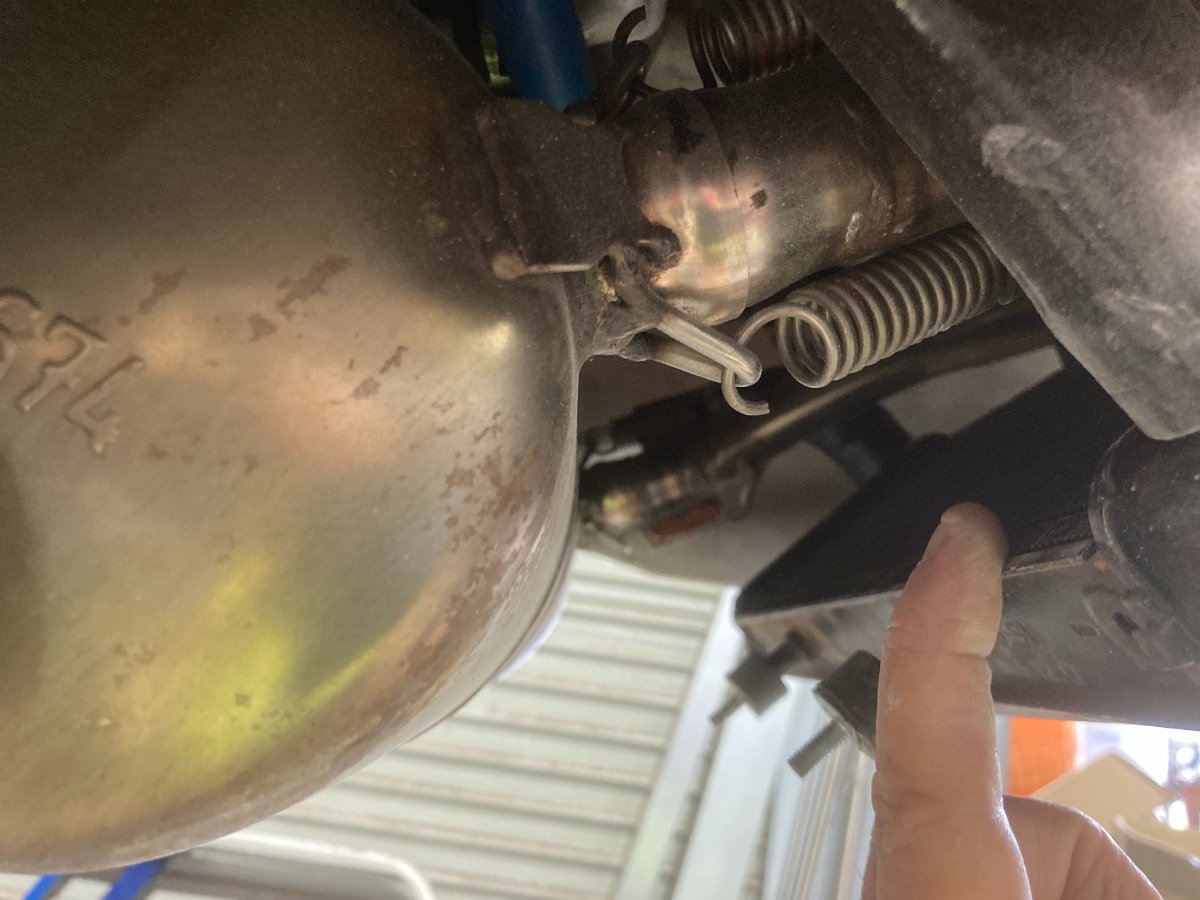
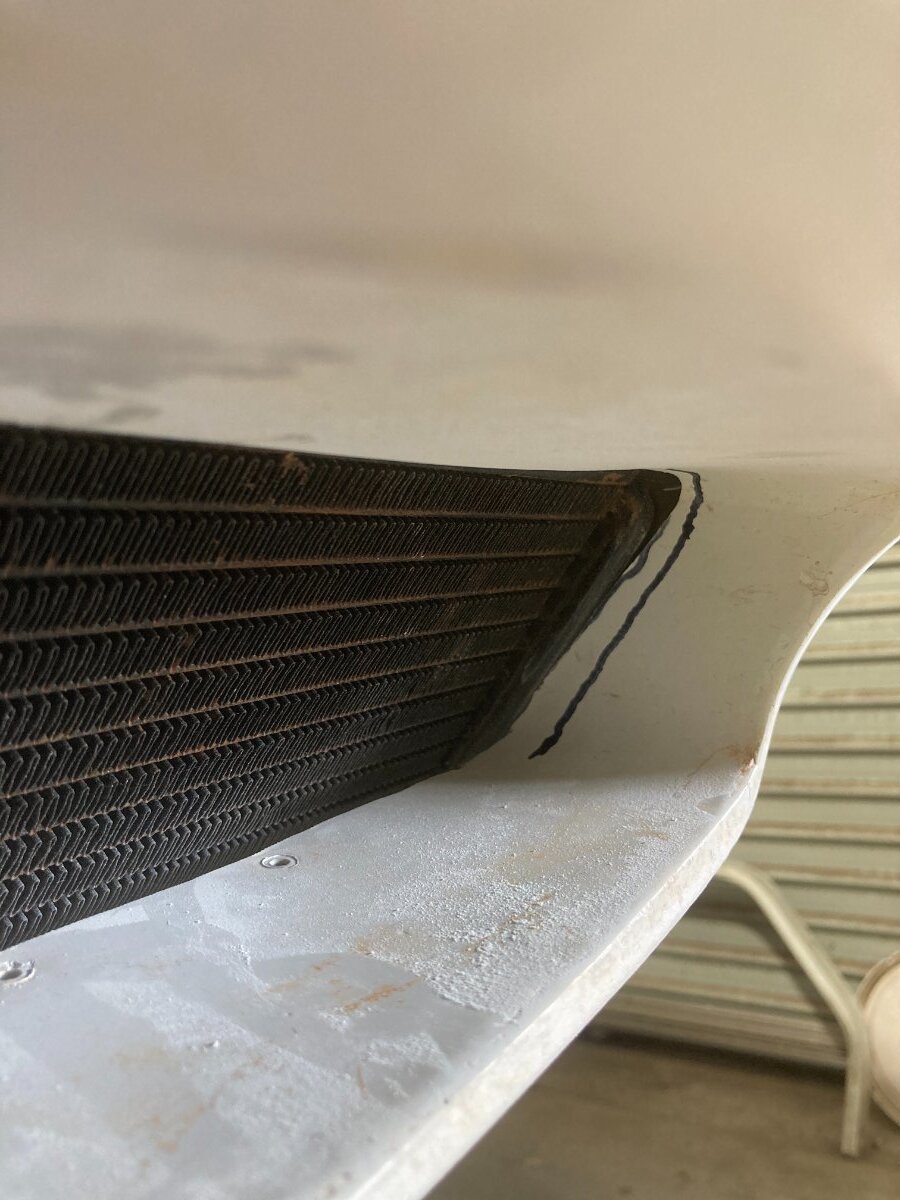
This engine is a big bore and should need more cooling obviously. I have never been happy with the angle of the radiator in the cowl ..even on the GF. I never had any cooling issues with the oil temps but the water on really hot days it used to climb a bit so I decided to mod the radiator angle as well. I had to mod the cowl underneath anyway for the larger exhaust and its position so will just make a new section that gets glassed onto the current cowl then cut out the original to just leave the new shape. You can see in the pics the cutting away of the original cowl to get the clearances I want. Just have to come up with some filling material to make the new atachment which I will make a mold of in case anyone else wants to put a better muffler on a Sav. I will still make a new set of exhaust pipes later but the current ones will be fine to get her flying
-
New throttle system for Rotax
Kyle Communications replied to Kyle Communications's topic in Savannah
Drifter11 I have all the CNC parts here and waiting for the laser cut stainless mounting parts. I have enough done for 50 units at the moment and orders for around 40 or so. I will send you a email but I have not finalized the price yet but it will not be very expensive. The CNC costs are the most expensive parts so far -
My Savannah S model rebuild Blog
Kyle Communications replied to Kyle Communications's topic in Savannah
Its taking so long to get anyone its crazy..at least we have all the gear though..most new places cant get the materials to even start building or renovating...as well as trying to get someone to do it. I have plenty of work to get done so gives me a buffer until they get back but really they will just be doing the final external finishing the main thing is the house is pretty much all weatherproof now. This week I hope to get the cowl modified and on the way to new molds made and cutouts..then finish the avionics wiring now I have the pressure switch for my auto electric fuel pump and then get the twin sticks in. Wont be too long before I am ready to start the engine. I hope to have Mabel down to the hangar for assembly at the latest in the new year -
My Savannah S model rebuild Blog
Kyle Communications replied to Kyle Communications's topic in Savannah
I havent had much time this past few weeks to work on Mabel. We look after my father and moter inlaw here at our place and things physically and mentally so a lot of time is taken up there. The past 3 weeks I have spent the majority of the days up at our farm as we finally have got our builder there...getting tradesmen now is so hard ...We finished as much as they could as they have other programmed jobs now and I hopefully will see them back late Feb is when I am booked in. The house now is to lockup so now I ahve the electrical to do and get the plumber and plasterer there...god knows when they will turn up. I should be able to get some stuff done now on Mabel. This weekend I finalised fitting the original cowl..I do have to mod the top half at the back to make it fit to the top deck. I fitted the exhaust system I made for the GF with the bigger muffler as the lower cowl will need to be modified for the muffler also the radiator positon and cooling inlet may need modifying. The pipes for the exhaust is pretty agricultural and need to be remade. Danny and I have been working on a new tube bender..a proper one that doesnt create or dent the tubes. I have the water circuit pipes pretty much sorted for the moment so they need finishing off but at least they look reasonably good. I will make a whole new exhaust when we get the bender finished. I got in titanium tube 32mm and also 1mm titanium sheet. also got some solid titanium bar as well 35mm. We use titanium sheet at work and we ordered a stack of it from the manufacturer so I piggy backed my stuff on the works shipment. So we are going to make new mufflers and also have worked out how to get the full tuned lengths for the exhaust headers even for the savannah. The RANS S-21 will be a lot easier as there is a heap of room behind the engine so can easily get the right lengths. This we believe will add at least 3 to 5 hp to the engine. Mabel and the S-21 have big bore kits fitted so should be hopefully around 118 to 120hp.
-
CASA Consultation Paper (760 kg) Published.
Kyle Communications replied to walrus's topic in Governing Bodies
-
CASA Consultation Paper (760 kg) Published.
Kyle Communications replied to walrus's topic in Governing Bodies
RAA has a live tonight at 6pm Qld time or 7pm Mexican time...It will be interesting to watch this -
Yes the 2 top outlets in the reserve tank I used one as the input from the fuel manifold the other as the breather going directly to the top of one of the fuel tanks..pax side..my fuel return went to the manifold itself and that stops your tank from overflowing using the ICP way of doing things. The fuel treturn just goes back to the bulk fuel lot so all open tanks should get that return in theory. I have never had intermittant fuel light or any issues with tank overflows at all. The current rebuild "Mabel" although has a different tank setup the fuel delivery system will be exactly the same although I will only have a right side and left side now...if you look at my S model rebuild blog on the savannah forum you can see what I did...
-
Thats excellent work and you are powering along. You dont need to put a fuel level in the reserve tank the light is fine..just throw away the bulb and fit a 10 or 12mm flashing LED into the housing..its easy to do. Look at my blog for the details...there is a lot in the blog There is a lot of reading there some 52 pages. I like the arduino solution ..I am into electronics as well would love to see what you are doing with that Mark
-
CASA Consultation Paper (760 kg) Published.
Kyle Communications replied to walrus's topic in Governing Bodies
I told that previous chairman/mouthpiece of the RAA (cant remember his name) on one of the FB lives that they need to go for the 760 first instead of as well as CTA...its better to get one thing then work on getting the others one at a time..thats how these numpty govt depts work...too many empire builders. He basically fobbed me off with the question...I think he is gone now anyway with the latest elections..or maybe I am wrong -
CASA Consultation Paper (760 kg) Published.
Kyle Communications replied to walrus's topic in Governing Bodies
Thanks for that KenSLA...I didnt see it as I did a quick scan because it was typical govt jargon ... • The making of a legislative instrument that reflects current requirements contained in the current 95 series CAOs to ensure operators can continue to operate from the 2 December 2021, with the addition of the increase in MTOW that was previously consulted. • Further consultation to occur on proposed changes to the stall speed limitation for light aeroplanes, and access to controlled airspace. It is intended that these consultations commence as soon as practicable and be conducted separately to any work on the MOS. This seems to say to me that the 760kg is going to be as at 2nd Dec 2021 but limited to the 45kt stall speed 🙂 -
CASA Consultation Paper (760 kg) Published.
Kyle Communications replied to walrus's topic in Governing Bodies
KenSLA where did you read that? I have no drama with the specs either -
That was a interesting read also surprised how quick it has come out
-
Katoomba Airport Battle Lost :-(
Kyle Communications replied to jackc's topic in AUS/NZ General Discussion
I have one :)...works pretty well -
E-Props ...who has first hand experience with these
Kyle Communications replied to eightyknots's topic in Engines and Props
The video for assembly of the Eprop adjustable prop has been released...turn on CC closed captions and you then go to settings and select auto translate to english..the translation is pretty good -
Does your ultralight have a transponder?
Kyle Communications replied to danny_galaga's topic in AUS/NZ General Discussion
As I get older maybe my comprehension is up to crap..your right..I just reread what KG said and you are correct...I am agreeing with him DOH!!! I think ADSB should be in every aircraft..get rid of the old Mode C crap..its a radar ping not aircraft to aircraft and also aircraft to ground -
Does your ultralight have a transponder?
Kyle Communications replied to danny_galaga's topic in AUS/NZ General Discussion
I totally disagree Being able to see other ADSB aircraft out there when NOT flying in CTA is a good thing. Would be nice is the SE2 also saw Mode C transponders but alas no. I think in the future all aircraft will be required to have ADSB out be it a EC device or a full blown Mode S For ultralight RAA style of aircraft I think it would be great to see where ALL the kamakazis are. The flying ability and decisions made from other pilots has me worried. I am not sure if its the training that happening now or the lack of training but there are so many pilots out there that just dont seem to give a sh*t about ops manuals or ERSA info when it comes to approaches or radio. I have certainly noticed it in the past 5 years or so. At least if you can see where everyone is you must be then able to make better informed decisions. EC devices are direct comms in most cases depending on other things but all the FR24 and the other one I cant think of right now all have feeder sites and no matter what Airservices has on the gound most likely you will see the data from a feeder on your Ipad or whatever Pad style nav device you have -
Skippy..its a long story and the less I put out there the better. The current committee has a new direction forward. The club members voted last year for a major change in the people running the place. Our AGM is next month and I believe the current commitee will most likely be voted back in due to the changes we have made...but lets say it the charges are soon to happen. Thats why I am getting this device ready.
-
Now thats how it should be run..the difference is the council does not run our airfield we do as a club and so are responsible for all the costs like fencing and maint and buildings etc The club does not want to make a fortune only get enough funds to run the place without going in debt and expand the facilities. Our biggest cost by far is the runway maint due to the now extreme overuse by commercial ops
-
The other thing about my radio project is when listening to all the calls through out the day..it is amazing just how many crap radios there are..so another thing with the monitoring is to be able to notify the owner of the aircraft to get it fixed...Ycab at the next ERSA will have radio as mandatory
-
There is no alternative in our airfields case....well there are two really..close down all commercial ops or charge landing fees to the ones that are doing all the damage ...its pretty simple. Of course there is another..close the airfield...let everyone who owns a hangar there lose all of those assets and let the council sell it all off for housing or industrial land
-
Ycab aeroclub is the leasee of the whole area from the MBRC..we maintain the airfield and all its facilites and pay the total insurance for the airfield and hangars. We also build the hangars that are privately owned and rent some of them also charge the hangar owners a lease and insurance fee per year which is very reasonable. It is not a public airfield. All club members are charged a small maint fee each year and that has been fine previously but since the huge increase in ops by commercial operations this is where it has all been falling apart. The airfield was developed by the club and its members some 25 to 30 years ago so no public money was ever used to get it to where it is now To be honest I would be happy if we got rid of most of all the commercial ops and just stayed with the private ops and small amount of RAA style aircraft training and I have no doubt that we would have been no worse off as we had been before and there would be no need to charge landing fees. Why the sudden increase in commercial ops...well I wont say anything about that but I am sure you can guess
-
Kiwi of course that is the fact...someone has to pay eventually....but user pays is the only fair system. The damage and wearing out of our runways by the obscene amount of movements now at our airfield is just crazy. We used to just maintain with club members before all this govt subsidized traing hex style has come in. At Ycab now there are 3 rec flying schools and 2 of them do some GA training and we have another that has 6 GA aircraft and about 5 or 6 helicopters and its literally non stopn all day almost every day of the week I have made a radio monitoring unit that gets all the radio calls automatically and records them. This then gets decoded to get the call signs..same as what Avdata do to be able to gauge TO and Landings. I have been testing it this past couple of weeks from my house before it goes down to the airfield for some more fine tuning...I was shocked at how many movements there are on a daily basis..this is why the airfield is being torn apart. How many calls do you think there is in one week of ops..............over 10000 !!!!!!!. How do I know this???...every radio call is recorded when the mute of the monitoring radio and a single file is created. After 1 week there are 10,000 files. 99.9% of those files are genuine calls Now some are from Caloundra but not as many as Ycab...I am tailoring it so I can pretty much clip all the caloundra ones within reason. On some calcs I have done and listening out of that 10000 there are more than 6 to 7000 for YCAB..base about 3 calls per circuit so thats more than 2000 landings per week !!!! and I believe that is conservative Flying training is expensive now and its just going to be one of those things. Unless someone gives us 150k + a year out of the goodness of their hearts where does the money come from...private ops at Ycab are well in the minority now. maybe the average private op is about once a week at best.
-
Ycab will soon be introducing landing fees. These will only be for commercial aircraft and flying schools regardless. All receational and private aircraft will be exempt These fees will NOT be going to council coffers they are direct to the aeroclub to provide the huge maintenance bills that are accruing because of overuse of the runways and taxiways This is fair...user pays for those that make money from use of the airfield...this is how all airfields should be run. Mark
-
E-Props ...who has first hand experience with these
Kyle Communications replied to eightyknots's topic in Engines and Props
Another very happy customer -
Jeff Tonkin at PSB is the guy I deal with for insurance...he was always excellent and came up with the best price


.jpg.be5a869a8e77d49d2474e402b996ee2d.jpg)
.jpg.f696a8fb5f97109aa9d00eb05525f7eb.jpg)