rankamateur
-
Posts
3,216 -
Joined
-
Last visited
-
Days Won
8
Content Type
Profiles
Forums
Gallery
Downloads
Blogs
Events
Store
Aircraft
Resources
Tutorials
Articles
Classifieds
Movies
Books
Community Map
Quizzes
Videos Directory
Everything posted by rankamateur
-
Mine was a bit like this http://www.ebay.com.au/itm/Plastic-Burr-Handle-With-10-Cutting-Deburring-Tool-For-NOGA-NB1100-Blades-BS1010-/131567471673?hash=item1ea2084c39:g:QeEAAOSwgQ9Vuhsl but had a yellow handle. I am sure a blue one would work.
-
Clean with GP solvent to take off printing then Prepsol(Wax and Silicone Remover) to take of the oily layer on the sheets. Use a file to rub the edges of sheets and parts smooth, then run the deburrer along the edge. I went over the face of the sheets, flat on the bench, with a 1/3 sheet orbital sander with green scourer pad for the primer to key onto, just enough to take the shine off them. Get couple of off cut pieces from some sheets, prepare them like parts, drill a row of holes through them for rivets. Put the black stuff on each surface. Let it dry, then rivet them together. leave it for two or three days, drill out the rivets and then see how hard they are to move apart. The black stuff stops the parts moving on the rivets causing the rivets to work loose.
-
So it like the difference between riding in a sail boat and riding a sailboard. On the sailboard you are part of the machine and you can't just go along for the ride....so when the weather gets rough you just have to tough it out!
-
Welcome Clinton, Do you have access to an RAA friendly airstrip close to Tamworth? Cheers Steve...
-
Click on the little envelope at left with the red number 1 on it. I will message you.
-
I have said it before...You could build a straight wing on the front lawn. Straight level benches save you some wiggling to align holes but the matched hole kit will not let you build a twist if you cleco the whole assembly before beginning to rivet the skin. You would lose a few rivets, and get a horrible back ache if you did try to build it on the lawn. On the back ache, take care not to make your bench too wide or you will have to reach over to your job more. This is especially so when you are working on the fuselage, This is where a rotating frame would be excellent. I just had to climb up on top of the box or get help to turn the whole fuselage.
-
Wrap some of the packing bubble wrap around a couple 3" x 3" timbers to hold the parts (fuselage particularly) up off the bench or you will get small bruise marks on the skins that you can't do anything about after they are riveted to the frames. These will also stop your clecos leaning over denting rings on the skins.
-
I got a second hand building table from a member on here that had just finished a CH701, it had been made out of the crate lid laminated with the base. The ICP crate with the lid refixed was a handy second table. It would have been better with a couple of cross braces screwed through the lid though.
-
The VG is magic at the really short landings but the VGs gave it about 10kts improvement in cruise, have a look at the videos down the bottom of this page www.aerokits.net.au. They were landed across my strip which was mowed 30m wide at the time. The XL and S have a much less cosy cockpit for big blokes.
-
The VG is a very capable airplane, more so than the XL and S, but it has a particular dis-like for 190cm blokes with long legs, then XL and S come into there own. Sad that has just about completely dried up VG builds.
-
Remember that the skins are the part you spend the most time looking at, so spend a little extra time when handling them, when deburring them, clean the printing off them with GP solvent so it doesn't bleed through your paint, and get assistance when installing them to avoid dents. There is a particularly nasty "Fish Scale" dent that happens when tension all runs to one point on the sheet. They are really ugly on the finished job, you can see them happening and once they have happened they are very hard to rub out. The most critical time for help is doing the leading edge wing skins and the round corners on the fuselage.
-
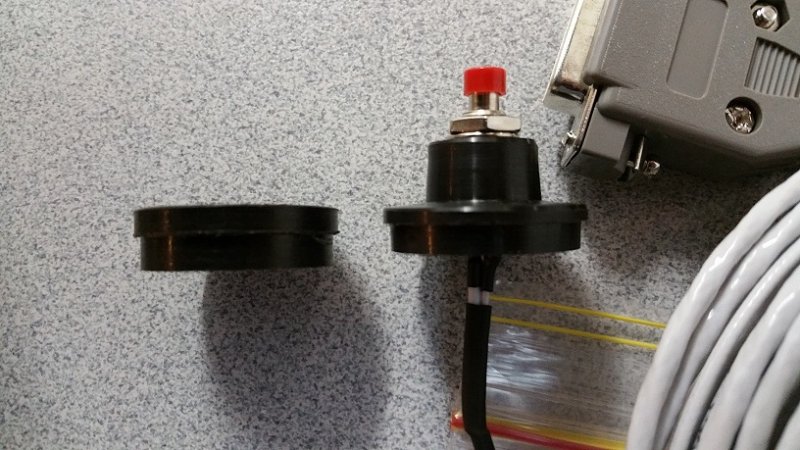
I mounted it in the plane today, I think it would be better if it rises 10mm instead of 9mm. It is quite usable but an extra millimetre would be better.
-
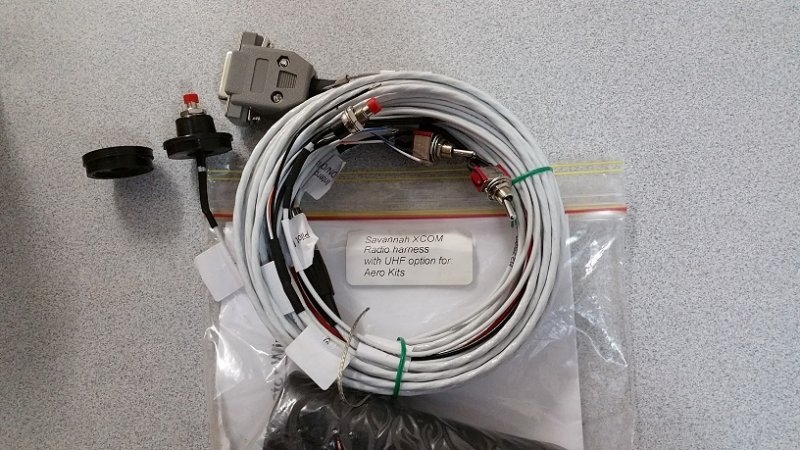
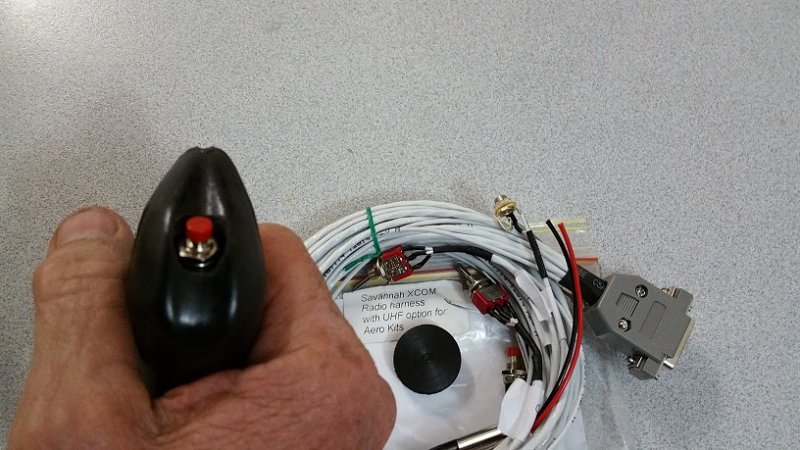
I did it myself Dan, that is why I included the measurements so you can do it too. The Xcom kit could come with a bush as part of the custom Savannah wiring kit, but it doesn't. It didn't even have the screws to mount the radio in the panel which is disappointing. Edit: I did reply last night, but didn't hit post sorry.
-
I did mine with a nylon bush, the outer diameter is 28.6mm, step is 26.6mm, the riser is 16mm diameter and rises 9mm. The hole up the middle is 11mm reduced to 6.25mm where the nut seats.

-
You will need to find the start new Thread button at the top of the Savannah page.
-
Wing and fuselage skins roll up if you need them to, makes them more compact and less prone to dents when handling. You will be handling them to de-burr, then to clean, then to mask and prime with black, then to assemble. Putting them into and out of the box is a two person job if you try to handle them flat, so get some more straps like the ones they supply to form the leading edge skins, they will hold the rolls.
-
Can you get hold of a couple of skateboards Bob?
-
There is a knock off version of the paint buddy roller on the internet sometimes (They have a dark Blue top) but the tank leaks and the roller is crap so don't worry about them, About three years ago I got one of the very last original ones that was being discontinued. I went through 3 rolls of 38mm masking tape doing masking for the black mastic. Don't leave the tape on any longer than needed to dry the black or the gum dries out and you will wreck the black layer soaking it off with solvent.
-
Way to go. You haven't mucked around lately, I could use a bit of your momentum.
-
Like the top of page 62
-
If you do order the xcom, tell them to send you the screws too, just ridiculous that they send out a kit with no fixings. They didn't even send the mounting screws that come from electrophone with the UHF.
-
Don't forget your crimping pliers and coax stripper....
-
In a previous discussion about this same topic I have mentioned that Gundy had trouble with his Microair radio in his Savannah at Natfly. Sue and the crew on the Jabiru site pulled a brand new one out of the box still in the foil and loaned it to him to get home to Gladstone. That is real local service, went way out of their way. He had a good run out of his Xcom replacement, not sure what became of his Microair.
-
Got that kit sitting here beside my desk....Tell me again, when did you say you were coming to visit?
-

Live prop nearly kills a pilot
rankamateur replied to rick morawski's topic in AUS/NZ General Discussion
I have always wondered if the giant can opener was piloted at the time of the attack, or did it act alone?