rick morawski
-
Posts
254 -
Joined
-
Last visited
-
Days Won
1
Content Type
Profiles
Forums
Gallery
Downloads
Blogs
Events
Store
Aircraft
Resources
Tutorials
Articles
Classifieds
Movies
Books
Community Map
Quizzes
Videos Directory
Everything posted by rick morawski
-
Hi Skee, As Rank says above, you can do whatever you want. You could damage the polycarb or the paintwork if you cook it too hard. I did these tests for my own interest and edumacation and share the results for any interested, you may also do some tests yourself before making a decision to cook your doors. I did a few more tests on rivets without a clearance hole in the polycarb - I heated them for 15, 30, 45, 60 seconds and only the 60 second one did not crack when thinners was applied. So quite a bit of heat is needed to destress and maybe more if the doorframe sinks the heat away before you can heat the polycarb. Cheers Rick
-
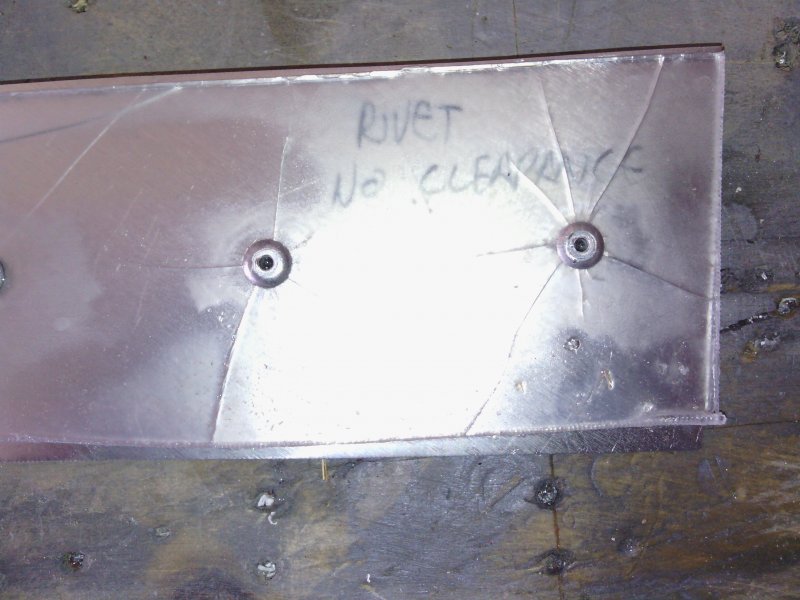
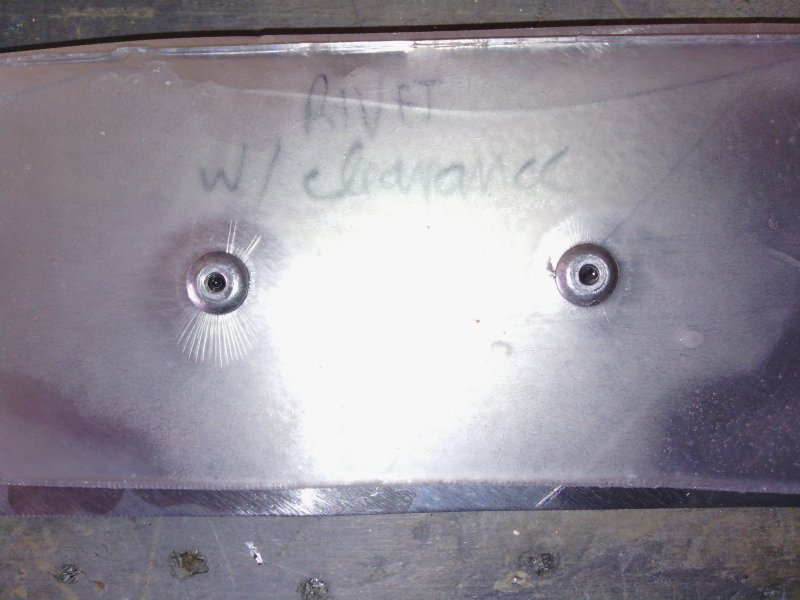
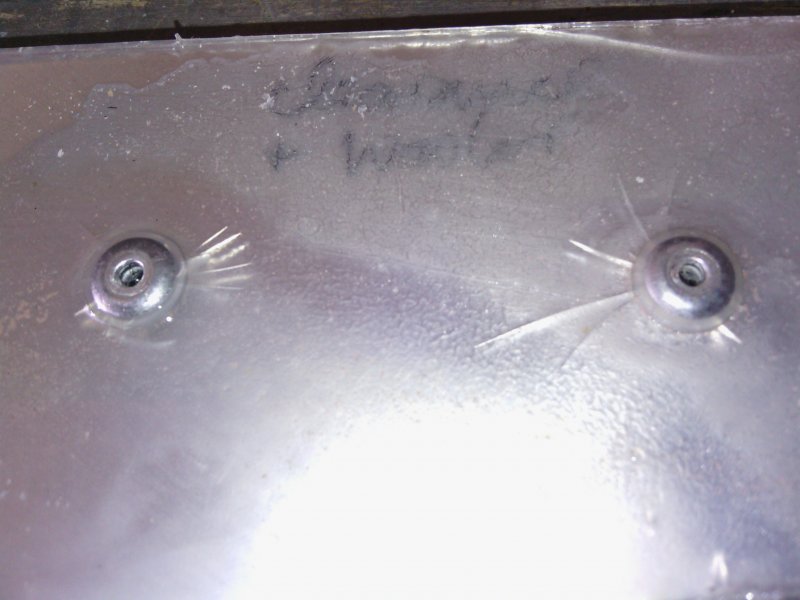
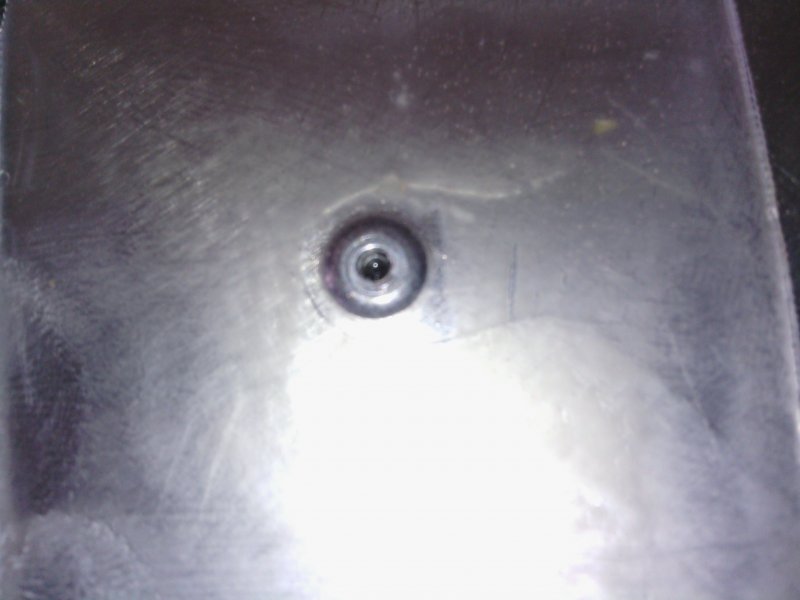
Not so dramatic with petrol but was immediate cracking and failure of the part, not so much crazing. Yes, tried down to about 10-15 deg, same result with failure at the point of most stress. This morning I cut some bits of polycarb and .016" ali and riveted them together in various configurations and poured a small amount of thinners on each. Firstly I made a multi rivet test, with two rivets through 1/8" holes- no extra clearance, then two rivets with 1/8" hole in the ali and 5/32" clearance hole in the polycarb, then two rivets with the clearance plus a nylon washer under the rivet head, and one unriveted hole for control, no photo of that one but it had no cracking. So you can see all of the the rivetted holes had some cracking but the clearance holes were the smallest and least cracked, so I did some more tests with single rivet pieces with a clearance hole and destressing them with the heat gun for vaious times. Heat gun was on high setting, 150-200mm from piece, waving across piece not concentrated blast, and I allowed the part to cool to room temp befor applying the thinners. first, heating for 1 minute and as you see not one crack. Encouraged by the result I tried several more individual tests with varying heating times and found I could destress the rivet penetration with as little as 15 sec waving the heat gun over the part. Lowest time I did was 7 sec and the thinners produced 2 small 1 to 2mm cracks. So from these test I reckon next time i rivet in a polycarb window i will drill clearance holes and spend a small time destressing with the heat gun. Cheers Rick

-
I will try today and post results, more fun than working:oh yeah:
-
I am particularly intersted in this thread because have always wondered if it was the fuel alone or the stress that caused the cracks in the polycarbonate windows. The post #38 by HITC got me enthused to experiment with some strips of polycarb and various solvents to see if it true and also to see if I could stop it by destressing with a heat gun. I tried the experiment with methylated spirits (denatured alcohol), petrol, enamel thinners, and lacquer thinners. I tried pouring a small amount of these solvents on pieces of unstressed, stressed and destressd polycarb. To destress I bent a strip of poly over double then lightly heated it with a heat gun. All of these had had the same result to a degree, but the lacquer thinner was the most aggessive, so i repeated the experiment and made a little video to show you (just did it with my phone, pretty crappy but you will see the results). Next time i put in a window i "might" try destressing it a bit, what do you think? [MEDIA=dailymotion]x3aeizg[/MEDIA]
-
Yes, trailing edge is staggered- outer part is higher.
-
Hi Lyndon There will be a small bag of a3 rivets in there somewhere, maybe in with the nuts and bolts, you will find them along with other bags of rivets- countersunk and large head black painted rivets. Go have a mummy look. I usually just drill the holes out and use a4 rivets. Cheers Rick
-
Marty, I hope you don't have a fuel tank forward of the instrument panel like some 701's have, because you will surely wreck your windscreen if you do.
-
This is very true too, I leave the thin plastic protection on while painting plus masking over the top to try and avoid this. Also do not have your windscreen in place while gluing in the carpets- the fumes from that glue will crack the plastic or permanently fog it.
-
Wow, that's a lot of cracking, looks just like fuel induced cracks to me, did he have a fuel tank leak or maybe a spill while refuelling? Always have doors closed when refuelling for that reason.
-
Hi Hasse, No, not to difficult to replace windows/windscreen if you are handy with derivetting, just be careful not to destroy the part if you are going to use it for a template, and no I did not replace anything that wasn't damaged. Cheers Rick
-
That's not a snack it's his thongs!
-
If it's not fuel I'd guess you've cleaned them with something that affects the polycarbonate. The cracks that radiate from the rivet holes are usually only 10-15 mm long , but can grow longer though flexing, the cracks from fuel or other hydrocarbons or usually longer, typically 100mm or so, and can join up an make a big hole if not fixed. These are just my observations from replacing more than a few Windows. If you are replacing with factory cut ones or make your own from sheet poly using old window as template make sure you oversize the rivet holes (agree with Marks post above) to avoid the stress cracks rising from the expanding rivets. Also I have heard windex has ammonia in it and should not be used on plastic. Cheers Rick
-
geez I didn't see that. It was a wrecked sav I bought and parted out, mainly the engine. Eventually I drove over it with a loader till it was flat an took it to the recyclers.
-
O the spring is just to keep rubbish from completely blocking the outlet.
-
use a good fuel resistant sealant, its a real pain in the a** if you get the wing painted and finished and it leaks.
-
the part with the spring is the tank outlet (new style). You have to drill a hole in the back of the tank on the correct side. Check your manual for installation.
-
Maybe it's a Savan oh one.
-
I built a CH701 as well, but not in that garage.
-
Yes that one was finished long ago, and the three that came after it! Just plain white for that one.
-
It is attached to the inboard end of the wing nose skin, covers the gap between the wing and windscreen. I think it will show up in the chapter on "wing assembly on fuselage." Cheers Rick Edit: Skee answered while I was typing
-
Here's one way http://www.ebay.com.au/itm/Newest-Cell-Phone-Calls-Recorder-with-Playback-Dictaphone-for-iPhone-4-4S-5S-EP-/181360179238?hash=item2a39e8b826
-
Hi John Hope you're still maintaining the pubs airstrips map, I use it often for planning. You can add Augusta and Rottnest in WA, both good places for a stop and lunch, Rotto even has a shuttle bus to pick you up and take you back to the airstrip Also can you edit Balladonia, you have it marked at the Balladonia station, should be Balladonia hotel (YBAL) which is N/W up the highway a bit. Cheers Rick
-
Hi Lyndon, You can get a factory made wide fork and axle (ask for the strength mod axle) to fit the Carlyle tyres from Reg at Aerokits, he usually has them in stock. Rick
-

DooMaw - building a STOL
rick morawski replied to Head in the clouds's topic in Aircraft Building and Design Discussion
That looks like one helluva strong cabin frame! I would feel safe in that! -
What would have happened if they got a Pullet Surprise instead. (you've got to say Pullet Surprise a few times if you dont get it)